Operation Manual
Page 1
MODEL DM-2000 DIGITAL COPYING MACHINE OPERATION MANUAL Page • GETTING STARTED 2 • MAKING COPIES 13 • STATUS INDICATORS 27 • GENERAL INFORMATION 37 • OPTIONAL EQUIPMENT 55 • APPENDIX 71
MODEL DM-2000 DIGITAL COPYING MACHINE OPERATION MANUAL Page • GETTING STARTED 2 • MAKING COPIES 13 • STATUS INDICATORS 27 • GENERAL INFORMATION 37 • OPTIONAL EQUIPMENT 55 • APPENDIX 71
Operation Manual
Page 4
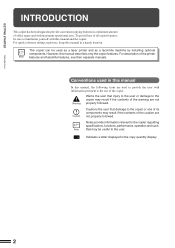
... user with information pertinent to the use , keep this manual in a minimum amount of all copier features, be used as a laser printer and as a facsimile machine by installing optional components. Indicates a letter displayed in this manual In this manual, the following icons are used in the copy quantity display...and such, that injury to the user or damage to the copier may result if the contents of the printer features and facsimile features, see their separate manuals. For quick reference during copier use of the warning are not properly followed. Warns the user that may...
... user with information pertinent to the use , keep this manual in a minimum amount of all copier features, be used as a laser printer and as a facsimile machine by installing optional components. Indicates a letter displayed in this manual In this manual, the following icons are used in the copy quantity display...and such, that injury to the user or damage to the copier may result if the contents of the printer features and facsimile features, see their separate manuals. For quick reference during copier use of the warning are not properly followed. Warns the user that may...

Operation Manual
Page 5
... programs allow the internal auditor to 99 copies. GETTING STARTED Main features MAIN FEATURES ➀ High-speed laser copying ● First-copy time is only 7.2 seconds (except in a power save mode or immediately ... This copier can be used as a facsimile machine by installing an optional printer expansion kit. ● This copier can be used as a laser printer by installing an optional facsimile expansion kit. ≈ Environmentally friendly design ●...9679; In addition to the automatic exposure mode, the manual exposure can be offset from the previous set can be used .
... programs allow the internal auditor to 99 copies. GETTING STARTED Main features MAIN FEATURES ➀ High-speed laser copying ● First-copy time is only 7.2 seconds (except in a power save mode or immediately ... This copier can be used as a facsimile machine by installing an optional printer expansion kit. ● This copier can be used as a laser printer by installing an optional facsimile expansion kit. ≈ Environmentally friendly design ●...9679; In addition to the automatic exposure mode, the manual exposure can be offset from the previous set can be used .

Operation Manual
Page 7
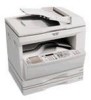
... TD cartridge. !9 TD cartridge Contains toner. @0 Roller rotating knob Turn to remove misfed paper. @1 Fusing unit release levers Lower to remove misfed paper. Accessories Operation manual 1 TD cartridge 1 Charger cleaner 1 5 Take care in removing paper. @2 Paper guide Open to remove misfed paper. The fusing unit is hot.
... TD cartridge. !9 TD cartridge Contains toner. @0 Roller rotating knob Turn to remove misfed paper. @1 Fusing unit release levers Lower to remove misfed paper. Accessories Operation manual 1 TD cartridge 1 Charger cleaner 1 5 Take care in removing paper. @2 Paper guide Open to remove misfed paper. The fusing unit is hot.
Operation Manual
Page 8
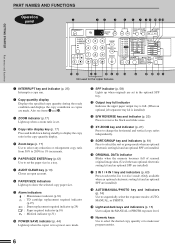
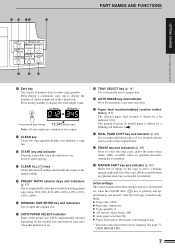
... ready condition and displays the copy countdown as copies are installed) !8 AUTO/MANUAL/PHOTO key and indicators (p. 14) Use to sequentially select the exposure modes: AUTO, MANUAL, or PHOTO. !9 Light and dark keys and indicators (p. 15) Use to adjust the MANUAL or PHOTO exposure level. @0 Numeric keys Use to select the desired copy...
... ready condition and displays the copy countdown as copies are installed) !8 AUTO/MANUAL/PHOTO key and indicators (p. 14) Use to sequentially select the exposure modes: AUTO, MANUAL, or PHOTO. !9 Light and dark keys and indicators (p. 15) Use to adjust the MANUAL or PHOTO exposure level. @0 Numeric keys Use to select the desired copy...
Operation Manual
Page 9
... to sequentially select preset reduction/enlargement copy ratios: 50%, 70%, 81%, 86%, 100%, 115%, 122%, 141%, 200%. @6 ORIGINAL SIZE ENTER key and indicators Use to manually select a paper tray. @9 AUTO IMAGE key and indicator Press for automatic copy ratio selection. #0 Paper feed location/misfeed location indicators (p. 31) The selected paper feed...
... to sequentially select preset reduction/enlargement copy ratios: 50%, 70%, 81%, 86%, 100%, 115%, 122%, 141%, 200%. @6 ORIGINAL SIZE ENTER key and indicators Use to manually select a paper tray. @9 AUTO IMAGE key and indicator Press for automatic copy ratio selection. #0 Paper feed location/misfeed location indicators (p. 31) The selected paper feed...
Operation Manual
Page 16
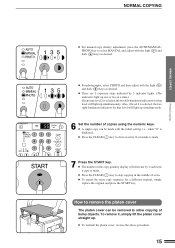
... automatically made. Enter an assigned 3-digit account number. See page 37, USER PROGRAMS. ● The bypass tray cannot be disabled using user program No. 8. AUTOMATIC, MANUAL, and PHOTO. ● Automatic exposure is selected. However, you can occur at the leading and trailing edges of the copies. Press the START key in...
... automatically made. Enter an assigned 3-digit account number. See page 37, USER PROGRAMS. ● The bypass tray cannot be disabled using user program No. 8. AUTOMATIC, MANUAL, and PHOTO. ● Automatic exposure is selected. However, you can occur at the leading and trailing edges of the copies. Press the START key in...
Operation Manual
Page 17
... key to stop copying in the copy quantity display will decrease by 1 each time a copy is made. ● Press the CLEAR ( ) key to select MANUAL and adjust with the light ( ) and dark ( ) keys as desired. ● For photographs, select PHOTO and then adjust with the light ( ) and dark ( ) keys as ...
... key to stop copying in the copy quantity display will decrease by 1 each time a copy is made. ● Press the CLEAR ( ) key to select MANUAL and adjust with the light ( ) and dark ( ) keys as desired. ● For photographs, select PHOTO and then adjust with the light ( ) and dark ( ) keys as ...
Operation Manual
Page 18
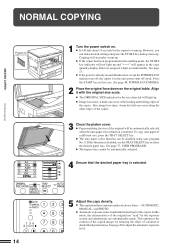
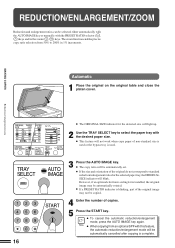
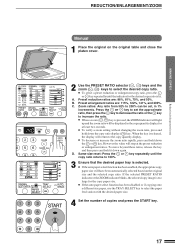
...% in 1% increments. MAKING COPIES Reduction/enlargement/zoom REDUCTION/ENLARGEMENT/ZOOM Reduction and enlargement ratios can be selected either automatically with the AUTO IMAGE key or manually with this feature, the automatic reduction/enlargement mode will be automatically cancelled after copying is used or the bypass tray is complete. 16 The zoom...
...% in 1% increments. MAKING COPIES Reduction/enlargement/zoom REDUCTION/ENLARGEMENT/ZOOM Reduction and enlargement ratios can be selected either automatically with the AUTO IMAGE key or manually with this feature, the automatic reduction/enlargement mode will be automatically cancelled after copying is used or the bypass tray is complete. 16 The zoom...
Operation Manual
Page 19
... key and then press and hold down again. B. Preset enlargement ratios are : 86%, 81%, 70%, and 50%. MAKING COPIES Reduction/enlargement/zoom REDUCTION/ENLARGEMENT/ZOOM Manual 1 Place the original on the original size and the selected copy ratio. Preset reduction ratios are : 115%, 122%, 141%, and 200%. Zoom ratios: Any ratio...
... key and then press and hold down again. B. Preset enlargement ratios are : 86%, 81%, 70%, and 50%. MAKING COPIES Reduction/enlargement/zoom REDUCTION/ENLARGEMENT/ZOOM Manual 1 Place the original on the original size and the selected copy ratio. Preset reduction ratios are : 115%, 122%, 141%, and 200%. Zoom ratios: Any ratio...

Operation Manual
Page 25
... Original Copy The B/W REVERSE feature is used to reverse black and white areas. ● When the B/W REVERSE feature is cancelled, the MANUAL mode will be automatically set to the MANUAL mode. Even if this feature is selected, the exposure mode will not automatically be selected. Other exposure modes cannot be cancelled. 1 Place...
... Original Copy The B/W REVERSE feature is used to reverse black and white areas. ● When the B/W REVERSE feature is cancelled, the MANUAL mode will be automatically set to the MANUAL mode. Even if this feature is selected, the exposure mode will not automatically be selected. Other exposure modes cannot be cancelled. 1 Place...

Operation Manual
Page 28
...adjustment AUTOMATIC EXPOSURE ADJUSTMENT The automatic exposure level can be adjusted to lighten or darken the automatic exposure level as desired. 4 Press the AUTO/MANUAL/PHOTO key. ● The AUTO indicator will stop blinking and will light up steadily. ● This automatic exposure level will remain in... lights up before proceeding to the current automatic exposure level will light up . 1 Press the AUTO/MANUAL/PHOTO key to select the PHOTO mode. 2 Press and hold down the AUTO/MANUAL/PHOTO key for approximately 5 seconds. ● The PHOTO indicator will go out and the AUTO indicator...
...adjustment AUTOMATIC EXPOSURE ADJUSTMENT The automatic exposure level can be adjusted to lighten or darken the automatic exposure level as desired. 4 Press the AUTO/MANUAL/PHOTO key. ● The AUTO indicator will stop blinking and will light up steadily. ● This automatic exposure level will remain in... lights up before proceeding to the current automatic exposure level will light up . 1 Press the AUTO/MANUAL/PHOTO key to select the PHOTO mode. 2 Press and hold down the AUTO/MANUAL/PHOTO key for approximately 5 seconds. ● The PHOTO indicator will go out and the AUTO indicator...

Operation Manual
Page 33
... blinking red misfeed location indicators will stop when a misfeed occurs. STATUS INDICATORS Misfeed removal Misfeed in optional equipment, see their respective sections of the operation manual. MISFEED REMOVAL The copier will indicate the approximate misfeed location. If paper is accidentally torn during removal, be sure to damage the photoconductive drum. First...
... blinking red misfeed location indicators will stop when a misfeed occurs. STATUS INDICATORS Misfeed removal Misfeed in optional equipment, see their respective sections of the operation manual. MISFEED REMOVAL The copier will indicate the approximate misfeed location. If paper is accidentally torn during removal, be sure to damage the photoconductive drum. First...

Operation Manual
Page 47
... enter the preheat mode first and then the auto power shut- This time is set with user programs No. 3 and No. 5, the last program set manually. For these settings, see page 38. ● The copier will start within 10 seconds. off mode after a preset time has elapsed when no copier operation...
... enter the preheat mode first and then the auto power shut- This time is set with user programs No. 3 and No. 5, the last program set manually. For these settings, see page 38. ● The copier will start within 10 seconds. off mode after a preset time has elapsed when no copier operation...
Operation Manual
Page 50
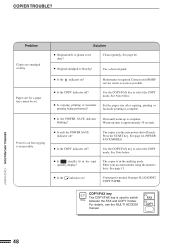
... clean original. Power is in the auto power shut-off ? The copier is on ? Press the START key. For details, see the MULTI ACCESS manual. 48 COPIER TROUBLE? Problem Copies are smudged or dirty. Paper size for a paper tray cannot be set. ● Is the indicator on but copying...printing or facsimile printing being performed? Wait until warm-up time is not possible. ● Is the POWER SAVE indicator blinking? Enter your SHARP service centre as soon as possible. ● Is the COPY indicator off? See Note below . ● Is steadily lit in the auditing mode.
... clean original. Power is in the auto power shut-off ? The copier is on ? Press the START key. For details, see the MULTI ACCESS manual. 48 COPIER TROUBLE? Problem Copies are smudged or dirty. Paper size for a paper tray cannot be set. ● Is the indicator on but copying...printing or facsimile printing being performed? Wait until warm-up time is not possible. ● Is the POWER SAVE indicator blinking? Enter your SHARP service centre as soon as possible. ● Is the COPY indicator off? See Note below . ● Is steadily lit in the auditing mode.

Operation Manual
Page 58
Single pass feeder (AR-SP2) Electronic sorting kit (AR-EB3) Facsimile expansion kit (AR-FX2)* Printer expansion kit (AR-PB8)* PS2 expansion kit (AR-PS1)* LCD panel kit (AR-PA1)* Job separator tray kit (AR-TR2)* * These options are available for ... used for the copier which allow you to configure a copier system to meet your particular needs. SYSTEM CONFIGURATION A number of these options, see their separate manuals. Platen cover (AR-VR1) System configuration OPTIONAL EQUIPMENT 250-sheet paper feed unit (AR-DE5) 2x250-sheet paper feed unit (AR-DE6) 56 The options...
Single pass feeder (AR-SP2) Electronic sorting kit (AR-EB3) Facsimile expansion kit (AR-FX2)* Printer expansion kit (AR-PB8)* PS2 expansion kit (AR-PS1)* LCD panel kit (AR-PA1)* Job separator tray kit (AR-TR2)* * These options are available for ... used for the copier which allow you to configure a copier system to meet your particular needs. SYSTEM CONFIGURATION A number of these options, see their separate manuals. Platen cover (AR-VR1) System configuration OPTIONAL EQUIPMENT 250-sheet paper feed unit (AR-DE5) 2x250-sheet paper feed unit (AR-DE6) 56 The options...
Operation Manual
Page 75
... cartridge - user maintenance 46 - part 4 O Operation panel 6 Options 56 Original table 4 P Paper - bypass tray 31 - operation panel 6 - reduction/enlargement 16 - maintenance required indicator 36 Manual exposure 15 Manual feeding 18 Margin shift 67 Misfeed removal - loading 10 - in 1 63 A Auto clear 7 Automatic exposure adjustment 26 Auto power shut-off mode 44 B B/W reverse...
... cartridge - user maintenance 46 - part 4 O Operation panel 6 Options 56 Original table 4 P Paper - bypass tray 31 - operation panel 6 - reduction/enlargement 16 - maintenance required indicator 36 Manual exposure 15 Manual feeding 18 Margin shift 67 Misfeed removal - loading 10 - in 1 63 A Auto clear 7 Automatic exposure adjustment 26 Auto power shut-off mode 44 B B/W reverse...
