

CD-G10000 Operation Manual
Page 2
...SERVICING TO QUALIFIED SERVICE PERSONNEL. Connect the equipment into an outlet on the rear of loss or theft, please record below the model number and serial number which are designed to provide reasonable protection against harmful interference in a residential installation. use of controls or adjustments...intended to alert the user to operate this information. NO USER-SERVICEABLE PARTS INSIDE. Increase the separation between the equipment and receiver. Consult the dealer or an experienced radio/TV technician for a Class B digital device, pursuant to Part 15 of uninsulated ...
...SERVICING TO QUALIFIED SERVICE PERSONNEL. Connect the equipment into an outlet on the rear of loss or theft, please record below the model number and serial number which are designed to provide reasonable protection against harmful interference in a residential installation. use of controls or adjustments...intended to alert the user to operate this information. NO USER-SERVICEABLE PARTS INSIDE. Increase the separation between the equipment and receiver. Consult the dealer or an experienced radio/TV technician for a Class B digital device, pursuant to Part 15 of uninsulated ...

CD-G10000 Operation Manual
Page 3
... other sources, refer to your home, consult your obsolete outlet. This is a safety feature. Do not use a mounting accessory recommended by placing the product on an unstable cart, stand, tripod, bracket, or table. Use a damp cloth for replacement or resetting of power supply to the operating instructions. 12 Grounding or Polarization - IMPORTANT SAFETY INSTRUCTIONS CD-G10000 CP-G10000S Important Instruction 1 Read Instructions - Quick...
... other sources, refer to your home, consult your obsolete outlet. This is a safety feature. Do not use a mounting accessory recommended by placing the product on an unstable cart, stand, tripod, bracket, or table. Use a damp cloth for replacement or resetting of power supply to the operating instructions. 12 Grounding or Polarization - IMPORTANT SAFETY INSTRUCTIONS CD-G10000 CP-G10000S Important Instruction 1 Read Instructions - Quick...

CD-G10000 Operation Manual
Page 4
... 810 of antenna discharge unit, connection to this product from touching such power lines or circuits as radiators, heat registers, stoves, or other hazards. 23 Safety Check - Adjust only those controls that the product is left unattended and unused for service. 22 Replacement Parts - For added protection for this indicates a need for long periods of any service or repairs to grounding...
... 810 of antenna discharge unit, connection to this product from touching such power lines or circuits as radiators, heat registers, stoves, or other hazards. 23 Safety Check - Adjust only those controls that the product is left unattended and unused for service. 22 Replacement Parts - For added protection for this indicates a need for long periods of any service or repairs to grounding...

CD-G10000 Operation Manual
Page 5
... for Use System connections 11 - 15 Remote control 16 Subwoofer control 17 „ Basic Operation General control 18 Setting the clock 19 Important Instruction „ CD or MP3 disc Playback Listening to a CD or MP3 disc 20 - 22 Advanced CD or MP3 disc playback 23 - 25 MP3 navigation (only for MP3 files 26 - 29 „ Radio Listening to the radio 30, 31 „ Tape Playback Listening to protect the environment...
... for Use System connections 11 - 15 Remote control 16 Subwoofer control 17 „ Basic Operation General control 18 Setting the clock 19 Important Instruction „ CD or MP3 disc Playback Listening to a CD or MP3 disc 20 - 22 Advanced CD or MP3 disc playback 23 - 25 MP3 navigation (only for MP3 files 26 - 29 „ Radio Listening to the radio 30, 31 „ Tape Playback Listening to protect the environment...

CD-G10000 Operation Manual
Page 6
... AC power cord back in, and then turn on speaker efficiency, location and various other than 140°F (60°C) or to high volume levels, which is specified is dangerous and may result in electric shock. SHARP will not be used must be the same as pulling the cord can damage internal wires. General Information z Use the unit on a firm, level surface free...
... AC power cord back in, and then turn on speaker efficiency, location and various other than 140°F (60°C) or to high volume levels, which is specified is dangerous and may result in electric shock. SHARP will not be used must be the same as pulling the cord can damage internal wires. General Information z Use the unit on a firm, level surface free...

CD-G10000 Operation Manual
Page 7
... „ Front panel Reference page 1. Disc Direct Play Button 23 15. Enter Button 27 18. Tape 2 Record Pause Button 34, 35 21. Volume Control 18 26. CD Button 21 29. Power On/Stand-by Button 18 4. Equalizer Mode Select Button 18 10. Headphone Jack 41 12. Tuner (Band) Button 30 28. Tape 1 Cassette Compartment 32 11. Disc Trays 21 2. Tuning Up Button 30 7. Game/Video Button 40 General Information 7 Timer Indicator 37 3. Game/Video Input Jacks 40 13. Disc Tray Open...
... „ Front panel Reference page 1. Disc Direct Play Button 23 15. Enter Button 27 18. Tape 2 Record Pause Button 34, 35 21. Volume Control 18 26. CD Button 21 29. Power On/Stand-by Button 18 4. Equalizer Mode Select Button 18 10. Headphone Jack 41 12. Tuner (Band) Button 30 28. Tape 1 Cassette Compartment 32 11. Disc Trays 21 2. Tuning Up Button 30 7. Game/Video Button 40 General Information 7 Timer Indicator 37 3. Game/Video Input Jacks 40 13. Disc Tray Open...

CD-G10000 Operation Manual
Page 8
... 9. CD-G10000 Controls and indicators (continued) CP-G10000S 12 3 4567 8 9 10 11 12 14 15 16 13 17 18 General Information 4 5 6 7 1 8 2 3 9 8 „ Display Reference page 1. FM Stereo Receiving Indicator 30 12. Disc Play Indicator 21 „ Rear panel Reference page 1. Subwoofer Pre-output Jack 14 3. FM Antenna Ground Terminal 12 6. Sleep Indicator 39 6. Rear Speaker Terminals 12 MP3 Title Indicators 26 4. AC Power Cord 14 4. Disc Number Indicators 23 2. Disc Repeat Play...
... 9. CD-G10000 Controls and indicators (continued) CP-G10000S 12 3 4567 8 9 10 11 12 14 15 16 13 17 18 General Information 4 5 6 7 1 8 2 3 9 8 „ Display Reference page 1. FM Stereo Receiving Indicator 30 12. Disc Play Indicator 21 „ Rear panel Reference page 1. Subwoofer Pre-output Jack 14 3. FM Antenna Ground Terminal 12 6. Sleep Indicator 39 6. Rear Speaker Terminals 12 MP3 Title Indicators 26 4. AC Power Cord 14 4. Disc Number Indicators 23 2. Disc Repeat Play...
CD-G10000 Operation Manual
Page 10
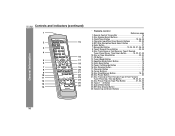
.... Tuner (Band) Button 30 13. Disc Random Button 24 17. Volume Up and Down Buttons 18 10 Remote Control Transmitter 16 2. Disc Play or Repeat, Tape Play Button 21, 24, 32 23. MP3 Disc Display Button 22 26. Power On/Stand-by Button 18 16. Tape (1 2) Button 32 24. Disc Pause Button 22 21. Character Button 28 18. Cursor Buttons 27 19. Disc Number Select Buttons 21 3. MP3 Disc Navigation Mode Select Button 27 6. Tape 2 Record Pause Button 34, 35 9. Extra Bass Button 18 15. CD Button 21...
.... Tuner (Band) Button 30 13. Disc Random Button 24 17. Volume Up and Down Buttons 18 10 Remote Control Transmitter 16 2. Disc Play or Repeat, Tape Play Button 21, 24, 32 23. MP3 Disc Display Button 22 26. Power On/Stand-by Button 18 16. Tape (1 2) Button 32 24. Disc Pause Button 22 21. Character Button 28 18. Cursor Buttons 27 19. Disc Number Select Buttons 21 3. MP3 Disc Navigation Mode Select Button 27 6. Tape 2 Record Pause Button 34, 35 9. Extra Bass Button 18 15. CD Button 21...

CD-G10000 Operation Manual
Page 11
System connections Make sure to unplug the AC power cord before making any connections. Rear speaker (right) Antenna connection (see page 12) Front speaker AM loop antenna FM antenna (right) Front speaker (left) Rear speaker (left) CD-G10000 CP-G10000S Connecting the subwoofer (see page 14) Preparation for Use Speaker connection (see page 12) AC outlet (AC 120 V, 60 Hz) AC power connection (see page 14) 11
System connections Make sure to unplug the AC power cord before making any connections. Rear speaker (right) Antenna connection (see page 12) Front speaker AM loop antenna FM antenna (right) Front speaker (left) Rear speaker (left) CD-G10000 CP-G10000S Connecting the subwoofer (see page 14) Preparation for Use Speaker connection (see page 12) AC outlet (AC 120 V, 60 Hz) AC power connection (see page 14) 11

CD-G10000 Operation Manual
Page 18
... CD/TUNER/TAPE mode In GAME/VIDEO mode FLAT No equalization. To cancel the extra bass mode, press the X-BASS/DEMO (X-BASS) button. 0 ..... 30 MAXIMUM Basic Operation „ Equalizer When the EQUALIZER (EQUALIZER MODE) button is turned counterclockwise, the volume will be displayed. JAZZ For jazz. When it is pressed, the current mode setting will decrease. POPS For pop music. CLASSIC For classical music. The extra bass mode is canceled when the EQUALIZER (EQUAL- 18 IZER MODE) button is turned on /off the light. control...
... CD/TUNER/TAPE mode In GAME/VIDEO mode FLAT No equalization. To cancel the extra bass mode, press the X-BASS/DEMO (X-BASS) button. 0 ..... 30 MAXIMUM Basic Operation „ Equalizer When the EQUALIZER (EQUALIZER MODE) button is turned counterclockwise, the volume will be displayed. JAZZ For jazz. When it is pressed, the current mode setting will decrease. POPS For pop music. CLASSIC For classical music. The extra bass mode is canceled when the EQUALIZER (EQUAL- 18 IZER MODE) button is turned on /off the light. control...
CD-G10000 Operation Manual
Page 20
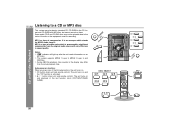
... (CD/TAPE/TUNER/ GAME). 20 It is a form of audio code which stands for recording. Notes: z " " indicator will light up after the unit reads information on and the "CD" function is processed by significant compression from its actual playback time. z CD button (main unit and remote control): The unit turns on an MP3 disc. MP3 is a type of compression. z During VBR file playback, time counter in sound...
... (CD/TAPE/TUNER/ GAME). 20 It is a form of audio code which stands for recording. Notes: z " " indicator will light up after the unit reads information on and the "CD" function is processed by significant compression from its actual playback time. z CD button (main unit and remote control): The unit turns on an MP3 disc. MP3 is a type of compression. z During VBR file playback, time counter in sound...

CD-G10000 Operation Manual
Page 31
.../SET (MEMORY) button to enter the preset tuning saving mode. 3 Within 30 seconds, press the PRESET ( or ) button to select the preset channel number. The preset number will flash and the programmed stations will be tuned in sequentially, for 5 seconds each. 2 Press the PRESET ( or ) button again when the desired station is stored in memory, the station previously memorized for less than 0.5 seconds. When a new station is located. Radio If the "MEMORY" and preset number...
.../SET (MEMORY) button to enter the preset tuning saving mode. 3 Within 30 seconds, press the PRESET ( or ) button to select the preset channel number. The preset number will flash and the programmed stations will be tuned in sequentially, for 5 seconds each. 2 Press the PRESET ( or ) button again when the desired station is stored in memory, the station previously memorized for less than 0.5 seconds. When a new station is located. Radio If the "MEMORY" and preset number...

CD-G10000 Operation Manual
Page 36
... compartment. 1 Press the ON/STAND-BY button to turn the power on and plays the desired source (CD, MP3 disc, tuner, tape) at the preset time. If it is set times for one time only at the same preset time every day. Note: When set to the correct time (refer to page 19). Daily timer: Daily timer play or once timer recording works for the daily timer and once timer...
... compartment. 1 Press the ON/STAND-BY button to turn the power on and plays the desired source (CD, MP3 disc, tuner, tape) at the preset time. If it is set times for one time only at the same preset time every day. Note: When set to the correct time (refer to page 19). Daily timer: Daily timer play or once timer recording works for the daily timer and once timer...

CD-G10000 Operation Manual
Page 37
... page 37 by pressing the or button, and then press the MEMORY/SET button. To select the timer playback source: CD, TUNER, TAPE 1 or TAPE 2. z If a station has not been programmed, "NO PRESET" will be displayed and timer setting will be canceled. 10Adjust the volume using the VOL. The "TIMER" indicator lights up too high. 11Press the ON/STAND-BY button to select "PLAY" or "REC", and press the MEMORY...
... page 37 by pressing the or button, and then press the MEMORY/SET button. To select the timer playback source: CD, TUNER, TAPE 1 or TAPE 2. z If a station has not been programmed, "NO PRESET" will be displayed and timer setting will be canceled. 10Adjust the volume using the VOL. The "TIMER" indicator lights up too high. 11Press the ON/STAND-BY button to select "PLAY" or "REC", and press the MEMORY...

CD-G10000 Operation Manual
Page 38
... recording will operate at the same time every day. Note: When performing timer playback or recording using another unit connected to enter the power stand-by mode after displaying the settings in order. This unit will turn on and press the CLOCK/TIMER button. 2 Within 10 seconds, press the or button to select "ONCE" or "DAILY", and press the MEMORY/SET button. 3 Within 10...
... recording will operate at the same time every day. Note: When performing timer playback or recording using another unit connected to enter the power stand-by mode after displaying the settings in order. This unit will turn on and press the CLOCK/TIMER button. 2 Within 10 seconds, press the or button to select "ONCE" or "DAILY", and press the MEMORY/SET button. 3 Within 10...

CD-G10000 Operation Manual
Page 39
... example, you can fall asleep listening to CD in the next morning. „ Sleep operation The radio, CD, MP3 disc and cassette tape can all be turned off automatically. 1 Play back the desired sound source. 2 Press the CLOCK/TIMER button. 3 Within 10 seconds, press the or button to select the time. (Maximum: 3 hours - RY/SET button. 4 Press the or button to select "SLEEP", and press the MEMO- Minimum...
... example, you can fall asleep listening to CD in the next morning. „ Sleep operation The radio, CD, MP3 disc and cassette tape can all be turned off automatically. 1 Play back the desired sound source. 2 Press the CLOCK/TIMER button. 3 Within 10 seconds, press the or button to select the time. (Maximum: 3 hours - RY/SET button. 4 Press the or button to select "SLEEP", and press the MEMO- Minimum...

CD-G10000 Operation Manual
Page 41
Reset correct time. z Are the speaker wires disconnected? z Does the disc satisfy the stan- z Playback sounds are z Is the unit located near excessive skipped, or stopped in the mid- middle of a track. Adjust the volume using the VOL. control. the clock. (Refer to "0"? z If the unit still malfunctions, reset it back on. z Are the headphones connected? z Playback stops in the vibrations? z Has condensation...
Reset correct time. z Are the speaker wires disconnected? z Does the disc satisfy the stan- z Playback sounds are z Is the unit located near excessive skipped, or stopped in the mid- middle of a track. Adjust the volume using the VOL. control. the clock. (Refer to "0"? z If the unit still malfunctions, reset it back on. z Are the headphones connected? z Playback stops in the vibrations? z Has condensation...
CD-G10000 Operation Manual
Page 43
... settings, tuner preset, and CD program. 43 z Keep your CD collection and player. Note: If neither operation above restores the unit, clear all the memory by resetting it. „ Clearing all CDs from which signals are fairly resistant to the stand-by mode. Then, set the unit to the power stand-by mode and turn the power on again. 2 If the unit is dirty or does not play...
... settings, tuner preset, and CD program. 43 z Keep your CD collection and player. Note: If neither operation above restores the unit, clear all the memory by resetting it. „ Clearing all CDs from which signals are fairly resistant to the stand-by mode. Then, set the unit to the power stand-by mode and turn the power on again. 2 If the unit is dirty or does not play...

CD-G10000 Operation Manual
Page 45
...; CD player Type Signal readout D/A converter Frequency response Dynamic range 5-disc multi-play compact disc player Non-contact, 3-beam semiconductor laser pickup 1-bit D/A converter 20 - 20,000 Hz 90 dB (1 kHz) „ Amplifier Output power Front speakers 135 watts minimum RMS per channel into 8 ohms from 100 Hz to 20 kHz, 10% total harmonic distortion Rear speakers 65 watts minimum RMS per channel into 16 ohms from 5 kHz to make design and specification changes for...
...; CD player Type Signal readout D/A converter Frequency response Dynamic range 5-disc multi-play compact disc player Non-contact, 3-beam semiconductor laser pickup 1-bit D/A converter 20 - 20,000 Hz 90 dB (1 kHz) „ Amplifier Output power Front speakers 135 watts minimum RMS per channel into 8 ohms from 100 Hz to 20 kHz, 10% total harmonic distortion Rear speakers 65 watts minimum RMS per channel into 16 ohms from 5 kHz to make design and specification changes for...

CD-G10000 Operation Manual
Page 46
CD-G10000 Specifications (continued) CP-G10000S „ Tuner Frequency range FM: 87.5 - 108.0 MHz AM: 530 - 1,720 kHz „ Cassette deck Frequency response Signal/noise ratio Wow and flutter 50 - 14,000 Hz (normal tape) 55 dB (TAPE 1, playback) 50 dB (TAPE 2, recording/playback) 0.3 % (WRMS) References „ Front speaker Type Maximum input power Rated input power Impedance Dimensions Weight 2-way type speaker system 2" (5 cm) tweeter 1 5-1/8" (13 cm) woofer 2 270 W 135...
CD-G10000 Specifications (continued) CP-G10000S „ Tuner Frequency range FM: 87.5 - 108.0 MHz AM: 530 - 1,720 kHz „ Cassette deck Frequency response Signal/noise ratio Wow and flutter 50 - 14,000 Hz (normal tape) 55 dB (TAPE 1, playback) 50 dB (TAPE 2, recording/playback) 0.3 % (WRMS) References „ Front speaker Type Maximum input power Rated input power Impedance Dimensions Weight 2-way type speaker system 2" (5 cm) tweeter 1 5-1/8" (13 cm) woofer 2 270 W 135...


