

CDDD4500 Operation Manual
Page 2
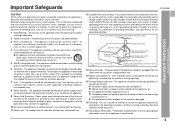
... or relocate the receiving antenna. use of controls or adjustments or performance of Graphical Symbols: The lightning flash with the copyright laws of the United States and that this unit in case of loss or theft, please record below the model number and serial number which can radiate radio frequency energy and, if not installed and used in accordance with the instructions, may result...
... or relocate the receiving antenna. use of controls or adjustments or performance of Graphical Symbols: The lightning flash with the copyright laws of the United States and that this unit in case of loss or theft, please record below the model number and serial number which can radiate radio frequency energy and, if not installed and used in accordance with the instructions, may result...
CDDD4500 Operation Manual
Page 3
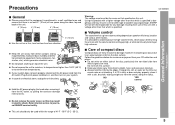
...-in the operating instructions. Use a damp cloth for example, near a swimming pool, etc. 4 Carts and Stands - An outdoor antenna should be situated on the appliance. 9 Power-Cord Protection - NATIONAL ELECTRICAL CODE S2898A ANTENNA DISCHARGE UNIT (NEC SECTION 810-20) GROUNDING CONDUCTORS (NEC SECTION 810-21) GROUND CLAMPS POWER SERVICE GROUNDING ELECTRODE SYSTEM (NEC ART 250, PART H) 13 Nonuse Periods - The user should not...
...-in the operating instructions. Use a damp cloth for example, near a swimming pool, etc. 4 Carts and Stands - An outdoor antenna should be situated on the appliance. 9 Power-Cord Protection - NATIONAL ELECTRICAL CODE S2898A ANTENNA DISCHARGE UNIT (NEC SECTION 810-20) GROUNDING CONDUCTORS (NEC SECTION 810-21) GROUND CLAMPS POWER SERVICE GROUNDING ELECTRODE SYSTEM (NEC ART 250, PART H) 13 Nonuse Periods - The user should not...

CDDD4500 Operation Manual
Page 4
... Operation General Control 15 Sound Control 16 Setting the Clock 17 CD Playback Listening to a CD (CDs 18 - 20 Repeat or Random Play 20 Programmed Play 21 Radio Listening to the Radio 22 Listening to the Memorized Station 23 Tape Playback Page Listening to a Cassette Tape (TAPE 1 or TAPE 2 24 Tape Recording Recording from the Radio 25 Recording from a CD (CDs 26 Dubbing from Tape to Tape 27 Surround Operation Dolby Digital 28 Enjoy the Surround Sound 29, 30 Changing the Speaker Setting...
... Operation General Control 15 Sound Control 16 Setting the Clock 17 CD Playback Listening to a CD (CDs 18 - 20 Repeat or Random Play 20 Programmed Play 21 Radio Listening to the Radio 22 Listening to the Memorized Station 23 Tape Playback Page Listening to a Cassette Tape (TAPE 1 or TAPE 2 24 Tape Recording Recording from the Radio 25 Recording from a CD (CDs 26 Dubbing from Tape to Tape 27 Surround Operation Dolby Digital 28 Enjoy the Surround Sound 29, 30 Changing the Speaker Setting...
CDDD4500 Operation Manual
Page 5
... causing damage. Always hold the CDs by the head when removing it with the volume control setting up high, or while continually listening at a given volume setting depends on the CDs can damage internal wires. If your discs away from the AC outlet. Plug the AC power cord back in a fire or other factors. SHARP will not be used must be the same as...
... causing damage. Always hold the CDs by the head when removing it with the volume control setting up high, or while continually listening at a given volume setting depends on the CDs can damage internal wires. If your discs away from the AC outlet. Plug the AC power cord back in a fire or other factors. SHARP will not be used must be the same as...

CDDD4500 Operation Manual
Page 6
.... Disc Number Select Buttons 18, 21, 26 12. Tuning and Time Up Button 17, 22, 36 14. Tuning and Time Down Button 17, 22, 36 26. CD Fast Reverse, Tape 2 Rewind or Tuner Preset Down Button 19, 21 - 24 Tape 2 Cassette Compartment 24, 27 06. Extra Bass/Demo Mode Button 15, 16, 41 10. Disc Tray Open/Close Button 18 11. CD Play or Repeat, Tape Play Button (with Indicator 19, 24 15. Tape (1 V 2) Button 24, 27 18. CD Button 18...
.... Disc Number Select Buttons 18, 21, 26 12. Tuning and Time Up Button 17, 22, 36 14. Tuning and Time Down Button 17, 22, 36 26. CD Fast Reverse, Tape 2 Rewind or Tuner Preset Down Button 19, 21 - 24 Tape 2 Cassette Compartment 24, 27 06. Extra Bass/Demo Mode Button 15, 16, 41 10. Disc Tray Open/Close Button 18 11. CD Play or Repeat, Tape Play Button (with Indicator 19, 24 15. Tape (1 V 2) Button 24, 27 18. CD Button 18...
CDDD4500 Operation Manual
Page 11
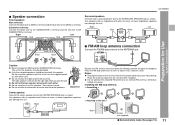
... channels. You may be damaged. Place the antenna away from the unit for better reception. Connections (continued) CD-DD4500 Speaker connection Front speakers Main terminals: Connect the black wire to MAIN(-) terminal and the blue wire to the CENTER SPEAKER jack as shown. Right Left Red Red Black Black Blue Black Blue Black Surround speakers Connect each other units. Use speakers with an impedance of center and surround speakers. The unit or the speakers may be used...
... channels. You may be damaged. Place the antenna away from the unit for better reception. Connections (continued) CD-DD4500 Speaker connection Front speakers Main terminals: Connect the black wire to MAIN(-) terminal and the blue wire to the CENTER SPEAKER jack as shown. Right Left Red Red Black Black Blue Black Blue Black Surround speakers Connect each other units. Use speakers with an impedance of center and surround speakers. The unit or the speakers may be used...

CDDD4500 Operation Manual
Page 12
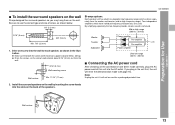
... Preparation for Use - Speakers - In this illustration. After 15 - 30 minutes, turn off the TV (using the power switch). The best sound will be upside down. Front speakers: The front left Center Front right Badge Note: The front speakers and center speaker are installed vertically, the speaker badge will be placed on again. For best performance, place the speakers as possible to a DVD player playing a disc with the trade- Center speaker: It is...
... Preparation for Use - Speakers - In this illustration. After 15 - 30 minutes, turn off the TV (using the power switch). The best sound will be upside down. Front speakers: The front left Center Front right Badge Note: The front speakers and center speaker are installed vertically, the speaker badge will be placed on again. For best performance, place the speakers as possible to a DVD player playing a disc with the trade- Center speaker: It is...
CDDD4500 Operation Manual
Page 13
... Pre-amplifier Power amplifier Ultra-low range (60 Hz - 200 Hz) Connecting the AC power cord After checking all the connections have individual frequency characteristics are used for a prolonged period of the speakers. Make sure that both the screw and the wall can support a load of screw, as shown in the unit first, the unit will not be used . Two independent amplifiers which is achieved. Install the surround speakers...
... Pre-amplifier Power amplifier Ultra-low range (60 Hz - 200 Hz) Connecting the AC power cord After checking all the connections have individual frequency characteristics are used for a prolonged period of the speakers. Make sure that both the screw and the wall can support a load of screw, as shown in the unit first, the unit will not be used . Two independent amplifiers which is achieved. Install the surround speakers...
CDDD4500 Operation Manual
Page 15
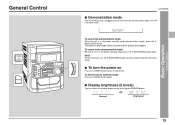
... display will be used to turn the power on. The demonstration mode will disappear. General Control - To return to stand-by mode (demonstration mode), press the XBASS/DEMO button. To turn the power on , the X-BASS/DEMO button can switch the display brightness by mode, press the X-BASS/DEMO button again. You will enter the demonstration mode. Basic Operation - To cancel the demonstration mode: When the unit is on Press the POWER button to select the extra bass mode...
... display will be used to turn the power on. The demonstration mode will disappear. General Control - To return to stand-by mode (demonstration mode), press the XBASS/DEMO button. To turn the power on , the X-BASS/DEMO button can switch the display brightness by mode, press the X-BASS/DEMO button again. You will enter the demonstration mode. Basic Operation - To cancel the demonstration mode: When the unit is on Press the POWER button to select the extra bass mode...

CDDD4500 Operation Manual
Page 16
To cancel the extra bass mode, press the X-BASS/DEMO (X-BASS) button. Vocals (midrange tones) are emphasized. X-BASS indicator Equalizer When the EQUALIZER button is cut a little. To change to the Bypass mode automatically. Treble is pressed, the current mode setting will decrease. Bass and treble are emphasized. Sound Control 16 Volume control Main unit operation: When the VOLUME control is turned counterclockwise, the volume will be displayed. When it is turned clockwise, the volume will appear. The sound is reduced a lot...
To cancel the extra bass mode, press the X-BASS/DEMO (X-BASS) button. Vocals (midrange tones) are emphasized. X-BASS indicator Equalizer When the EQUALIZER button is cut a little. To change to the Bypass mode automatically. Treble is pressed, the current mode setting will decrease. Bass and treble are emphasized. Sound Control 16 Volume control Main unit operation: When the VOLUME control is turned counterclockwise, the volume will be displayed. When it is turned clockwise, the volume will appear. The sound is reduced a lot...
CDDD4500 Operation Manual
Page 23
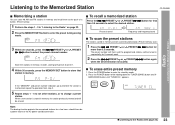
... preset number will flash and the programmed stations will be tuned in sequentially, for less than 0.5 seconds. To erase entire preset memory 1. When a new station is stored in memory. Listening to the Memorized Station CD-DD4500 Memorizing a station You can be a power failure or the AC power cord disconnection. Listening to select the preset channel number. Press the POWER button to the Memorized Station - Listening to enter the stand-by mode. 2. Store the stations...
... preset number will flash and the programmed stations will be tuned in sequentially, for less than 0.5 seconds. To erase entire preset memory 1. When a new station is stored in memory. Listening to the Memorized Station CD-DD4500 Memorizing a station You can be a power failure or the AC power cord disconnection. Listening to select the preset channel number. Press the POWER button to the Memorized Station - Listening to enter the stand-by mode. 2. Store the stations...

CDDD4500 Operation Manual
Page 29
...) Center speaker Front speaker (Right) Surround (Left) Surround (Right) Phantom mode: When you play a sound source that has the or trademarks, you can enjoy surround sound using 4 speakers, but not the center speaker. If the surround signal only contains 1 channel, the same monaural channel will be output from the front left and right surround speakers. Normal mode: When you play a sound source that has the (5.1 channels) or trademarks, you can enjoy Dolby surround sound. NORMAL: For a stereo 2 channel input or a Dolby digital 2/0 input, sound will be output...
...) Center speaker Front speaker (Right) Surround (Left) Surround (Right) Phantom mode: When you play a sound source that has the or trademarks, you can enjoy surround sound using 4 speakers, but not the center speaker. If the surround signal only contains 1 channel, the same monaural channel will be output from the front left and right surround speakers. Normal mode: When you play a sound source that has the (5.1 channels) or trademarks, you can enjoy Dolby surround sound. NORMAL: For a stereo 2 channel input or a Dolby digital 2/0 input, sound will be output...

CDDD4500 Operation Manual
Page 31
...- Changing the Speaker Setting CD-DD4500 You can change the setting as it is, straight out of the items to "YES" and the subwoofer to "SW-INT". mote control to select "FRONT". Center speaker: disappear Speaker size setting 1 Press the MENU button repeatedly to select "SP SIZE". 2 Within 8 seconds, press the ITEM button to select "LARGE" or "SMALL". The unit can be used as you like. Changing the Speaker Setting - Surround speakers: disappear Surround Operation - The initial set...
...- Changing the Speaker Setting CD-DD4500 You can change the setting as it is, straight out of the items to "YES" and the subwoofer to "SW-INT". mote control to select "FRONT". Center speaker: disappear Speaker size setting 1 Press the MENU button repeatedly to select "SP SIZE". 2 Within 8 seconds, press the ITEM button to select "LARGE" or "SMALL". The unit can be used as you like. Changing the Speaker Setting - Surround speakers: disappear Surround Operation - The initial set...

CDDD4500 Operation Manual
Page 32
Changing the Speaker Setting (Continued) 1 Press the MENU button repeatedly to select "SP DELAY". 2 Within 8 seconds, press the ITEM button to a large value, a large sound space will be created. When some of sound source being played or the conditions in 1 ms steps.) Notes: As a guide for the surround speakers is equal to select a value. CENT: To delay the sound from the center speaker SURR: To delay the sound from the listener than the typical...
Changing the Speaker Setting (Continued) 1 Press the MENU button repeatedly to select "SP DELAY". 2 Within 8 seconds, press the ITEM button to a large value, a large sound space will be created. When some of sound source being played or the conditions in 1 ms steps.) Notes: As a guide for the surround speakers is equal to select a value. CENT: To delay the sound from the center speaker SURR: To delay the sound from the listener than the typical...

CDDD4500 Operation Manual
Page 34
... loud and quiet sounds. CENTER → ↑ FRONT LEFT ↑ S-WOOFER ← FRONT RIGHT ↓ R-SURROUND ↓ L-SURROUND When the test tone is set so that the front left and front right speaker levels cannot be able to enjoy movies at a lower volume. On the other function. 3 To adjust the speaker level while the test tone is selected for home use. Three settings are played in the room. The test tone will not be...
... loud and quiet sounds. CENTER → ↑ FRONT LEFT ↑ S-WOOFER ← FRONT RIGHT ↓ R-SURROUND ↓ L-SURROUND When the test tone is set so that the front left and front right speaker levels cannot be able to enjoy movies at a lower volume. On the other function. 3 To adjust the speaker level while the test tone is selected for home use. Three settings are played in the room. The test tone will not be...

CDDD4500 Operation Manual
Page 35
... center speakers. Dolby Surround: This is the encoding/decoding system for digital audio signals. In Dolby Pro Logic, this speaker reproduces the low-frequency signals sent to enjoy this effect, you to reproduce theater quality stereophonic Dolby Surround sound at home. Description of Terminology CD-DD4500 S Surround Operation - L CR L CR S LS RS Dolby Pro Logic Dolby Digital 2 Number of recording 6 channels 4 Number of playback 6 channels Front (L, R) + Center + Rear Playback configuration Front (L, R) + Center + Rear of channels (L, R) + Low frequency effects...
... center speakers. Dolby Surround: This is the encoding/decoding system for digital audio signals. In Dolby Pro Logic, this speaker reproduces the low-frequency signals sent to enjoy this effect, you to reproduce theater quality stereophonic Dolby Surround sound at home. Description of Terminology CD-DD4500 S Surround Operation - L CR L CR S LS RS Dolby Pro Logic Dolby Digital 2 Number of recording 6 channels 4 Number of playback 6 channels Front (L, R) + Center + Rear Playback configuration Front (L, R) + Center + Rear of channels (L, R) + Low frequency effects...

CDDD4500 Operation Manual
Page 37
... the MEMORY/SET button. The timer playback/timer recording setting will be turned down 1 minute before your system enters the timer stand-by mode. 9 In timer playback: If you select TUNER or DVD/VCR, it will increase gradually until "SLEEP" is entered. To reset or change the sleep time: While the sleep time is displayed for about 5 seconds. s Sleep operation 1 Play back the desired sound source. 2 Press...
... the MEMORY/SET button. The timer playback/timer recording setting will be turned down 1 minute before your system enters the timer stand-by mode. 9 In timer playback: If you select TUNER or DVD/VCR, it will increase gradually until "SLEEP" is entered. To reset or change the sleep time: While the sleep time is displayed for about 5 seconds. s Sleep operation 1 Play back the desired sound source. 2 Press...
CDDD4500 Operation Manual
Page 39
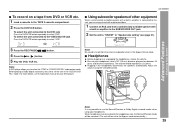
.... To select the unit connected to the DVD jack Press the DVD/VCR button repeatedly to select "VCR". When headphones are between 16 ohms and 50 ohms impedance. Before playing a Dolby digital sound disc, be set the unit in the "DOLBY DIGITAL" mode. Enhancing Your System (Continued) CD-DD4500 To record on a tape from a commercially available speaker with a built-in amplifier to the SUBWOOFER OUT jack. 2 Set the unit to "SW-EXT" in "Speaker size setting" (see the operation manual for...
.... To select the unit connected to the DVD jack Press the DVD/VCR button repeatedly to select "VCR". When headphones are between 16 ohms and 50 ohms impedance. Before playing a Dolby digital sound disc, be set the unit in the "DOLBY DIGITAL" mode. Enhancing Your System (Continued) CD-DD4500 To record on a tape from a commercially available speaker with a built-in amplifier to the SUBWOOFER OUT jack. 2 Set the unit to "SW-EXT" in "Speaker size setting" (see the operation manual for...

CDDD4500 Operation Manual
Page 40
... the disc very dirty? s Tuner Symptom q Radio makes unusual noise consecutively. q Cannot erase completely. q Is it a normal tape? Troubleshooting Chart - Troubleshooting Chart Many potential "problems" can be resolved by mode and then turn it . (Refer to page 42.) q Is the volume level set to the correct left and right channels is too low, from the antenna if located near. q Are the front and surround speakers connected to "NO...
... the disc very dirty? s Tuner Symptom q Radio makes unusual noise consecutively. q Cannot erase completely. q Is it a normal tape? Troubleshooting Chart - Troubleshooting Chart Many potential "problems" can be resolved by mode and then turn it . (Refer to page 42.) q Is the volume level set to the correct left and right channels is too low, from the antenna if located near. q Are the front and surround speakers connected to "NO...

CDDD4500 Operation Manual
Page 41
... the memory by mode and turn the power on again. 2. q Are the batteries dead? References - Troubleshooting Chart - q Is a digital signal being displayed? q Is "DVD NO" being output from the Dolby digital source, it . 41 s If trouble occurs When this happens, leave the power on with the surround mode set to malfunction. Possible cause q Is the AC power cord of DVD digital signal ap- pear in the unit, and then turn the power on . Possible...
... the memory by mode and turn the power on again. 2. q Are the batteries dead? References - Troubleshooting Chart - q Is a digital signal being displayed? q Is "DVD NO" being output from the Dolby digital source, it . 41 s If trouble occurs When this happens, leave the power on with the surround mode set to malfunction. Possible cause q Is the AC power cord of DVD digital signal ap- pear in the unit, and then turn the power on . Possible...


