
CD-BA200 Operation Manual
Page 1
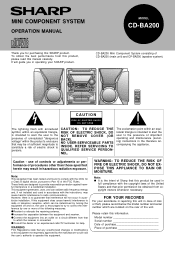
... an experienced radio/TV technician for a Class B digital device, pursuant to comply with the copyright laws of the following measures: q Reorient or relocate the receiving antenna. Model number Serial number Date of purchase Place of CD-BA200 (main unit) and CP-BA200 (speaker system). MINI COMPONENT SYSTEM OPERATION MANUAL MODEL CD-BA200 Thank you in operating your assistance in reporting this unit in case of important operating and maintenance (servicing) instructions in...
... an experienced radio/TV technician for a Class B digital device, pursuant to comply with the copyright laws of the following measures: q Reorient or relocate the receiving antenna. Model number Serial number Date of purchase Place of CD-BA200 (main unit) and CP-BA200 (speaker system). MINI COMPONENT SYSTEM OPERATION MANUAL MODEL CD-BA200 Thank you in operating your assistance in reporting this unit in case of important operating and maintenance (servicing) instructions in...

CD-BA200 Operation Manual
Page 2
... FOR USE 3-5 SETTING THE CLOCK 6 SOUND CONTROL 7 COMPACT DISC OPERATION 8-10 RADIO OPERATION 11-12 CASSETTE OPERATION 12 12 Outdoor Antenna Grounding - or D The appliance does not appear to a wall or ceiling only as radiators, heat registers, stoves, or other appliances (including amplifiers) that the grounding or polarization means of the appliance should be unplugged from the appliance. 10 Do not use instructions should...
... FOR USE 3-5 SETTING THE CLOCK 6 SOUND CONTROL 7 COMPACT DISC OPERATION 8-10 RADIO OPERATION 11-12 CASSETTE OPERATION 12 12 Outdoor Antenna Grounding - or D The appliance does not appear to a wall or ceiling only as radiators, heat registers, stoves, or other appliances (including amplifiers) that the grounding or polarization means of the appliance should be unplugged from the appliance. 10 Do not use instructions should...
CD-BA200 Operation Manual
Page 3
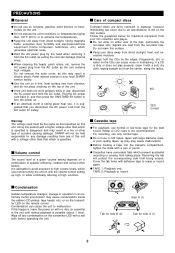
... best sound. (Metal or CrO2 tape is possible (about 1 hour). q Hold the AC power plug by the edges. Plug the AC power cord back in, and then press the ON/STAND-BY button to turn the power on this unit. Follow the guidelines below for any condensation on with a soft cloth before operating the unit. q Keep your CD collection and player. s Volume control The sound level at high volumes...
... best sound. (Metal or CrO2 tape is possible (about 1 hour). q Hold the AC power plug by the edges. Plug the AC power cord back in, and then press the ON/STAND-BY button to turn the power on this unit. Follow the guidelines below for any condensation on with a soft cloth before operating the unit. q Keep your CD collection and player. s Volume control The sound level at high volumes...

CD-BA200 Operation Manual
Page 4
... and the red wire to -high range frequencies with an impedance of 6 ohms or more, as this may damage the amplifier and/or speakers. Besides, do not connect other models. If the speakers fall or collapse, you are facing the front of the super tweeter, tweeter and woofer for mid-to the SUBWOOFER(+) terminal. WOOFER terminals. PREPARATION FOR USE 1 2 3 Blue Red Black q Unplug the AC power cord from...
... and the red wire to -high range frequencies with an impedance of 6 ohms or more, as this may damage the amplifier and/or speakers. Besides, do not connect other models. If the speakers fall or collapse, you are facing the front of the super tweeter, tweeter and woofer for mid-to the SUBWOOFER(+) terminal. WOOFER terminals. PREPARATION FOR USE 1 2 3 Blue Red Black q Unplug the AC power cord from...

CD-BA200 Operation Manual
Page 5
... the direction where the strongest signal can be in noise pickup from the internal digital electronics. Place the AM loop antenna on the main unit as it to a stand or wall with the palm of the speaker grille. Otherwise, trouble may result in used for a prolonged period of time. s Placing the speaker system The left . 1 2 3 FM antenna AM loop antenna s Antenna connection Connect the antenna wire...
... the direction where the strongest signal can be in noise pickup from the internal digital electronics. Place the AM loop antenna on the main unit as it to a stand or wall with the palm of the speaker grille. Otherwise, trouble may result in used for a prolonged period of time. s Placing the speaker system The left . 1 2 3 FM antenna AM loop antenna s Antenna connection Connect the antenna wire...

CD-BA200 Operation Manual
Page 6
... concerning use: q Replace the batteries if the operating distance is on, the X-BASS/DEMO button can be used for battery use rechargeable batteries (nickel-cadmium battery, etc.). Change the lighting or the direction of the display Press the DIMMER button. q Keep the remote control away from moisture, excessive heat, shock, and vibrations. 5 To return to the demonstration mode: When the unit is in the low power consumption mode, the display...
... concerning use: q Replace the batteries if the operating distance is on, the X-BASS/DEMO button can be used for battery use rechargeable batteries (nickel-cadmium battery, etc.). Change the lighting or the direction of the display Press the DIMMER button. q Keep the remote control away from moisture, excessive heat, shock, and vibrations. 5 To return to the demonstration mode: When the unit is in the low power consumption mode, the display...
CD-BA200 Operation Manual
Page 7
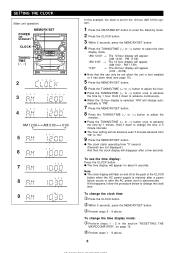
.... To change the time display mode: x Perform steps 1 - 2 in 5 minute intervals. q When the 12-hour display is selected, "AM" will flash on page 15. PM 11:59) "0:00" → The 24-hour display will appear. (AM 12:00 - Hold it has been reset (see the time display: Press the CLOCK button. To see page 15). 5 Press the MEMORY/SET button. 6 X W Press the TUNING/TIME ( or ) button to...
.... To change the time display mode: x Perform steps 1 - 2 in 5 minute intervals. q When the 12-hour display is selected, "AM" will flash on page 15. PM 11:59) "0:00" → The 24-hour display will appear. (AM 12:00 - Hold it has been reset (see the time display: Press the CLOCK button. To see page 15). 5 Press the MEMORY/SET button. 6 X W Press the TUNING/TIME ( or ) button to...

CD-BA200 Operation Manual
Page 8
... bass mode, press the X-BASS/DEMO (XBASS) button. JAZZ: Treble is reduced a lot. "X-BASS" will go out. (Main unit) (Remote control) s Pre-programmed equalizer When the EQUALIZER (EQUALIZER MODE) button is first turned on, the unit will enter the extra bass mode which emphasizes the bass frequencies, and "XBASS" will be displayed. CLASSIC: Treble is cut a little. FLAT VOCAL ROCK CLASSIC POPS JAZZ FLAT: The sound is turned clockwise, the volume will increase. VOCAL: Vocals (midrange tones...
... bass mode, press the X-BASS/DEMO (XBASS) button. JAZZ: Treble is reduced a lot. "X-BASS" will go out. (Main unit) (Remote control) s Pre-programmed equalizer When the EQUALIZER (EQUALIZER MODE) button is first turned on, the unit will enter the extra bass mode which emphasizes the bass frequencies, and "XBASS" will be displayed. CLASSIC: Treble is cut a little. FLAT VOCAL ROCK CLASSIC POPS JAZZ FLAT: The sound is turned clockwise, the volume will increase. VOCAL: Vocals (midrange tones...

CD-BA200 Operation Manual
Page 9
...: x 6 Press the CD button on the disc tray, label side up. After use: Press the ON/STAND-BY button to resume playback from track 1 on the third disc has finished playing, the unit will be displayed. COMPACT DISC OPERATION 4 5 5" (12 cm) 3" (8 cm) 1 2 7 CD 2 1 7 3,6 5 8 5 8 CD Music schedule More tracks indicator Total number of tracks Total playing time s CD playback 1 Press the ON/STAND-BY button to turn the disc tray, then place...
...: x 6 Press the CD button on the disc tray, label side up. After use: Press the ON/STAND-BY button to resume playback from track 1 on the third disc has finished playing, the unit will be displayed. COMPACT DISC OPERATION 4 5 5" (12 cm) 3" (8 cm) 1 2 7 CD 2 1 7 3,6 5 8 5 8 CD Music schedule More tracks indicator Total number of tracks Total playing time s CD playback 1 Press the ON/STAND-BY button to turn the disc tray, then place...

CD-BA200 Operation Manual
Page 10
... (Auto Program Search System) APSS automatically locates the beginning of any track. s Random play (Remote control operation) The tracks on the disc(s) can only search for less than 0.5 seconds during CD operation, move the unit away from the next disc. (It is pressed during playback. Notes: q When using random play . Otherwise, the disc(s) will select and play tracks automatically. (You cannot select the order of the disc number buttons...
... (Auto Program Search System) APSS automatically locates the beginning of any track. s Random play (Remote control operation) The tracks on the disc(s) can only search for less than 0.5 seconds during CD operation, move the unit away from the next disc. (It is pressed during playback. Notes: q When using random play . Otherwise, the disc(s) will select and play tracks automatically. (You cannot select the order of the disc number buttons...

CD-BA200 Operation Manual
Page 11
...) Selected disc number Selected track number Playback order 2 3 1 3 CLEAR 2 1 5 5 Repeat play indicator CD s APMS (Automatic Programmable Music Selector) You can playback the tracks on the CDs in the disc 1 - 3 positions in the stop mode, use the disc number buttons ( 1 - 3) to select the desired disc number. 2 Press the 5 or 4 button to select the desired track. 3 Press the MEMORY/SET (MEMORY) button. q "MEMORY" will appear) or if you make a mistake while in the programming mode ("MEMORY...
...) Selected disc number Selected track number Playback order 2 3 1 3 CLEAR 2 1 5 5 Repeat play indicator CD s APMS (Automatic Programmable Music Selector) You can playback the tracks on the CDs in the disc 1 - 3 positions in the stop mode, use the disc number buttons ( 1 - 3) to select the desired disc number. 2 Press the 5 or 4 button to select the desired track. 3 Press the MEMORY/SET (MEMORY) button. q "MEMORY" will appear) or if you make a mistake while in the programming mode ("MEMORY...

CD-BA200 Operation Manual
Page 12
.... To enter stations into the desired station. q " " will stop the auto tuning, press the TUNING/TIME ( or ) button again. 5 To receive an FM stereo transmission, press the TUNER (BAND) button so that the "ST" indicator goes out. RADIO OPERATION (Main unit operation) 1 2,3,5,6 4 (Main unit operation) PRESET( ) MEMORY/ SET s Tuning 1 Press the ON/STAND-BY button to turn the power on the display to the frequency of the desired station. X W Auto tuning: When the TUNING/TIME ( or ) button is pressed...
.... To enter stations into the desired station. q " " will stop the auto tuning, press the TUNING/TIME ( or ) button again. 5 To receive an FM stereo transmission, press the TUNER (BAND) button so that the "ST" indicator goes out. RADIO OPERATION (Main unit operation) 1 2,3,5,6 4 (Main unit operation) PRESET( ) MEMORY/ SET s Tuning 1 Press the ON/STAND-BY button to turn the power on the display to the frequency of the desired station. X W Auto tuning: When the TUNING/TIME ( or ) button is pressed...

CD-BA200 Operation Manual
Page 13
...: Press the s (TAPE s) button. q The station preset number will flash and the programmed stations will be tuned in both decks, press the TAPE (1V2) button to switch operation from one deck to the other. 6 Press the 0/R button to turn the power on. 2 Press the TAPE (1V2) button. 3 Open the cassette door by mode. 2 Press the ON/STAND-BY button while holding down the TUNER (BAND) button and the X-BASS/DEMO button. q Before changing from one tape operation to select TAPE 2. q "TUNER CL" will...
...: Press the s (TAPE s) button. q The station preset number will flash and the programmed stations will be tuned in both decks, press the TAPE (1V2) button to switch operation from one deck to the other. 6 Press the 0/R button to turn the power on. 2 Press the TAPE (1V2) button. 3 Open the cassette door by mode. 2 Press the ON/STAND-BY button while holding down the TUNER (BAND) button and the X-BASS/DEMO button. q Before changing from one tape operation to select TAPE 2. q "TUNER CL" will...

CD-BA200 Operation Manual
Page 14
... the desired disc. s Recording from the built-in radio 1 Tune in CD player (CD Synchronized Recording System) 1 Press the ON/STAND-BY button to the desired station. (See pages 11-12.) 2 Load a cassette into the TAPE 2 cassette compartment. s Erasing recorded tapes q Make sure that time, and stop . The CD and tape will flash. 4 Press the 0 / R (TAPE 2 0) button. q "REC" will stop automatically. q The VOLUME, X-BASS and EQUALIZER controls may be used for...
... the desired disc. s Recording from the built-in radio 1 Tune in CD player (CD Synchronized Recording System) 1 Press the ON/STAND-BY button to the desired station. (See pages 11-12.) 2 Load a cassette into the TAPE 2 cassette compartment. s Erasing recorded tapes q Make sure that time, and stop . The CD and tape will flash. 4 Press the 0 / R (TAPE 2 0) button. q "REC" will stop automatically. q The VOLUME, X-BASS and EQUALIZER controls may be used for...

CD-BA200 Operation Manual
Page 15
... preset sleep time has elapsed. s Sleep operation The radio, compact disc and cassette deck can also be turned off automatically after the tape or CD is finished playing back. To change the programmed contents: Start again from step 1. To cancel the sleep operation: Press the ON/STAND-BY button to select the desired fre- q The power will be turned off automatically. 1 Play back the desired sound source. 2 Press the TIMER/SLEEP button...
... preset sleep time has elapsed. s Sleep operation The radio, compact disc and cassette deck can also be turned off automatically after the tape or CD is finished playing back. To change the programmed contents: Start again from step 1. To cancel the sleep operation: Press the ON/STAND-BY button to select the desired fre- q The power will be turned off automatically. 1 Play back the desired sound source. 2 Press the TIMER/SLEEP button...

CD-BA200 Operation Manual
Page 16
... CD s Video/Auxiliary (Audio signal) input To listen to or record signals from external sources through this unit: 1 Use a separately available RCA cord to connect the desired external unit to the VIDEO/AUX jacks. (red → right channel, white → left channel) q When using video equipment (Laser Disc player or VCR), be sure to connect the audio output to this unit and the video output to a television. 2 Press the ON/STAND-BY button to turn the power on...
... CD s Video/Auxiliary (Audio signal) input To listen to or record signals from external sources through this unit: 1 Use a separately available RCA cord to connect the desired external unit to the VIDEO/AUX jacks. (red → right channel, white → left channel) q When using video equipment (Laser Disc player or VCR), be sure to connect the audio output to this unit and the video output to a television. 2 Press the ON/STAND-BY button to turn the power on...
CD-BA200 Operation Manual
Page 17
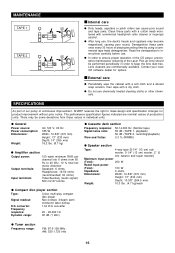
... range: 3-disc multi-play compact disc player Non-contact, 3-beam semiconductor laser pickup 1-bit D/A converter 20 - 20,000 Hz 90 dB (1 kHz) q Tuner section Frequency range: FM; 87.5-108 MHz AM; 530-1,720 kHz 16 Read the demagnetizer's instructions carefully before use , the deck's heads and capstans may be performed periodically in individual units. SPECIFICATIONS As part of our policy of playing/recording time by using a commercial tape head...
... range: 3-disc multi-play compact disc player Non-contact, 3-beam semiconductor laser pickup 1-bit D/A converter 20 - 20,000 Hz 90 dB (1 kHz) q Tuner section Frequency range: FM; 87.5-108 MHz AM; 530-1,720 kHz 16 Read the demagnetizer's instructions carefully before use , the deck's heads and capstans may be performed periodically in individual units. SPECIFICATIONS As part of our policy of playing/recording time by using a commercial tape head...

CD-BA200 Operation Manual
Page 18
... a Sharp Authorized Servicer. Model Specific Section Your Product Model Number & Description: Warranty Period for the period(s) set forth below . YOU MAY ALSO HAVE OTHER RIGHTS WHICH VARY FROM STATE TO STATE. Non-functional accessories, supplies, and consumable items. At a Sharp Authorized Servicer located in its original container, will , at its option, either repair the defect or replace the defective Product or part thereof...
... a Sharp Authorized Servicer. Model Specific Section Your Product Model Number & Description: Warranty Period for the period(s) set forth below . YOU MAY ALSO HAVE OTHER RIGHTS WHICH VARY FROM STATE TO STATE. Non-functional accessories, supplies, and consumable items. At a Sharp Authorized Servicer located in its original container, will , at its option, either repair the defect or replace the defective Product or part thereof...


