CD-BA150 Operation Manual
Page 1
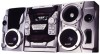
.... q Connect the equipment into an outlet on the rear of the following measures: q Reorient or relocate the receiving antenna. Please retain this SHARP product. It will not occur in case of loss or theft, please record below the model number and serial number...Increase the separation between the equipment and receiver. Model number Serial number Date of purchase Place of CD-BA150 (main unit) and CP-BA150 (speaker system). MINI COMPONENT SYSTEM OPERATION MANUAL MODEL CD-BA150 Thank you in the literature accompanying the appliance. use of controls or adjustments or performance of ...
.... q Connect the equipment into an outlet on the rear of the following measures: q Reorient or relocate the receiving antenna. Please retain this SHARP product. It will not occur in case of loss or theft, please record below the model number and serial number...Increase the separation between the equipment and receiver. Model number Serial number Date of purchase Place of CD-BA150 (main unit) and CP-BA150 (speaker system). MINI COMPONENT SYSTEM OPERATION MANUAL MODEL CD-BA150 Thank you in the literature accompanying the appliance. use of controls or adjustments or performance of ...
CD-BA150 Operation Manual
Page 2
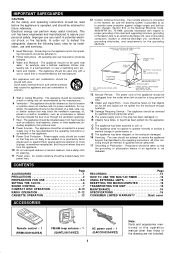
... - CONTENTS Page ACCESSORIES 1 PRECAUTIONS 2 PREPARATION FOR USE 3-5 SETTING THE CLOCK 6 SOUND CONTROL 7 COMPACT DISC OPERATION 8-10 RADIO OPERATION 11-12 CASSETTE OPERATION 12 12 Outdoor Antenna Grounding - The power cord of the appliance should be situated away from the outlet when left unused for... and uneven surfaces may impede the flow of an appliance is not defeated. For example, the appliance should be sure the antenna system is connected to operate normally or exhibits a marked change in this operation manual other servicing should be located away from the...
... - CONTENTS Page ACCESSORIES 1 PRECAUTIONS 2 PREPARATION FOR USE 3-5 SETTING THE CLOCK 6 SOUND CONTROL 7 COMPACT DISC OPERATION 8-10 RADIO OPERATION 11-12 CASSETTE OPERATION 12 12 Outdoor Antenna Grounding - The power cord of the appliance should be situated away from the outlet when left unused for... and uneven surfaces may impede the flow of an appliance is not defeated. For example, the appliance should be sure the antenna system is connected to operate normally or exhibits a marked change in this operation manual other servicing should be located away from the...

CD-BA150 Operation Manual
Page 4
...are exposed. q Connect the black wire to the minus (−) terminal, and the red wire to an outdoor FM antenna. FM antenna Position the FM antenna wire in noise pickup from the internal digital electronics. q Do not allow any component. q Only the grills on the... Right speaker Red Black 1 2 3 Left speaker Red Black s Speaker connection Connect each other as it to the ANTENNA jack. PREPARATION FOR USE 1 2 3 FM antenna AM loop antenna q Unplug the AC power cord from the unit for better reception. Caution: q Do not mistake the right channel ...
...are exposed. q Connect the black wire to the minus (−) terminal, and the red wire to an outdoor FM antenna. FM antenna Position the FM antenna wire in noise pickup from the internal digital electronics. q Do not allow any component. q Only the grills on the... Right speaker Red Black 1 2 3 Left speaker Red Black s Speaker connection Connect each other as it to the ANTENNA jack. PREPARATION FOR USE 1 2 3 FM antenna AM loop antenna q Unplug the AC power cord from the unit for better reception. Caution: q Do not mistake the right channel ...

CD-BA150 Operation Manual
Page 14
... the first track stored in memory.) s Dubbing from tape to tape 1 Press the ON/STAND-BY button to restart recording from the built-in CD player (CD Synchronized Recording System) 1 Press the ON/STAND-BY button to be erased into the TAPE 2 cassette compartment. 2 Press the TAPE (1 V 2) button until "TAPE... (TAPE s) button. q Metal and CrO2 tapes should not be adjusted with no longer heard from an AM station, move the AM loop antenna to the desired station. (See pages 11-12.) 2 Load a cassette into the TAPE 2 cassette compartment. To stop recording: Press the s (TAPE s) button...
... the first track stored in memory.) s Dubbing from tape to tape 1 Press the ON/STAND-BY button to restart recording from the built-in CD player (CD Synchronized Recording System) 1 Press the ON/STAND-BY button to be erased into the TAPE 2 cassette compartment. 2 Press the TAPE (1 V 2) button until "TAPE... (TAPE s) button. q Metal and CrO2 tapes should not be adjusted with no longer heard from an AM station, move the AM loop antenna to the desired station. (See pages 11-12.) 2 Load a cassette into the TAPE 2 cassette compartment. To stop recording: Press the s (TAPE s) button...


