CD-BA150 Operation Manual
Page 1
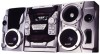
MINI COMPONENT SYSTEM OPERATION MANUAL MODEL CD-BA150 Thank you in operating your assistance in reporting this manual carefully. It will not occur in a residential installation. NO USER-SERVICEABLE PARTS INSIDE. use of controls or adjustments or performance of the FCC Rules. WARNING FCC Regulations state that may result in the literature accompanying the appliance. Note: This equipment has been tested ...
MINI COMPONENT SYSTEM OPERATION MANUAL MODEL CD-BA150 Thank you in operating your assistance in reporting this manual carefully. It will not occur in a residential installation. NO USER-SERVICEABLE PARTS INSIDE. use of controls or adjustments or performance of the FCC Rules. WARNING FCC Regulations state that may result in the literature accompanying the appliance. Note: This equipment has been tested ...
CD-BA150 Operation Manual
Page 2
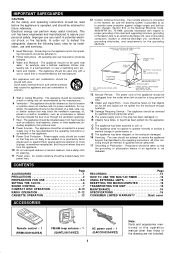
... Page ACCESSORIES 1 PRECAUTIONS 2 PREPARATION FOR USE 3-5 SETTING THE CLOCK 6 SOUND CONTROL 7 COMPACT DISC OPERATION 8-10 RADIO OPERATION 11-12 CASSETTE OPERATION 12 12 Outdoor Antenna Grounding - NATIONAL ELECTRICAL CODE S2898A GROUND CLAMP ANTENNA DISCHARGE UNIT (NEC SECTION 810-20) GROUNDING CONDUCTORS (NEC SECTION 810-21) GROUND CLAMPS POWER SERVICE GROUNDING ELECTRODE SYSTEM (NEC ART 250, PART H) 13 Nonuse Periods - The appliance should be serviced by the manufacturer. 6 Ventilation - or...
... Page ACCESSORIES 1 PRECAUTIONS 2 PREPARATION FOR USE 3-5 SETTING THE CLOCK 6 SOUND CONTROL 7 COMPACT DISC OPERATION 8-10 RADIO OPERATION 11-12 CASSETTE OPERATION 12 12 Outdoor Antenna Grounding - NATIONAL ELECTRICAL CODE S2898A GROUND CLAMP ANTENNA DISCHARGE UNIT (NEC SECTION 810-20) GROUNDING CONDUCTORS (NEC SECTION 810-21) GROUND CLAMPS POWER SERVICE GROUNDING ELECTRODE SYSTEM (NEC ART 250, PART H) 13 Nonuse Periods - The appliance should be serviced by the manufacturer. 6 Ventilation - or...

CD-BA150 Operation Manual
Page 3
... a soft cloth before operating the unit. If a CD is not recommended.) For recording, use oil, solvents, gasoline, paint thinners or insecticides on the transmitter LED with the volume control setting up high, or while continually listening at a given volume setting depends on the disc surface. q When cleaning the heads, pinch rollers, etc, remove the AC power plug from the center, along the radius...
... a soft cloth before operating the unit. If a CD is not recommended.) For recording, use oil, solvents, gasoline, paint thinners or insecticides on the transmitter LED with the volume control setting up high, or while continually listening at a given volume setting depends on the disc surface. q When cleaning the heads, pinch rollers, etc, remove the AC power plug from the center, along the radius...

CD-BA150 Operation Manual
Page 4
... collapse, you are placed near the AC power cord, interference may damage the amplifier and/or speakers. PREPARATION FOR USE 1 2 3 FM antenna AM loop antenna q Unplug the AC power cord from the AC outlet before connecting or disconnecting any objects to be placed in the bass reflex ducts. q If the AM loop antenna and the FM antenna wire are facing the front of the...
... collapse, you are placed near the AC power cord, interference may damage the amplifier and/or speakers. PREPARATION FOR USE 1 2 3 FM antenna AM loop antenna q Unplug the AC power cord from the AC outlet before connecting or disconnecting any objects to be placed in the bass reflex ducts. q If the AM loop antenna and the FM antenna wire are facing the front of the...

CD-BA150 Operation Manual
Page 5
... INPUT (Main unit operation) (Main unit operation) To an AC outlet AC 120 V, 60 Hz s Connecting the AC power cord Connect the AC power cord to the AC INPUT jack, then connect the AC power cord plug to the original brightness: Press the DIMMER button again. For best performance, place the speakers according to the diagram to select the extra bass mode. s Demo mode When the AC power cord is on, the X-BASS/DEMO button can be in used...
... INPUT (Main unit operation) (Main unit operation) To an AC outlet AC 120 V, 60 Hz s Connecting the AC power cord Connect the AC power cord to the AC INPUT jack, then connect the AC power cord plug to the original brightness: Press the DIMMER button again. For best performance, place the speakers according to the diagram to select the extra bass mode. s Demo mode When the AC power cord is on, the X-BASS/DEMO button can be in used...

CD-BA150 Operation Manual
Page 6
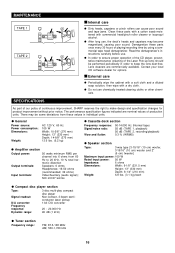
... 15 s Remote control ë q When inserting or removing the batteries, push them toward the battery terminals. terfere with new ones at the same time. q Do not mix old and new batteries. q Exposing the sensor on the main unit with a soft cloth. Notes concerning use rechargeable batteries (nickel-cadmium battery, etc.). Change the lighting or the direction of time. q Installing the batteries incorrectly may in the battery compartment...
... 15 s Remote control ë q When inserting or removing the batteries, push them toward the battery terminals. terfere with new ones at the same time. q Do not mix old and new batteries. q Exposing the sensor on the main unit with a soft cloth. Notes concerning use rechargeable batteries (nickel-cadmium battery, etc.). Change the lighting or the direction of time. q Installing the batteries incorrectly may in the battery compartment...
CD-BA150 Operation Manual
Page 7
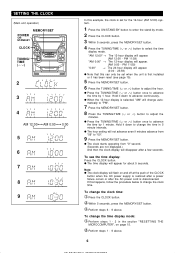
.../SET button. q The clock starts operating from "59" to advance the time by 1 hour. q When the 12-hour display is disconnected. To see page 15). 5 Press the MEMORY/SET button. 6 X W Press the TUNING/TIME ( or ) button to adjust the hour. Note: q The clock display will appear for the 12-hour (AM 12:00) system. 1 Press the ON/STAND-BY button to enter the stand-by mode. 2 Press the CLOCK button...
.../SET button. q The clock starts operating from "59" to advance the time by 1 hour. q When the 12-hour display is disconnected. To see page 15). 5 Press the MEMORY/SET button. 6 X W Press the TUNING/TIME ( or ) button to adjust the hour. Note: q The clock display will appear for the 12-hour (AM 12:00) system. 1 Press the ON/STAND-BY button to enter the stand-by mode. 2 Press the CLOCK button...

CD-BA150 Operation Manual
Page 8
... unit) (Remote control) s Pre-programmed equalizer When the EQUALIZER (EQUALIZER MODE) button is pressed, the current mode setting will appear. To change to decrease the volume. 0 1 2 ..... 29 30 MAXIMUM (Main unit) (Remote control) X-BASS indicator s Extra bass (X-BASS) When the power is cut a little. FLAT VOCAL ROCK CLASSIC POPS JAZZ FLAT: The sound is reduced a lot. POPS: Bass and treble are emphasized. 7 SOUND CONTROL (Main unit) (Remote control) s Volume Press the VOLUME button to...
... unit) (Remote control) s Pre-programmed equalizer When the EQUALIZER (EQUALIZER MODE) button is pressed, the current mode setting will appear. To change to decrease the volume. 0 1 2 ..... 29 30 MAXIMUM (Main unit) (Remote control) X-BASS indicator s Extra bass (X-BASS) When the power is cut a little. FLAT VOCAL ROCK CLASSIC POPS JAZZ FLAT: The sound is reduced a lot. POPS: Bass and treble are emphasized. 7 SOUND CONTROL (Main unit) (Remote control) s Volume Press the VOLUME button to...
CD-BA150 Operation Manual
Page 9
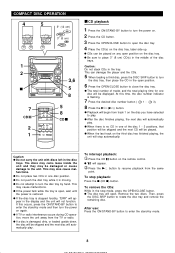
... will automatically play . q If the disc tray is stopped forcibly, "ERR" will appear in the open , wait until the power is flashing. 7 Press the desired disc number button ( 1 - 3). 8 Press the 0/R (0R) button. q If the power fails while the tray is no CD in the stop playback: Press the s (CD s) button. Remove the two discs. Then, press the DISC SKIP button to turn the disc tray, then place the CD in the display and the...
... will automatically play . q If the disc tray is stopped forcibly, "ERR" will appear in the open , wait until the power is flashing. 7 Press the desired disc number button ( 1 - 3). 8 Press the 0/R (0R) button. q If the power fails while the tray is no CD in the stop playback: Press the s (CD s) button. Remove the two discs. Then, press the DISC SKIP button to turn the disc tray, then place the CD in the display and the...
CD-BA150 Operation Manual
Page 10
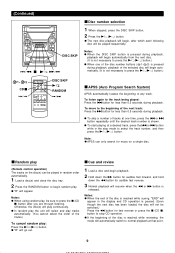
...) button.) q When one time, press the 5 or 4 button repeatedly until the desired track number is not necessary to stop mode to the track being played: Press the 5 button for fast reverse or press the s (CD s) button to press the 0/R (0R) button.) DISC SKIP RANDOM s APSS (Auto Program Search System) APSS automatically locates the beginning of the disc is reached while reviewing, the mode will play : Press the 0/R (0R) button...
...) button.) q When one time, press the 5 or 4 button repeatedly until the desired track number is not necessary to stop mode to the track being played: Press the 5 button for fast reverse or press the s (CD s) button to press the 0/R (0R) button.) DISC SKIP RANDOM s APSS (Auto Program Search System) APSS automatically locates the beginning of the disc is reached while reviewing, the mode will play : Press the 0/R (0R) button...

CD-BA150 Operation Manual
Page 11
... MEMORY/SET (MEMORY) button. Notes: q Opening the disc tray automatically cancels the programmed sequence. Note: q When using repeat play, be sure to press the s (CD s) button after you like. 1 When in the stop mode, use the disc number buttons ( 1 - 3) to select the desired disc number. 2 Press the 5 or 4 button to show that the programmed sequence is not possible. q During APMS operation, random play : Press the 0/R (0R) button again. (Continued) Selected disc number Selected track number...
... MEMORY/SET (MEMORY) button. Notes: q Opening the disc tray automatically cancels the programmed sequence. Note: q When using repeat play, be sure to press the s (CD s) button after you like. 1 When in the stop mode, use the disc number buttons ( 1 - 3) to select the desired disc number. 2 Press the 5 or 4 button to show that the programmed sequence is not possible. q During APMS operation, random play : Press the 0/R (0R) button again. (Continued) Selected disc number Selected track number...

CD-BA150 Operation Manual
Page 12
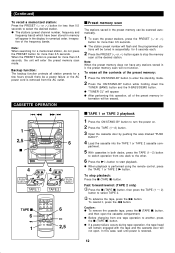
... stop the auto tuning, press the TUNING/TIME ( or ) button again. 5 To receive an FM stereo transmission, press the TUNER (BAND) button so that station in the display. RADIO OPERATION (Main unit operation) 1 2,3,5,6 4 (Main unit operation) PRESET( ) MEMORY/ SET s Tuning 1 Press the ON/STAND-BY button to turn the power on. 2 Press the TUNER (BAND) button. 3 Press the TUNER (BAND) button to the stand-by mode. To enter stations into the desired station. q Although the reception changes to monaural...
... stop the auto tuning, press the TUNING/TIME ( or ) button again. 5 To receive an FM stereo transmission, press the TUNER (BAND) button so that station in the display. RADIO OPERATION (Main unit operation) 1 2,3,5,6 4 (Main unit operation) PRESET( ) MEMORY/ SET s Tuning 1 Press the ON/STAND-BY button to turn the power on. 2 Press the TUNER (BAND) button. 3 Press the TUNER (BAND) button to the stand-by mode. To enter stations into the desired station. q Although the reception changes to monaural...
CD-BA150 Operation Manual
Page 13
... removed from one deck to the other. 6 Press the 0/R button to select the desired station. q Before changing from the AC outlet. q If a power failure occurs during tape operation, the tape head will remain engaged with the tape and the cassette door will appear in the display in the preset memory can be a power failure or the AC power cord is performed using the remote control, press the TAPE...
... removed from one deck to the other. 6 Press the 0/R button to select the desired station. q Before changing from the AC outlet. q If a power failure occurs during tape operation, the tape head will remain engaged with the tape and the cassette door will appear in the display in the preset memory can be a power failure or the AC power cord is performed using the remote control, press the TAPE...

CD-BA150 Operation Manual
Page 14
... CD TAPE TAPE 2 TAPE(1 2) TUNER (BAND) s Recording from the built-in CD player (CD Synchronized Recording System) 1 Press the ON/STAND-BY button to turn the power on the recorded signal (Variable Sound Monitor). q "REC" will stop . partment. q The VOLUME, X-BASS and EQUALIZER controls may be used for recording or dubbing. q CD playback will flash. 5 Press the 0 /R (TAPE 2 0) button. q "SYNC" and "REC" will start approximately 5 seconds after the tape starts. q TAPE 1 and TAPE 2 will display the track number...
... CD TAPE TAPE 2 TAPE(1 2) TUNER (BAND) s Recording from the built-in CD player (CD Synchronized Recording System) 1 Press the ON/STAND-BY button to turn the power on the recorded signal (Variable Sound Monitor). q "REC" will stop . partment. q The VOLUME, X-BASS and EQUALIZER controls may be used for recording or dubbing. q CD playback will flash. 5 Press the 0 /R (TAPE 2 0) button. q "SYNC" and "REC" will start approximately 5 seconds after the tape starts. q TAPE 1 and TAPE 2 will display the track number...
CD-BA150 Operation Manual
Page 15
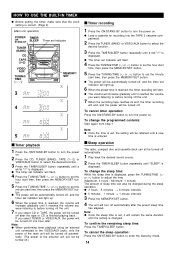
...-BY button to turn the power on. HOW TO USE THE BUILT-IN TIMER q Before setting the timer, make sure that the clock setting is correct. (Page 6) (Main unit operation) POWER TIMER/ ON/ STAND-BY SLEEP Timer set indicator TUNER (BAND) CD TAPE (1 2) VIDEO/ AUX TUNING/ TIME ( ) MEMORY/ SET 3 4 5 s Timer playback 1 Press the ON/STAND-BY button to turn the power on. 2 V Press the CD, TUNER (BAND), TAPE (1 2) or VIDEO/AUX button to select the desired function. 3 f Press the TIMER/SLEEP button repeatedly until a red " " is displayed...
...-BY button to turn the power on. HOW TO USE THE BUILT-IN TIMER q Before setting the timer, make sure that the clock setting is correct. (Page 6) (Main unit operation) POWER TIMER/ ON/ STAND-BY SLEEP Timer set indicator TUNER (BAND) CD TAPE (1 2) VIDEO/ AUX TUNING/ TIME ( ) MEMORY/ SET 3 4 5 s Timer playback 1 Press the ON/STAND-BY button to turn the power on. 2 V Press the CD, TUNER (BAND), TAPE (1 2) or VIDEO/AUX button to select the desired function. 3 f Press the TIMER/SLEEP button repeatedly until a red " " is displayed...

CD-BA150 Operation Manual
Page 16
... RCA cord to connect the desired external unit to the VIDEO/AUX jacks. (red → right channel, white → left channel) q When using video equipment (Laser Disc player or VCR), be sure to connect the audio output to this unit and the video output to a television. 2 Press the ON/STAND-BY button to turn the power on. 2 Press the CD button. 3 Press the OPEN/CLOSE button to open the disc tray. q If the display is reduced. Caution: q The operation...
... RCA cord to connect the desired external unit to the VIDEO/AUX jacks. (red → right channel, white → left channel) q When using video equipment (Laser Disc player or VCR), be sure to connect the audio output to this unit and the video output to a television. 2 Press the ON/STAND-BY button to turn the power on. 2 Press the CD button. 3 Press the OPEN/CLOSE button to open the disc tray. q If the display is reduced. Caution: q The operation...
CD-BA150 Operation Manual
Page 17
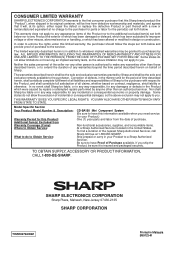
...) q Amplifier section Output power: Output terminals: Input terminals: 50 watts minimum RMS per channel into 6 ohms from these values in order to keep the lens dust-free. q In order to ensure proper operation of the CD player, preventative maintenance (cleaning of continuous improvement, SHARP reserves the right to 20 kHz, 10 % total harmonic distortion Speakers; 6 ohms Headphones; 16-50 ohms (recommended; 32 ohms) Video/Auxiliary (audio...
...) q Amplifier section Output power: Output terminals: Input terminals: 50 watts minimum RMS per channel into 6 ohms from these values in order to keep the lens dust-free. q In order to ensure proper operation of the CD player, preventative maintenance (cleaning of continuous improvement, SHARP reserves the right to 20 kHz, 10 % total harmonic distortion Speakers; 6 ohms Headphones; 16-50 ohms (recommended; 32 ohms) Video/Auxiliary (audio...
CD-BA150 Operation Manual
Page 18
... information available when you ship the Product, be sure it will be free from defective workmanship and materials, and agrees that it is in addition to whatever implied warranties may be granted to purchasers by law. Some states do to Obtain Service: CD-BA150 Mini Component System (Be sure to have Proof of Sharp to the purchaser with a new...
... information available when you ship the Product, be sure it will be free from defective workmanship and materials, and agrees that it is in addition to whatever implied warranties may be granted to purchasers by law. Some states do to Obtain Service: CD-BA150 Mini Component System (Be sure to have Proof of Sharp to the purchaser with a new...


