
BD-HP21U Operation Manual
Page 4
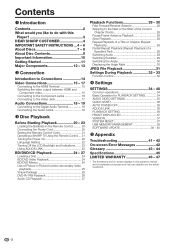
Contents n Introduction Contents 2 What would you like to do with this Player 3 DEAR SHARP CUSTOMER 4 IMPORTANT SAFETY INSTRUCTIONS ... 4 - 6 About Discs 7 - 8 About Disc Contents 9 Important Information 10 Getting Started 11 Major Components 12 - 13 o Connection Introduction to Connections 14 Video Connections ... SETTING 34 AUDIO VIDEO SETTINGS 35 QUICK START 36 AUTO POWER OFF 36 AQUOS LINK 36 PLAYBACK SETTING 36 FRONT DISPLAY/LED 37 VERSION 37 SYSTEM RESET 37 USB MEMORY MANAGEMENT 38 SOFTWARE UPDATE 39 - 40 r Appendix Troubleshooting 41 - 42 On-screen Error Messages ...
Contents n Introduction Contents 2 What would you like to do with this Player 3 DEAR SHARP CUSTOMER 4 IMPORTANT SAFETY INSTRUCTIONS ... 4 - 6 About Discs 7 - 8 About Disc Contents 9 Important Information 10 Getting Started 11 Major Components 12 - 13 o Connection Introduction to Connections 14 Video Connections ... SETTING 34 AUDIO VIDEO SETTINGS 35 QUICK START 36 AUTO POWER OFF 36 AQUOS LINK 36 PLAYBACK SETTING 36 FRONT DISPLAY/LED 37 VERSION 37 SYSTEM RESET 37 USB MEMORY MANAGEMENT 38 SOFTWARE UPDATE 39 - 40 r Appendix Troubleshooting 41 - 42 On-screen Error Messages ...
BD-HP21U Operation Manual
Page 25
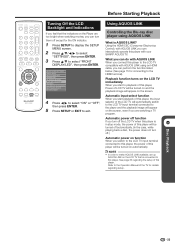
...SHARP AQUOS TV. NOTE • In order to the LCD TV compatible with AQUOS LINK using AQUOS LINK What is in stop mode, the power of this player to make AQUOS LINK available, set up AQUOS LINK on the LCD TV that the indicators on the Player are watching a TV program. p Disc...on the LCD TV immediately. Using AQUOS LINK Controlling the Blu-ray disc player using an HDMI cable, you start to the HDMI terminal). AUDIO VIDEO SETTINGS QUICK START AUTO POWER OFF AQUOS LINK PLAYBACK SETTING FRONT DISPLAY/LED VERSION USB MEMORY MANAGEMENT SOFTWARE UPDATE SYSTEM RESET 4 Press c/d to ...
...SHARP AQUOS TV. NOTE • In order to the LCD TV compatible with AQUOS LINK using AQUOS LINK What is in stop mode, the power of this player to make AQUOS LINK available, set up AQUOS LINK on the LCD TV that the indicators on the Player are watching a TV program. p Disc...on the LCD TV immediately. Using AQUOS LINK Controlling the Blu-ray disc player using an HDMI cable, you start to the HDMI terminal). AUDIO VIDEO SETTINGS QUICK START AUTO POWER OFF AQUOS LINK PLAYBACK SETTING FRONT DISPLAY/LED VERSION USB MEMORY MANAGEMENT SOFTWARE UPDATE SYSTEM RESET 4 Press c/d to ...
BD-HP21U Operation Manual
Page 36
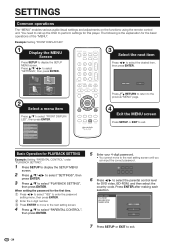
...then press ENTER. 3 Select the next item Press c/d to exit. 34 PARENTAL CONTROL DISC LANGUAGE ANGLE MARK DISPLAY PASSWORD SETTING LEVEL 3 0 USA 7 Press SETUP or EXIT to...Press SETUP to exit. AUDIO VIDEO SETTINGS QUICK START AUTO POWER OFF AQUOS LINK PLAYBACK SETTING FRONT DISPLAY/LED VERSION USB MEMORY MANAGEMENT SOFTWARE UPDATE SYSTEM RESET ON OFF Press n RETURN to return to the previous... LANGUAGE PICTURE 2 Select a menu item Press a/b to select the parental control level for this player. You need to call up the OSD to select "PLAYBACK SETTING", then press ENTER. Press ...
...then press ENTER. 3 Select the next item Press c/d to exit. 34 PARENTAL CONTROL DISC LANGUAGE ANGLE MARK DISPLAY PASSWORD SETTING LEVEL 3 0 USA 7 Press SETUP or EXIT to...Press SETUP to exit. AUDIO VIDEO SETTINGS QUICK START AUTO POWER OFF AQUOS LINK PLAYBACK SETTING FRONT DISPLAY/LED VERSION USB MEMORY MANAGEMENT SOFTWARE UPDATE SYSTEM RESET ON OFF Press n RETURN to return to the previous... LANGUAGE PICTURE 2 Select a menu item Press a/b to select the parental control level for this player. You need to call up the OSD to select "PLAYBACK SETTING", then press ENTER. Press ...
BD-HP21U Operation Manual
Page 40
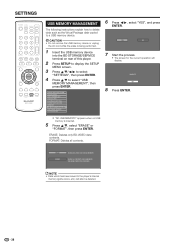
... process. • The screen for the current operation will also be deleted. 38 NOTE • Data which has been saved to the player's internal memory (game score, etc.) will display. COMPLETE OK 8 Press ENTER. • "NO USB MEMORY!" ERASE ALL CONTENTS ON USB... MEMORY INCLUDING PROTECTED CONTENTS. FORMAT: Deletes all contents. AUDIO VIDEO SETTINGS QUICK START AUTO POWER OFF AQUOS LINK PLAYBACK SETTING FRONT DISPLAY/LED VERSION USB MEMORY MANAGEMENT SOFTWARE UPDATE SYSTEM RESET 6 Press c/d, select "YES", and press ENTER. SETTINGS USB MEMORY MANAGEMENT The following...
... process. • The screen for the current operation will also be deleted. 38 NOTE • Data which has been saved to the player's internal memory (game score, etc.) will display. COMPLETE OK 8 Press ENTER. • "NO USB MEMORY!" ERASE ALL CONTENTS ON USB... MEMORY INCLUDING PROTECTED CONTENTS. FORMAT: Deletes all contents. AUDIO VIDEO SETTINGS QUICK START AUTO POWER OFF AQUOS LINK PLAYBACK SETTING FRONT DISPLAY/LED VERSION USB MEMORY MANAGEMENT SOFTWARE UPDATE SYSTEM RESET 6 Press c/d, select "YES", and press ENTER. SETTINGS USB MEMORY MANAGEMENT The following...
BD-HP21U Operation Manual
Page 41
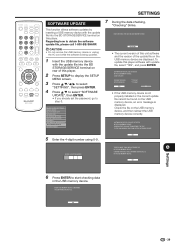
... THAN ONE SOFTWARE FILE IN THE USB MEMORY DEVICE. OK 6 Press ENTER to obtain the software update file, please call 1-800-BE-SHARP. To update this player. START UPDATE? SOFTWARE UPDATE FILE IS DETECTED IN THE USB MEMORY DEVICE. CAUTION • Do not remove the USB memory... device or unplug the AC cord while the software is displayed. AUDIO VIDEO SETTINGS QUICK START AUTO POWER OFF AQUOS LINK ...
... THAN ONE SOFTWARE FILE IN THE USB MEMORY DEVICE. OK 6 Press ENTER to obtain the software update file, please call 1-800-BE-SHARP. To update this player. START UPDATE? SOFTWARE UPDATE FILE IS DETECTED IN THE USB MEMORY DEVICE. CAUTION • Do not remove the USB memory... device or unplug the AC cord while the software is displayed. AUDIO VIDEO SETTINGS QUICK START AUTO POWER OFF AQUOS LINK ...
BD-HP21U Operation Manual
Page 42
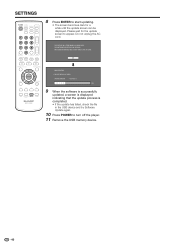
... USB device and try Software Update again. 10 Press POWER to start updating. • The screen becomes dark for the update screen to appear. THE PICTURE WILL TEMPORARILY GO DARK UNTIL THE SOFTWARE UPDATE DISPLAY APPEARS. Do not unplug the AC cord. SETTINGS 8 Press ENTER to turn off the player. 11 Remove the USB memory...
... USB device and try Software Update again. 10 Press POWER to start updating. • The screen becomes dark for the update screen to appear. THE PICTURE WILL TEMPORARILY GO DARK UNTIL THE SOFTWARE UPDATE DISPLAY APPEARS. Do not unplug the AC cord. SETTINGS 8 Press ENTER to turn off the player. 11 Remove the USB memory...

