
AF-R100EX , AF-R120EX Operation Manual
Page 1
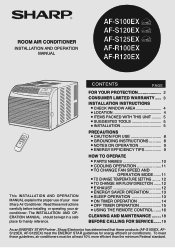
... TEMPERATURE SETTING .......... 12 • TO CHANGE AIR FLOW DIRECTION ....... 12 • EXHAUST 12 • ENERGY SAVER OPERATION 13 • SLEEP OPERATION 13 • ON TIMER OPERATION 14 • OFF TIMER OPERATION 15 • USING THE REMOTE CONTROL ....... 16 CLEANING AND MAINTENANCE ........ 18 BEFORE CALLING FOR SERVlCE ...... 19 As an ENERGY STAR Partner, Sharp Electronics has determined that these products (AF-S100EX, AFS120EX, AF-S125EX) meet these instructions carefully before installing or operating your new Sharp Air Conditioner. The INSTALLATION AND OPERATION MANUAL...
... TEMPERATURE SETTING .......... 12 • TO CHANGE AIR FLOW DIRECTION ....... 12 • EXHAUST 12 • ENERGY SAVER OPERATION 13 • SLEEP OPERATION 13 • ON TIMER OPERATION 14 • OFF TIMER OPERATION 15 • USING THE REMOTE CONTROL ....... 16 CLEANING AND MAINTENANCE ........ 18 BEFORE CALLING FOR SERVlCE ...... 19 As an ENERGY STAR Partner, Sharp Electronics has determined that these products (AF-S100EX, AFS120EX, AF-S125EX) meet these instructions carefully before installing or operating your new Sharp Air Conditioner. The INSTALLATION AND OPERATION MANUAL...
AF-R100EX , AF-R120EX Operation Manual
Page 2
...: For service problems, warranty information, missing items and other assistance: Sharp Electronics Corporation Customer Assistance Center 1300 Naperville Drive Romeoville, IL 60446-1091 Please provide the following information when you write or call: model number, serial number, date of purchase, your complete mailing address (including zip code), your nearest Sharp Authorized Servicer) PARTS (for reporting loss or theft, please record below the model and serial number located on...
...: For service problems, warranty information, missing items and other assistance: Sharp Electronics Corporation Customer Assistance Center 1300 Naperville Drive Romeoville, IL 60446-1091 Please provide the following information when you write or call: model number, serial number, date of purchase, your complete mailing address (including zip code), your nearest Sharp Authorized Servicer) PARTS (for reporting loss or theft, please record below the model and serial number located on...
AF-R100EX , AF-R120EX Operation Manual
Page 3
... LIMITED WARRANTY CONSUMER LIMITED WARRANTY SHARP ELECTRONICS CORPORATION warrants to the first consumer purchaser that this Sharp brand product (the "Product"), when shipped in its original container, will be free from defective workmanship and materials, and agrees that it will reinstall it is necessary to remove the Product, the Servicer will , at its option, either repair the defect or replace the defective Product or part...
... LIMITED WARRANTY CONSUMER LIMITED WARRANTY SHARP ELECTRONICS CORPORATION warrants to the first consumer purchaser that this Sharp brand product (the "Product"), when shipped in its original container, will be free from defective workmanship and materials, and agrees that it will reinstall it is necessary to remove the Product, the Servicer will , at its option, either repair the defect or replace the defective Product or part...
AF-R100EX , AF-R120EX Operation Manual
Page 4
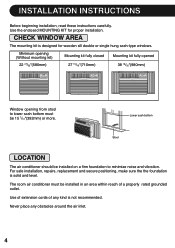
.... 4 Lower sash bottom Stool LOCATION The air conditioner should be installed on a firm foundation to lower sash bottom must be 15 7/16"(392mm) or more. Use the enclosed MOUNTING KIT for wooden sill double or single hung sash-type windows. Use of extension cords of a properly rated grounded outlet. Never place any kind is not recommended. For safe installation, repairs, replacement and secure positioning, make...
.... 4 Lower sash bottom Stool LOCATION The air conditioner should be installed on a firm foundation to lower sash bottom must be 15 7/16"(392mm) or more. Use the enclosed MOUNTING KIT for wooden sill double or single hung sash-type windows. Use of extension cords of a properly rated grounded outlet. Never place any kind is not recommended. For safe installation, repairs, replacement and secure positioning, make...
AF-R100EX , AF-R120EX Operation Manual
Page 5
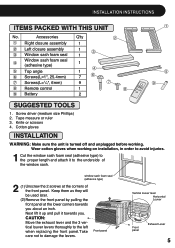
... will be used later. (2)Remove the front panel by pulling the front panel at the corners of the window sash. INSTALLATION INSTRUCTIONS ITEMS PACKED WITH THIS UNIT No. Accessories Q'ty 1 Right closure assembly 1 2 Left closure assembly 1 ! 3 Window sash foam seal 1 Window sash foam seal 4 (adhesive type) 1 " 5 Top angle 1 6 Screws(L=1", 25.4mm) 7 $ 7 Screws(L=1/4", 6mm) 9 % 8 Remote control 1 & 9 Battery 2 5 ' SUGGESTED TOOLS 1. CAUTION: Move the exhaust lever and...
... will be used later. (2)Remove the front panel by pulling the front panel at the corners of the window sash. INSTALLATION INSTRUCTIONS ITEMS PACKED WITH THIS UNIT No. Accessories Q'ty 1 Right closure assembly 1 2 Left closure assembly 1 ! 3 Window sash foam seal 1 Window sash foam seal 4 (adhesive type) 1 " 5 Top angle 1 6 Screws(L=1", 25.4mm) 7 $ 7 Screws(L=1/4", 6mm) 9 % 8 Remote control 1 & 9 Battery 2 5 ' SUGGESTED TOOLS 1. CAUTION: Move the exhaust lever and...
AF-R100EX , AF-R120EX Operation Manual
Page 6
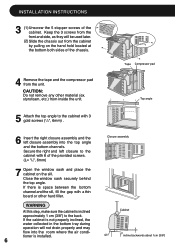
... cabinet with a thin board or other material (ex. CAUTION: Do not remove any other hard filler. Secure the right and left closure assembly into the room where the air conditioner is installed. 6 Closure assembly Cabinet sill incline backwards about 1cm (3/8") Keep the 3 screws from the front and side, as they will not drain properly and may flow...
... cabinet with a thin board or other material (ex. CAUTION: Do not remove any other hard filler. Secure the right and left closure assembly into the room where the air conditioner is installed. 6 Closure assembly Cabinet sill incline backwards about 1cm (3/8") Keep the 3 screws from the front and side, as they will not drain properly and may flow...
AF-R100EX , AF-R120EX Operation Manual
Page 7
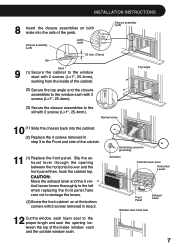
... lever Horizontal Louver Front Panel Exhaust Lever Window sash foam seal 7 Closure assembly (Left) Top angle (2) Secure the top angle and the closure assemblies to the window sash with 3 screws (L=1", 25.4mm). (3) Secure the closure assemblies to the sill with 2 screws (L=1", 25.4mm), working from the inside window sash and the outside window sash. INSTALLATION INSTRUCTIONS 8 Insert the closure assemblies...
... lever Horizontal Louver Front Panel Exhaust Lever Window sash foam seal 7 Closure assembly (Left) Top angle (2) Secure the top angle and the closure assemblies to the window sash with 3 screws (L=1", 25.4mm). (3) Secure the closure assemblies to the sill with 2 screws (L=1", 25.4mm), working from the inside window sash and the outside window sash. INSTALLATION INSTRUCTIONS 8 Insert the closure assemblies...
AF-R100EX , AF-R120EX Operation Manual
Page 8
... rating of electric shock by following the installation instructions given in the previous section of this manual. • Make sure the unit is the correct capacity for the area you want to cool. • Do not modify any part of this plug. The plug must be a UL Listed 3-wire grounding type appliance extension cord rated 125 Volts, 15 amp or more. • Ventilate the room periodically during use...
... rating of electric shock by following the installation instructions given in the previous section of this manual. • Make sure the unit is the correct capacity for the area you want to cool. • Do not modify any part of this plug. The plug must be a UL Listed 3-wire grounding type appliance extension cord rated 125 Volts, 15 amp or more. • Ventilate the room periodically during use...
AF-R100EX , AF-R120EX Operation Manual
Page 9
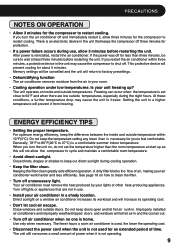
... air conditioner removes moisture from freezing. Do not keep doors open and let hot air rush in and the cool air out. • Turn off for about 5 minutes. Keeping the filter clean greatly aids efficient operation. After power is a comfortable summer indoor temperature. Direct sunlight on how to cycle and maintain a comfortable room temperature. • Avoid direct sunlight. If you turn the unit on inside and outside doors. At these conditions, a further temperature...
... air conditioner removes moisture from freezing. Do not keep doors open and let hot air rush in and the cool air out. • Turn off for about 5 minutes. Keeping the filter clean greatly aids efficient operation. After power is a comfortable summer indoor temperature. Direct sunlight on how to cycle and maintain a comfortable room temperature. • Avoid direct sunlight. If you turn the unit on inside and outside doors. At these conditions, a further temperature...
AF-R100EX , AF-R120EX Operation Manual
Page 10
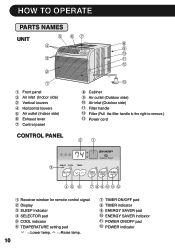
...TO OPERATE PARTS NAMES UNIT 5 67 4 8 9 10 3 11 12 2 1 1 Front panel 2 Air inlet (Indoor side) 3 Vertical louvers 4 Horizontal louvers 5 Air outlet (Indoor side) 6 Exhaust lever 7 Control panel 13 8 Cabinet 9 Air outlet (Outdoor side) 10 Air inlet (Outdoor side) 11 Filter handle 12 Filter (Pull the filter handle to the right to remove.) 13 Power cord CONTROL PANEL F hr ! SLEEP COOL TEMP SELECTOR TIMER ON/OFF ENERGY POWER SAVER ON/OFF "# $ 1 Receiver window for remote control signal 2 Display 3 SLEEP indicator 4 SELECTOR pad 5 COOL indicator 6 TEMPERATURE setting...
...TO OPERATE PARTS NAMES UNIT 5 67 4 8 9 10 3 11 12 2 1 1 Front panel 2 Air inlet (Indoor side) 3 Vertical louvers 4 Horizontal louvers 5 Air outlet (Indoor side) 6 Exhaust lever 7 Control panel 13 8 Cabinet 9 Air outlet (Outdoor side) 10 Air inlet (Outdoor side) 11 Filter handle 12 Filter (Pull the filter handle to the right to remove.) 13 Power cord CONTROL PANEL F hr ! SLEEP COOL TEMP SELECTOR TIMER ON/OFF ENERGY POWER SAVER ON/OFF "# $ 1 Receiver window for remote control signal 2 Display 3 SLEEP indicator 4 SELECTOR pad 5 COOL indicator 6 TEMPERATURE setting...
AF-R100EX , AF-R120EX Operation Manual
Page 11
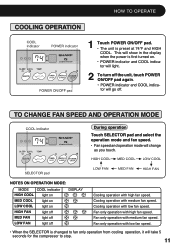
... OPERATE COOLING OPERATION COOL indicator POWER indicator F hr SLEEP COOL TEMP SELECTOR TIMER ON/OFF ENERGY POWER SAVER ON/OFF POWER ON/OFF pad 1 Touch POWER ON/OFF pad. • The unit is first turned on HIGH FAN light off MED FAN light off LOW FAN light off . Fan only operation with medium fan speed. Cooling operation with low fan speed. • When the SELECTOR is changed to fan only operation from cooling operation, it will take 5 seconds for the compressor to stop. 11 Fan only operation...
... OPERATE COOLING OPERATION COOL indicator POWER indicator F hr SLEEP COOL TEMP SELECTOR TIMER ON/OFF ENERGY POWER SAVER ON/OFF POWER ON/OFF pad 1 Touch POWER ON/OFF pad. • The unit is first turned on HIGH FAN light off MED FAN light off LOW FAN light off . Fan only operation with medium fan speed. Cooling operation with low fan speed. • When the SELECTOR is changed to fan only operation from cooling operation, it will take 5 seconds for the compressor to stop. 11 Fan only operation...
AF-R100EX , AF-R120EX Operation Manual
Page 12
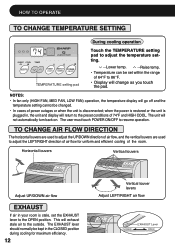
... direction of air flow, and the vertical louvers are used to adjust the LEFT/RIGHT direction of air flow for maximum efficiency. 12 Vertical louver levers Adjust LEFT/RIGHT air flow CLOSED EXHAUST Lever OPEN HOW TO OPERATE TO CHANGE TEMPERATURE SETTING F hr SLEEP COOL TEMP SELECTOR TIMER ON/OFF ENERGY POWER SAVER ON/OFF TEMPERATURE setting pad During cooling operation Touch the TEMPERATURE setting pad to adjust the temperature setting. ---Lower temp. ---Raise temp. • Temperature can be set the EXHAUST...
... direction of air flow, and the vertical louvers are used to adjust the LEFT/RIGHT direction of air flow for maximum efficiency. 12 Vertical louver levers Adjust LEFT/RIGHT air flow CLOSED EXHAUST Lever OPEN HOW TO OPERATE TO CHANGE TEMPERATURE SETTING F hr SLEEP COOL TEMP SELECTOR TIMER ON/OFF ENERGY POWER SAVER ON/OFF TEMPERATURE setting pad During cooling operation Touch the TEMPERATURE setting pad to adjust the temperature setting. ---Lower temp. ---Raise temp. • Temperature can be set the EXHAUST...
AF-R100EX , AF-R120EX Operation Manual
Page 13
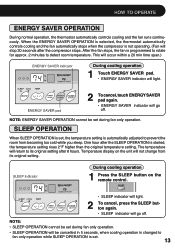
...hr SLEEP COOL TEMP SELECTOR TIMER ON/OFF ENERGY POWER SAVER ON/OFF During cooling operation 1 Press the SLEEP button on the unit will return to fan only operation while SLEEP OPERATION is started, the temperature setting rises 2°F higher than the original temperature setting. The temperature will not change from becoming too cold while you sleep. NOTE: ENERGY SAVER OPERATION cannot be set during fan only operation. • SLEEP OPERATION will stop 30 seconds after the SLEEP OPERATION is set during fan only operation. Temperature display on the remote control. NOTE...
...hr SLEEP COOL TEMP SELECTOR TIMER ON/OFF ENERGY POWER SAVER ON/OFF During cooling operation 1 Press the SLEEP button on the unit will return to fan only operation while SLEEP OPERATION is started, the temperature setting rises 2°F higher than the original temperature setting. The temperature will not change from becoming too cold while you sleep. NOTE: ENERGY SAVER OPERATION cannot be set during fan only operation. • SLEEP OPERATION will stop 30 seconds after the SLEEP OPERATION is set during fan only operation. Temperature display on the remote control. NOTE...
AF-R100EX , AF-R120EX Operation Manual
Page 14
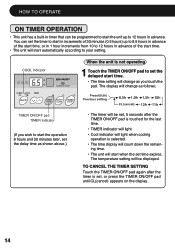
.... • TIMER indicator will light. • Cool indicator will light when cooling operation is not operating 1 Touch the TIMER ON/OFF pad to set , or press the TIMER ON/OFF pad until CL(cancel) appears on the display. 14 COOL indicator F hr SLEEP COOL TEMP SELECTOR TIMER ON/OFF ENERGY POWER SAVER ON/OFF TIMER ON/OFF pad TIMER indicator (If you touch the pad. HOW TO OPERATE ON TIMER OPERATION • This unit has...
.... • TIMER indicator will light. • Cool indicator will light when cooling operation is not operating 1 Touch the TIMER ON/OFF pad to set , or press the TIMER ON/OFF pad until CL(cancel) appears on the display. 14 COOL indicator F hr SLEEP COOL TEMP SELECTOR TIMER ON/OFF ENERGY POWER SAVER ON/OFF TIMER ON/OFF pad TIMER indicator (If you touch the pad. HOW TO OPERATE ON TIMER OPERATION • This unit has...
AF-R100EX , AF-R120EX Operation Manual
Page 15
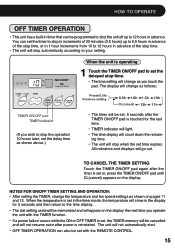
... set with the TIMER function. • If a power failure occurs while the ON or OFF TIMER is set in the timer mode, the temperature will show in the display for the last time. • TIMER indicator will light. • The time display will count down the remaining time. • The unit will change as you operate the unit with the REMOTE CONTROL. 15 HOW TO OPERATE OFF TIMER OPERATION • This unit...
... set with the TIMER function. • If a power failure occurs while the ON or OFF TIMER is set in the timer mode, the temperature will show in the display for the last time. • TIMER indicator will light. • The time display will count down the remaining time. • The unit will change as you operate the unit with the REMOTE CONTROL. 15 HOW TO OPERATE OFF TIMER OPERATION • This unit...

AF-R100EX , AF-R120EX Operation Manual
Page 16
... will not be using the unit for a long time, remove the batteries from up to direct sunlight. CAUTION: • Do not expose the receiver window to 20 feet (6 meters) away. • The beep will also sound when each pad on the control panel is approximately one year with normal use. • When you replace the batteries, always use two new ones of...
... will not be using the unit for a long time, remove the batteries from up to direct sunlight. CAUTION: • Do not expose the receiver window to 20 feet (6 meters) away. • The beep will also sound when each pad on the control panel is approximately one year with normal use. • When you replace the batteries, always use two new ones of...
AF-R100EX , AF-R120EX Operation Manual
Page 17
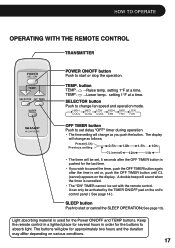
... Power ON/OFF and TEMP buttons. button TEMP. ---Raise temp. SLEEP button Push to change as follows; HOW TO OPERATE OPERATING WITH THE REMOTE CONTROL TRANSMITTER POWER ON / OFF TEMP. HIGH MED LOW HIGH MED LOW COOL COOL COOL FAN FAN FAN AIR CONDITIONER OFF TIMER button Push to set , 5 seconds after the time is cancelled. • The "ON" TIMER cannot be activated by the TIMER ON/OFF pad on the display. The display will change fan speed and operation mode. Keep the remote control in a lighted...
... Power ON/OFF and TEMP buttons. button TEMP. ---Raise temp. SLEEP button Push to change as follows; HOW TO OPERATE OPERATING WITH THE REMOTE CONTROL TRANSMITTER POWER ON / OFF TEMP. HIGH MED LOW HIGH MED LOW COOL COOL COOL FAN FAN FAN AIR CONDITIONER OFF TIMER button Push to set , 5 seconds after the time is cancelled. • The "ON" TIMER cannot be activated by the TIMER ON/OFF pad on the display. The display will change fan speed and operation mode. Keep the remote control in a lighted...
AF-R100EX , AF-R120EX Operation Manual
Page 18
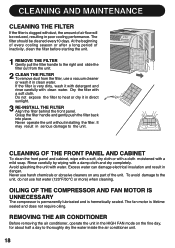
... CABINET To clean the front panel and cabinet, wipe with a soft, dry cloth or with a cloth moistened with a damp cloth and dry completely. REMOVING THE AIR CONDITIONER Before removing the air conditioner, operate the unit in clean water. Never operate the unit without installing the filter. It may result in direct sunlight. 3 RE-INSTALL THE FILTER Align the filter behind the front panel. Excess water can damage electrical insulation and result in poor cooling performance. Rinse...
... CABINET To clean the front panel and cabinet, wipe with a soft, dry cloth or with a cloth moistened with a damp cloth and dry completely. REMOVING THE AIR CONDITIONER Before removing the air conditioner, operate the unit in clean water. Never operate the unit without installing the filter. It may result in direct sunlight. 3 RE-INSTALL THE FILTER Align the filter behind the front panel. Excess water can damage electrical insulation and result in poor cooling performance. Rinse...
AF-R100EX , AF-R120EX Operation Manual
Page 19
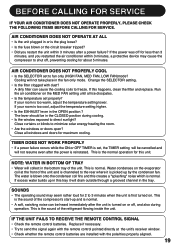
... SERVlCE IF YOUR AIR CONDITIONER DOES NOT OPERATE PROPERLY, PLEASE CHECK THE FOLLOWING ITEMS BEFORE CALLING FOR SERVICE. Change the SELECTOR setting. • Is the filter clogged with the remote control pointed directly at the front of the refrigerant flowing inside the unit. Water condenses on or off for maximum cooling. SOUNDS • The operating sound may cause the compressor to fan only (HIGH FAN, MED FAN, LOW FAN)mode? Replace if necessary. •...
... SERVlCE IF YOUR AIR CONDITIONER DOES NOT OPERATE PROPERLY, PLEASE CHECK THE FOLLOWING ITEMS BEFORE CALLING FOR SERVICE. Change the SELECTOR setting. • Is the filter clogged with the remote control pointed directly at the front of the refrigerant flowing inside the unit. Water condenses on or off for maximum cooling. SOUNDS • The operating sound may cause the compressor to fan only (HIGH FAN, MED FAN, LOW FAN)mode? Replace if necessary. •...

AF-R100EX , AF-R120EX Operation Manual
Page 20
SHARP ELECTRONICS CORPORATION Sharp Plaza, Mahwah, New Jersey 07430-2135 SHARP CORPORATION Osaka, Japan Printed in Thailand TINSEA362JBRZ 03MO TH 1 20
SHARP ELECTRONICS CORPORATION Sharp Plaza, Mahwah, New Jersey 07430-2135 SHARP CORPORATION Osaka, Japan Printed in Thailand TINSEA362JBRZ 03MO TH 1 20


