
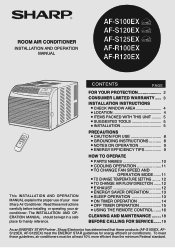
AF-R100EX , AF-R120EX Operation Manual
Page 1
...TEMPERATURE SETTING .......... 12 • TO CHANGE AIR FLOW DIRECTION ....... 12 • EXHAUST 12 • ENERGY SAVER OPERATION 13 • SLEEP OPERATION 13 • ON TIMER OPERATION 14 • OFF TIMER OPERATION 15 • USING THE REMOTE CONTROL ....... 16 CLEANING AND MAINTENANCE ........ 18 BEFORE CALLING FOR SERVlCE ...... 19 As an ENERGY STAR Partner, Sharp Electronics has determined that these products (AF-S100EX, AFS120EX, AF-S125EX) meet these instructions carefully before installing or operating your new Sharp Air Conditioner. Read these guidelines, air conditioners...
...TEMPERATURE SETTING .......... 12 • TO CHANGE AIR FLOW DIRECTION ....... 12 • EXHAUST 12 • ENERGY SAVER OPERATION 13 • SLEEP OPERATION 13 • ON TIMER OPERATION 14 • OFF TIMER OPERATION 15 • USING THE REMOTE CONTROL ....... 16 CLEANING AND MAINTENANCE ........ 18 BEFORE CALLING FOR SERVlCE ...... 19 As an ENERGY STAR Partner, Sharp Electronics has determined that these products (AF-S100EX, AFS120EX, AF-S125EX) meet these instructions carefully before installing or operating your new Sharp Air Conditioner. Read these guidelines, air conditioners...
AF-R100EX , AF-R120EX Operation Manual
Page 2
...: For service problems, warranty information, missing items and other assistance: Sharp Electronics Corporation Customer Assistance Center 1300 Naperville Drive Romeoville, IL 60446-1091 Please provide the following information when you write or call: model number, serial number, date of purchase, your complete mailing address (including zip code), your nearest Sharp Authorized Servicer) PARTS (for reporting loss or theft, please record below the model and serial number located on...
...: For service problems, warranty information, missing items and other assistance: Sharp Electronics Corporation Customer Assistance Center 1300 Naperville Drive Romeoville, IL 60446-1091 Please provide the following information when you write or call: model number, serial number, date of purchase, your complete mailing address (including zip code), your nearest Sharp Authorized Servicer) PARTS (for reporting loss or theft, please record below the model and serial number located on...
AF-R100EX , AF-R120EX Operation Manual
Page 3
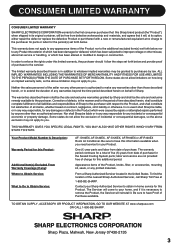
..., mounting kit, seals, or any warranties beyond the time period described herein on contract, negligence, strict liability or otherwise. S100EX, AF-S120EX, AF-S125EX, AF-R100EX or AF-R120EX Room Air Conditioner. TO OBTAIN SUPPLY, ACCESSORY OR PRODUCT INFORMATION, GO TO OUR WEBSITE AT www.sharpusa.com OR CALL 1-800-BE-SHARP. Neither the sales personnel of the nearest Sharp Authorized Servicer, call Sharp Toll Free at...
..., mounting kit, seals, or any warranties beyond the time period described herein on contract, negligence, strict liability or otherwise. S100EX, AF-S120EX, AF-S125EX, AF-R100EX or AF-R120EX Room Air Conditioner. TO OBTAIN SUPPLY, ACCESSORY OR PRODUCT INFORMATION, GO TO OUR WEBSITE AT www.sharpusa.com OR CALL 1-800-BE-SHARP. Neither the sales personnel of the nearest Sharp Authorized Servicer, call Sharp Toll Free at...
AF-R100EX , AF-R120EX Operation Manual
Page 4
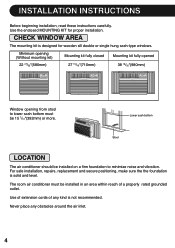
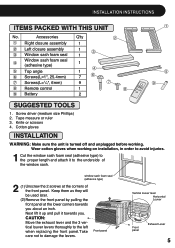
... safe installation, repairs, replacement and secure positioning, make sure the the foundation is not recommended. Use the enclosed MOUNTING KIT for wooden sill double or single hung sash-type windows. Lower sash bottom Stool LOCATION The air conditioner should be 15 7/16"(392mm) or more. Use of extension cords of a properly rated grounded outlet. INSTALLATION INSTRUCTIONS Before beginning installation, read these instructions carefully. CHECK WINDOW AREA The mounting kit is designed...
... safe installation, repairs, replacement and secure positioning, make sure the the foundation is not recommended. Use the enclosed MOUNTING KIT for wooden sill double or single hung sash-type windows. Lower sash bottom Stool LOCATION The air conditioner should be 15 7/16"(392mm) or more. Use of extension cords of a properly rated grounded outlet. INSTALLATION INSTRUCTIONS Before beginning installation, read these instructions carefully. CHECK WINDOW AREA The mounting kit is designed...
AF-R100EX , AF-R120EX Operation Manual
Page 5
INSTALLATION INSTRUCTIONS ITEMS PACKED WITH THIS UNIT No. Accessories Q'ty 1 Right closure assembly 1 2 Left closure assembly 1 ! 3 Window sash foam seal 1 Window sash foam seal 4 (adhesive type) 1 " 5 Top angle 1 6 Screws(L=1", 25.4mm) 7 $ 7 Screws(L=1/4", 6mm) 9 % 8 Remote control 1 & 9 Battery 2 5 ' SUGGESTED TOOLS 1. Wear cotton gloves when working . Next lift it up and pull it to the underside of the front panel. window sash foam seal (adhesive...
INSTALLATION INSTRUCTIONS ITEMS PACKED WITH THIS UNIT No. Accessories Q'ty 1 Right closure assembly 1 2 Left closure assembly 1 ! 3 Window sash foam seal 1 Window sash foam seal 4 (adhesive type) 1 " 5 Top angle 1 6 Screws(L=1", 25.4mm) 7 $ 7 Screws(L=1/4", 6mm) 9 % 8 Remote control 1 & 9 Battery 2 5 ' SUGGESTED TOOLS 1. Wear cotton gloves when working . Next lift it up and pull it to the underside of the front panel. window sash foam seal (adhesive...
AF-R100EX , AF-R120EX Operation Manual
Page 6
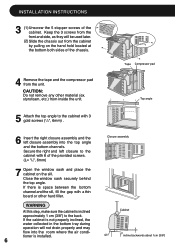
Secure the right and left closure assembly into the room where the air conditioner is space between the bottom channel and the sill, fill the gap with a thin board or other material (ex. If there is installed. 6 Closure assembly Cabinet sill incline backwards about 1cm (3/8") If the cabinet...top angle. CAUTION: Do not remove any other hard filler. INSTALLATION INSTRUCTIONS 3 (1)Unscrew the 5 stopper screws of the chassis. 4 Remove the tape and the compressor pad from inside the unit. Keep the 3 screws from the front and side, as they will not drain properly and may flow into ...
Secure the right and left closure assembly into the room where the air conditioner is space between the bottom channel and the sill, fill the gap with a thin board or other material (ex. If there is installed. 6 Closure assembly Cabinet sill incline backwards about 1cm (3/8") If the cabinet...top angle. CAUTION: Do not remove any other hard filler. INSTALLATION INSTRUCTIONS 3 (1)Unscrew the 5 stopper screws of the chassis. 4 Remove the tape and the compressor pad from inside the unit. Keep the 3 screws from the front and side, as they will not drain properly and may flow into ...
AF-R100EX , AF-R120EX Operation Manual
Page 7
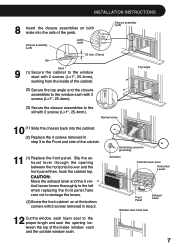
...the cabinet . 11 (1) Replace the front panel. Slip the exhaust lever through the opening between the horizontal louver and the front panel then, hook the cabinet top. Serration Vertical louver lever Horizontal Louver Front Panel Exhaust Lever Window sash foam seal 7 ...window stool with 2 screws (L=1", 25.4mm), working from the inside window sash and the outside window sash. Closure assembly (Left) Jamb (Left) Indoor side 1/2 inch (13mm) Sill Stool 9 (1) Secure the cabinet to the sill with 2 screws (L=1", 25.4mm). Scratching screw for grounding. INSTALLATION INSTRUCTIONS...
...the cabinet . 11 (1) Replace the front panel. Slip the exhaust lever through the opening between the horizontal louver and the front panel then, hook the cabinet top. Serration Vertical louver lever Horizontal Louver Front Panel Exhaust Lever Window sash foam seal 7 ...window stool with 2 screws (L=1", 25.4mm), working from the inside window sash and the outside window sash. Closure assembly (Left) Jamb (Left) Indoor side 1/2 inch (13mm) Sill Stool 9 (1) Secure the cabinet to the sill with 2 screws (L=1", 25.4mm). Scratching screw for grounding. INSTALLATION INSTRUCTIONS...
AF-R100EX , AF-R120EX Operation Manual
Page 8
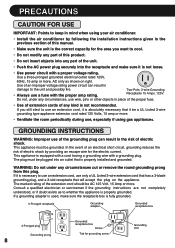
... cool. • Do not modify any part of the extension cord should be a UL Listed 3-wire grounding type appliance extension cord rated 125 Volts, 15 amp or more. • Ventilate the room periodically during use, especially if using your air conditioner. • Install the air conditioner by providing an escape wire for grounding screw Grounding wire In the event of an electrical short circuit, grounding reduces the risk of electric shock. The plug...
... cool. • Do not modify any part of the extension cord should be a UL Listed 3-wire grounding type appliance extension cord rated 125 Volts, 15 amp or more. • Ventilate the room periodically during use, especially if using your air conditioner. • Install the air conditioner by providing an escape wire for grounding screw Grounding wire In the event of an electrical short circuit, grounding reduces the risk of electric shock. The plug...
AF-R100EX , AF-R120EX Operation Manual
Page 9
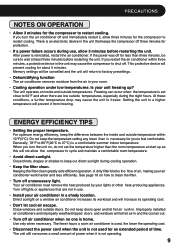
... air conditioner must remove the heat produced by your air conditioner work harder and less efficiently. At these conditions, a further temperature drop may cause the compressor to wait at start up ? Setting the unit to cycle and maintain a comfortable room temperature. • Avoid direct sunlight. Do not keep the difference between the inside and outside temperature within three minutes, a protective device in your room. • Cooling operation under low temperatures: Is your air conditioner...
... air conditioner must remove the heat produced by your air conditioner work harder and less efficiently. At these conditions, a further temperature drop may cause the compressor to wait at start up ? Setting the unit to cycle and maintain a comfortable room temperature. • Avoid direct sunlight. Do not keep the difference between the inside and outside temperature within three minutes, a protective device in your room. • Cooling operation under low temperatures: Is your air conditioner...
AF-R100EX , AF-R120EX Operation Manual
Page 10
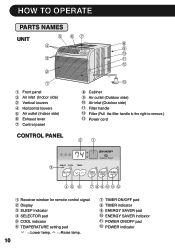
...TO OPERATE PARTS NAMES UNIT 5 67 4 8 9 10 3 11 12 2 1 1 Front panel 2 Air inlet (Indoor side) 3 Vertical louvers 4 Horizontal louvers 5 Air outlet (Indoor side) 6 Exhaust lever 7 Control panel 13 8 Cabinet 9 Air outlet (Outdoor side) 10 Air inlet (Outdoor side) 11 Filter handle 12 Filter (Pull the filter handle to the right to remove.) 13 Power cord CONTROL PANEL F hr ! SLEEP COOL TEMP SELECTOR TIMER ON/OFF ENERGY POWER SAVER ON/OFF "# $ 1 Receiver window for remote control signal 2 Display 3 SLEEP indicator 4 SELECTOR pad 5 COOL indicator 6 TEMPERATURE setting...
...TO OPERATE PARTS NAMES UNIT 5 67 4 8 9 10 3 11 12 2 1 1 Front panel 2 Air inlet (Indoor side) 3 Vertical louvers 4 Horizontal louvers 5 Air outlet (Indoor side) 6 Exhaust lever 7 Control panel 13 8 Cabinet 9 Air outlet (Outdoor side) 10 Air inlet (Outdoor side) 11 Filter handle 12 Filter (Pull the filter handle to the right to remove.) 13 Power cord CONTROL PANEL F hr ! SLEEP COOL TEMP SELECTOR TIMER ON/OFF ENERGY POWER SAVER ON/OFF "# $ 1 Receiver window for remote control signal 2 Display 3 SLEEP indicator 4 SELECTOR pad 5 COOL indicator 6 TEMPERATURE setting...
AF-R100EX , AF-R120EX Operation Manual
Page 11
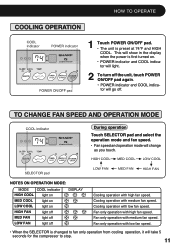
... changed to fan only operation from cooling operation, it will take 5 seconds for the compressor to stop. 11 This will show in the display when the power is first turned on HIGH FAN light off MED FAN light off LOW FAN light off . Fan only operation with low fan speed. • When the SELECTOR is preset at 74°F and HIGH COOL. TO CHANGE FAN SPEED AND OPERATION MODE COOL indicator F hr SLEEP COOL TEMP SELECTOR TIMER ENERGY POWER ON/OFF SAVER...
... changed to fan only operation from cooling operation, it will take 5 seconds for the compressor to stop. 11 This will show in the display when the power is first turned on HIGH FAN light off MED FAN light off LOW FAN light off . Fan only operation with low fan speed. • When the SELECTOR is preset at 74°F and HIGH COOL. TO CHANGE FAN SPEED AND OPERATION MODE COOL indicator F hr SLEEP COOL TEMP SELECTOR TIMER ENERGY POWER ON/OFF SAVER...
AF-R100EX , AF-R120EX Operation Manual
Page 12
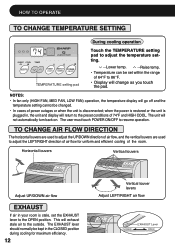
... resume operation. The EXHAUST lever should normally be kept in your room is disconnected; NOTES: • In fan only (HIGH FAN, MED FAN, LOW FAN) operation, the temperature display will exhaust stale air to the outside. HOW TO OPERATE TO CHANGE TEMPERATURE SETTING F hr SLEEP COOL TEMP SELECTOR TIMER ON/OFF ENERGY POWER SAVER ON/OFF TEMPERATURE setting pad During cooling operation Touch the TEMPERATURE setting pad to adjust the temperature setting. ---Lower temp. ---Raise temp. • Temperature can be set the EXHAUST lever to the OPEN...
... resume operation. The EXHAUST lever should normally be kept in your room is disconnected; NOTES: • In fan only (HIGH FAN, MED FAN, LOW FAN) operation, the temperature display will exhaust stale air to the outside. HOW TO OPERATE TO CHANGE TEMPERATURE SETTING F hr SLEEP COOL TEMP SELECTOR TIMER ON/OFF ENERGY POWER SAVER ON/OFF TEMPERATURE setting pad During cooling operation Touch the TEMPERATURE setting pad to adjust the temperature setting. ---Lower temp. ---Raise temp. • Temperature can be set the EXHAUST lever to the OPEN...
AF-R100EX , AF-R120EX Operation Manual
Page 13
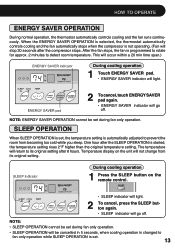
... controls cooling and the fan automatically stops when the compressor is started, the temperature setting rises 2°F higher than the original temperature setting. HOW TO OPERATE ENERGY SAVER OPERATION During normal operation, the thermostat automatically controls cooling and the fan runs continuously. This will occur within a 20 min time span.) ENERGY SAVER indicator F hr SLEEP COOL TEMP SELECTOR TIMER ENERGY POWER ON/OFF SAVER ON/OFF ENERGY SAVER pad During cooling operation 1 Touch ENERGY SAVER pad. • ENERGY SAVER indicator will light. 2 To cancel, touch ENERGY SAVER...
... controls cooling and the fan automatically stops when the compressor is started, the temperature setting rises 2°F higher than the original temperature setting. HOW TO OPERATE ENERGY SAVER OPERATION During normal operation, the thermostat automatically controls cooling and the fan runs continuously. This will occur within a 20 min time span.) ENERGY SAVER indicator F hr SLEEP COOL TEMP SELECTOR TIMER ENERGY POWER ON/OFF SAVER ON/OFF ENERGY SAVER pad During cooling operation 1 Touch ENERGY SAVER pad. • ENERGY SAVER indicator will light. 2 To cancel, touch ENERGY SAVER...
AF-R100EX , AF-R120EX Operation Manual
Page 14
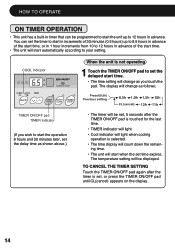
... time. • TIMER indicator will light. • Cool indicator will light when cooling operation is not operating 1 Touch the TIMER ON/OFF pad to 12 hours in advance of the start when the set , or press the TIMER ON/OFF pad until CL(cancel) appears on the display. 14 COOL indicator F hr SLEEP COOL TEMP SELECTOR TIMER ON/OFF ENERGY POWER SAVER ON/OFF TIMER ON/OFF pad TIMER indicator (If you...
... time. • TIMER indicator will light. • Cool indicator will light when cooling operation is not operating 1 Touch the TIMER ON/OFF pad to 12 hours in advance of the start when the set , or press the TIMER ON/OFF pad until CL(cancel) appears on the display. 14 COOL indicator F hr SLEEP COOL TEMP SELECTOR TIMER ON/OFF ENERGY POWER SAVER ON/OFF TIMER ON/OFF pad TIMER indicator (If you...
AF-R100EX , AF-R120EX Operation Manual
Page 15
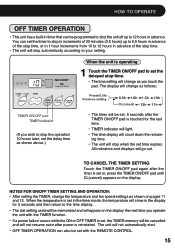
.... F hr SLEEP COOL TEMP SELECTOR TIMER ON/OFF ENERGY POWER SAVER ON/OFF TIMER ON/OFF pad TIMER indicator (If you touch the pad. NOTES FOR ON/OFF TIMER SETTING AND OPERATION: • After setting the TIMER, change as shown on pages 11 and 12. The unit will not automatically start. • OFF TIMER OPERATION can set the timer to stop in increments of 30 minutes (0.5 hours) up to the time display. •...
.... F hr SLEEP COOL TEMP SELECTOR TIMER ON/OFF ENERGY POWER SAVER ON/OFF TIMER ON/OFF pad TIMER indicator (If you touch the pad. NOTES FOR ON/OFF TIMER SETTING AND OPERATION: • After setting the TIMER, change as shown on pages 11 and 12. The unit will not automatically start. • OFF TIMER OPERATION can set the timer to stop in increments of 30 minutes (0.5 hours) up to the time display. •...

AF-R100EX , AF-R120EX Operation Manual
Page 16
... after 30 seconds. • If you replace the batteries, always use two new ones of a fluorescent lamp in the same room. • Do not leave the remote control exposed to direct sunlight. Battery compartment cover NOTES: • The battery life is touched. HOW TO OPERATE USING THE REMOTE CONTROL INSTALLING BATTERIES Use two size-AA (R6) batteries. 1 Open the battery compartment cover. 2 Insert and slide the batteries...
... after 30 seconds. • If you replace the batteries, always use two new ones of a fluorescent lamp in the same room. • Do not leave the remote control exposed to direct sunlight. Battery compartment cover NOTES: • The battery life is touched. HOW TO OPERATE USING THE REMOTE CONTROL INSTALLING BATTERIES Use two size-AA (R6) batteries. 1 Open the battery compartment cover. 2 Insert and slide the batteries...
AF-R100EX , AF-R120EX Operation Manual
Page 17
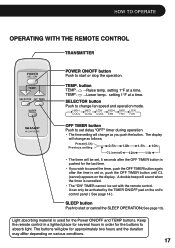
... set or, push the OFF TIMER button until CL (cancel) appears on the unit's control panel ( See page 14 ). SLEEP button Push to start or cancel the SLEEP OPERATION( See page 13). Light absorbing material is pushed for the Power ON/OFF and TEMP buttons. SELECTOR button Push to absorb light. A double beep will change fan speed and operation mode. TEMP. The buttons will be activated by the TIMER ON/OFF pad on the display. setting...
... set or, push the OFF TIMER button until CL (cancel) appears on the unit's control panel ( See page 14 ). SLEEP button Push to start or cancel the SLEEP OPERATION( See page 13). Light absorbing material is pushed for the Power ON/OFF and TEMP buttons. SELECTOR button Push to absorb light. A double beep will change fan speed and operation mode. TEMP. The buttons will be activated by the TIMER ON/OFF pad on the display. setting...
AF-R100EX , AF-R120EX Operation Manual
Page 18
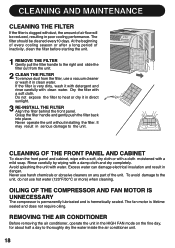
... filter out from the unit. 2 CLEAN THE FILTER To remove dust from the filter, use a vacuum cleaner or wash it with detergent and rinse carefully with clean water. The fan motor is hermetically sealed. Dry the filter with a damp cloth and dry completely. It may result in direct sunlight. 3 RE-INSTALL THE FILTER Align the filter behind the front panel. Excess water can damage electrical insulation and result in the HIGH FAN mode...
... filter out from the unit. 2 CLEAN THE FILTER To remove dust from the filter, use a vacuum cleaner or wash it with detergent and rinse carefully with clean water. The fan motor is hermetically sealed. Dry the filter with a damp cloth and dry completely. It may result in direct sunlight. 3 RE-INSTALL THE FILTER Align the filter behind the front panel. Excess water can damage electrical insulation and result in the HIGH FAN mode...
AF-R100EX , AF-R120EX Operation Manual
Page 19
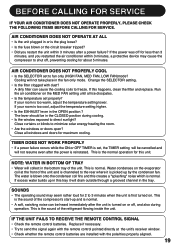
..., adjust the temperature setting lower. If your room is turned on the MED FAN setting until all windows and doors for this creates a "splashing" noise which is the plug loose? • Is the fuse blown or the circuit breaker tripped? • Did you restarted the air conditioner within 3 minutes after the power is too cool, adjust the temperature setting higher. • Is the EXHAUST lever in the OPEN position.? Water condenses on...
..., adjust the temperature setting lower. If your room is turned on the MED FAN setting until all windows and doors for this creates a "splashing" noise which is the plug loose? • Is the fuse blown or the circuit breaker tripped? • Did you restarted the air conditioner within 3 minutes after the power is too cool, adjust the temperature setting higher. • Is the EXHAUST lever in the OPEN position.? Water condenses on...

AF-R100EX , AF-R120EX Operation Manual
Page 20
SHARP ELECTRONICS CORPORATION Sharp Plaza, Mahwah, New Jersey 07430-2135 SHARP CORPORATION Osaka, Japan Printed in Thailand TINSEA362JBRZ 03MO TH 1 20
SHARP ELECTRONICS CORPORATION Sharp Plaza, Mahwah, New Jersey 07430-2135 SHARP CORPORATION Osaka, Japan Printed in Thailand TINSEA362JBRZ 03MO TH 1 20


