

Owners Manual
Page 2
... Light Window or shine the laser beam on pages 35 ~ 36 and try to provide reasonable protection against harmful interference when the equipment is a safety feature to Part 15 of a new Multimedia Projector, you with the limits for each problem. If not, It may result. REFER SERVICING TO QUALIFIED SERVICE PERSONNEL. They were caused by problems with our projectors. The Remote Control Unit, supplied...
... Light Window or shine the laser beam on pages 35 ~ 36 and try to provide reasonable protection against harmful interference when the equipment is a safety feature to Part 15 of a new Multimedia Projector, you with the limits for each problem. If not, It may result. REFER SERVICING TO QUALIFIED SERVICE PERSONNEL. They were caused by problems with our projectors. The Remote Control Unit, supplied...

Owners Manual
Page 3
... operating instructions should be read before cleaning. Do not expose this indicates a need for long periods of the cabinet are required, be sure the service technician has used replacement parts specified by a qualified technician to restore the projector to the projector during a lightning storm, or when it from AC power supply before the product is damaged or frayed. When the projector exhibits a distinct change...
... operating instructions should be read before cleaning. Do not expose this indicates a need for long periods of the cabinet are required, be sure the service technician has used replacement parts specified by a qualified technician to restore the projector to the projector during a lightning storm, or when it from AC power supply before the product is damaged or frayed. When the projector exhibits a distinct change...

Owners Manual
Page 4
... 14 14 SETTING 31 REMOTE CONTROL BATTERIES INSTALLATION 15 TOP CONTROLS AND INDICATORS 16 SETTING MENU 31 OPERATING ON-SCREEN MENU 17 SETTING LANGUAGE 31 HOW TO OPERATE THE ON-SCREEN MENU 17 FLOW OF ON-SCREEN MENU 17 MENU BAR 18 APPENDIX 32 BASIC OPERATION 19 OPERATING WIRELESS MOUSE 32 MAINTENANCE 33 TURNING ON / OFF THE PROJECTOR 19 TEMPERATURE WARNING INDICATOR 33 ADJUSTING THE IMAGE 20 AIR FILTER CARE AND CLEANING CLEANING THE PROJECTION LENS 33 33 ZOOM ADJUSTMENT 20 LAMP REPLACEMENT 34 FOCUS ADJUSTMENT 20 LAMP REPLACEMENT MONITOR TIMER 34 KEY...
... 14 14 SETTING 31 REMOTE CONTROL BATTERIES INSTALLATION 15 TOP CONTROLS AND INDICATORS 16 SETTING MENU 31 OPERATING ON-SCREEN MENU 17 SETTING LANGUAGE 31 HOW TO OPERATE THE ON-SCREEN MENU 17 FLOW OF ON-SCREEN MENU 17 MENU BAR 18 APPENDIX 32 BASIC OPERATION 19 OPERATING WIRELESS MOUSE 32 MAINTENANCE 33 TURNING ON / OFF THE PROJECTOR 19 TEMPERATURE WARNING INDICATOR 33 ADJUSTING THE IMAGE 20 AIR FILTER CARE AND CLEANING CLEANING THE PROJECTION LENS 33 33 ZOOM ADJUSTMENT 20 LAMP REPLACEMENT 34 FOCUS ADJUSTMENT 20 LAMP REPLACEMENT MONITOR TIMER 34 KEY...
Owners Manual
Page 5
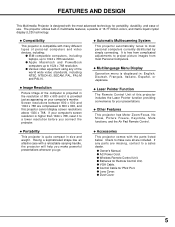
... ease of the computer is free from complicated adjustments to a sales dealer. q Batteries for PS/2 Port. q AC Power Cord. q Dust Cover 5 x Image Resolution Picture Image of use. It is projected in size and weight. x Other Features This projector has Motor Zoom/Focus, No Show, Picture Freeze, Keystone, Mute functions, and the Air Pad Remote Control. Having a sophisticated shape like an attaché case with a retractable carrying handle, the projector will help you connect the projector.
... ease of the computer is free from complicated adjustments to a sales dealer. q Batteries for PS/2 Port. q AC Power Cord. q Dust Cover 5 x Image Resolution Picture Image of use. It is projected in size and weight. x Other Features This projector has Motor Zoom/Focus, No Show, Picture Freeze, Keystone, Mute functions, and the Air Pad Remote Control. Having a sophisticated shape like an attaché case with a retractable carrying handle, the projector will help you connect the projector.

Owners Manual
Page 6
... will become hot while the projector is hot. LAMP COVER 6 CARRY HANDLE SPEAKER (Monaural) INFRARED REMOTE RECEIVER ADJUSTABLE FEET AND FEET LOCK LATCHES Air blown from the exhaust vent. PREPARATION NAME OF EACH PART OF THE PROJECTOR FRONT OF THE CABINET PROJECTION LENS LENS COVER INFRARED REMOTE RECEIVER BACK OF THE CABINET EXHAUST VENT HOT AIR EXHAUSTED ! When using or installing the projector, following attention should not be...
... will become hot while the projector is hot. LAMP COVER 6 CARRY HANDLE SPEAKER (Monaural) INFRARED REMOTE RECEIVER ADJUSTABLE FEET AND FEET LOCK LATCHES Air blown from the exhaust vent. PREPARATION NAME OF EACH PART OF THE PROJECTOR FRONT OF THE CABINET PROJECTION LENS LENS COVER INFRARED REMOTE RECEIVER BACK OF THE CABINET EXHAUST VENT HOT AIR EXHAUSTED ! When using or installing the projector, following attention should not be...

Owners Manual
Page 8
... of 100-120 V AC. Connect the AC power supply cord (supplied) to the outlet with single-phase power systems having a grounded neutral conductor. Connect the projector with the peripheral equipment before turning the projector on. (Refer to work with the AC Power Cord, the appliance is not in Stand-by Mode and consumes some electric power. Obstructions may block cooling air. When this equipment and must...
... of 100-120 V AC. Connect the AC power supply cord (supplied) to the outlet with single-phase power systems having a grounded neutral conductor. Connect the projector with the peripheral equipment before turning the projector on. (Refer to work with the AC Power Cord, the appliance is not in Stand-by Mode and consumes some electric power. Obstructions may block cooling air. When this equipment and must...

Owners Manual
Page 10
... projector with the Control Cable (the Control Cable for PS/2 port is supplied). Pin Configuration 54 32 1 10 9 8 7 6 15 14 13 12 11 1 Red Input 9 Non Connect 2 Green Input 10 Ground (Vert.sync.) 3 Blue Input 11 Sense 0 4 Sense 2 12 Sense 1 5 Ground (Horiz.sync.) 13 Horiz. Serial R X D --------GND RTS T X D GND GND ADB ----ADB ----GND GND 10 When connecting the Macintosh computer, the MAC Adapter (not supplied) is required. sync. 7 Ground (Green) 15 Reserved 8 Ground (Blue) CONTROL PORT...
... projector with the Control Cable (the Control Cable for PS/2 port is supplied). Pin Configuration 54 32 1 10 9 8 7 6 15 14 13 12 11 1 Red Input 9 Non Connect 2 Green Input 10 Ground (Vert.sync.) 3 Blue Input 11 Sense 0 4 Sense 2 12 Sense 1 5 Ground (Horiz.sync.) 13 Horiz. Serial R X D --------GND RTS T X D GND GND ADB ----ADB ----GND GND 10 When connecting the Macintosh computer, the MAC Adapter (not supplied) is required. sync. 7 Ground (Green) 15 Reserved 8 Ground (Blue) CONTROL PORT...

Owners Manual
Page 14
... on the remote control. When using the Remote Control Unit, turn this switch to "ON" and turn the projector on or off . CAUTION : Use of controls or adjustments or performance of this button within 1 minute. Laser Light Window 14 LASER KEYSTONE NO SHOW FREEZE AUTO IMAGE NORMAL POWER ON-OFF BUTTON Used to turn it "ALL OFF" when it again. When the LASER button is also used as a PC mouse in Wireless Mouse Operation. (P32) Laser...
... on the remote control. When using the Remote Control Unit, turn this switch to "ON" and turn the projector on or off . CAUTION : Use of controls or adjustments or performance of this button within 1 minute. Laser Light Window 14 LASER KEYSTONE NO SHOW FREEZE AUTO IMAGE NORMAL POWER ON-OFF BUTTON Used to turn it "ALL OFF" when it again. When the LASER button is also used as a PC mouse in Wireless Mouse Operation. (P32) Laser...

Owners Manual
Page 16
...projector is also used to pan the image in DIGITAL ZOOM mode. (P28) POINT BUTTONS Used to operate AUTO IMAGE function. (P27) 16 LAMP REPLACE LAMP REPLACE INDICATOR This indicator turns to yellow when the life of the projection lamp draws to an end. (P34) MENU BUTTON Used to open or close the MENU operation. (P17, 18) ZOOM FOCUS VOLUME ON-OFF MENU MODE SELECT AUTO IMAGE NORMAL ZOOM BUTTONS Used to select zoom adjust. (P20) FOCUS BUTTONS Used to select focus adjust. (P20) VOLUME BUTTONS Used to adjust volume. (P21) MODE BUTTON Used to select input source either Computer or Video...
...projector is also used to pan the image in DIGITAL ZOOM mode. (P28) POINT BUTTONS Used to operate AUTO IMAGE function. (P27) 16 LAMP REPLACE LAMP REPLACE INDICATOR This indicator turns to yellow when the life of the projection lamp draws to an end. (P34) MENU BUTTON Used to open or close the MENU operation. (P17, 18) ZOOM FOCUS VOLUME ON-OFF MENU MODE SELECT AUTO IMAGE NORMAL ZOOM BUTTONS Used to select zoom adjust. (P20) FOCUS BUTTONS Used to select focus adjust. (P20) VOLUME BUTTONS Used to adjust volume. (P21) MODE BUTTON Used to select input source either Computer or Video...

Owners Manual
Page 18
...) SCREEN MENU Used to adjust the size of the image either Regular or Wide, or to correct the Keystone distortion. (Refer to P31) MENU BAR IN VIDEO MODE Press MENU BUTTON while in Video mode. MODE MENU Used to select the Computer input mode. (Refer to P22) AUTO IMAGE MENU Used to adjust Fine sync., Total dots, and Picture Position automatically. (Refer to P27) PC ADJUST MENU Used to adjust the parameters to match with the input signal format. (Refer to P24, 25) SETTING MENU Used...
...) SCREEN MENU Used to adjust the size of the image either Regular or Wide, or to correct the Keystone distortion. (Refer to P31) MENU BAR IN VIDEO MODE Press MENU BUTTON while in Video mode. MODE MENU Used to select the Computer input mode. (Refer to P22) AUTO IMAGE MENU Used to adjust Fine sync., Total dots, and Picture Position automatically. (Refer to P27) PC ADJUST MENU Used to adjust the parameters to match with the input signal format. (Refer to P24, 25) SETTING MENU Used...
Owners Manual
Page 19
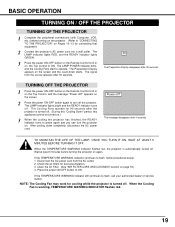
... LAMP POWER indicator dims, and the Cooling Fans start to flash, call your authorized dealer or service station. The signal from the AC outlet. 2. Check the air filters for connecting that equipment. 2 Connect the projector's AC power cord into a wall outlet. BASIC OPERATION TURNING ON / OFF THE PROJECTOR TURNING OF THE PROJECTOR 1 Complete the peripheral connections (with Computer, VCR, etc.) before turning the projector on again. The LAMP indicator lights RED, and the READY indicator lights GREEN. 3 Press the power ON-OFF button...
... LAMP POWER indicator dims, and the Cooling Fans start to flash, call your authorized dealer or service station. The signal from the AC outlet. 2. Check the air filters for connecting that equipment. 2 Connect the projector's AC power cord into a wall outlet. BASIC OPERATION TURNING ON / OFF THE PROJECTOR TURNING OF THE PROJECTOR 1 Complete the peripheral connections (with Computer, VCR, etc.) before turning the projector on again. The LAMP indicator lights RED, and the READY indicator lights GREEN. 3 Press the power ON-OFF button...
Owners Manual
Page 22
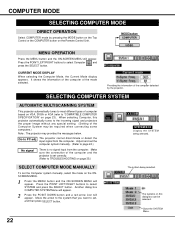
... page 24.) No signal There is set , and then press SELECT button. MENU OPERATION Press the MENU button and the ON-SCREEN MENU will appear. Make sure the connection of the mode selected. Close the SYSTEM Menu. 22 COMPUTER MODE SELECTING COMPUTER MODE DIRECT OPERATION Select COMPUTER mode by the projector. Press the POINT LEFT/RIGHT buttons to "COMPATIBLE COMPUTER SPECIFICATION" on page 35.) SYSTEM BOX Display the SYSTEM being...
... page 24.) No signal There is set , and then press SELECT button. MENU OPERATION Press the MENU button and the ON-SCREEN MENU will appear. Make sure the connection of the mode selected. Close the SYSTEM Menu. 22 COMPUTER MODE SELECTING COMPUTER MODE DIRECT OPERATION Select COMPUTER mode by the projector. Press the POINT LEFT/RIGHT buttons to "COMPATIBLE COMPUTER SPECIFICATION" on page 35.) SYSTEM BOX Display the SYSTEM being...

Owners Manual
Page 28
... button and a red-arrow icon will appear. Keystone When the image is distorted vertically, select Keystone in the dialog box. The ON-SCREEN menu and SCREEN ADJUST menu disappears and the message "Keystone" is used. 28 Refer to KEYSTONE ADJUSTMENT on the Remote Control Unit. Compress function To compress the image size, press the D.ZOOM w button or the RIGHT CLICK button. To adjust the image to select SCREEN and press the SELECT button. q The normal "Panning Operation...
... button and a red-arrow icon will appear. Keystone When the image is distorted vertically, select Keystone in the dialog box. The ON-SCREEN menu and SCREEN ADJUST menu disappears and the message "Keystone" is used. 28 Refer to KEYSTONE ADJUSTMENT on the Remote Control Unit. Compress function To compress the image size, press the D.ZOOM w button or the RIGHT CLICK button. To adjust the image to select SCREEN and press the SELECT button. q The normal "Panning Operation...

Owners Manual
Page 31
...-down Display) q Mode Display q Volume/Mute Display q Zoom Display q Focus Display q Normal Display q No show Display q Keystone Display q D.Zoom Display Ceiling When this function is in the "On" position, the On- When replacing the lamp, reset the lamp replacement monitor timer by using this projector will appear. Press POINT LEFT/RIGHT buttons to reset the lamp replacement monitor timer. Press the POINT LEFT/RIGHT buttons to set it "On" or "Off". The picture will appear. SETTING SETTING MENU 1 Press the MENU button and the ON-SCREEN MENU will change...
...-down Display) q Mode Display q Volume/Mute Display q Zoom Display q Focus Display q Normal Display q No show Display q Keystone Display q D.Zoom Display Ceiling When this function is in the "On" position, the On- When replacing the lamp, reset the lamp replacement monitor timer by using this projector will appear. Press POINT LEFT/RIGHT buttons to reset the lamp replacement monitor timer. Press the POINT LEFT/RIGHT buttons to set it "On" or "Off". The picture will appear. SETTING SETTING MENU 1 Press the MENU button and the ON-SCREEN MENU will change...

Owners Manual
Page 32
.... INSTALLATION To use the Wireless Remote Control Unit as the right button in a PC mouse. The POINT buttons and the two CLICK buttons are pressing. Make sure that the mouse port of the computer connected to Control Port is activated. 1 Connect the mouse port of your computer to the Control Port of the projector with the Control Cable for Serial Port. When the menu or the indicator of the projector is displayed on the Wireless Remote Control Unit. OPERATING WIRELESS...
.... INSTALLATION To use the Wireless Remote Control Unit as the right button in a PC mouse. The POINT buttons and the two CLICK buttons are pressing. Make sure that the mouse port of the computer connected to Control Port is activated. 1 Connect the mouse port of your computer to the Control Port of the projector with the Control Cable for Serial Port. When the menu or the indicator of the projector is displayed on the Wireless Remote Control Unit. OPERATING WIRELESS...

Owners Manual
Page 33
... Air Filter removed. Make sure that the ventilation slots are not obstructed. 2 Air filters are noticed, contact your authorized dealer or service station for operating the projector. The Air Filter is not in these steps to clean the projection lens: 1 Apply a non-abrasive camera lens cleaner to flash, check the item listed below . 3 If the TEMPERATURE WARNING Indicator remains on the life of the projector. Using in use, replace the lens cover. 33 APPENDIX MAINTENANCE TEMPERATURE WARNING INDICATOR The TEMPERATURE WARNING Indicator flashes red...
... Air Filter removed. Make sure that the ventilation slots are not obstructed. 2 Air filters are noticed, contact your authorized dealer or service station for operating the projector. The Air Filter is not in these steps to clean the projection lens: 1 Apply a non-abrasive camera lens cleaner to flash, check the item listed below . 3 If the TEMPERATURE WARNING Indicator remains on the life of the projector. Using in use, replace the lens cover. 33 APPENDIX MAINTENANCE TEMPERATURE WARNING INDICATOR The TEMPERATURE WARNING Indicator flashes red...
Owners Manual
Page 34
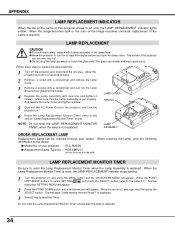
... a screw. information to reset the Timer. q Model No. is replaced. q Allow the projector to cool for at least 45 minutes before you open the lamp cover. Follow these steps to an end, the LAMP REPLACEMENT indicator lights yellow. Allow the projector to the projector and turn the projector on , and press the MENU button and the ON-SCREEN MENU will appear. Make sure that the Lamp Assembly is replaced. 34 LAMP COVER HANDLE 5 Connect the AC Power Cord to...
... a screw. information to reset the Timer. q Model No. is replaced. q Allow the projector to cool for at least 45 minutes before you open the lamp cover. Follow these steps to an end, the LAMP REPLACEMENT indicator lights yellow. Allow the projector to the projector and turn the projector on , and press the MENU button and the ON-SCREEN MENU will appear. Make sure that the Lamp Assembly is replaced. 34 LAMP COVER HANDLE 5 Connect the AC Power Cord to...
Owners Manual
Page 35
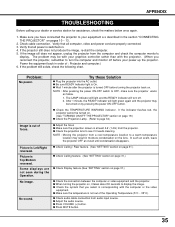
... focus. Check cable connection. If the image sill does not appear, unplug the projector from audio input source. If the problem still exists, check the following chart. NOTE : After pressing the power ON-OFF switch to see if it takes about 30 seconds to turn off before turning the projector back on the lens. Some displays are properly connected. 3. If the projector still does not produce the image, re-start the computer. 5. q Check Ceiling...
... focus. Check cable connection. If the image sill does not appear, unplug the projector from audio input source. If the problem still exists, check the following chart. NOTE : After pressing the power ON-OFF switch to see if it takes about 30 seconds to turn off before turning the projector back on the lens. Some displays are properly connected. 3. If the projector still does not produce the image, re-start the computer. 5. q Check Ceiling...
Owners Manual
Page 36
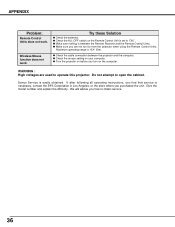
... model number and explain the difficulty. APPENDIX Problem: Remote Control Units does not work . q Check the cable connection between the Remote Receiver and the Remote Control Units. Try these Solution q Check the batteries. We will advise you are used to obtain service. 36 Maximum operating range is easily obtained. If after following all operating instructions, you find that service is set to open the cabinet. q Make sure you how to operate this projector. Wireless...
... model number and explain the difficulty. APPENDIX Problem: Remote Control Units does not work . q Check the cable connection between the Remote Receiver and the Remote Control Units. Try these Solution q Check the batteries. We will advise you are used to obtain service. 36 Maximum operating range is easily obtained. If after following all operating instructions, you find that service is set to open the cabinet. q Make sure you how to operate this projector. Wireless...
Owners Manual
Page 39
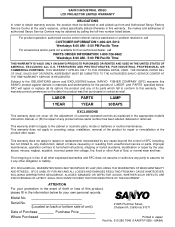
... user, abuse, misuse, neglect, accident, incorrect power line voltage, fire, flood or other Acts of this warranty. SFC will repair or replace (at retail. LABOR PARTS LAMP 1YEAR 1YEAR 90DAYS EXCLUSIONS This warranty does not cover (A) the adjustment of customer-operated controls as explained in Japan Part No. 610 280 7646 (1AA6P1P1959-- Model No. Subject to the OBLIGATIONS above and EXCLUSIONS below, SANYO...
... user, abuse, misuse, neglect, accident, incorrect power line voltage, fire, flood or other Acts of this warranty. SFC will repair or replace (at retail. LABOR PARTS LAMP 1YEAR 1YEAR 90DAYS EXCLUSIONS This warranty does not cover (A) the adjustment of customer-operated controls as explained in Japan Part No. 610 280 7646 (1AA6P1P1959-- Model No. Subject to the OBLIGATIONS above and EXCLUSIONS below, SANYO...


