Owners Manual
Page 2
.... When installing an outside antenna system, extreme care should be connected to the grounding system of the building, as close to the point of cable entry as power-supply cord or plug is required when the apparatus has been damaged in wire to an antenna discharge unit, size of grounding conductors, location of the lead-in any ventilation openings. Wall or Ceiling Mounting-The...
.... When installing an outside antenna system, extreme care should be connected to the grounding system of the building, as close to the point of cable entry as power-supply cord or plug is required when the apparatus has been damaged in wire to an antenna discharge unit, size of grounding conductors, location of the lead-in any ventilation openings. Wall or Ceiling Mounting-The...
Owners Manual
Page 3
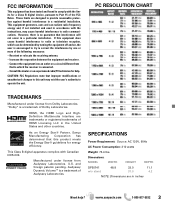
... a particular installation. Dimensions: MODEL WIDTH HEIGHT DEPTH DP50741 48.8 33.0 w/o stand 31.0 11.1 4.2 NOTE: Dimensions are designed to provide reasonable protection against harmful interference in a residential installation. These limits are in inches Need help . Connect the equipment into an outlet on , the user is connected. - CAUTION: FCC Regulations state that to which can radiate radio frequency energy and, if not installed and used in...
... a particular installation. Dimensions: MODEL WIDTH HEIGHT DEPTH DP50741 48.8 33.0 w/o stand 31.0 11.1 4.2 NOTE: Dimensions are designed to provide reasonable protection against harmful interference in a residential installation. These limits are in inches Need help . Connect the equipment into an outlet on , the user is connected. - CAUTION: FCC Regulations state that to which can radiate radio frequency energy and, if not installed and used in...
Owners Manual
Page 4
... damage is to clean the screen. • Do not use hard objects such as indicated here. Inputs 9 Setup 9 Menu Language 9 Captions 9 V-Chip 10 Clock Timer 10 No Signal Shut-Off 10 Mode (Home/Store 11 Panel Protection 11 Channel 11 Channel Search 11 Channel Scan Memory 11 Picture 12 Manual Picture Settings 12 ECO (Energy Saver 12 Light Sensor 12 Pix-Shape Settings 13 Sound 13 aaManual Sound Settings 13 PHOTO VIEWER 14 PC...
... damage is to clean the screen. • Do not use hard objects such as indicated here. Inputs 9 Setup 9 Menu Language 9 Captions 9 V-Chip 10 Clock Timer 10 No Signal Shut-Off 10 Mode (Home/Store 11 Panel Protection 11 Channel 11 Channel Search 11 Channel Scan Memory 11 Picture 12 Manual Picture Settings 12 ECO (Energy Saver 12 Light Sensor 12 Pix-Shape Settings 13 Sound 13 aaManual Sound Settings 13 PHOTO VIEWER 14 PC...
Owners Manual
Page 5
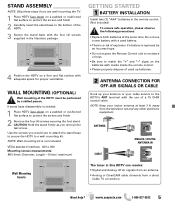
... screen and finish 2 Carefully insert the stand base to a wall mounting kit. WALL MOUNTING (OPTIONAL) Wall mounting of a 75 OHM coaxial cable. If stand base disassembly is needed: 1 Place HDTV face down on the batteries with marks inside the remote control. • Please properly dispose of the HDTV. 3 Secure the stand base with the four (4) screws supplied in this HDTV can receive: • Digital and Analog off air signals from an antenna • Analog or ClearQAM cable channels...
... screen and finish 2 Carefully insert the stand base to a wall mounting kit. WALL MOUNTING (OPTIONAL) Wall mounting of a 75 OHM coaxial cable. If stand base disassembly is needed: 1 Place HDTV face down on the batteries with marks inside the remote control. • Please properly dispose of the HDTV. 3 Secure the stand base with the four (4) screws supplied in this HDTV can receive: • Digital and Analog off air signals from an antenna • Analog or ClearQAM cable channels...

Owners Manual
Page 6
... HDMI cable/adapter) NOTE: Composite, Component, and DVI video connections need their appropriate audio connections. Standard Definition High Definition Optimum High Definition Composite Component H D M I (or DVI to the AUDIO (DVI) jack. 8 Analog / Digital Antenna Input 9 USB Input View pictures stored in a USB flash drive. GETTING STARTED HDTV INPUT/OUTPUT REFERENCE 1 Analog Stereo Audio Out (L/R) jacks 2 Digital Audio Output (Coaxial) 3 Component Video Input (VIDEO3) Green (Y), blue (Pb), and red (Pr) Video inputs plus the white (L) and red (R) Audio inputs. 4 Composite Video Input...
... HDMI cable/adapter) NOTE: Composite, Component, and DVI video connections need their appropriate audio connections. Standard Definition High Definition Optimum High Definition Composite Component H D M I (or DVI to the AUDIO (DVI) jack. 8 Analog / Digital Antenna Input 9 USB Input View pictures stored in a USB flash drive. GETTING STARTED HDTV INPUT/OUTPUT REFERENCE 1 Analog Stereo Audio Out (L/R) jacks 2 Digital Audio Output (Coaxial) 3 Component Video Input (VIDEO3) Green (Y), blue (Pb), and red (Pr) Video inputs plus the white (L) and red (R) Audio inputs. 4 Composite Video Input...

Owners Manual
Page 7
...HDTV's input jack. HDMI INPUT1, 2 & 3 are used to any digital device with the use of a phono-type digital audio cable. DVD PLAYER (or similar device) DVI STEREO AMPLIFIER Audio Output L/R jacks are not supplied. Need help? NOTE: Audio/Video cables are used to hookup an external stereo Amplifier. (Do not connect external speakers directly to the HDTV.) HDMI USB FLASH DRIVE MULTICHANNEL RECEIVER Digital Audio Output is used to hookup HD digital devices such as a Blu-ray player, HD Cable Box, HD Satellite Receiver or Video-game System. Connect your digital device's HDMI...
...HDTV's input jack. HDMI INPUT1, 2 & 3 are used to any digital device with the use of a phono-type digital audio cable. DVD PLAYER (or similar device) DVI STEREO AMPLIFIER Audio Output L/R jacks are not supplied. Need help? NOTE: Audio/Video cables are used to hookup an external stereo Amplifier. (Do not connect external speakers directly to the HDTV.) HDMI USB FLASH DRIVE MULTICHANNEL RECEIVER Digital Audio Output is used to hookup HD digital devices such as a Blu-ray player, HD Cable Box, HD Satellite Receiver or Video-game System. Connect your digital device's HDMI...
Owners Manual
Page 8
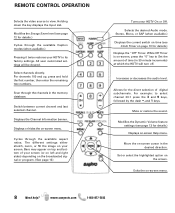
... and hold the first number, then enter the remaining two numbers. Cycles through the channels in the desired direction. Displays or hides the on the broadcasted signal or program. (See page 13) Turns your HDTV On or Off. Modifies the Dynamic Volume feature settings (see Clock Timer on -screen, press the "0" key to its factory settings. REMOTE CONTROL OPERATION Selects the video source to select channel 39.1 press the...
... and hold the first number, then enter the remaining two numbers. Cycles through the channels in the desired direction. Displays or hides the on the broadcasted signal or program. (See page 13) Turns your HDTV On or Off. Modifies the Dynamic Volume feature settings (see Clock Timer on -screen, press the "0" key to its factory settings. REMOTE CONTROL OPERATION Selects the video source to select channel 39.1 press the...
Owners Manual
Page 9
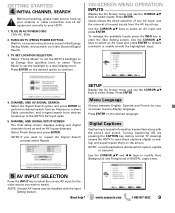
... Antenna or a direct Cable connection, and a signal search from the AV input loop. Press ENTER. Digital Captions Captioning is textual information transmitted along with the Input Setting feature. NOTE: Local broadcasters decide which caption signals to your HDTV. 1. Use the CURSOR LM and keys to modify Font, Background, and Foreground of unused inputs from devices hooked up your on the screen. TV SET LOCATION SELECTION: Select "Home Mode" to set the HDTV...
... Antenna or a direct Cable connection, and a signal search from the AV input loop. Press ENTER. Digital Captions Captioning is textual information transmitted along with the Input Setting feature. NOTE: Local broadcasters decide which caption signals to your HDTV. 1. Use the CURSOR LM and keys to modify Font, Background, and Foreground of unused inputs from devices hooked up your on the screen. TV SET LOCATION SELECTION: Select "Home Mode" to set the HDTV...
Owners Manual
Page 10
..., respectively. Select Adjust (Standard) and press ENTER. When the HDTV detects compatible RRT5 data, it will allow the HDTV to automatically turn off if no video and/or audio signals are set, press the EXIT key to close the V-Chip menu. Once ratings are being received. NOTE: Blocking a rating will automatically turn off feature is set to ON, it 's downloaded & stored in other countries. Use the CURSOR...
..., respectively. Select Adjust (Standard) and press ENTER. When the HDTV detects compatible RRT5 data, it will allow the HDTV to automatically turn off if no video and/or audio signals are set, press the EXIT key to close the V-Chip menu. Once ratings are being received. NOTE: Blocking a rating will automatically turn off feature is set to ON, it 's downloaded & stored in other countries. Use the CURSOR...

Owners Manual
Page 11
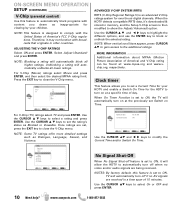
... display at HDTV's first power on local digital channels, visit www.antennaweb.org Need help avoid this situation, use the White Pattern feature immediately to repair the panel. trast for saving energy and power consumption reduction. Search for cable channels, the database of digital channels. Digital Add-On - To help ? Exit the White Pattern blank screen by pressing any button on the desired mode. Therefore, when you search for analog and unscrambled (ClearQAM) digital cable channels. Store Mode...
... display at HDTV's first power on local digital channels, visit www.antennaweb.org Need help avoid this situation, use the White Pattern feature immediately to repair the panel. trast for saving energy and power consumption reduction. Search for cable channels, the database of digital channels. Digital Add-On - To help ? Exit the White Pattern blank screen by pressing any button on the desired mode. Therefore, when you search for analog and unscrambled (ClearQAM) digital cable channels. Store Mode...
Owners Manual
Page 12
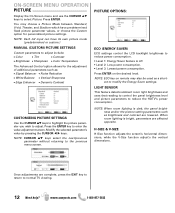
... to control the panel brightness level and picture parameters to modify the Energy Saver settings. Once adjustments are affected opposite. H-SIZE & V-SIZE H-Size function adjusts the screen's horizontal dimensions, while the V-Size function adjust's the vertical dimensions. www.sanyoctv.com 1-800-877-5032 cut to reduce the HDTV's power consumption. NOTE: When room lighting is off. • Level 2: Low power consumption. • Level 3: Lowest power consumption. NOTE: Each AV input can have predetermined fixed picture parameter...
... to control the panel brightness level and picture parameters to modify the Energy Saver settings. Once adjustments are affected opposite. H-SIZE & V-SIZE H-Size function adjusts the screen's horizontal dimensions, while the V-Size function adjust's the vertical dimensions. www.sanyoctv.com 1-800-877-5032 cut to reduce the HDTV's power consumption. NOTE: When room lighting is off. • Level 2: Low power consumption. • Level 3: Lowest power consumption. NOTE: Each AV input can have predetermined fixed picture parameter...
Owners Manual
Page 13
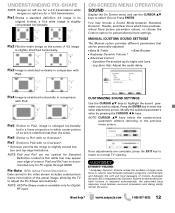
... with no Overscan*. * Overscan permits the image to normal TV viewing. 1 Audyssey Dynamic Volume solves the problem of large variations in the video stream includes coded picture frame information of screen). CUSTOMIZING SOUND SETTINGS Use the CURSOR LM keys to adjust. NOTE: CURSOR LM keys select the next/previous parameter without returning to enter the value adjustment screen. Need help? www.sanyoctv.com 1-800-877...
... with no Overscan*. * Overscan permits the image to normal TV viewing. 1 Audyssey Dynamic Volume solves the problem of large variations in the video stream includes coded picture frame information of screen). CUSTOMIZING SOUND SETTINGS Use the CURSOR LM keys to adjust. NOTE: CURSOR LM keys select the next/previous parameter without returning to enter the value adjustment screen. Need help? www.sanyoctv.com 1-800-877...
Owners Manual
Page 14
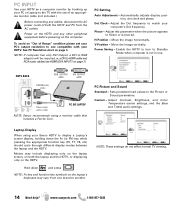
... Resolution chart on the HDTV. Adjust the Dot frequency to Standby Mode when computer is blurred. Move the image vertically. Enable the HDTV to turn to match your HDTV. Move the image horizontally. HDTV BACK RGB OUTPUT JACK DVI OUTPUT JACK RGB Monitor cable Stereo mini audio cable PC OR LAPTOP NOTE: Sanyo recommends using your Sanyo HDTV to HDMI cable and RCA audio cables (see HDMI (DVI) INPUT1 on the computer. Dot Clock - Phase - PC Picture and Sound Standard - Power Saving - Adjust...
... Resolution chart on the HDTV. Adjust the Dot frequency to Standby Mode when computer is blurred. Move the image vertically. Enable the HDTV to turn to match your HDTV. Move the image horizontally. HDTV BACK RGB OUTPUT JACK DVI OUTPUT JACK RGB Monitor cable Stereo mini audio cable PC OR LAPTOP NOTE: Sanyo recommends using your Sanyo HDTV to HDMI cable and RCA audio cables (see HDMI (DVI) INPUT1 on the computer. Dot Clock - Phase - PC Picture and Sound Standard - Power Saving - Adjust...
Owners Manual
Page 15
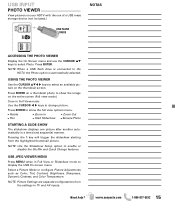
... screen (Full view mode). NOTE: When a USB flash drive is connected to select Photo. Select a Picture Mode or configure Picture Adjustments such as Color, Tint, Contrast, Brightness, Sharpness, Dynamic Contrast, and Color Temperature. Once in TV and AV inputs. www.sanyoctv.com 1-800-877-5032 15 Press ENTER. NOTE: Picture Settings are separate configurations from the highlighted thumbnail picture. USB INPUT PHOTO VIEWER View pictures on your HDTV with the use of a USB...
... screen (Full view mode). NOTE: When a USB flash drive is connected to select Photo. Select a Picture Mode or configure Picture Adjustments such as Color, Tint, Contrast, Brightness, Sharpness, Dynamic Contrast, and Color Temperature. Once in TV and AV inputs. www.sanyoctv.com 1-800-877-5032 15 Press ENTER. NOTE: Picture Settings are separate configurations from the highlighted thumbnail picture. USB INPUT PHOTO VIEWER View pictures on your HDTV with the use of a USB...

Owners Manual
Page 16
... exchange at the sole discretion of unit) Purchase Price Where Purchased Sanyo Manufacturing Corp. 3333 Sanyo Road, Forrest City, AR 72335 16 Need help? Model No Date of Purchase Serial No Located on a label attached to the retailer along with the receipt and the included accessories, such as the remote control. THIS LIMITED WARRANTY APPLIES ONLY TO THE ORIGINAL...
... exchange at the sole discretion of unit) Purchase Price Where Purchased Sanyo Manufacturing Corp. 3333 Sanyo Road, Forrest City, AR 72335 16 Need help? Model No Date of Purchase Serial No Located on a label attached to the retailer along with the receipt and the included accessories, such as the remote control. THIS LIMITED WARRANTY APPLIES ONLY TO THE ORIGINAL...
Installation Guide
Page 1
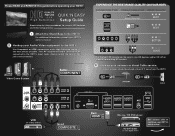
... CABLE/CONNECTOR IMAGE QUALITY Antenna or Digital Cable BEST BEST BETTER GOOD For the best HD experience, be sure to continue your HDTV's initial setup! Hook up your HDTV's owner's manual. Please READ and REMOVE this guide before operating your HDTV QUIK 'N EASY Setup Guide Simple step by step procedures for the best picture possible. AUDIO (DVI) Good COMPOSITE Best HDMI Blu-ray / HD DVD player See reverse side to use HD devices and/or HD off-air signals...
... CABLE/CONNECTOR IMAGE QUALITY Antenna or Digital Cable BEST BEST BETTER GOOD For the best HD experience, be sure to continue your HDTV's initial setup! Hook up your HDTV's owner's manual. Please READ and REMOVE this guide before operating your HDTV QUIK 'N EASY Setup Guide Simple step by step procedures for the best picture possible. AUDIO (DVI) Good COMPOSITE Best HDMI Blu-ray / HD DVD player See reverse side to use HD devices and/or HD off-air signals...
Installation Guide
Page 2
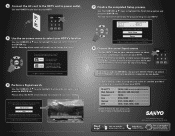
... key. ECO AUDIO ON TIMER CAPTION RESET SLEEP Use the on your HDTV's location. STORE Store Home Store mode is for ENERGY STAR. Home Mode is switched on your remote control to select your HDTV. Signal search Skip *To avoid signal interference when searching for best results. HDMI, the HDMI Logo and High-Definition Multimedia Interface are having problems, call us toll-free at least 3 feet away from the available Input sources on -screen menu to select...
... key. ECO AUDIO ON TIMER CAPTION RESET SLEEP Use the on your HDTV's location. STORE Store Home Store mode is for ENERGY STAR. Home Mode is switched on your remote control to select your HDTV. Signal search Skip *To avoid signal interference when searching for best results. HDMI, the HDMI Logo and High-Definition Multimedia Interface are having problems, call us toll-free at least 3 feet away from the available Input sources on -screen menu to select...


