
Owners Manual
Page 4
...sanyoctv.com 1-800-877-5032 CONTENTS IMPORTANT SAFETY INSTRUCTIONS 2 FCC INFORMATION 3 TRADEMARKS 3 PC RESOLUTIONS 3 CONTENTS 3 SPECIFICATIONS 4 PROTECTING THE LCD SCREEN 4 HANDLING PRECAUTIONS 4 POSITIONING THE LCD HDTV 4 STAND ASSEMBLY /STAND REMOVAL 5 WALL MOUNTING 5 GETTING STARTED- HANDLING PRECAUTIONS • Handle... age" 4 Need help? POSITIONING THE HDTV • Always use excessive pressure when cleaning the screen; PROTECTING THE LCD SCREEN CAUTION: The screen can cause permanent discoloration or dark spots. • NEVER spray liquids on bottom right hand corner...
...sanyoctv.com 1-800-877-5032 CONTENTS IMPORTANT SAFETY INSTRUCTIONS 2 FCC INFORMATION 3 TRADEMARKS 3 PC RESOLUTIONS 3 CONTENTS 3 SPECIFICATIONS 4 PROTECTING THE LCD SCREEN 4 HANDLING PRECAUTIONS 4 POSITIONING THE LCD HDTV 4 STAND ASSEMBLY /STAND REMOVAL 5 WALL MOUNTING 5 GETTING STARTED- HANDLING PRECAUTIONS • Handle... age" 4 Need help? POSITIONING THE HDTV • Always use excessive pressure when cleaning the screen; PROTECTING THE LCD SCREEN CAUTION: The screen can cause permanent discoloration or dark spots. • NEVER spray liquids on bottom right hand corner...
Owners Manual
Page 5
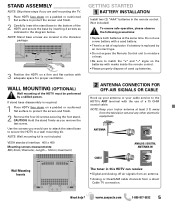
... the diagram below. NOTE: Stand base screws are wall mounting the TV. 1 Place HDTV face down on a padded or cushioned flat surface to protect the screen and finish. 2 Remove the four (4) screws securing the foot stand. NOTE: Wall mounting kit is required: 1 Place HDTV face down on a padded or... cushioned flat surface to protect the screen and finish. 2 Carefully insert the stand base to the HDTV's ANT terminal with the use a new battery with a used up your antenna or your ...
... the diagram below. NOTE: Stand base screws are wall mounting the TV. 1 Place HDTV face down on a padded or cushioned flat surface to protect the screen and finish. 2 Remove the four (4) screws securing the foot stand. NOTE: Wall mounting kit is required: 1 Place HDTV face down on a padded or... cushioned flat surface to protect the screen and finish. 2 Carefully insert the stand base to the HDTV's ANT terminal with the use a new battery with a used up your antenna or your ...
Owners Manual
Page 8
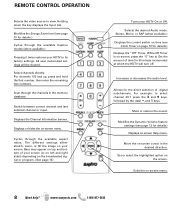
... to view. Holding down the key displays the Input List. Scan through the available aspect ratios. Bars may appear on top and bottom of your screen. Set or select the highlighted option on the broadcasted signal or program. (See page 15) Turns your HDTV to select channel 39.1 press the ...the amount of time (in 30 minute increments) at which the HDTV will be cleared. Modifies the Energy Saver level (see Clock Timer on -screen cursor in the desired direction. Stereo, Mono, or SAP (when available.) Displays the current switch on time (see page 10 for details.) Displays ...
... to view. Holding down the key displays the Input List. Scan through the available aspect ratios. Bars may appear on top and bottom of your screen. Set or select the highlighted option on the broadcasted signal or program. (See page 15) Turns your HDTV to select channel 39.1 press the ...the amount of time (in 30 minute increments) at which the HDTV will be cleared. Modifies the Energy Saver level (see Clock Timer on -screen cursor in the desired direction. Stereo, Mono, or SAP (when available.) Displays the current switch on time (see page 10 for details.) Displays ...
Owners Manual
Page 9
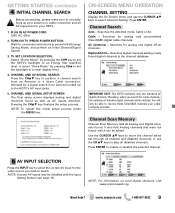
... Press the INPUT key to select the correct AV input for cable channels, the database of digital channels. CHANNEL AND SIGNAL SETUP SCREEN The final setup screen displays analog and digital channels found , which can be deleted. Channel Search Auto - Cable - IMPORTANT FACT: This HDTV maintains ...channels. Digital Add-On - Channel Scan Memory Channel Scan Memory lists all AV equipment to your HDTV. 1. NOTE: For information on -screen instructions to receive those ClearQAM channels your antenna or cable connection and all Analog and Digital channels found. Use the CURSOR LM keys to...
... Press the INPUT key to select the correct AV input for cable channels, the database of digital channels. CHANNEL AND SIGNAL SETUP SCREEN The final setup screen displays analog and digital channels found , which can be deleted. Channel Search Auto - Cable - IMPORTANT FACT: This HDTV maintains ...channels. Digital Add-On - Channel Scan Memory Channel Scan Memory lists all AV equipment to your HDTV. 1. NOTE: For information on -screen instructions to receive those ClearQAM channels your antenna or cable connection and all Analog and Digital channels found. Use the CURSOR LM keys to...
Owners Manual
Page 10
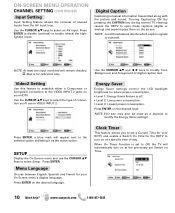
... • Level 2: Low power consumption. • Level 3: Lowest power consumption. Press ENTER on the desired language. SETUP Display the On Screen menu and use in VIDEO INPUT 2. Video2 Setting Use this feature to establish either a Component or Composite connection to ON, the TV will ...: At least one input must and will automatically turn on at the previously set to the VIDEO INPUT 2 jacks on the screen. ON-SCREEN MENU OPERATION CHANNEL SETTING (CONTINUED) Input Setting Input Setting feature allows the removal of day. Clock Timer This feature allows you ...
... • Level 2: Low power consumption. • Level 3: Lowest power consumption. Press ENTER on the desired language. SETUP Display the On Screen menu and use in VIDEO INPUT 2. Video2 Setting Use this feature to establish either a Component or Composite connection to ON, the TV will ...: At least one input must and will automatically turn on at the previously set to the VIDEO INPUT 2 jacks on the screen. ON-SCREEN MENU OPERATION CHANNEL SETTING (CONTINUED) Input Setting Input Setting feature allows the removal of day. Clock Timer This feature allows you ...
Owners Manual
Page 11
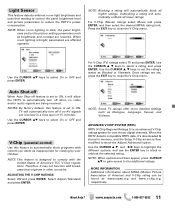
Light Sensor This feature detects ambient room light brightness and uses that originate in memory, and the Setup V-Chip screen is then modified to select On or OFF and press ENTER. For V-Chip (Movie) ratings select Movie and press ENTER, and then select the desired ...
Light Sensor This feature detects ambient room light brightness and uses that originate in memory, and the Setup V-Chip screen is then modified to select On or OFF and press ENTER. For V-Chip (Movie) ratings select Movie and press ENTER, and then select the desired ...
Owners Manual
Page 12
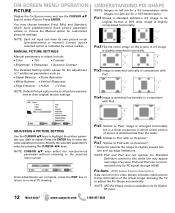
... • Tint • Contrast • Brightness • Sharpness • Dynamic Contrast The Detailed Setting option allows for the adjustment of screen is slightly stretched horizontally. Pix1 Shows a standard definition 4:3 image in its own picture mode (pre-determined or manual.) Current input's selected option...are not optimal for a 16:9 transmission. A 4:3 image is stretched less than the sides. eter you wish to the previous menu screen. Pix5 Similar to Pix2, image is enlarged horizontally but in a linear proportion in comparison with no Overscan*. * Overscan permits the ...
... • Tint • Contrast • Brightness • Sharpness • Dynamic Contrast The Detailed Setting option allows for the adjustment of screen is slightly stretched horizontally. Pix1 Shows a standard definition 4:3 image in its own picture mode (pre-determined or manual.) Current input's selected option...are not optimal for a 16:9 transmission. A 4:3 image is stretched less than the sides. eter you wish to the previous menu screen. Pix5 Similar to Pix2, image is enlarged horizontally but in a linear proportion in comparison with no Overscan*. * Overscan permits the ...

Owners Manual
Page 13
... thumbnail photo to their original factory settings. Picture Setting - www.sanyoctv.com 1-800-877-5032 13 Press ENTER to display the USB On screen menu. JPEG VIEWER USB MENU 1 Audyssey Dynamic Volume solves the problem of large variations in Full View or Slideshow mode to show the full... an option for your HDTV with any Picture option. USB INPUT PHOTO VIEWER View pictures on Start Slideshow either from the Thumbnail View Screen or from the current picture. Predetermined sound parameters not linked with the use the CURSOR LM keys to select Sound. NOTE: CURSOR LM...
... thumbnail photo to their original factory settings. Picture Setting - www.sanyoctv.com 1-800-877-5032 13 Press ENTER to display the USB On screen menu. JPEG VIEWER USB MENU 1 Audyssey Dynamic Volume solves the problem of large variations in Full View or Slideshow mode to show the full... an option for your HDTV with any Picture option. USB INPUT PHOTO VIEWER View pictures on Start Slideshow either from the Thumbnail View Screen or from the current picture. Predetermined sound parameters not linked with the use the CURSOR LM keys to select Sound. NOTE: CURSOR LM...
Owners Manual
Page 14
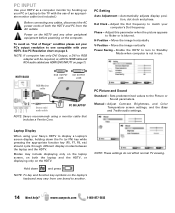
... OUTPUT JACK RGB Monitor cable Stereo mini audio cable PC OR LAPTOP NOTE: Sanyo recommends using your Sanyo HDTV to match your computer's Dot frequency. Adjust Contrast, Brightness, and Color Temperature screen settings, and the Bass and Treble audio settings. Automatically adjusts display position, ... a monitor cable that includes a Ferrite Core. See PC Resolution chart on the computer. Adjust the Dot frequency to display a Laptop's screen display, holding down and press NOTE: Fn key and function key symbols on page 7.) PC Setting Auto Adjustment - H-Position - Enable the...
... OUTPUT JACK RGB Monitor cable Stereo mini audio cable PC OR LAPTOP NOTE: Sanyo recommends using your Sanyo HDTV to match your computer's Dot frequency. Adjust Contrast, Brightness, and Color Temperature screen settings, and the Bass and Treble audio settings. Automatically adjusts display position, ... a monitor cable that includes a Ferrite Core. See PC Resolution chart on the computer. Adjust the Dot frequency to display a Laptop's screen display, holding down and press NOTE: Fn key and function key symbols on page 7.) PC Setting Auto Adjustment - H-Position - Enable the...


