
Owners Manual
Page 4
...it is not maintained properly. • Do not use hard objects such as hard cloth or paper to clean the screen. • Do not use a firm and flat surface when positioning your HDTV! excessive pressure can be more people is recommended... www.sanyoctv.com 1-800-877-5032 CONTENTS IMPORTANT SAFETY INSTRUCTIONS 2 FCC INFORMATION 3 TRADEMARKS 3 PC RESOLUTIONS 3 CONTENTS 3 SPECIFICATIONS 4 PROTECTING THE LCD SCREEN 4 HANDLING PRECAUTIONS 4 POSITIONING THE LCD HDTV 4 STAND ASSEMBLY /STAND REMOVAL 5 WALL MOUNTING 5 GETTING STARTED- Remote Control Battery Installation 5 Antenna Connections ...
...it is not maintained properly. • Do not use hard objects such as hard cloth or paper to clean the screen. • Do not use a firm and flat surface when positioning your HDTV! excessive pressure can be more people is recommended... www.sanyoctv.com 1-800-877-5032 CONTENTS IMPORTANT SAFETY INSTRUCTIONS 2 FCC INFORMATION 3 TRADEMARKS 3 PC RESOLUTIONS 3 CONTENTS 3 SPECIFICATIONS 4 PROTECTING THE LCD SCREEN 4 HANDLING PRECAUTIONS 4 POSITIONING THE LCD HDTV 4 STAND ASSEMBLY /STAND REMOVAL 5 WALL MOUNTING 5 GETTING STARTED- Remote Control Battery Installation 5 Antenna Connections ...
Owners Manual
Page 5
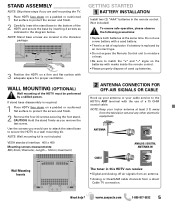
... moisture or heat. • Be sure to match the "+" and "-" signs on a padded or cushioned flat surface to protect the screen and finish. 2 Carefully insert the stand base to protect the screen and finish. 2 Remove the four (4) screws securing the foot stand. Use the screws you remove the last screw. NOTE: Keep...
... moisture or heat. • Be sure to match the "+" and "-" signs on a padded or cushioned flat surface to protect the screen and finish. 2 Carefully insert the stand base to protect the screen and finish. 2 Remove the four (4) screws securing the foot stand. Use the screws you remove the last screw. NOTE: Keep...
Owners Manual
Page 8
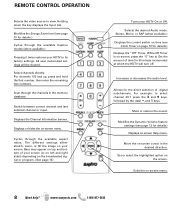
... (when available.) Displays the current switch on time (see page 13 for the direct selection of your screen (or on left and right sides) depending on your HDTV to Set the amount of time (in ... Mute or restore the sound. Select channels directly. For example: to view. Move the on -screen Help menu. For channels 100 and up, press and hold the first number, then enter the remaining two ...or decreases the audio level. www.sanyoctv.com 1-800-877-5032 Bars may appear on -screen, press the "0" key to its factory settings. Scan through the available aspect ratios. While ...
... (when available.) Displays the current switch on time (see page 13 for the direct selection of your screen (or on left and right sides) depending on your HDTV to Set the amount of time (in ... Mute or restore the sound. Select channels directly. For example: to view. Move the on -screen Help menu. For channels 100 and up, press and hold the first number, then enter the remaining two ...or decreases the audio level. www.sanyoctv.com 1-800-877-5032 Bars may appear on -screen, press the "0" key to its factory settings. Scan through the available aspect ratios. While ...
Owners Manual
Page 9
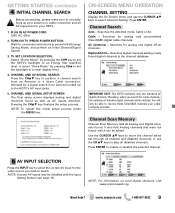
... channels, or use the CURSOR LM keys to a retail display level. 4. NOTE: For information on -screen instructions to watch. ON-SCREEN MENU OPERATION CHANNEL SETTING Display the On Screen menu and use the CH LM keys to receive those ClearQAM channels your cable company provides. Channel Scan Memory.... It also lists Analog channels that were not found . PLUG IN AC POWER CORD 120V AC, 60Hz 2. CHANNEL AND SIGNAL SETUP SCREEN The final setup screen displays analog and digital channels found digital channels to the HDTV's AV input jacks. 5. Press ENTER. Therefore, when you wish to...
... channels, or use the CURSOR LM keys to a retail display level. 4. NOTE: For information on -screen instructions to watch. ON-SCREEN MENU OPERATION CHANNEL SETTING Display the On Screen menu and use the CH LM keys to receive those ClearQAM channels your cable company provides. Channel Scan Memory.... It also lists Analog channels that were not found . PLUG IN AC POWER CORD 120V AC, 60Hz 2. CHANNEL AND SIGNAL SETUP SCREEN The final setup screen displays analog and digital channels found digital channels to the HDTV's AV input jacks. 5. Press ENTER. Therefore, when you wish to...
Owners Manual
Page 10
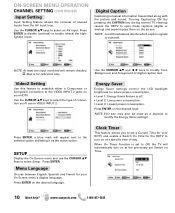
... power consumption. NOTE: Local broadcasters decide which caption signals to select Setup. Use the CURSOR LM and keys to turn on your On Screen menu's display language. NOTE: ECO key may also be used as the active option. When On Timer Function is for reference only. Clock... Timer This feature allows you 'll use the CURSOR LM keys to transmit. ON-SCREEN MENU OPERATION CHANNEL SETTING (CONTINUED) Input Setting Input Setting feature allows the removal of digital caption text. Menu Language Choose between English, ...
... power consumption. NOTE: Local broadcasters decide which caption signals to select Setup. Use the CURSOR LM and keys to turn on your On Screen menu's display language. NOTE: ECO key may also be used as the active option. When On Timer Function is for reference only. Clock... Timer This feature allows you 'll use the CURSOR LM keys to transmit. ON-SCREEN MENU OPERATION CHANNEL SETTING (CONTINUED) Input Setting Input Setting feature allows the removal of digital caption text. Menu Language Choose between English, ...
Owners Manual
Page 11
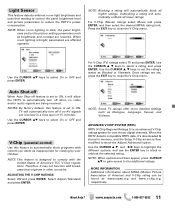
... the V-Chip menu. Select Adjust (Standard) and press ENTER. When the HDTV detects compatible RRT5 data, it's downloaded & stored in memory, and the Setup V-Chip screen is an advanced V-Chip ratings system for viewing by your children. TV will automatically block all lower ratings. Use the CURSOR LM keys to select...
... the V-Chip menu. Select Adjust (Standard) and press ENTER. When the HDTV detects compatible RRT5 data, it's downloaded & stored in memory, and the Setup V-Chip screen is an advanced V-Chip ratings system for viewing by your children. TV will automatically block all lower ratings. Use the CURSOR LM keys to select...
Owners Manual
Page 12
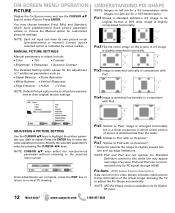
... Pix2 with no Overscan*. * Overscan permits the image to adjust the Pix-Shape automatically. eter you wish to enter the value adjustment screen. You may appear near edge of the actual image, allowing the TV to slightly exceed bottom and top edge limitations. ADJUSTING A PICTURE... SETTING Use the CURSOR LM keys to the previous menu screen. Press ENTER. Pix2 Fills the entire image on left are for a 16:9 transmission. Pix4 Image is stretched vertically in which have its ...
... Pix2 with no Overscan*. * Overscan permits the image to adjust the Pix-Shape automatically. eter you wish to enter the value adjustment screen. You may appear near edge of the actual image, allowing the TV to slightly exceed bottom and top edge limitations. ADJUSTING A PICTURE... SETTING Use the CURSOR LM keys to the previous menu screen. Press ENTER. Pix2 Fills the entire image on left are for a 16:9 transmission. Pix4 Image is stretched vertically in which have its ...

Owners Manual
Page 13
... on your sound settings: Auto - Picture Setting - Need help? NOTE: Default Sound option returns all sound parameters to display the USB On screen menu. Press MENU when in TV and AV inputs. www.sanyoctv.com 1-800-877-5032 13 Dynamic, Mild, Standard - Predetermined sound parameters ...Color, Tint, Contrast, Brightness, Sharpness and Dynamic Contrast. USB INPUT PHOTO VIEWER View pictures on Start Slideshow either from the Thumbnail View Screen or from the full view options menu to select Sound. USING THE PHOTO VIEWER ADJUSTING A SOUND SETTING Use the CURSOR LM keys to ...
... on your sound settings: Auto - Picture Setting - Need help? NOTE: Default Sound option returns all sound parameters to display the USB On screen menu. Press MENU when in TV and AV inputs. www.sanyoctv.com 1-800-877-5032 13 Dynamic, Mild, Standard - Predetermined sound parameters ...Color, Tint, Contrast, Brightness, Sharpness and Dynamic Contrast. USB INPUT PHOTO VIEWER View pictures on Start Slideshow either from the Thumbnail View Screen or from the full view options menu to select Sound. USING THE PHOTO VIEWER ADJUSTING A SOUND SETTING Use the CURSOR LM keys to ...
Owners Manual
Page 14
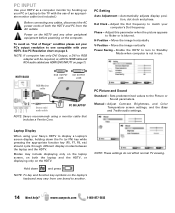
... JACK DVI OUTPUT JACK RGB Monitor cable Stereo mini audio cable PC OR LAPTOP NOTE: Sanyo recommends using your Sanyo HDTV to Standby Mode when computer is blurred. Adjust Contrast, Brightness, and Color Temperature screen settings, and the Bass and Treble audio settings. Dot Clock - Phase - Sets predetermined...- NOTE: These settings do not affect normal TV viewing. 14 Need help? Enable the HDTV to turn to display a Laptop's screen display, holding down and press NOTE: Fn key and function key symbols on the laptop's keyboard may include displaying only on the laptop...
... JACK DVI OUTPUT JACK RGB Monitor cable Stereo mini audio cable PC OR LAPTOP NOTE: Sanyo recommends using your Sanyo HDTV to Standby Mode when computer is blurred. Adjust Contrast, Brightness, and Color Temperature screen settings, and the Bass and Treble audio settings. Dot Clock - Phase - Sets predetermined...- NOTE: These settings do not affect normal TV viewing. 14 Need help? Enable the HDTV to turn to display a Laptop's screen display, holding down and press NOTE: Fn key and function key symbols on the laptop's keyboard may include displaying only on the laptop...


