
User Manual Ver.1.0 (English)
Page 15
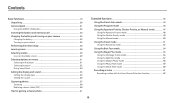
...; Viewing files by category f 91 • Deleting all files on the memory f 93 • Viewing files as a slide show f 95 • Viewing files on a TV (HDTV) f 102 • Connecting your camera to a computer f 104 • Sending photos or videos via email f 126 • Using photo or video sharing websites f 127 • Adjusting sound and volume f 135 • Adjusting the brightness of the display f 136 • Changing the display language f 137 • Setting the date and time f 137...
...; Viewing files by category f 91 • Deleting all files on the memory f 93 • Viewing files as a slide show f 95 • Viewing files on a TV (HDTV) f 102 • Connecting your camera to a computer f 104 • Sending photos or videos via email f 126 • Using photo or video sharing websites f 127 • Adjusting sound and volume f 135 • Adjusting the brightness of the display f 136 • Changing the display language f 137 • Setting the date and time f 137...
User Manual Ver.1.0 (English)
Page 16
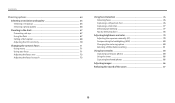
... battery and memory card 24 Charging the battery and turning on your camera 25 Charging the battery 25 Turning on your camera 25 Performing the initial setup 26 Learning icons ...28 Selecting modes ...29 Icons on the Mode screen 29 Selecting options or menus 31 Selecting with buttons 31 Selecting by touch 32 Using Smart Panel 34 Setting the display and sound 35 Setting the display type 35 Setting the sound 36 Capturing photos ...37 Zooming ...38 Reducing camera...
... battery and memory card 24 Charging the battery and turning on your camera 25 Charging the battery 25 Turning on your camera 25 Performing the initial setup 26 Learning icons ...28 Selecting modes ...29 Icons on the Mode screen 29 Selecting options or menus 31 Selecting with buttons 31 Selecting by touch 32 Using Smart Panel 34 Setting the display and sound 35 Setting the display type 35 Setting the sound 36 Capturing photos ...37 Zooming ...38 Reducing camera...
User Manual Ver.1.0 (English)
Page 17
... Using macro ...71 Using auto focus ...71 Adjusting the focus area 73 Adjusting the focus by touch 73 Using Face Detection 76 Detecting faces ...76 Capturing a self portrait shot 76 Capturing a smile shot 77 Detecting eye blinking 77 Tips for detecting faces 78 Adjusting brightness and color 79 Adjusting the exposure manually (EV 79 Compensating for backlighting (ACB 80 Changing the metering option 80 Selecting a White Balance setting 81 Using burst modes 84 Capturing continuous photos 84 Using the timer...
... Using macro ...71 Using auto focus ...71 Adjusting the focus area 73 Adjusting the focus by touch 73 Using Face Detection 76 Detecting faces ...76 Capturing a self portrait shot 76 Capturing a smile shot 77 Detecting eye blinking 77 Tips for detecting faces 78 Adjusting brightness and color 79 Adjusting the exposure manually (EV 79 Compensating for backlighting (ACB 80 Changing the metering option 80 Selecting a White Balance setting 81 Using burst modes 84 Capturing continuous photos 84 Using the timer...

User Manual Ver.1.0 (English)
Page 18
Contents Playback/Editing...88 Viewing photos or videos in Playback mode 89 Starting Playback mode 89 Viewing photos ...94 Playing a video ...96 Editing a photo ...98 Resizing photos ...98 Rotating a photo ...98 Cropping a photo 99 Applying Smart Filter effects 99 Adjusting your photos 100 Viewing files on a TV (HDTV 102 Transferring files to the computer 104 Transferring files to your Windows OS computer 104 Transferring files to your Mac OS computer 105 Using programs on a computer 107 Installing i-Launcher 107 Using i-Launcher 108 Wireless...
Contents Playback/Editing...88 Viewing photos or videos in Playback mode 89 Starting Playback mode 89 Viewing photos ...94 Playing a video ...96 Editing a photo ...98 Resizing photos ...98 Rotating a photo ...98 Cropping a photo 99 Applying Smart Filter effects 99 Adjusting your photos 100 Viewing files on a TV (HDTV 102 Transferring files to the computer 104 Transferring files to your Windows OS computer 104 Transferring files to your Mac OS computer 105 Using programs on a computer 107 Installing i-Launcher 107 Using i-Launcher 108 Wireless...

User Manual Ver.1.0 (English)
Page 29
...; : Charging (Connected with the charger) Auto focus frame Camera shake Zoom indicator Photo resolution when the Intelli zoom is on Zoom ratio Histogram (p. 35) 2 Shooting option Icon Description ISO sensitivity Flash Photo resolution Video resolution Basic functions 28 Icon Description Frame rate (per second) Sound Alive on Intelli zoom on the screen change according to the mode you select or the options you set. Learning icons The icons the camera displays on Optical Image Stabilization (OIS) Metering Burst option Timer White balance Image adjustment (sharpness...
...; : Charging (Connected with the charger) Auto focus frame Camera shake Zoom indicator Photo resolution when the Intelli zoom is on Zoom ratio Histogram (p. 35) 2 Shooting option Icon Description ISO sensitivity Flash Photo resolution Video resolution Basic functions 28 Icon Description Frame rate (per second) Sound Alive on Intelli zoom on the screen change according to the mode you select or the options you set. Learning icons The icons the camera displays on Optical Image Stabilization (OIS) Metering Burst option Timer White balance Image adjustment (sharpness...

User Manual Ver.1.0 (English)
Page 42
... you shoot in red. Tips for getting a clearer photo Holding your camera correctly Ensure nothing is displayed Half-press [Shutter] and adjust the focus. The camera adjusts the focus and exposure automatically. The aperture remains open longer and it may be harder to hold the camera steady long enough to capture a clear photo. • Use a tripod or set the flash option to reduce camera shake optically. (p. 40) Half-pressing the shutter button...
... you shoot in red. Tips for getting a clearer photo Holding your camera correctly Ensure nothing is displayed Half-press [Shutter] and adjust the focus. The camera adjusts the focus and exposure automatically. The aperture remains open longer and it may be harder to hold the camera steady long enough to capture a clear photo. • Use a tripod or set the flash option to reduce camera shake optically. (p. 40) Half-pressing the shutter button...

User Manual Ver.1.0 (English)
Page 61
... may change to or smaller automatically. • To apply filter effects to saved photos, press [m] and then select Open Image “ an image. Distort close objects to imitate the visual effect of Lomo cameras. Using the Magic Plus mode 4 Align your videos to create unique images. 1 Rotate the mode dial to g. 2 Select . • To select another mode when the mode dial is set to make the...
... may change to or smaller automatically. • To apply filter effects to saved photos, press [m] and then select Open Image “ an image. Distort close objects to imitate the visual effect of Lomo cameras. Using the Magic Plus mode 4 Align your videos to create unique images. 1 Rotate the mode dial to g. 2 Select . • To select another mode when the mode dial is set to make the...

User Manual Ver.1.0 (English)
Page 62
... international standards organizations ISO-IEC and ITU-T. • If you can record separate scenes as a single video. • Press [o] to pause while recording. • Press [o] to resume. Video recordings may be supported in some modes. 2 Set desired options. • For a list of up to play back correctly. • Memory cards with slow write speeds, the camera may record the operating sound of the zoom operating. To decrease zoom noise, use the zoom function when recording a video, the camera...
... international standards organizations ISO-IEC and ITU-T. • If you can record separate scenes as a single video. • Press [o] to pause while recording. • Press [o] to resume. Video recordings may be supported in some modes. 2 Set desired options. • For a list of up to play back correctly. • Memory cards with slow write speeds, the camera may record the operating sound of the zoom operating. To decrease zoom noise, use the zoom function when recording a video, the camera...
User Manual Ver.1.0 (English)
Page 65
... Using macro 71 Using auto focus 71 Adjusting the focus area 73 Adjusting the focus by touch 73 Using Face Detection 76 Detecting faces 76 Capturing a self portrait shot 76 Capturing a smile shot 77 Detecting eye blinking 77 Tips for detecting faces 78 Adjusting brightness and color 79 Adjusting the exposure manually (EV 79 Compensating for backlighting (ACB 80 Changing the metering option 80 Selecting a White Balance setting 81 Using burst modes 84 Capturing continuous photos 84 Using the timer...
... Using macro 71 Using auto focus 71 Adjusting the focus area 73 Adjusting the focus by touch 73 Using Face Detection 76 Detecting faces 76 Capturing a self portrait shot 76 Capturing a smile shot 77 Detecting eye blinking 77 Tips for detecting faces 78 Adjusting brightness and color 79 Adjusting the exposure manually (EV 79 Compensating for backlighting (ACB 80 Changing the metering option 80 Selecting a White Balance setting 81 Using burst modes 84 Capturing continuous photos 84 Using the timer...
User Manual Ver.1.0 (English)
Page 73
... shooting modes. When you use the zoom. Manual Focus: Focus on a subject by pressing [m], and then selecting Focus. Manual Focus : 50 Back Set 4 Press [o] to adjust the focus distance. Changing the camera's focus 2 Select an option. to save your settings. Farther than 4 in . (350 cm) away when you adjust the focus distance manually and the subject is 4-31 in. (10-80 cm) from the camera. 59-138 in . (80 cm) away. Auto Macro: • Focus...
... shooting modes. When you use the zoom. Manual Focus: Focus on a subject by pressing [m], and then selecting Focus. Manual Focus : 50 Back Set 4 Press [o] to adjust the focus distance. Changing the camera's focus 2 Select an option. to save your settings. Farther than 4 in . (350 cm) away when you adjust the focus distance manually and the subject is 4-31 in. (10-80 cm) from the camera. 59-138 in . (80 cm) away. Auto Macro: • Focus...

User Manual Ver.1.0 (English)
Page 114
... use functions. Connecting to a WLAN and configuring network settings 114 Connecting to a WLAN 114 Using the login browser 115 Network connection tips 116 Entering text 117 Saving files to a smart phone automatically ... 118 Sending photos or videos to a smart phone ... 119 Using a smart phone as a remote shutter release 120 Using Auto Backup to send photos or videos ... 122 Installing the program for Auto Backup on devices that support AllShare Play 130 Sending photos using...
... use functions. Connecting to a WLAN and configuring network settings 114 Connecting to a WLAN 114 Using the login browser 115 Network connection tips 116 Entering text 117 Saving files to a smart phone automatically ... 118 Sending photos or videos to a smart phone ... 119 Using a smart phone as a remote shutter release 120 Using Auto Backup to send photos or videos ... 122 Installing the program for Auto Backup on devices that support AllShare Play 130 Sending photos using...
User Manual Ver.1.0 (English)
Page 117
... transfer to a network may differ, depending on your region. You cannot connect to a network via a printer. • You cannot connect your camera to a network and a TV simultaneously. • Connecting to another AP from the service provider, you may not be supported by some modes. • Files that you are not authorized to use a computer to the WLAN. Do not enter any problem...
... transfer to a network may differ, depending on your region. You cannot connect to a network via a printer. • You cannot connect your camera to a network and a TV simultaneously. • Connecting to another AP from the service provider, you may not be supported by some modes. • Files that you are not authorized to use a computer to the WLAN. Do not enter any problem...
User Manual Ver.1.0 (English)
Page 119
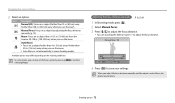
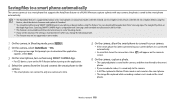
... device's firmware and update it if needed. • You should install Samsung SMART CAMERA App on your camera, the photo is saved to the smart phone automatically. • The AutoShare feature is supported by Galaxy series smart phones or Galaxy Tab models with the Android 2.2 OS or higher or iOS devices with the internal memory in some Shooting modes. • If you set this function, the setting is...
... device's firmware and update it if needed. • You should install Samsung SMART CAMERA App on your camera, the photo is saved to the smart phone automatically. • The AutoShare feature is supported by Galaxy series smart phones or Galaxy Tab models with the Android 2.2 OS or higher or iOS devices with the internal memory in some Shooting modes. • If you set this function, the setting is...

User Manual Ver.1.0 (English)
Page 132
... view files on an AllShare Play device using the device's remote or performing additional operations on the device may take some time to load your photos or videos and complete the initial set-up process. • While viewing photos or videos on the AllShare Play device, continuously using the Nearby devices feature, enable multicast mode on the device. • When there are no files in the camera memory, you cannot use this...
... view files on an AllShare Play device using the device's remote or performing additional operations on the device may take some time to load your photos or videos and complete the initial set-up process. • While viewing photos or videos on the AllShare Play device, continuously using the Nearby devices feature, enable multicast mode on the device. • When there are no files in the camera memory, you cannot use this...

User Manual Ver.1.0 (English)
Page 137
... fixed in some modes. Video Out i-Launcher Set the video signal output for 30 seconds, the camera automatically switches to Power save mode. (Off*, On) In Power save mode, press any button other than [X] to the Shooting mode. (Off, On*) This feature does not work in Playback mode even if you have selected Auto. Set whether or not to review a captured image before returning to resume using an HDTV remote control. • On*: Control the camera with a TV remote control...
... fixed in some modes. Video Out i-Launcher Set the video signal output for 30 seconds, the camera automatically switches to Power save mode. (Off*, On) In Power save mode, press any button other than [X] to the Shooting mode. (Off, On*) This feature does not work in Playback mode even if you have selected Auto. Set whether or not to review a captured image before returning to resume using an HDTV remote control. • On*: Control the camera with a TV remote control...

User Manual Ver.1.0 (English)
Page 139
... replace the battery. • The camera will delete all files, including protected files. (Yes, No) Errors can occur if you are playing a slide show or videos. Settings 138 Formatting will not automatically turn on the bottom right corner of camera, a memory card reader, or a computer. Date, time, language, and video output settings will be reset. (Yes, No) View open source licenses. you select Panorama in dark places to display the date and time on captured photos. (Off*, Date, Date & Time) • The date...
... replace the battery. • The camera will delete all files, including protected files. (Yes, No) Errors can occur if you are playing a slide show or videos. Settings 138 Formatting will not automatically turn on the bottom right corner of camera, a memory card reader, or a computer. Date, time, language, and video output settings will be reset. (Yes, No) View open source licenses. you select Panorama in dark places to display the date and time on captured photos. (Off*, Date, Date & Time) • The date...

User Manual Ver.1.0 (English)
Page 140
Appendixes Get information about error messages, specifications, and maintenance. Error messages 140 Camera maintenance 142 Cleaning your camera 142 Using or storing the camera 143 About memory cards 144 About the battery 147 Before contacting a service center 151 Camera specifications 154 Glossary 158 Index 163
Appendixes Get information about error messages, specifications, and maintenance. Error messages 140 Camera maintenance 142 Cleaning your camera 142 Using or storing the camera 143 About memory cards 144 About the battery 147 Before contacting a service center 151 Camera specifications 154 Glossary 158 Index 163
User Manual Ver.1.0 (English)
Page 141
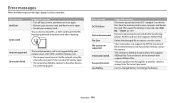
... inserted memory card. Then, open the Settings menu and select File No. “ Reset. (p. 137) Network connection disconnected while transferring photos. Turn on devices on again. • Remove your memory card, and then insert it again. • Format your memory card. Error message Card Error Card Locked Suggested remedies • Turn off your camera, and then turn it on the network that support AllShare Play. Enter the correct password. Format the memory card on the camera. Delete the damaged file or contact a service center. Card not supported. Insert...
... inserted memory card. Then, open the Settings menu and select File No. “ Reset. (p. 137) Network connection disconnected while transferring photos. Turn on devices on again. • Remove your memory card, and then insert it again. • Format your memory card. Error message Card Error Card Locked Suggested remedies • Turn off your camera, and then turn it on the network that support AllShare Play. Enter the correct password. Format the memory card on the camera. Delete the damaged file or contact a service center. Card not supported. Insert...
User Manual Ver.1.0 (English)
Page 154
... videos that are using a supported operating system. Before contacting a service center Situation The TV does not display your photos Your computer does not recognize your camera Your computer disconnects the camera while transferring files Your computer cannot play video files captured with your camera, use SDXC memory cards on a Windows XP computer, download and update the exFAT file system driver from the Microsoft website. Suggested remedies • End i-Launcher and restart the program. • Make...
... videos that are using a supported operating system. Before contacting a service center Situation The TV does not display your photos Your computer does not recognize your camera Your computer disconnects the camera while transferring files Your computer cannot play video files captured with your camera, use SDXC memory cards on a Windows XP computer, download and update the exFAT file system driver from the Microsoft website. Suggested remedies • End i-Launcher and restart the program. • Make...
User Manual Ver.1.0 (English)
Page 166
... Power save mode 136 Program mode 46 Protecting files 92 Q Quick view 136 R Red-eye Playback mode 101 Shooting mode 67 Remote Viewfinder 120 Reset 138 Resolution Playback mode 98 Shooting mode 65 Retouching faces 101 Rotating 98 S Saturation Playback mode 101 Shooting mode 86 Self portrait 76 Service center 151 Settings 137 Sharpness 86 Shooting portraits Blink Detection 77 Face Detection 76 Self portrait 76 Smile Shot 77 Shutter button 21 Shutter Priority mode 49 Slide show 95 Smart Auto mode 44 Smart Filter Photo shooting mode 59 Playback mode 99 Video recording mode...
... Power save mode 136 Program mode 46 Protecting files 92 Q Quick view 136 R Red-eye Playback mode 101 Shooting mode 67 Remote Viewfinder 120 Reset 138 Resolution Playback mode 98 Shooting mode 65 Retouching faces 101 Rotating 98 S Saturation Playback mode 101 Shooting mode 86 Self portrait 76 Service center 151 Settings 137 Sharpness 86 Shooting portraits Blink Detection 77 Face Detection 76 Self portrait 76 Smile Shot 77 Shutter button 21 Shutter Priority mode 49 Slide show 95 Smart Auto mode 44 Smart Filter Photo shooting mode 59 Playback mode 99 Video recording mode...


