
User Manual Ver.1.0 (English)
Page 1
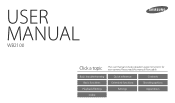
Basic troubleshooting Basic functions Playback/Editing Index Quick reference Extended functions Settings Contents Shooting options Appendixes USER MANUAL WB2100 Click a topic This user manual includes detailed usage instructions for your camera. Please read this manual thoroughly.
Basic troubleshooting Basic functions Playback/Editing Index Quick reference Extended functions Settings Contents Shooting options Appendixes USER MANUAL WB2100 Click a topic This user manual includes detailed usage instructions for your camera. Please read this manual thoroughly.
User Manual Ver.1.0 (English)
Page 5
... camera's settings. Settings 104 Refer to options to reuse or distribute any part of this manual without prior permission. Shooting options 55 Learn how to set the options in this manual are the property of their respective owners. • Camera specifications or contents of this...to all laws and regulations concerning its use. • You are not allowed to configure your computer or TV. Outline of the User Manual Basic functions 13 Learn about error messages, specifications, and maintenance. 4 Copyright information • Microsoft Windows and the Windows logo ...
... camera's settings. Settings 104 Refer to options to reuse or distribute any part of this manual without prior permission. Shooting options 55 Learn how to set the options in this manual are the property of their respective owners. • Camera specifications or contents of this...to all laws and regulations concerning its use. • You are not allowed to configure your computer or TV. Outline of the User Manual Basic functions 13 Learn about error messages, specifications, and maintenance. 4 Copyright information • Microsoft Windows and the Windows logo ...
User Manual Ver.1.0 (English)
Page 6
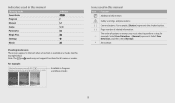
... will be too bright or dark. and Movie modes EV : +1 Icons used in a mode. Indicators used in this manual Shooting mode Smart Auto Program Manual Scene Panorama Magic Plus Settings Movie Indicator Shooting mode icons These icons appear in the text when a function is available in ...this manual Icon Function Additional information Safety warnings and precautions [ ] Camera buttons. See the example below. Cancel Set 4 Press [o] to get a better photo...
... will be too bright or dark. and Movie modes EV : +1 Icons used in a mode. Indicators used in this manual Shooting mode Smart Auto Program Manual Scene Panorama Magic Plus Settings Movie Indicator Shooting mode icons These icons appear in the text when a function is available in ...this manual Icon Function Additional information Safety warnings and precautions [ ] Camera buttons. See the example below. Cancel Set 4 Press [o] to get a better photo...

User Manual Ver.1.0 (English)
Page 7
... changing the shutter speed, aperture value, or ISO sensitivity. Half-press [Shutter] Press [Shutter] Subject, background, and composition • Subject: The main object in this manual Pressing the shutter • Half-press [Shutter]: Press the shutter halfway down • Press [Shutter]: Press the shutter all the way down Exposure (Brightness) The...
... changing the shutter speed, aperture value, or ISO sensitivity. Half-press [Shutter] Press [Shutter] Subject, background, and composition • Subject: The main object in this manual Pressing the shutter • Half-press [Shutter]: Press the shutter halfway down • Press [Shutter]: Press the shutter all the way down Exposure (Brightness) The...

User Manual Ver.1.0 (English)
Page 11
Contents Extended functions...39 Using the Smart Auto mode 40 Using the Program mode 42 Using the Manual mode 43 Using the Scene mode 44 Using the Panorama mode 45 Using the Magic Plus mode 47 Using the Low Light Shot mode 47 ...
Contents Extended functions...39 Using the Smart Auto mode 40 Using the Program mode 42 Using the Manual mode 43 Using the Scene mode 44 Using the Panorama mode 45 Using the Magic Plus mode 47 Using the Low Light Shot mode 47 ...

User Manual Ver.1.0 (English)
Page 12
... a self portrait shot 67 Capturing a smile shot 68 Detecting eye blinking 68 Tips for detecting faces 69 Adjusting brightness and color 70 Adjusting the exposure manually (EV 70 Locking the exposure value (AEL 71 Compensating for backlighting (ACB 71 Changing the metering option 72 Selecting a White Balance setting 72 Using burst...
... a self portrait shot 67 Capturing a smile shot 68 Detecting eye blinking 68 Tips for detecting faces 69 Adjusting brightness and color 70 Adjusting the exposure manually (EV 70 Locking the exposure value (AEL 71 Compensating for backlighting (ACB 71 Changing the metering option 72 Selecting a White Balance setting 72 Using burst...
User Manual Ver.1.0 (English)
Page 18
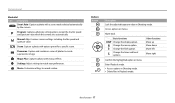
... camera. Enter Playback mode. • Access options in Shooting mode. • Delete files in Shooting mode. Move back. c Change the macro option. Basic functions 17 Manual: Adjust various camera settings including shutter speed and aperture value. Access options or menus. Basic functions D Change the display option. F Change the flash option. Scene...
... camera. Enter Playback mode. • Access options in Shooting mode. • Delete files in Shooting mode. Move back. c Change the macro option. Basic functions 17 Manual: Adjust various camera settings including shutter speed and aperture value. Access options or menus. Basic functions D Change the display option. F Change the flash option. Scene...
User Manual Ver.1.0 (English)
Page 28
...) HDR: Capture scenes with emphasis on mid-tones, by the camera. (p. 40) Program: Capture a photo with settings you have adjusted manually. (p. 42) Manual: Adjust both the aperture value and the shutter speed manually. (p. 43) Scene: Capture a photo with various effects. (p. 91) Settings: Adjust settings to match your preferences. (p. 105) Movie: Customize settings to...
...) HDR: Capture scenes with emphasis on mid-tones, by the camera. (p. 40) Program: Capture a photo with settings you have adjusted manually. (p. 42) Manual: Adjust both the aperture value and the shutter speed manually. (p. 43) Scene: Capture a photo with various effects. (p. 91) Settings: Adjust settings to match your preferences. (p. 105) Movie: Customize settings to...

User Manual Ver.1.0 (English)
Page 40
Using the Smart Auto mode 40 Using the Program mode 42 Using the Manual mode 43 Using the Scene mode 44 Using the Panorama mode 45 Using the Magic Plus mode 47 Using the Low Light Shot mode 47 Using the HDR mode 47 Using the Split Shot mode 48 Using the Photo Filter mode 49 Using the Movie Filter mode 50 Using the Movie mode 51 Recording high-speed videos 53 Using the Smart Scene Detection mode 54 Extended functions Learn how to capture a photo and record a video by selecting a mode.
Using the Smart Auto mode 40 Using the Program mode 42 Using the Manual mode 43 Using the Scene mode 44 Using the Panorama mode 45 Using the Magic Plus mode 47 Using the Low Light Shot mode 47 Using the HDR mode 47 Using the Split Shot mode 48 Using the Photo Filter mode 49 Using the Movie Filter mode 50 Using the Movie mode 51 Recording high-speed videos 53 Using the Smart Scene Detection mode 54 Extended functions Learn how to capture a photo and record a video by selecting a mode.

User Manual Ver.1.0 (English)
Page 44
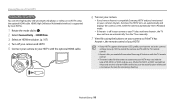
Change aperture/shutter speed Extended functions 43 Using the Manual mode The Manual mode allows you to adjust both the aperture value and the shutter speed manually. 1 Rotate the mode dial to . 2 Press [o], and then press [F/t] to select the aperture or shutter speed. 3 Press [D/c] to adjust the aperture value or shutter speed. 4 Set the desired options. • For a list of options, refer to "Shooting options". (p. 55) 5 Align your subject in the frame, and then half-press [Shutter] to focus. 6 Press [Shutter] to capture the photo.
Change aperture/shutter speed Extended functions 43 Using the Manual mode The Manual mode allows you to adjust both the aperture value and the shutter speed manually. 1 Rotate the mode dial to . 2 Press [o], and then press [F/t] to select the aperture or shutter speed. 3 Press [D/c] to adjust the aperture value or shutter speed. 4 Set the desired options. • For a list of options, refer to "Shooting options". (p. 55) 5 Align your subject in the frame, and then half-press [Shutter] to focus. 6 Press [Shutter] to capture the photo.
User Manual Ver.1.0 (English)
Page 56
... a self portrait shot 67 Capturing a smile shot 68 Detecting eye blinking 68 Tips for detecting faces 69 Adjusting brightness and color 70 Adjusting the exposure manually (EV 70 Locking the exposure value (AEL 71 Compensating for backlighting (ACB 71 Changing the metering option 72 Selecting a White Balance setting 72 Using burst...
... a self portrait shot 67 Capturing a smile shot 68 Detecting eye blinking 68 Tips for detecting faces 69 Adjusting brightness and color 70 Adjusting the exposure manually (EV 70 Locking the exposure value (AEL 71 Compensating for backlighting (ACB 71 Changing the metering option 72 Selecting a White Balance setting 72 Using burst...

User Manual Ver.1.0 (English)
Page 71
... change the exposure value later to adjust the brightness and color for better image quality. You may be too bright or dark. Adjusting the exposure manually (EV) Depending on an appropriate exposure, select AE Bracket, and then capture bracketed photos. The camera will capture 3 consecutive photos, each with a different exposure: normal...
... change the exposure value later to adjust the brightness and color for better image quality. You may be too bright or dark. Adjusting the exposure manually (EV) Depending on an appropriate exposure, select AE Bracket, and then capture bracketed photos. The camera will capture 3 consecutive photos, each with a different exposure: normal...

User Manual Ver.1.0 (English)
Page 72
... and color Locking the exposure value (AEL) The adjusted exposure value locks when [A] is pressed, and remains locked until [A] is pressed again. 1 Adjust the exposure manually. (p. 70) 2 Press [A]. • The AEL ( ) icon turns on in the photo.
... and color Locking the exposure value (AEL) The adjusted exposure value locks when [A] is pressed, and remains locked until [A] is pressed again. 1 Adjust the exposure manually. (p. 70) 2 Press [A]. • The AEL ( ) icon turns on in the photo.

User Manual Ver.1.0 (English)
Page 92
... option. Playback/Editing 91 Resizing photos Change the size of the photo. 5 Press [c] to save it as new files. • When you rotate or resize manually are not automatically converted to a lower resolution. • You cannot edit a photo while viewing a folder. Rotate : Right 90˚ Back Set Cancel Save Available resize...
... option. Playback/Editing 91 Resizing photos Change the size of the photo. 5 Press [c] to save it as new files. • When you rotate or resize manually are not automatically converted to a lower resolution. • You cannot edit a photo while viewing a folder. Rotate : Right 90˚ Back Set Cancel Save Available resize...
User Manual Ver.1.0 (English)
Page 97
...the camera's settings menu (p. 107) to control the camera and TV with the TV's remote control. • Anynet+ lets you use. Turn the TV on manually. 7 View files using the optional HDMI cable. Playback/Editing 96 A faster SD, SDHC, or SDXC card will not necessarily result in a faster HDMI transfer, ... not have turned on your camera or, if the TV has Anynet+, the remote control of SD, SDHC, or SDXC card you control all connected Samsung A/V devices with the TV remote control. • The time it takes for the camera to connect to improve the transfer rate during shooting. Viewing ...
...the camera's settings menu (p. 107) to control the camera and TV with the TV's remote control. • Anynet+ lets you use. Turn the TV on manually. 7 View files using the optional HDMI cable. Playback/Editing 96 A faster SD, SDHC, or SDXC card will not necessarily result in a faster HDMI transfer, ... not have turned on your camera or, if the TV has Anynet+, the remote control of SD, SDHC, or SDXC card you control all connected Samsung A/V devices with the TV remote control. • The time it takes for the camera to connect to improve the transfer rate during shooting. Viewing ...

User Manual Ver.1.0 (English)
Page 122
... in the summertime. • Do not place the battery in a microwave oven. • Avoid storing or using the battery in this user manual. • Do not place the battery near heating devices or expose it to excessively warm environments, such as the inside of the battery with ..., or electric blankets for a prolonged period. • When the device is handled carelessly or improperly. Dispose of the battery in this user manual. If you notice any confined space for charging the battery Charge the battery only by country or region. Appendixes 121 Camera maintenance Personal injury or...
... in the summertime. • Do not place the battery in a microwave oven. • Avoid storing or using the battery in this user manual. • Do not place the battery near heating devices or expose it to excessively warm environments, such as the inside of the battery with ..., or electric blankets for a prolonged period. • When the device is handled carelessly or improperly. Dispose of the battery in this user manual. If you notice any confined space for charging the battery Charge the battery only by country or region. Appendixes 121 Camera maintenance Personal injury or...

User Manual Ver.1.0 (English)
Page 127
...; Modes: Smart Auto (Portrait, Night Portrait, Backlight Portrait, Night, Backlight, Landscape, White, Natural Green, Blue Sky, Sunset, Macro, Macro text, Macro Color, Tripod, Action), Program, Manual, Scene (Frame Guide, Night, Portrait, Children, Landscape, Close up, Text, Sunset, Dawn, Backlight, Fireworks, Beach & Snow), Panorama, Magic Plus (Low Light Shot, HDR, Split Shot...
...; Modes: Smart Auto (Portrait, Night Portrait, Backlight Portrait, Night, Backlight, Landscape, White, Natural Green, Blue Sky, Sunset, Macro, Macro text, Macro Color, Tripod, Action), Program, Manual, Scene (Frame Guide, Night, Portrait, Children, Landscape, Close up, Text, Sunset, Dawn, Backlight, Fireworks, Beach & Snow), Panorama, Magic Plus (Low Light Shot, HDR, Split Shot...

User Manual Ver.1.0 (English)
Page 134
... that the product and its electronic accessories should not be disposed of with separate collection systems) This marking on the battery, manual or packaging indicates that the battery contains mercury, cadmium or lead above the reference levels in EC Directive 2006/66. This ...should contact their supplier and check the terms and conditions of their working life. CAN ICES-3 (B)/NMB-3(B) PlanetFirst represents Samsung Electronics' commitment to our website: www.samsung.com/recyclingdirect Or call, (877) 278 - 0799 Appendixes 133 To find the nearest recycling location, go to ...
... that the product and its electronic accessories should not be disposed of with separate collection systems) This marking on the battery, manual or packaging indicates that the battery contains mercury, cadmium or lead above the reference levels in EC Directive 2006/66. This ...should contact their supplier and check the terms and conditions of their working life. CAN ICES-3 (B)/NMB-3(B) PlanetFirst represents Samsung Electronics' commitment to our website: www.samsung.com/recyclingdirect Or call, (877) 278 - 0799 Appendixes 133 To find the nearest recycling location, go to ...

User Manual Ver.1.0 (English)
Page 137
... Macro 64 Macro 64 Super Macro 64 Magic Plus mode HDR 47 Low Light Shot 47 Movie Filter 50 Photo Filter 49 Split Shot 48 Manual mode 43 Appendixes 136
... Macro 64 Macro 64 Super Macro 64 Magic Plus mode HDR 47 Low Light Shot 47 Movie Filter 50 Photo Filter 49 Split Shot 48 Manual mode 43 Appendixes 136


