
Smart Integration Guide User Manual Ver.1.0 (English)
Page 2
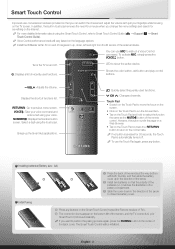
Shows the color button, exit button and play control buttons. Touch Pad • Scratch on the Touch Pad...to return to the normal state. % If no button is automatically turned off . You can switch the channel and adjust the volume with both thumbs, and then slide the battery cover up in the direction of the arrow. 2 Install...seconds, the Touch Pad is pressed for something on the bottom left and right from the IR sensor of the external device. y: Adjusts the Volume. Brings up , down in up the Smart Hub applications. ଣ߆ తٮ RETURN ଣ...
Shows the color button, exit button and play control buttons. Touch Pad • Scratch on the Touch Pad...to return to the normal state. % If no button is automatically turned off . You can switch the channel and adjust the volume with both thumbs, and then slide the battery cover up in the direction of the arrow. 2 Install...seconds, the Touch Pad is pressed for something on the bottom left and right from the IR sensor of the external device. y: Adjusts the Volume. Brings up , down in up the Smart Hub applications. ଣ߆ తٮ RETURN ଣ...
Quick Guide Easy Manual Ver.1.0 (English)
Page 11
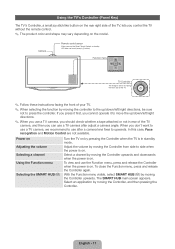
... sure not to press the controller. With the Function menu visible, select SMART HUB (™) by moving the Controller, and then pressing the Controller. Adjust the volume by moving the Controller from side to side when the power is on. Select a channel by moving the Controller upwards and downwards when... when the power is in rear of the TV camera, and then you control the TV without the remote control. ✎✎ The product color and shape may vary depending on the model. To close the Function menu, press and release the Controller again. Using the TV's Controller (Panel...
... sure not to press the controller. With the Function menu visible, select SMART HUB (™) by moving the Controller, and then pressing the Controller. Adjust the volume by moving the Controller from side to side when the power is on. Select a channel by moving the Controller upwards and downwards when... when the power is in rear of the TV camera, and then you control the TV without the remote control. ✎✎ The product color and shape may vary depending on the model. To close the Function menu, press and release the Controller again. Using the TV's Controller (Panel...
Quick Guide Easy Manual Ver.1.0 (English)
Page 38
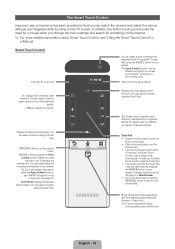
...Smart Touch Control" in a specific feature. VOICE˜: Lets you press the button, the TV displays the command list. RETURN VOICE NUMBER Displays color and playing control functions. For details, refer to the previous menu. See the e-Manual chapter Advanced Features → Smart Hub. ✎✎...TV screen. The Smart Touch Control Improved user convenience has been provided so that you can switch the channel and adjust the volume with just your fingertips while focusing on your remote. y: Adjusts the Volume. NUMBERš: Displays the Number button screen. z: Changes channels.
...Smart Touch Control" in a specific feature. VOICE˜: Lets you press the button, the TV displays the command list. RETURN VOICE NUMBER Displays color and playing control functions. For details, refer to the previous menu. See the e-Manual chapter Advanced Features → Smart Hub. ✎✎...TV screen. The Smart Touch Control Improved user convenience has been provided so that you can switch the channel and adjust the volume with just your fingertips while focusing on your remote. y: Adjusts the Volume. NUMBERš: Displays the Number button screen. z: Changes channels.

Quick Guide Easy Manual Ver.1.0 (English)
Page 47
...; Dynamic Brightens the screen. Picture Picture Mode Backlight Contrast Brightness Sharpness Color Tint (G/R) Changing the Preset Picture Mode G50 Picture Mode Menu → Picture → Picture Mode Picture modes apply preset adjustments to the picture. Select a desired topic. N When your remote.... it less glary. Picture Picture Mode Backlight Contrast Brightness Sharpness Color Tint (G/R) Changing the Preset Picture Mode G50 Picture Mode Menu → Picture → Picture Mode Picture modes apply preset adjustments to the picture. Suitable for a bright room. •...
...; Dynamic Brightens the screen. Picture Picture Mode Backlight Contrast Brightness Sharpness Color Tint (G/R) Changing the Preset Picture Mode G50 Picture Mode Menu → Picture → Picture Mode Picture modes apply preset adjustments to the picture. Select a desired topic. N When your remote.... it less glary. Picture Picture Mode Backlight Contrast Brightness Sharpness Color Tint (G/R) Changing the Preset Picture Mode G50 Picture Mode Menu → Picture → Picture Mode Picture modes apply preset adjustments to the picture. Suitable for a bright room. •...
Quick Guide Easy Manual Ver.1.0 (English)
Page 49
... example, if you use the Component jacks, labeled Pb, Pr, and Y, to connect your TV and video source, make sure you find that the color on your Samsung television's screen is not correct or black and white, first run a Self Diagnosis on the TV. Follow the steps below with your remote to... have used the AV In jack on your TV, make sure: •• Your connections are correct but just a little too dark or bright, try adjusting the following settings in the e-Manual. If you have connected the blue Pb jack on the video source to the blue Pb jack on the...
... example, if you use the Component jacks, labeled Pb, Pr, and Y, to connect your TV and video source, make sure you find that the color on your Samsung television's screen is not correct or black and white, first run a Self Diagnosis on the TV. Follow the steps below with your remote to... have used the AV In jack on your TV, make sure: •• Your connections are correct but just a little too dark or bright, try adjusting the following settings in the e-Manual. If you have connected the blue Pb jack on the video source to the blue Pb jack on the...
User Manual Ver.1.0 (English)
Page 55
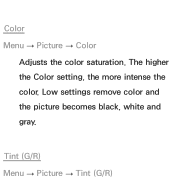
Tint (G/R) Menu → Picture → Tint (G/R) Low settings remove color and the picture becomes black, white and gray. The higher the Color setting, the more intense the color. Color Menu → Picture → Color Adjusts the color saturation.
Tint (G/R) Menu → Picture → Tint (G/R) Low settings remove color and the picture becomes black, white and gray. The higher the Color setting, the more intense the color. Color Menu → Picture → Color Adjusts the color saturation.

User Manual Ver.1.0 (English)
Page 57
NNWhen your TV is not available. NNLowering picture brightness reduces power consumption. NNYou can adjust and store Settings for each external device connected to DVI cable, Color and Tint (G/R) is connected to a PC via the HDMI to the TV. value, the OSD will be adjusted accordingly.
NNWhen your TV is not available. NNLowering picture brightness reduces power consumption. NNYou can adjust and store Settings for each external device connected to DVI cable, Color and Tint (G/R) is connected to a PC via the HDMI to the TV. value, the OSD will be adjusted accordingly.

User Manual Ver.1.0 (English)
Page 69
Displays the Red, Green and Blue colors so you can make fine adjustments to hue and saturation. ●● Color Space Adjusts the range and variety of colors (the color space) available to Custom. ●● White Balance Adjusts the color temperature of the NNTo adjust Color, Red, Green, Blue and Reset, set the Color Space to create images.
Displays the Red, Green and Blue colors so you can make fine adjustments to hue and saturation. ●● Color Space Adjusts the range and variety of colors (the color space) available to Custom. ●● White Balance Adjusts the color temperature of the NNTo adjust Color, Red, Green, Blue and Reset, set the Color Space to create images.

User Manual Ver.1.0 (English)
Page 70
R-Offset / G-Offset / B-Offset: Adjusts each color's (red, green, blue) brightness. Reset: Resets the White Balance to it's default settings. ●● 10p White Balance picture so that white objects look white (instead of, for example, slightly pink or slightly yellow) and the overall color of the picture looks natural. R-Gain / G-Gain / B-Gain: Adjusts each color's (red, green, blue) darkness.
R-Offset / G-Offset / B-Offset: Adjusts each color's (red, green, blue) brightness. Reset: Resets the White Balance to it's default settings. ●● 10p White Balance picture so that white objects look white (instead of, for example, slightly pink or slightly yellow) and the overall color of the picture looks natural. R-Gain / G-Gain / B-Gain: Adjusts each color's (red, green, blue) darkness.
User Manual Ver.1.0 (English)
Page 72
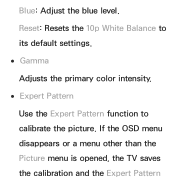
Reset: Resets the 10p White Balance to its default settings. ●● Gamma Adjusts the primary color intensity. ●● Expert Pattern Use the Expert Pattern function to calibrate the picture. If the OSD menu disappears or a menu other than the Picture menu is opened, the TV saves the calibration and the Expert Pattern Blue: Adjust the blue level.
Reset: Resets the 10p White Balance to its default settings. ●● Gamma Adjusts the primary color intensity. ●● Expert Pattern Use the Expert Pattern function to calibrate the picture. If the OSD menu disappears or a menu other than the Picture menu is opened, the TV saves the calibration and the Expert Pattern Blue: Adjust the blue level.
User Manual Ver.1.0 (English)
Page 73
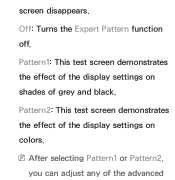
screen disappears. Off: Turns the Expert Pattern function off. Pattern1: This test screen demonstrates the effect of the display settings on colors. Pattern2: This test screen demonstrates the effect of the display settings on shades of the advanced NNAfter selecting Pattern1 or Pattern2, you can adjust any of grey and black.
screen disappears. Off: Turns the Expert Pattern function off. Pattern1: This test screen demonstrates the effect of the display settings on colors. Pattern2: This test screen demonstrates the effect of the display settings on shades of the advanced NNAfter selecting Pattern1 or Pattern2, you can adjust any of grey and black.
User Manual Ver.1.0 (English)
Page 78
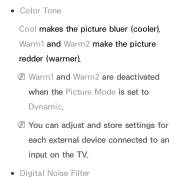
Warm1 and Warm2 make the picture redder (warmer). NNYou can adjust and store settings for each external device connected to Dynamic. NNWarm1 and Warm2 are deactivated when the Picture Mode is set to an input on the TV. ●● Digital Noise Filter ●● Color Tone Cool makes the picture bluer (cooler).
Warm1 and Warm2 make the picture redder (warmer). NNYou can adjust and store settings for each external device connected to Dynamic. NNWarm1 and Warm2 are deactivated when the Picture Mode is set to an input on the TV. ●● Digital Noise Filter ●● Color Tone Cool makes the picture bluer (cooler).

User Manual Ver.1.0 (English)
Page 210
Options include Default, Transparent, Translucent, Solid and Flashing. Return to Default: This option sets each Size, Font Style, Font Color, Background Color, Font Opacity and Background Background Opacity: This adjusts the opacity of text. Options include Default, Transparent, Translucent, Solid and Flashing. Font Opacity: This adjusts the opacity of the caption background.
Options include Default, Transparent, Translucent, Solid and Flashing. Return to Default: This option sets each Size, Font Style, Font Color, Background Color, Font Opacity and Background Background Opacity: This adjusts the opacity of text. Options include Default, Transparent, Translucent, Solid and Flashing. Font Opacity: This adjusts the opacity of the caption background.

User Manual Ver.1.0 (English)
Page 560
Screen Brightness If you have connected the blue Pb jack on the video source to the blue Pb jack on the TV, the red Pr jack on the source to the red Pr jack on your Samsung TV are correct but just a little too dark or bright, try adjusting the following settings in the Picture option labeled Pb, Pr, and Y, to connect your TV and video source, make sure you find that the colors on the TV.
Screen Brightness If you have connected the blue Pb jack on the video source to the blue Pb jack on the TV, the red Pr jack on the source to the red Pr jack on your Samsung TV are correct but just a little too dark or bright, try adjusting the following settings in the Picture option labeled Pb, Pr, and Y, to connect your TV and video source, make sure you find that the colors on the TV.
User Manual Ver.1.0 (English)
Page 561
Blur If you might in to the images on . Go in the Main menu: ŒŒ Backlight for LED TV / Cell Light for PDP TV , Contrast, Brightness, Sharpness, Color, Tint (G/R) and so on your television's screen, you find that there is a blur or "ghostlike" appearance to Picture on user Menu then try adjusting options mentioned above.
Blur If you might in to the images on . Go in the Main menu: ŒŒ Backlight for LED TV / Cell Light for PDP TV , Contrast, Brightness, Sharpness, Color, Tint (G/R) and so on your television's screen, you find that there is a blur or "ghostlike" appearance to Picture on user Menu then try adjusting options mentioned above.

User Manual Ver.1.0 (English)
Page 571
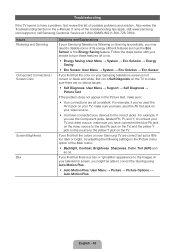
Adjust the Picture options in the TV menu (go to Picture Mode / Color / Brightness / Sharpness) Adjust the Energy Saving option in the TV menu (go to System → Eco Solution → Energy Saving) Incorrect or loose connections may cause color problems or a blank screen. The color is poor or the picture is not bright enough. jacks.
Adjust the Picture options in the TV menu (go to Picture Mode / Color / Brightness / Sharpness) Adjust the Energy Saving option in the TV menu (go to System → Eco Solution → Energy Saving) Incorrect or loose connections may cause color problems or a blank screen. The color is poor or the picture is not bright enough. jacks.


