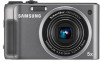
TL350 Cable - Samsung
TL350 Cable
Related Manual Pages


Similar Questions

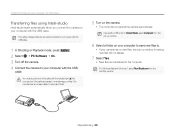
Data Transfer Cable.
We bought this Samsung S860 camera some years ago. I accept it's probably obsolete now, but up until...
We bought this Samsung S860 camera some years ago. I accept it's probably obsolete now, but up until...
(Posted by davesmith1953 3 years ago)

Need A Power Charger An Cable. Were And How Much? Thanks
(Posted by borsodi 8 years ago)
