Samsung TL110 Battery
Related Manual Pages


Similar Questions

Camera Batteries
what batteries should I use with this camera?
what batteries should I use with this camera?
(Posted by cheyennedouglas2018 1 year ago)

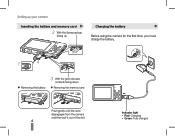
Why Need Reset Date/time Whenever Change Battery?
I am a happy owner of Samsung ST600 for 3+ years. I don't have any problem with it. Only recently, I...
I am a happy owner of Samsung ST600 for 3+ years. I don't have any problem with it. Only recently, I...
(Posted by chenjumy 10 years ago)

St76 When To Change The Battery
Why does the ST76 battery need to be changed? Does the battery save pictures and videos? Do I need t...
Why does the ST76 battery need to be changed? Does the battery save pictures and videos? Do I need t...
(Posted by kpauler 10 years ago)
Related Terms
The following terms were also used when searching for Samsung TL110 Battery:- samsung tl110
- tl110 samsung
- samsung tl110 camera
- tl110 camera
- samsung tl110 review
- samsung tl110 digital camera
- samsung tl110 price
- tl110 review
- tl110 digital camera
- samsung tl110 reviews
- tl110 price
- samsung tl110 case
- samsung tl110 prices
- samsung tl110 rating
- tl110 charger
- tl110 driver
- tl110 samsung review
- samsung tl110 manual
- tl110 accessories
- tl110 digital camera review
- tl110 manual
- tl110 memory card
- tl110 rating
- tl110 camera reviews
- tl110 case
- tl110 dimensions
- tl110 reviews
- camara digital samsung tl110
- camara digital tl110
- samsung tl110 14.2 megapixel digital camera
- samsung tl110 14.2 megapixels
- samsung tl110 accessories
- samsung tl110 battery
- samsung tl110 battery charger
- samsung tl110 camera accessories
- samsung tl110 camera charger
- samsung tl110 camera manual
- samsung tl110 camera price
- samsung tl110 camera review
- samsung tl110 camera reviews
- samsung tl110 camera user guide
- samsung tl110 charger
- samsung tl110 charger cable
- samsung tl110 charger cable and adapter
- samsung tl110 compact camera
- samsung tl110 costco
- samsung tl110 digital camera charger
- samsung tl110 digital camera review
- samsung tl110 dimensions
- samsung tl110 driver
- samsung tl110 driver download
- samsung tl110 drivers
- samsung tl110 manual pdf
- samsung tl110 max memory
- samsung tl110 memory card
- samsung tl110 orange
- samsung tl110 parts
- samsung tl110 power cord
- samsung tl110 software
- samsung tl110 software download
- samsung tl110 specs
- samsung tl110 troubleshooting
- samsung tl110 usb cable
- samsung tl110 usb cord
- samsung tl110 user manual
- samsung tl110 warranty
- tl110 14.2 megapixel digital camera
- tl110 14.2 megapixels
- tl110 battery
- tl110 battery charger
- tl110 camera accessories
- tl110 camera charger
- tl110 camera manual
- tl110 camera price
- tl110 camera review
- tl110 camera user guide
- tl110 charger cable
- tl110 charger cable and adapter
- tl110 compact camera
- tl110 costco
- tl110 digital camera charger
- tl110 driver download
- tl110 drivers
- tl110 instructions
- tl110 manual pdf
- tl110 max memory
- tl110 orange
- tl110 parts
- tl110 prices
- tl110 review samsung
- tl110 samsung camera
- tl110 samsung card reader
- tl110 samsung charger
- tl110 samsung manual
- tl110 samsung price
- tl110 samsung specs
- tl110 sdhc cards
- tl110 software
- tl110 software download
- tl110 specs
- tl110 troubleshooting
- tl110 usb cable
- tl110 user manual
- tl110 warranty