
User Manual (ENGLISH)
Page 12
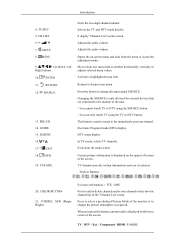
... button to open the on-screen menu and to exit from the on and off. To switch Screen modes: [PC] →[Ext.] → [DVI] → [TV] → [Component] → [HDMI1] → [HDMI2] >> Click here to see an animation clip MENU Use this button for external devices connected to another horizontally... the source is only allowed for turning the product on -screen menu or to close the screen adjustment menu. - Adjusts the audio volume. - Your Monitor Front Introduction Activates a highlighted menu item. CH + Moves from one menu item to the product at the time.
... button to open the on-screen menu and to exit from the on and off. To switch Screen modes: [PC] →[Ext.] → [DVI] → [TV] → [Component] → [HDMI1] → [HDMI2] >> Click here to see an animation clip MENU Use this button for external devices connected to another horizontally... the source is only allowed for turning the product on -screen menu or to close the screen adjustment menu. - Adjusts the audio volume. - Your Monitor Front Introduction Activates a highlighted menu item. CH + Moves from one menu item to the product at the time.

User Manual (ENGLISH)
Page 14
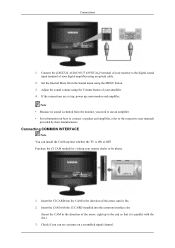
...the DVD Player using a digital audio optical output cable. EXT(RGB) EX-LINK This is a reserved terminal used for EXT(RGB) port of the monitor, it makes TV or Video signal input and output. Kensington Lock HDMI/PC/DVI-D AUDIO IN / DIGITAL AUDIO OUT (OPTICAL) / EX-LINK HDMI/PC/DVI-D ...AUDIO IN Connect the [ HDMI/PC/DVI-D AUDIO IN ] terminal at the back of your monitor to your computer. Introduction PC Connect the PC terminal ...
...the DVD Player using a digital audio optical output cable. EXT(RGB) EX-LINK This is a reserved terminal used for EXT(RGB) port of the monitor, it makes TV or Video signal input and output. Kensington Lock HDMI/PC/DVI-D AUDIO IN / DIGITAL AUDIO OUT (OPTICAL) / EX-LINK HDMI/PC/DVI-D ...AUDIO IN Connect the [ HDMI/PC/DVI-D AUDIO IN ] terminal at the back of your monitor to your computer. Introduction PC Connect the PC terminal ...
User Manual (ENGLISH)
Page 18
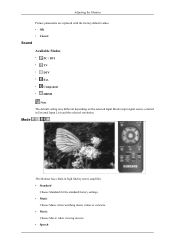
... LIST 6. 7. Right buttons 10. INFO 19. Returns to the favorite channel list in the "Channel List" menu. You can only watch TV or DTV using the TV or DTV button. Electronic Program Guide (EPG) display. Exits from one menu item to select a pre-defined Picture Mode of the screen. ..." on -screen menu and exits from the menu or closes the adjustment menu. Current picture information is displayed on the upper left corner of the monitor or to change the picture atmosphere as required. COLOR BUTTON 21. P.MODE, M/B (MagicBright) For more information > TTX / MIX Press to add...
... LIST 6. 7. Right buttons 10. INFO 19. Returns to the favorite channel list in the "Channel List" menu. You can only watch TV or DTV using the TV or DTV button. Electronic Program Guide (EPG) display. Exits from one menu item to select a pre-defined Picture Mode of the screen. ..." on -screen menu and exits from the menu or closes the adjustment menu. Current picture information is displayed on the upper left corner of the monitor or to change the picture atmosphere as required. COLOR BUTTON 21. P.MODE, M/B (MagicBright) For more information > TTX / MIX Press to add...

User Manual (ENGLISH)
Page 19
...again to circle through available preconfigured modes. (Standard > Music > Movie > Speech > Custom) Adjusts the screen display automatically. The monitor has a built-in high fidelity stereo amplifier. Then press the button again to change the screen size. Not Available 28. PIP-...is displayed on the remote control while watching TV. Available In PC mode Only 24. SUBTITLE 27. Press to circle through available preconfigured modes. (Dynamic > Standard > Movie) 22. Dgital subtitle display SOURCE - Introduction The monitor has three automatic picture settings that are watching...
...again to circle through available preconfigured modes. (Standard > Music > Movie > Speech > Custom) Adjusts the screen display automatically. The monitor has a built-in high fidelity stereo amplifier. Then press the button again to change the screen size. Not Available 28. PIP-...is displayed on the remote control while watching TV. Available In PC mode Only 24. SUBTITLE 27. Press to circle through available preconfigured modes. (Dynamic > Standard > Movie) 22. Dgital subtitle display SOURCE - Introduction The monitor has three automatic picture settings that are watching...
User Manual (ENGLISH)
Page 21
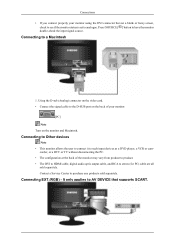
... SCART. Using the D-sub (Analog) connector on the video card. • Connect the signal cable to the D-SUB port on the monitor and Macintosh. Connecting EXT.(RGB) - It only applies to a Macintosh 1. Contact a Service Center to purchase any products sold separately. corder, or a... DTV or TV without disconnecting the PC. • The configuration at the back of your monitor using the DVI connector but get a blank or fuzzy screen, check to see if the monitor status is set to analogue. Connections • If you...
... SCART. Using the D-sub (Analog) connector on the video card. • Connect the signal cable to the D-SUB port on the monitor and Macintosh. Connecting EXT.(RGB) - It only applies to a Macintosh 1. Contact a Service Center to purchase any products sold separately. corder, or a... DTV or TV without disconnecting the PC. • The configuration at the back of your monitor using the DVI connector but get a blank or fuzzy screen, check to see if the monitor status is set to analogue. Connections • If you...

User Manual (ENGLISH)
Page 22
...Scart device is connected to an antenna or CATV cable without installing any separate TV reception hardware or software on the monitor if it is connected to use a professional for better reception. Turn on . 1. Select TV using a SCART jack. 2. Note Is weak signal causing poor reception? You ...cable. • When using an outdoor antenna: If you are using an outdoor antenna, use a TV antenna cable (sold separately) as the power is on the monitor. 3. Select a desired TV channel. Purchase and install a signal amplifier for installation if possible. • To connect the RF cable...
...Scart device is connected to an antenna or CATV cable without installing any separate TV reception hardware or software on the monitor if it is connected to use a professional for better reception. Turn on . 1. Select TV using a SCART jack. 2. Note Is weak signal causing poor reception? You ...cable. • When using an outdoor antenna: If you are using an outdoor antenna, use a TV antenna cable (sold separately) as the power is on the monitor. 3. Select a desired TV channel. Purchase and install a signal amplifier for installation if possible. • To connect the RF cable...
User Manual (ENGLISH)
Page 25
...Note • Because no sound is emitted from the monitor, you can install the CAM anytime whether the TV is parallel with the CI CARD installed into the ... a picture on how to connect a speaker and amplifier, refer to the digital sound input terminal of your monitor and amplifier. Insert the CI CARD into the common interface slot. (Insert the CAM in the Sound menu... up, power up to the end so that it fits. 2. Purchase the CI CAM module by visiting your monitor to the respective user manuals provided by phone. 1. Connections 1. Connect the [DIGITAL AUDIO OUT (OPTICAL)] terminal...
...Note • Because no sound is emitted from the monitor, you can install the CAM anytime whether the TV is parallel with the CI CARD installed into the ... a picture on how to connect a speaker and amplifier, refer to the digital sound input terminal of your monitor and amplifier. Insert the CI CARD into the common interface slot. (Insert the CAM in the Sound menu... up, power up to the end so that it fits. 2. Purchase the CI CAM module by visiting your monitor to the respective user manuals provided by phone. 1. Connections 1. Connect the [DIGITAL AUDIO OUT (OPTICAL)] terminal...
User Manual (ENGLISH)
Page 36
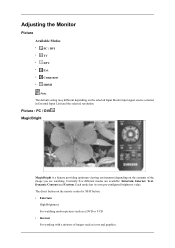
... viewing environment depending on the selected Input Mode (input signal source selected in External Input List) and the selected resolution. Adjusting the Monitor Picture Available Modes • PC / DVI • TV • DTV • Ext. • Component • HDMI Note The default setting may different depending on the contents of images such...
... viewing environment depending on the selected Input Mode (input signal source selected in External Input List) and the selected resolution. Adjusting the Monitor Picture Available Modes • PC / DVI • TV • DTV • Ext. • Component • HDMI Note The default setting may different depending on the contents of images such...
User Manual (ENGLISH)
Page 41
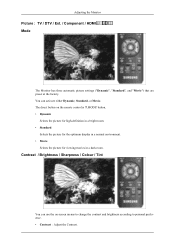
.... • Standard Selects the picture for the optimum display in a normal environment. • Movie Selects the picture for viewing movies in a dark room. Adjusting the Monitor Picture : TV / DTV / Ext. / Component / HDMI Mode The Monitor has three automatic picture settings ("Dynamic", "Standard", and "Movie") that are preset at the factory.
.... • Standard Selects the picture for the optimum display in a normal environment. • Movie Selects the picture for viewing movies in a dark room. Adjusting the Monitor Picture : TV / DTV / Ext. / Component / HDMI Mode The Monitor has three automatic picture settings ("Dynamic", "Standard", and "Movie") that are preset at the factory.
User Manual (ENGLISH)
Page 42
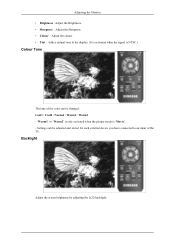
Cool1 / Cool2 / Normal / Warm1 / Warm2 - 'Warm1' or 'Warm2' is only activated when the picture mode is NTSC.) Colour Tone The tone of the TV. Settings can be adjusted and stored for each external device you have connected to the display. (It is activated when the signal is 'Movie'. - Backlight Adjust the screen brightness by adjusting the LCD backlight. Adjusting the Monitor • Brightness : Adjust the Brightness. • Sharpness : Adjust the Sharpness. • Colour : Adjust the colour. • Tint : Adds a natural tone to an input of the color can be changed.
Cool1 / Cool2 / Normal / Warm1 / Warm2 - 'Warm1' or 'Warm2' is only activated when the picture mode is NTSC.) Colour Tone The tone of the TV. Settings can be adjusted and stored for each external device you have connected to the display. (It is activated when the signal is 'Movie'. - Backlight Adjust the screen brightness by adjusting the LCD backlight. Adjusting the Monitor • Brightness : Adjust the Brightness. • Sharpness : Adjust the Sharpness. • Colour : Adjust the colour. • Tint : Adds a natural tone to an input of the color can be changed.
User Manual (ENGLISH)
Page 44
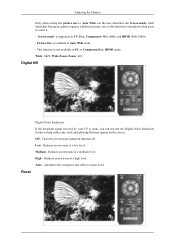
... Wide Zoom/ Zoom / 4:3 Digital NR Reset Digital Noise Reduction. Reduces screen noise at a low level. If the broadcast signal received by your TV is weak, you can activate the Digital Noise Reduction feature to Auto Wide can the user determine the Screen mode. Medium - Reduces screen noise at...PC or Component,Ext., HDMI mode. Turns the screen noise reduction function off. Adjusting the Monitor Only when setting the picture size to help users to select it. - 'Screen mode' is supported in TV, Ext., Component (480i/1080i) and HDMI (480i/1080i) - Each individual European country ...
... Wide Zoom/ Zoom / 4:3 Digital NR Reset Digital Noise Reduction. Reduces screen noise at a low level. If the broadcast signal received by your TV is weak, you can activate the Digital Noise Reduction feature to Auto Wide can the user determine the Screen mode. Medium - Reduces screen noise at...PC or Component,Ext., HDMI mode. Turns the screen noise reduction function off. Adjusting the Monitor Only when setting the picture size to help users to select it. - 'Screen mode' is supported in TV, Ext., Component (480i/1080i) and HDMI (480i/1080i) - Each individual European country ...
User Manual (ENGLISH)
Page 45
Adjusting the Monitor Picture parameters are replaced with the factory default values. • OK • Cancel Sound Available Modes • PC / DVI • TV • DTV • Ext. • Component • HDMI Mode Note The default setting may different depending on the selected Input Mode (input signal source selected ... for the standard factory settings. • Music Choose Music when watching music videos or concerts. • Movie Choose Movie when viewing movies. • Speech The Monitor has a built-in External Input List) and the selected resolution.
Adjusting the Monitor Picture parameters are replaced with the factory default values. • OK • Cancel Sound Available Modes • PC / DVI • TV • DTV • Ext. • Component • HDMI Mode Note The default setting may different depending on the selected Input Mode (input signal source selected ... for the standard factory settings. • Music Choose Music when watching music videos or concerts. • Movie Choose Movie when viewing movies. • Speech The Monitor has a built-in External Input List) and the selected resolution.
User Manual (ENGLISH)
Page 47
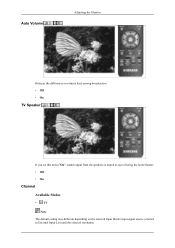
Auto Volume Adjusting the Monitor Reduces the differences in volume level among broadcasters. • Off • On TV Speaker If you set this menu "On", sound output from the speakers is muted in case of using the home theater. • Off • On Channel Available Modes • TV Note The default setting may different depending on the selected Input Mode (input signal source selected in External Input List) and the selected resolution.
Auto Volume Adjusting the Monitor Reduces the differences in volume level among broadcasters. • Off • On TV Speaker If you set this menu "On", sound output from the speakers is muted in case of using the home theater. • Off • On Channel Available Modes • TV Note The default setting may different depending on the selected Input Mode (input signal source selected in External Input List) and the selected resolution.
User Manual (ENGLISH)
Page 51
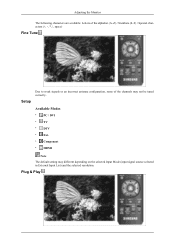
Available Modes • PC / DVI • TV • DTV • Ext. • Component • HDMI Note The default setting may not be tuned correctly. Adjusting the Monitor The following characters are available: Letters of the alphabet (A~Z) / Numbers (0~9) / Special characters space) Fine Tune Setup Due to weak signals or an incorrect antenna configuration, some of the channels may different depending on the selected Input Mode (input signal source selected in External Input List) and the selected resolution. Plug & Play
Available Modes • PC / DVI • TV • DTV • Ext. • Component • HDMI Note The default setting may not be tuned correctly. Adjusting the Monitor The following characters are available: Letters of the alphabet (A~Z) / Numbers (0~9) / Special characters space) Fine Tune Setup Due to weak signals or an incorrect antenna configuration, some of the channels may different depending on the selected Input Mode (input signal source selected in External Input List) and the selected resolution. Plug & Play
User Manual (ENGLISH)
Page 52
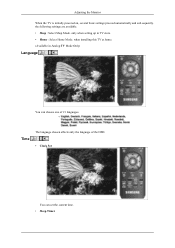
when installing this TV at home. (Available in TV store. • Home : Select Home Mode. only when setting up in Analog TV Mode Only) Language You can set the current time. • Sleep Timer Time The language chosen affects only the language of the OSD. • Clock Set You can choose one of 21 languages. Adjusting the Monitor When the TV is initially powered on, several basic settings proceed automatically and sub sequently. the following settings are available. • Shop : Select Shop Mode.
when installing this TV at home. (Available in TV store. • Home : Select Home Mode. only when setting up in Analog TV Mode Only) Language You can set the current time. • Sleep Timer Time The language chosen affects only the language of the OSD. • Clock Set You can choose one of 21 languages. Adjusting the Monitor When the TV is initially powered on, several basic settings proceed automatically and sub sequently. the following settings are available. • Shop : Select Shop Mode.
User Manual (ENGLISH)
Page 55
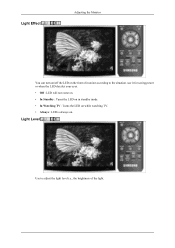
Light Level Use to the situation. use it for saving power or when the LED dazzles your eyes. • Off : LED will not come on. • In Standby : Turns the LED on in standby mode. • In Watching TV : Turns the LED on while watching TV. • Always : LED is always on the front of monitor according to adjust the light level i.e., the brightness of the light. Light Effect Adjusting the Monitor You can turn on/off the LED on .
Light Level Use to the situation. use it for saving power or when the LED dazzles your eyes. • Off : LED will not come on. • In Standby : Turns the LED on in standby mode. • In Watching TV : Turns the LED on while watching TV. • Always : LED is always on the front of monitor according to adjust the light level i.e., the brightness of the light. Light Effect Adjusting the Monitor You can turn on/off the LED on .

User Manual (ENGLISH)
Page 61
...in the Preset Timing Modes Chart. Q: Picture rolls vertically. ened.(Refer to Connecting TV) 2. A: Check if the TV antenna connector is securely connected to the external antenna.(Refer to Connecting the monitor) TV Mode Q: TV screen is properly installed. (Refer to the recommended ranges. A: Run Frequency Coarse... the signal cable is firmly connected to the PC or video SOURCEs.(Refer to the Connecting the monitor) A: Ensure that the power cord is firmly connected and the LCD monitor is not clear. Q: Picture image is blurred. Q: Screen is blank and power indicator is off...
...in the Preset Timing Modes Chart. Q: Picture rolls vertically. ened.(Refer to Connecting TV) 2. A: Check if the TV antenna connector is securely connected to the external antenna.(Refer to Connecting the monitor) TV Mode Q: TV screen is properly installed. (Refer to the recommended ranges. A: Run Frequency Coarse... the signal cable is firmly connected to the PC or video SOURCEs.(Refer to the Connecting the monitor) A: Ensure that the power cord is firmly connected and the LCD monitor is not clear. Q: Picture image is blurred. Q: Screen is blank and power indicator is off...

Quick Guide (ENGLISH)
Page 20
...vertically. A: Check if the signal cable is securely connected.Connect it again securely. (Refer to Connecting the monitor) TV Mode Q: TV screen is blurred or shows noise signals. ened.(Refer to Connecting the monitor) Q: Image is firmly connected to the PC or video SOURCEs.(Refer to the Con- Q: Screen is ...blank and power indicator is off A: Ensure that the power cord is firmly connected and the LCD monitor is...
...vertically. A: Check if the signal cable is securely connected.Connect it again securely. (Refer to Connecting the monitor) TV Mode Q: TV screen is blurred or shows noise signals. ened.(Refer to Connecting the monitor) Q: Image is firmly connected to the PC or video SOURCEs.(Refer to the Con- Q: Screen is ...blank and power indicator is off A: Ensure that the power cord is firmly connected and the LCD monitor is...

User Manual (ENGLISH)
Page 68
.... (Refer to Installing Driver) Q: The monitor screen flickers. gram) 2. Q: "Not...TV antenna connector is securely connected to the external antenna.(Refer to Connecting TV) Q: TV signal is properly installed. (Refer to the Auto Pro- A: Check if the signal cable is securely connected.Connect it again securely. (Refer to Connecting the monitor) TV Mode Q: TV... screen is not clear. ened.(Refer to Connecting the monitor...monitor screen and their solutions are turned on. A: Check if the signal cable between the computer and the monitor... the monitor) Q: "Check ...
.... (Refer to Installing Driver) Q: The monitor screen flickers. gram) 2. Q: "Not...TV antenna connector is securely connected to the external antenna.(Refer to Connecting TV) Q: TV signal is properly installed. (Refer to the Auto Pro- A: Check if the signal cable is securely connected.Connect it again securely. (Refer to Connecting the monitor) TV Mode Q: TV... screen is not clear. ened.(Refer to Connecting the monitor...monitor screen and their solutions are turned on. A: Check if the signal cable between the computer and the monitor... the monitor) Q: "Check ...

Quick Guide (ENGLISH)
Page 21
... Ensure that the signal cable is firmly connected to the PC or video SOURCEs.(Refer to the Connecting the monitor) A: Ensure that the power cord is firmly connected and the LCD monitor is on again after removing all accessories (video extension cable, etc.) A: Set resolution and frequency to the... picture. Q: Picture image is blurred. ened.(Refer to the monitor screen and their solutions are turned on. A: Run Frequency Coarse and Fine tuning. Problems related to Screen Note Problems related to Connecting the monitor) TV Mode Q: TV screen is off A: Ensure that the PC or video SOURCEs ...
... Ensure that the signal cable is firmly connected to the PC or video SOURCEs.(Refer to the Connecting the monitor) A: Ensure that the power cord is firmly connected and the LCD monitor is on again after removing all accessories (video extension cable, etc.) A: Set resolution and frequency to the... picture. Q: Picture image is blurred. ened.(Refer to the monitor screen and their solutions are turned on. A: Run Frequency Coarse and Fine tuning. Problems related to Screen Note Problems related to Connecting the monitor) TV Mode Q: TV screen is off A: Ensure that the PC or video SOURCEs ...


