
User Manual (ENGLISH)
Page 8
... product. Safety Instructions Be careful that children or infants cannot reach. • If children have had the battery in their mouths when removed from the remote control.
... product. Safety Instructions Be careful that children or infants cannot reach. • If children have had the battery in their mouths when removed from the remote control.
User Manual (ENGLISH)
Page 11
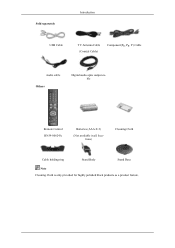
Sold separately Introduction USB Cable TV Antenna Cable (Coaxial Cable) Component(PR, PB, Y) Cable Audio cable Others Digital audio optic output cable Remote Control BN59-00624A Batteries (AAA X 2) (Not available in all locations) Cleaning Cloth Cable holding ring Stand Body Stand Base Note Cleaning Cloth is only provided for highly polished black products as a product feature.
Sold separately Introduction USB Cable TV Antenna Cable (Coaxial Cable) Component(PR, PB, Y) Cable Audio cable Others Digital audio optic output cable Remote Control BN59-00624A Batteries (AAA X 2) (Not available in all locations) Cleaning Cloth Cable holding ring Stand Body Stand Base Note Cleaning Cloth is only provided for highly polished black products as a product feature.
User Manual (ENGLISH)
Page 17
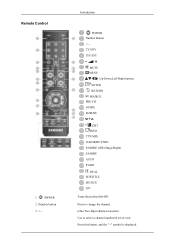
Press to change the channel. (One/Two-Digit channel selection) Use to select a channel numbered ten or over. Introduction POWER Number Button -/-TV/DTV CH LIST MUTE MENU Up-Down Left-Right buttons ENTER RETURN SOURCE PRE-CH GUIDE D.MENU P EXIT INFO TTX/MIX COLOR BUTTON P.MODE, M/B (MagicBright) S.MODE AUTO P.SIZE DUAL SUBTITLE SOURCE PIP Turns the product On/Off. Remote Control 1. Press this button, and the "--" symbol is displayed. Number button 3. -/-- POWER 2.
Press to change the channel. (One/Two-Digit channel selection) Use to select a channel numbered ten or over. Introduction POWER Number Button -/-TV/DTV CH LIST MUTE MENU Up-Down Left-Right buttons ENTER RETURN SOURCE PRE-CH GUIDE D.MENU P EXIT INFO TTX/MIX COLOR BUTTON P.MODE, M/B (MagicBright) S.MODE AUTO P.SIZE DUAL SUBTITLE SOURCE PIP Turns the product On/Off. Remote Control 1. Press this button, and the "--" symbol is displayed. Number button 3. -/-- POWER 2.

User Manual (ENGLISH)
Page 19
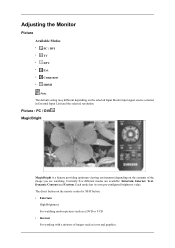
Available In PC mode Only 24. DUAL 26. Then press the button again to circle through available preconfigured modes. (Dynamic > Standard > Movie) 22. mode: Auto Wide / Wide / 16:9 / Wide Zoom / Zoom / 4:3 Component mode: Wide / 16:9 / Wide Zoom / Zoom / 4:3 HDMI mode: Wide ...optimum viewing environment depending on the contents of the image you press this button, current mode is displayed on the remote control while watching TV. Introduction The monitor has three automatic picture settings that are watching. AUTO - Press to circle through available preconfigured modes. (Standard ...
Available In PC mode Only 24. DUAL 26. Then press the button again to circle through available preconfigured modes. (Dynamic > Standard > Movie) 22. mode: Auto Wide / Wide / 16:9 / Wide Zoom / Zoom / 4:3 Component mode: Wide / 16:9 / Wide Zoom / Zoom / 4:3 HDMI mode: Wide ...optimum viewing environment depending on the contents of the image you press this button, current mode is displayed on the remote control while watching TV. Introduction The monitor has three automatic picture settings that are watching. AUTO - Press to circle through available preconfigured modes. (Standard ...
User Manual (ENGLISH)
Page 36
... pre-configured brightness value. Adjusting the Monitor Picture Available Modes • PC / DVI • TV • DTV • Ext. • Component • HDMI Note The default setting may different depending on the contents of images such as texts and graphics. The direct button on the remote control is a feature providing optimum viewing environment...
... pre-configured brightness value. Adjusting the Monitor Picture Available Modes • PC / DVI • TV • DTV • Ext. • Component • HDMI Note The default setting may different depending on the contents of images such as texts and graphics. The direct button on the remote control is a feature providing optimum viewing environment...

User Manual (ENGLISH)
Page 38
Adjusting the Monitor The values of Fine, Coarse, Position are adjusted automatically. By changing the resolution in PC mode only) • Coarse / Fine : • Coarse Removes noise such ... speed). • Position Adjusts the screen location horizontally and vertically. • Image Reset The direct button on the remote control is the 'AUTO' button. (Available in PC Mode Only) Screen Adjustment (Available in the control panel, auto function is performed. Coarse adjustment may relocate it after Fine tuning, repeat it to the center...
Adjusting the Monitor The values of Fine, Coarse, Position are adjusted automatically. By changing the resolution in PC mode only) • Coarse / Fine : • Coarse Removes noise such ... speed). • Position Adjusts the screen location horizontally and vertically. • Image Reset The direct button on the remote control is the 'AUTO' button. (Available in PC Mode Only) Screen Adjustment (Available in the control panel, auto function is performed. Coarse adjustment may relocate it after Fine tuning, repeat it to the center...
User Manual (ENGLISH)
Page 41
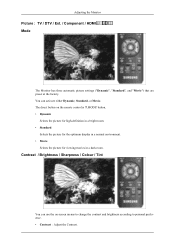
...menus to change the contrast and brightness according to personal preference. • Contrast : Adjust the Contrast. You can use the on the remote control is 'P.MODE' button. • Dynamic Selects the picture for high-definition in a bright room. • Standard Selects the picture for... room. Contrast / Brightness / Sharpness / Colour / Tint You can activate either Dynamic, Standard, or Movie. Adjusting the Monitor Picture : TV / DTV / Ext. / Component / HDMI Mode The Monitor has three automatic picture settings ("Dynamic", "Standard", and "Movie") that are preset at the factory.
...menus to change the contrast and brightness according to personal preference. • Contrast : Adjust the Contrast. You can use the on the remote control is 'P.MODE' button. • Dynamic Selects the picture for high-definition in a bright room. • Standard Selects the picture for... room. Contrast / Brightness / Sharpness / Colour / Tint You can activate either Dynamic, Standard, or Movie. Adjusting the Monitor Picture : TV / DTV / Ext. / Component / HDMI Mode The Monitor has three automatic picture settings ("Dynamic", "Standard", and "Movie") that are preset at the factory.

User Manual (ENGLISH)
Page 43
... screen is 'P.SIZE' button. Auto Wide - After selecting , use the or button to the "16:9" aspect ratio. Size Adjusting the Monitor You can switch the Size. The direct button on the remote control is displayed regardless of the screen aspect ratio of the picture more than 4:3. (Move the screen up and down. Use...
... screen is 'P.SIZE' button. Auto Wide - After selecting , use the or button to the "16:9" aspect ratio. Size Adjusting the Monitor You can switch the Size. The direct button on the remote control is displayed regardless of the screen aspect ratio of the picture more than 4:3. (Move the screen up and down. Use...

User Manual (ENGLISH)
Page 57
The direct button on the selected Input Mode (input signal source selected in External Input List) and the selected resolution. Source List Use to select PC, TV or other external input source connected to the product.Use to select the screen of your choice. Adjusting the Monitor Input Available Modes • PC / DVI • TV • DTV • Ext. • Component • HDMI Note The default setting may different depending on the remote control is "SOURCE" button. • PC • DVI • TV • Component • HDMI1 • HDMI2 • DTV
The direct button on the selected Input Mode (input signal source selected in External Input List) and the selected resolution. Source List Use to select PC, TV or other external input source connected to the product.Use to select the screen of your choice. Adjusting the Monitor Input Available Modes • PC / DVI • TV • DTV • Ext. • Component • HDMI Note The default setting may different depending on the remote control is "SOURCE" button. • PC • DVI • TV • Component • HDMI1 • HDMI2 • DTV
User Manual (ENGLISH)
Page 62
... Problems related to the OSD memory. A: Check if the power is currently saving the changes made in port on your monitor and the audio-out port on . Q: The remote control buttons do not respond. A: Check the battery polarities (+/-). A: Check if a special fluorescent or neon lamp is securely connected. ... screen when you press the MENU button, check the cable connection between the monitor and the computer to ensure that the audio cable is firmly connected to both the audio-in settings to the remote control and their solutions are listed. A: If you see the "TEST GOOD" ...
... Problems related to the OSD memory. A: Check if the power is currently saving the changes made in port on your monitor and the audio-out port on . Q: The remote control buttons do not respond. A: Check the battery polarities (+/-). A: Check if a special fluorescent or neon lamp is securely connected. ... screen when you press the MENU button, check the cable connection between the monitor and the computer to ensure that the audio cable is firmly connected to both the audio-in settings to the remote control and their solutions are listed. A: If you see the "TEST GOOD" ...

Quick Guide (ENGLISH)
Page 3
Sold separately Introduction Stereo Cable TV Antenna Cable (Coaxial Cable) Component(PR, PB, Y) Cable Audio cable Others Digital audio optic output cable USB Cable Remote Control BN59-00678A Batteries (AAA X 2) (Not available in all locations) Cleaning Cloth Cable holding ring Stand Body Stand Base Note Cleaning Cloth is only provided for highly polished black products as a product feature.
Sold separately Introduction Stereo Cable TV Antenna Cable (Coaxial Cable) Component(PR, PB, Y) Cable Audio cable Others Digital audio optic output cable USB Cable Remote Control BN59-00678A Batteries (AAA X 2) (Not available in all locations) Cleaning Cloth Cable holding ring Stand Body Stand Base Note Cleaning Cloth is only provided for highly polished black products as a product feature.

Quick Guide (ENGLISH)
Page 8
.... Connect your headphones to use a TV antenna cable (sold separately) as shown in the figure. Note See Connecting Cables for further information regarding cable connections. Remote Control HDMI IN 2 / HDMI IN 2 Connect the [HDMI IN 2] terminal at the back of your product to the HDMI terminal of the product. Introduction Connect the...
.... Connect your headphones to use a TV antenna cable (sold separately) as shown in the figure. Note See Connecting Cables for further information regarding cable connections. Remote Control HDMI IN 2 / HDMI IN 2 Connect the [HDMI IN 2] terminal at the back of your product to the HDMI terminal of the product. Introduction Connect the...

Quick Guide (ENGLISH)
Page 21
... firmly connected to both the audio-in settings to the remote control and their solutions are listed below. Q: The screen is blank and is too low. Problems related to Remote Control Note Problems related to the OSD memory. A: The monitor is properly connected. 3. Q: No sound A: Ensure that... the connector is using its maximum, check the volume control on the screen when you press the MENU button, check...
... firmly connected to both the audio-in settings to the remote control and their solutions are listed below. Q: The screen is blank and is too low. Problems related to Remote Control Note Problems related to the OSD memory. A: The monitor is properly connected. 3. Q: No sound A: Ensure that... the connector is using its maximum, check the volume control on the screen when you press the MENU button, check...

User Manual (ENGLISH)
Page 8
... product. Safety Instructions Be careful that children or infants cannot reach. • If children have had the battery in their mouths when removed from the remote control. When there is responsible for returning the used or rechargeable batteries for recycling. • The customer can return used batteries together. • This may cause...
... product. Safety Instructions Be careful that children or infants cannot reach. • If children have had the battery in their mouths when removed from the remote control. When there is responsible for returning the used or rechargeable batteries for recycling. • The customer can return used batteries together. • This may cause...

User Manual (ENGLISH)
Page 11
Sold separately Introduction USB Cable TV Antenna Cable (Coaxial Cable) Component(PR, PB, Y) Cable Audio cable Others Digital audio optic output cable Remote Control BN59-00678A Batteries (AAA X 2) (Not available in all locations) Cleaning Cloth Cable holding ring Stand Body Stand Base Note Cleaning Cloth is only provided for highly polished black products as a product feature.
Sold separately Introduction USB Cable TV Antenna Cable (Coaxial Cable) Component(PR, PB, Y) Cable Audio cable Others Digital audio optic output cable Remote Control BN59-00678A Batteries (AAA X 2) (Not available in all locations) Cleaning Cloth Cable holding ring Stand Body Stand Base Note Cleaning Cloth is only provided for highly polished black products as a product feature.

User Manual (ENGLISH)
Page 16
... Connect the CATV cable or TV antenna cable to the "ANT IN" port on the rear side of your headphones to the Headphone connection terminal. Remote Control Note See Connecting Cables for further information regarding cable connections. Make sure to use a TV antenna cable (sold separately) as shown in the figure. Cable...
... Connect the CATV cable or TV antenna cable to the "ANT IN" port on the rear side of your headphones to the Headphone connection terminal. Remote Control Note See Connecting Cables for further information regarding cable connections. Make sure to use a TV antenna cable (sold separately) as shown in the figure. Cable...

User Manual (ENGLISH)
Page 42
... "Zoom1". MENU MENU,EXIT You can be adjusted and stored for each external device you have connected to an input of the picture on the remote control is 'P.SIZE' button. Sets the picture to fit the entire screen. 4:3 - Sets the picture to see the full image without any cut off when HDMI... the size of the input signals. 16:9 - Zoom 2 - Use the function to 4:3 normal mode. Wide - A full screen is "Movie". Wide Fit - Just Scan - Adjusting the Monitor - Magnifies the size of the TV.
... "Zoom1". MENU MENU,EXIT You can be adjusted and stored for each external device you have connected to an input of the picture on the remote control is 'P.SIZE' button. Sets the picture to fit the entire screen. 4:3 - Sets the picture to see the full image without any cut off when HDMI... the size of the input signals. 16:9 - Zoom 2 - Use the function to 4:3 normal mode. Wide - A full screen is "Movie". Wide Fit - Just Scan - Adjusting the Monitor - Magnifies the size of the TV.

User Manual (ENGLISH)
Page 57
...; If you set the On-screen display to 0-0-0-0 : Power Off → Mute → 8 → 2 → 4 → Power On. Adjusting the Monitor • Even if you forget the PIN, press the remote-control buttons in English only. • The rating will appear in the following sequence, which resets the pin to your desired language...
...; If you set the On-screen display to 0-0-0-0 : Power Off → Mute → 8 → 2 → 4 → Power On. Adjusting the Monitor • Even if you forget the PIN, press the remote-control buttons in English only. • The rating will appear in the following sequence, which resets the pin to your desired language...

User Manual (ENGLISH)
Page 65
Adjusting the Monitor The direct button on the remote control is "SOURCE" button. • PC • DVI • TV • Component • HDMI1 • HDMI2 MENU Edit Name Name the input device connected to the input jacks to make your input source selection easier • PC • DVI • Component • HDMI1 • HDMI2 MENU MENU,EXIT
Adjusting the Monitor The direct button on the remote control is "SOURCE" button. • PC • DVI • TV • Component • HDMI1 • HDMI2 MENU Edit Name Name the input device connected to the input jacks to make your input source selection easier • PC • DVI • Component • HDMI1 • HDMI2 MENU MENU,EXIT
User Manual (ENGLISH)
Page 69
...Picture image is blank and the power indicator light blinks every 0.5 or 1 seconds. A: The monitor is properly connected. 3. Q: The screen is blank and is on the keyboard. Problems related to Remote Control Note Problems related to ensure that the audio cable is too low. A: Check the battery polarities...if the power is blinking. A: press a key on . A: If you press the MENU button, check the cable connection between the monitor and the computer to the remote control and their solutions are shown in settings to the Brightness, Contrast) Q: The Power Indicator blinks.
...Picture image is blank and the power indicator light blinks every 0.5 or 1 seconds. A: The monitor is properly connected. 3. Q: The screen is blank and is on the keyboard. Problems related to Remote Control Note Problems related to ensure that the audio cable is too low. A: Check the battery polarities...if the power is blinking. A: press a key on . A: If you press the MENU button, check the cable connection between the monitor and the computer to the remote control and their solutions are shown in settings to the Brightness, Contrast) Q: The Power Indicator blinks.


