Operation Manual
Page 3
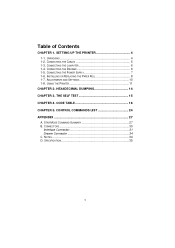
... LIST 24 APPENDIX 27 A. NOTES 34 D. CONNECTING THE POWER SUPPLY 7 1-6. ADJUSTMENTS AND SETTINGS 10 1-8. CONNECTING THE DRAWER 6 1-5. Table of Contents CHAPTER 1. INSTALLING OR REPLACING THE PAPER ROLL 8 1-7. USING THE PRINTER 11 CHAPTER 2. CONNECTORS 30 Interface Connector 31 Drawer Connector 34 C. THE SELF TEST 15 CHAPTER 4. SETTING UP THE...
... LIST 24 APPENDIX 27 A. NOTES 34 D. CONNECTING THE POWER SUPPLY 7 1-6. ADJUSTMENTS AND SETTINGS 10 1-8. CONNECTING THE DRAWER 6 1-5. Table of Contents CHAPTER 1. INSTALLING OR REPLACING THE PAPER ROLL 8 1-7. USING THE PRINTER 11 CHAPTER 2. CONNECTORS 30 Interface Connector 31 Drawer Connector 34 C. THE SELF TEST 15 CHAPTER 4. SETTING UP THE...

Operation Manual
Page 8
1-6. Remove the used paper roll core if there is not receiving data; Open the paper roll cover by pressing the cover-open the print cover while the printer is operating. Insert the paper roll as shown. 8 Make sure that meet the specifications. This may be lost. 2. Do not use paper rolls that have the paper glued to use paper rolls that the printer is one. 4. Installing or Replacing the Paper Roll Notes : Be sure to the core because the printer cannot detect the paper end correctly. 1. Notes : Do not open button. otherwise, data may damage the printer. 3.
1-6. Remove the used paper roll core if there is not receiving data; Open the paper roll cover by pressing the cover-open the print cover while the printer is operating. Insert the paper roll as shown. 8 Make sure that meet the specifications. This may be lost. 2. Do not use paper rolls that have the paper glued to use paper rolls that the printer is one. 4. Installing or Replacing the Paper Roll Notes : Be sure to the core because the printer cannot detect the paper end correctly. 1. Notes : Do not open button. otherwise, data may damage the printer. 3.
Operation Manual
Page 9
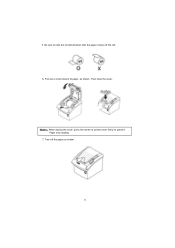
Then close the cover. Be sure to prevent Paper miss-loading. 7. Tear off the roll. 6. Notes : When closing the cover, press the center of paper, as shown. 9 5. Pull out a small amount of printer cover firmly to note the correct direction that the paper comes off the paper as shown.
Then close the cover. Be sure to prevent Paper miss-loading. 7. Tear off the roll. 6. Notes : When closing the cover, press the center of paper, as shown. 9 5. Pull out a small amount of printer cover firmly to note the correct direction that the paper comes off the paper as shown.
Operation Manual
Page 10
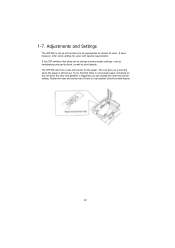
... give you to be appropriate for almost all users. If you find that allow you a warning when the paper is set up at front or rear position.(See the below figure) 10 The SRP-350 also has a near end sensor tab at the factory to change the near-end sensor setting. It does..., however, offer some settings for the paper. Rotate the near -end sensor for users with special requirements. This can change...
... give you to be appropriate for almost all users. If you find that allow you a warning when the paper is set up at front or rear position.(See the below figure) 10 The SRP-350 also has a near end sensor tab at the factory to change the near-end sensor setting. It does..., however, offer some settings for the paper. Rotate the near -end sensor for users with special requirements. This can change...

Operation Manual
Page 11
... Panel Button The button can also hold down the FEED button to advance paper one line. Install a new paper roll and the printer will continue printing. You can be disabled by the ESC c 5 command. When the light blinks, it indicates the self-test printing standby state or macro... execution standby state when the macro execution command is on whenever the printer is used. 11 Panel lights POWER The POWER light is on . Press the FEED button once to feed paper continuously. 1-8. ERROR This indicates an error.
... Panel Button The button can also hold down the FEED button to advance paper one line. Install a new paper roll and the printer will continue printing. You can be disabled by the ESC c 5 command. When the light blinks, it indicates the self-test printing standby state or macro... execution standby state when the macro execution command is on whenever the printer is used. 11 Panel lights POWER The POWER light is on . Press the FEED button once to feed paper continuously. 1-8. ERROR This indicates an error.
Operation Manual
Page 15
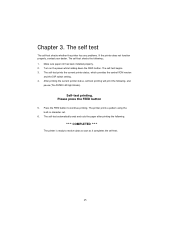
...the built-in character set. 6. The self test The self-test checks whether the printer has any problems. If the printer does not function properly, contact your dealer. The self-test prints the current printer status, which provides the control ROM version and the DIP switch setting. 4. The self...-test automatically ends and cuts the paper after printing the following , and pause (The PAPER LED light blinks). The self-test checks the following; ...
...the built-in character set. 6. The self test The self-test checks whether the printer has any problems. If the printer does not function properly, contact your dealer. The self-test prints the current printer status, which provides the control ROM version and the DIP switch setting. 4. The self...-test automatically ends and cuts the paper after printing the following , and pause (The PAPER LED light blinks). The self-test checks the following; ...
Operation Manual
Page 24
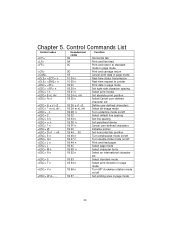
...default line spacing Set line spacing Set peripheral device Cancel user-defined characters Initialize printer Set horizontal tab position Turn emphasized mode on/off Turn double-strike mode on/off Print and feed paper Select page mode Select character fonts Select an international character set Select standard ...mode Select print direction in page mode Turn 90º clockwise rotation mode on/off Set printing area ...
...default line spacing Set line spacing Set peripheral device Cancel user-defined characters Initialize printer Set horizontal tab position Turn emphasized mode on/off Turn double-strike mode on/off Print and feed paper Select page mode Select character fonts Select an international character set Select standard ...mode Select print direction in page mode Turn 90º clockwise rotation mode on/off Set printing area ...
Operation Manual
Page 25
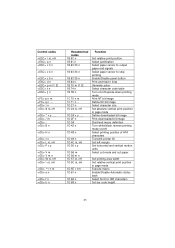
...nL nH 1D 5E r t m 1D 61 n 1D 62 n 1D 68 n Function Set relative print position Select justification Select paper sensor to output paper end signals Select paper sensor to stop printing Enable/Disable panel button Print and feed n lines Generate pulse Select character code table Turn on/off upside...definition Turn white/black reverse printing mode on/off Select printing position of HRI characters Transmit printer ID Set left margin Set horizontal and vertical motion units Select cut mode and cut paper Set printing area width Set relative vertical print position in page mode Execute macro Enable/...
...nL nH 1D 5E r t m 1D 61 n 1D 62 n 1D 68 n Function Set relative print position Select justification Select paper sensor to output paper end signals Select paper sensor to stop printing Enable/Disable panel button Print and feed n lines Generate pulse Select character code table Turn on/off upside...definition Turn white/black reverse printing mode on/off Select printing position of HRI characters Transmit printer ID Set left margin Set horizontal and vertical motion units Select cut mode and cut paper Set printing area width Set relative vertical print position in page mode Execute macro Enable/...
Operation Manual
Page 28
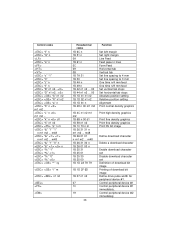
... n1 n2 1B 1D 52 n1 n2 1B 1D 61 n 1B 48 n 00 m1 m2 Function Set left margin Set right margin Line Feed Feed paper n lines Form Feed Horizontal tab Vertical tab Set line spacing to 4 mm Set line spacing to 3 mm One time n/4 mm feed One time n/8 mm feed...
... n1 n2 1B 1D 52 n1 n2 1B 1D 61 n 1B 48 n 00 m1 m2 Function Set left margin Set right margin Line Feed Feed paper n lines Form Feed Horizontal tab Vertical tab Set line spacing to 4 mm Set line spacing to 3 mm One time n/4 mm feed One time n/8 mm feed...
Operation Manual
Page 34
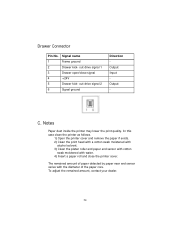
... ground Drawer kick- out drive signal 2 Signal ground Direction Output Input Output - Notes Paper dust inside the printer may lower the print quality. To adjust the remained amount, contact your dealer. 34 C. In this case clean the printer as follows. 1) Open the printer cover and remove the paper if exists. 2) Clean the print head with a cotton...
... ground Drawer kick- out drive signal 2 Signal ground Direction Output Input Output - Notes Paper dust inside the printer may lower the print quality. To adjust the remained amount, contact your dealer. 34 C. In this case clean the printer as follows. 1) Open the printer cover and remove the paper if exists. 2) Clean the print head with a cotton...

Operation Manual
Page 35
D. Specification Printing method Thermal line printing Dot density 180 X 180 dpi (7dots/mm) Printing width 72.192 +0.2mm or -0.2mm Paper width Characters per line (default) 79 ~ 80 mm 42 (Font A) 56 (Font B) Printing speed 35.5 lines/sec(1/6" Feed) 150 mm/sec Receive Buffer ...Size 4K Bytes NOTE : Printing speed may vary with environment temperature, printing level, etc. 35 Except for paper 15,000,000 lines 1x10⁸ pulse (Approximately 100 Km) 1,000,000 Cut 37,000,000 lines * These values are calculated under printing level 2 with ...
D. Specification Printing method Thermal line printing Dot density 180 X 180 dpi (7dots/mm) Printing width 72.192 +0.2mm or -0.2mm Paper width Characters per line (default) 79 ~ 80 mm 42 (Font A) 56 (Font B) Printing speed 35.5 lines/sec(1/6" Feed) 150 mm/sec Receive Buffer ...Size 4K Bytes NOTE : Printing speed may vary with environment temperature, printing level, etc. 35 Except for paper 15,000,000 lines 1x10⁸ pulse (Approximately 100 Km) 1,000,000 Cut 37,000,000 lines * These values are calculated under printing level 2 with ...


