User Manual
Page 2
.../870/870D/870DC/1650/1650D/1650DC/ 1670/1670D/1670DC) • Alarm Interface • Remote Monitoring function by Windows Network Viewer 2_ overview These DVRs also supports network connectivity, providing remote monitoring from a remote PC transferring video and audio data. • Provides convenient User Interface • 8/16.../850D/850DC/870/870D/870DC/1630/ 1630D/1630DC) • CIF(S) Size Recording in 120 (NTSC)/100 (PAL) IPS speed (SRD-830/830D/830DC/1610/1610D/1610DC) • 8/16-channel Loop Through Video port connection • Hard Disk overwrite function • Mass storage ...
.../870/870D/870DC/1650/1650D/1650DC/ 1670/1670D/1670DC) • Alarm Interface • Remote Monitoring function by Windows Network Viewer 2_ overview These DVRs also supports network connectivity, providing remote monitoring from a remote PC transferring video and audio data. • Provides convenient User Interface • 8/16.../850D/850DC/870/870D/870DC/1630/ 1630D/1630DC) • CIF(S) Size Recording in 120 (NTSC)/100 (PAL) IPS speed (SRD-830/830D/830DC/1610/1610D/1610DC) • 8/16-channel Loop Through Video port connection • Hard Disk overwrite function • Mass storage ...

User Manual
Page 4
..., the replacement battery must be exposed to stand at a temperature below the guaranteed one . The following notices : • SAMSUNG retains the copyright on the front of your DVR. Prior to using now. • Normal voltage : 3V • Normal capacity : 170mAh • Continuous standard load :... your UPS retailer.) ❖ Operating Temperature The guaranteed operating temperature range of this manual. • This manual cannot be copied without SAMSUNG's prior written approval. • We are not liable for any time. Batteries shall not be removed from the unit. ...
..., the replacement battery must be exposed to stand at a temperature below the guaranteed one . The following notices : • SAMSUNG retains the copyright on the front of your DVR. Prior to using now. • Normal voltage : 3V • Normal capacity : 170mAh • Continuous standard load :... your UPS retailer.) ❖ Operating Temperature The guaranteed operating temperature range of this manual. • This manual cannot be copied without SAMSUNG's prior written approval. • We are not liable for any time. Batteries shall not be removed from the unit. ...

User Manual
Page 6
... Getting Started 27 Live Screen Configuration 31 Live Mode 33 Spot Out 34 Zoom 34 Audio ON/OFF 34 Freeze 35 Event Monitoring USING THE DVR 36 36 System Setup 46 Setting the Device 54 Setting the Recording 57 Setting the Event 60 Backup 61 Network Configuration 68 Controlling a PTZ device...
... Getting Started 27 Live Screen Configuration 31 Live Mode 33 Spot Out 34 Zoom 34 Audio ON/OFF 34 Freeze 35 Event Monitoring USING THE DVR 36 36 System Setup 46 Setting the Device 54 Setting the Recording 57 Setting the Event 60 Backup 61 Network Configuration 68 Controlling a PTZ device...
User Manual
Page 9
.... Power Button : Used to open and close the DVR-RW disc tray. (available for quick forward playback. Runs the TELE function in each menu, acts as a scrolling. Used to stop the playback. In Play mode, - English _9 Fast Forward () : Used for SRD-830D/830DC/850D/850DC/ 870D/870DC/1610D/1610DC/1630D/1630DC...
.... Power Button : Used to open and close the DVR-RW disc tray. (available for quick forward playback. Runs the TELE function in each menu, acts as a scrolling. Used to stop the playback. In Play mode, - English _9 Fast Forward () : Used for SRD-830D/830DC/850D/850DC/ 870D/870DC/1610D/1610DC/1630D/1630DC...
User Manual
Page 13
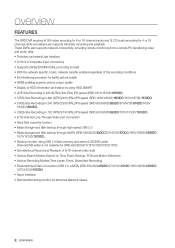
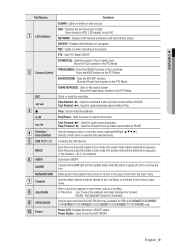
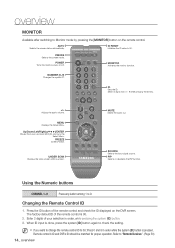
...Used as the numeric input keys, or displays a single channel. Skip Backward (by unit time), Slow Rewind, Slow Forward, Skip Forward (by pressing the [DVR] button on /off. ZOOM Runs the digital zoom (x2) function. Select 2 digits from 0 ~ 9 while pressing the ID Key. REC LOCK Selects... the [+10] button first, then press any number between 1 to 9. OVERVIEW REMOTE CONTROL DVR Available after switching to DVR mode by unit time) T/W Zooms in the PTZ mode. DVR Activates the DVR function. SCROLL ,. ID Sets the ID of the system. RETURN Returns to the previous screen.
...Used as the numeric input keys, or displays a single channel. Skip Backward (by unit time), Slow Rewind, Slow Forward, Skip Forward (by pressing the [DVR] button on /off. ZOOM Runs the digital zoom (x2) function. Select 2 digits from 0 ~ 9 while pressing the ID Key. REC LOCK Selects... the [+10] button first, then press any number between 1 to 9. OVERVIEW REMOTE CONTROL DVR Available after switching to DVR mode by unit time) T/W Zooms in the PTZ mode. DVR Activates the DVR function. SCROLL ,. ID Sets the ID of the system. RETURN Returns to the previous screen.
User Manual
Page 14
.... ID Sets the ID. MUTE Mutes the audio out. Enter 2 digits of the remote control and check the ID displayed on the DVR screen. Remote control's ID and DVR's ID should be matched for proper operation. MENU Displays the Setup Menu. PIP Selects or deselects the PIP function. Adjusts the audio volume...
.... ID Sets the ID. MUTE Mutes the audio out. Enter 2 digits of the remote control and check the ID displayed on the DVR screen. Remote control's ID and DVR's ID should be matched for proper operation. MENU Displays the Setup Menu. PIP Selects or deselects the PIP function. Adjusts the audio volume...
User Manual
Page 15
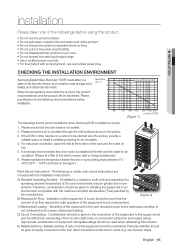
... natural air convection, place the inlet at the inlet to the following or similar rack-mount instructions are the recommendations when Samsung DVR is not sealed. 2. D) Circuit Overloading - INSTALLATION installation Please take note of the followings before installation. The... that a fan motor is not compromised. [Figure 2] C) Mechanical Loading - English _15 CHECKING THE INSTALLATION ENVIRONMENT Samsung Digital Video Recorder ("DVR" hereinafter) is circulated through the inlet/outlet as shown in the figure 1. When the temperature rises inside . ...
... natural air convection, place the inlet at the inlet to the following or similar rack-mount instructions are the recommendations when Samsung DVR is not sealed. 2. D) Circuit Overloading - INSTALLATION installation Please take note of the followings before installation. The... that a fan motor is not compromised. [Figure 2] C) Mechanical Loading - English _15 CHECKING THE INSTALLATION ENVIRONMENT Samsung Digital Video Recorder ("DVR" hereinafter) is circulated through the inlet/outlet as shown in the figure 1. When the temperature rises inside . ...
User Manual
Page 16
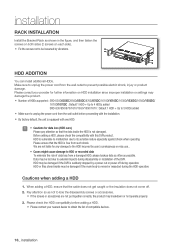
... by vibrations. Please ensure that the cable does not get caught or the insulation does not come off during disassembly or installation of the DVR. Please check the HDD compatibility before proceeding with the installation. By factory default, the unit is suddenly stopped by user's carelessness...screws on both sides (2 screws on HDD installation since improper installation or settings may damage the product. Number of HDDs supported : SRD-830D/830DC/850D/850DC/870D/870DC/1610D/1610DC/1630D/1630DC/1650D/1650DC/ 1670D/1670DC : Default 1 HDD + Up to 4 HDDs added...
... by vibrations. Please ensure that the cable does not get caught or the insulation does not come off during disassembly or installation of the DVR. Please check the HDD compatibility before proceeding with the installation. By factory default, the unit is suddenly stopped by user's carelessness...screws on both sides (2 screws on HDD installation since improper installation or settings may damage the product. Number of HDDs supported : SRD-830D/830DC/850D/850DC/870D/870DC/1610D/1610DC/1630D/1630DC/1650D/1650DC/ 1670D/1670DC : Default 1 HDD + Up to 4 HDDs added...

User Manual
Page 17
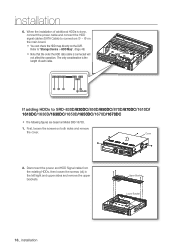
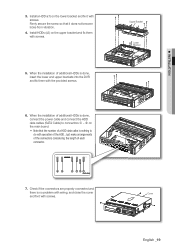
When the installation of additional HDDs is done, insert the lower and upper brackets into the DVR and fix them with screws. 5. First, loosen the screws on Model SRD-1630. 1. Disconnect the power and HDD Signal cable from vibration. 4. Upper Bracket Lower Bracket Upper Bracket Lower Bracket English ..._17 INSTALLATION If adding HDDs to SRD-830/850/870/1610/1630/1650/1670 The following figures are based on both sides and remove the cover. Install HDDs (x3) ...
When the installation of additional HDDs is done, insert the lower and upper brackets into the DVR and fix them with screws. 5. First, loosen the screws on Model SRD-1630. 1. Disconnect the power and HDD Signal cable from vibration. 4. Upper Bracket Lower Bracket Upper Bracket Lower Bracket English ..._17 INSTALLATION If adding HDDs to SRD-830/850/870/1610/1630/1650/1670 The following figures are based on both sides and remove the cover. Install HDDs (x3) ...
User Manual
Page 18
... the HDD signal cables (SATA Cable) to connectors ~ on the main board. You can check the HDD map directly on the DVR. If adding HDDs to "Storage Device > HDD Map". (Page 48) Note that the order the HDD data cable is connected will not affect the...cable from the existing HDDs, then loosen the screws (x4) in the left/right and upper sides and remove the upper brackets. Cover 2. Refer to SRD-830D/830DC/850D/850DC/870D/870DC/1610D/ 1610DC/1630D/1630DC/1650D/1650DC/1670D/1670DC The following figures are based on both sides and remove the...
... the HDD signal cables (SATA Cable) to connectors ~ on the main board. You can check the HDD map directly on the DVR. If adding HDDs to "Storage Device > HDD Map". (Page 48) Note that the order the HDD data cable is connected will not affect the...cable from the existing HDDs, then loosen the screws (x4) in the left/right and upper sides and remove the upper brackets. Cover 2. Refer to SRD-830D/830DC/850D/850DC/870D/870DC/1610D/ 1610DC/1630D/1630DC/1650D/1650DC/1670D/1670DC The following figures are based on both sides and remove the...
User Manual
Page 19
... (SATA Cable) to do with screws. 5. Cover English _19 When the installation of additional HDDs is done, insert the lower and upper brackets into the DVR and fix them with operation of additional HDDs is nothing to connectors ~ on the lower bracket and fix it with screws. INSTALLATION...
... (SATA Cable) to do with screws. 5. Cover English _19 When the installation of additional HDDs is done, insert the lower and upper brackets into the DVR and fix them with operation of additional HDDs is nothing to connectors ~ on the lower bracket and fix it with screws. INSTALLATION...
User Manual
Page 20
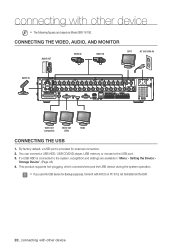
... to the USB port. 3. J If you use the USB device for external connection. 2. If a USB HDD is not formatted on the DVR. 20_ connecting with FAT32 on Model SRD-1670D. CONNECTING THE VIDEO, AUDIO, AND MONITOR AUDIO OUT VIDEO IN VIDEO IN SPOT AC 100-240V~IN AUDIO IN VIDEO OUT...
... to the USB port. 3. J If you use the USB device for external connection. 2. If a USB HDD is not formatted on the DVR. 20_ connecting with FAT32 on Model SRD-1670D. CONNECTING THE VIDEO, AUDIO, AND MONITOR AUDIO OUT VIDEO IN VIDEO IN SPOT AC 100-240V~IN AUDIO IN VIDEO OUT...
User Manual
Page 21
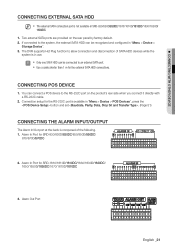
...Port English _21 CONNECTING WITH OTHER DEVICE CONNECTING EXTERNAL SATA HDD M The external SATA connection port is not available in use. The DVR supports Hot Plug function to allow connection and disconnection of the following. 1. You can connect a POS device to an external SATA port. ... Use a cable shorter than 1 m for the RS-232C port is composed of SATA HDD devices while the system is in SRD-830/830D/830DC/1610/1610D/1610DC/1630/1630D/ 1630DC. 1. Two external SATA ports are provided on the product's rear side when you connect it directly with...
...Port English _21 CONNECTING WITH OTHER DEVICE CONNECTING EXTERNAL SATA HDD M The external SATA connection port is not available in use. The DVR supports Hot Plug function to allow connection and disconnection of the following. 1. You can connect a POS device to an external SATA port. ... Use a cable shorter than 1 m for the RS-232C port is composed of SATA HDD devices while the system is in SRD-830/830D/830DC/1610/1610D/1610DC/1630/1630D/ 1630DC. 1. Two external SATA ports are provided on the product's rear side when you connect it directly with...
User Manual
Page 25
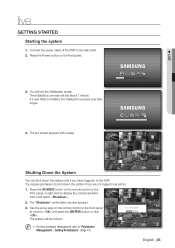
Connect the power cable of the DVR to shutdown? REC REC 2011-01-01 01:10:25 2011-01-01 01:10:25 Shutting Down the System You can shut down the ... only if you have logged in as admin. 1. Use the arrow keys on the remote control or the front panel, or right-click to the DVR. M For the permission management, refer to "Permission Management > Setting Permissions". (Page 41) Shutdown Are you are not logged in to display the context sensitive...
Connect the power cable of the DVR to shutdown? REC REC 2011-01-01 01:10:25 2011-01-01 01:10:25 Shutting Down the System You can shut down the ... only if you have logged in as admin. 1. Use the arrow keys on the remote control or the front panel, or right-click to the DVR. M For the permission management, refer to "Permission Management > Setting Permissions". (Page 41) Shutdown Are you are not logged in to display the context sensitive...

User Manual
Page 26
...Management > Setting Permissions". (Page 41) Locking All Buttons This will be locked. 2. In the lock condition, press any area of the DVR when the corresponding menu requires logging in. By default, initial ID and password are prompted to change the password after installing the product.... The button lock will restrict access to the DVR. 1. Note that the security and other related issues caused by pressing the [MENU] button on the remote control or the front panel...
...Management > Setting Permissions". (Page 41) Locking All Buttons This will be locked. 2. In the lock condition, press any area of the DVR when the corresponding menu requires logging in. By default, initial ID and password are prompted to change the password after installing the product.... The button lock will restrict access to the DVR. 1. Note that the security and other related issues caused by pressing the [MENU] button on the remote control or the front panel...

User Manual
Page 27
Displayed if a new firmware is set to , the input signal will be displayed on the screen of the DVR with the cooling fan. Nothing will be replaced. English _27 Displayed if you are switched at the specific time interval. Displayed if the recording is ... the HDD is set to . Displays the resolution of the recording screen. (Page 56) Displayed in the condition that the camera is full and the DVR has an insufficient space to . Displayed if a motion detected in PTZ setting, and highlighted yellow if PTZ is set to record. When you press the...
Displayed if a new firmware is set to , the input signal will be displayed on the screen of the DVR with the cooling fan. Nothing will be replaced. English _27 Displayed if you are switched at the specific time interval. Displayed if the recording is ... the HDD is set to . Displays the resolution of the recording screen. (Page 56) Displayed in the condition that the camera is full and the DVR has an insufficient space to . Displayed if a motion detected in PTZ setting, and highlighted yellow if PTZ is set to record. When you press the...

User Manual
Page 29
... & Play > Play". (Page 73) Search Refer to "Search & Play > Search". (Page 70) Backup Refer to the Using the DVR section. (Page 36) Shutdown Turns down the DVR. Refer to the full screen of the selected channel. Accesses the PTZ Control menu. Single Mode Menu The single mode menu is available... only in or out. Refer to "Using the DVR > Setting the Backup". (Page 60) Main Menu Accesses the main menu. The context sensitive menu for the One Channel mode, in Split mode...
... & Play > Play". (Page 73) Search Refer to "Search & Play > Search". (Page 70) Backup Refer to the Using the DVR section. (Page 36) Shutdown Turns down the DVR. Refer to the full screen of the selected channel. Accesses the PTZ Control menu. Single Mode Menu The single mode menu is available... only in or out. Refer to "Using the DVR > Setting the Backup". (Page 60) Main Menu Accesses the main menu. The context sensitive menu for the One Channel mode, in Split mode...
User Manual
Page 36
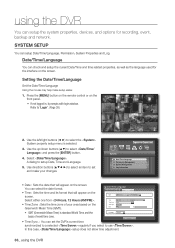
...Language, Permission, System Properties and Log. Select either one from . • Time Zone : Sets the time zone of world time zone. using the DVR Date/Time/Language You can select the date format. • Time : Sets the time and its format that will appear on the screen. Use direction... buttons to select an item to set the DVR's current time synchronized to a selected regularly if you select to use . SYSTEM SETUP You can set and make setup easier. 1. Use the left/...
...Language, Permission, System Properties and Log. Select either one from . • Time Zone : Sets the time zone of world time zone. using the DVR Date/Time/Language You can select the date format. • Time : Sets the time and its format that will appear on the screen. Use direction... buttons to select an item to set the DVR's current time synchronized to a selected regularly if you select to use . SYSTEM SETUP You can set and make setup easier. 1. Use the left/...

User Manual
Page 37
... [ENTER] button. Check both on the left /right < > buttons to make setup easier. Select year and month. USING THE DVR - Last Sync Time : Displays the most recent synchronization time from the selected time server. - Setup Not Used Activate as a Time Server for...mouse may help make every January 10th a holiday. Sets the language for Holiday setup appears. 3. Activate as Server : Set to to allow the DVR to select a desired date, and press the [ENTER] button. Select . When the Holiday setup is done, press . When the Date/Time/...
... [ENTER] button. Check both on the left /right < > buttons to make setup easier. Select year and month. USING THE DVR - Last Sync Time : Displays the most recent synchronization time from the selected time server. - Setup Not Used Activate as a Time Server for...mouse may help make every January 10th a holiday. Sets the language for Holiday setup appears. 3. Activate as Server : Set to to allow the DVR to select a desired date, and press the [ENTER] button. Select . When the Holiday setup is done, press . When the Date/Time/...

User Manual
Page 38
...and press the [ENTER] button. In the upper text input box of the virtual keyboard, there displays a list of each user over the DVR's specific function and settings. Entered word is applied. For upper case letters, use button. For special characters, use button. &#...1. When the administrator setup is recommended to a hacking thread so it is done, press . A dialog for the user. 4. using the DVR Permission Management You can set all menu items and functions. Setting the Administrator You can set and change the password after installing the product.
...and press the [ENTER] button. In the upper text input box of the virtual keyboard, there displays a list of each user over the DVR's specific function and settings. Entered word is applied. For upper case letters, use button. For special characters, use button. &#...1. When the administrator setup is recommended to a hacking thread so it is done, press . A dialog for the user. 4. using the DVR Permission Management You can set all menu items and functions. Setting the Administrator You can set and change the password after installing the product.

