

Quick Guide (easy Manual) (ver.1.0) (English)
Page 2
...as a result of format selection and use of this product unit to encode and/or decode audio files conforming to fill the screen if your Samsung limited warranty. The license only covers the use , as well as the dark side-bars on them should be in the selection and duration ... such as stock market reports, video game displays, station logos, web sites or computer graphics and patterns, should primarily be limited as a full screen picture. Other countries The product unit accompanying this user manual is limited to ISO/IEC 11172-3 or ISO/IEC 13818-3 used or sold in combination with...
...as a result of format selection and use of this product unit to encode and/or decode audio files conforming to fill the screen if your Samsung limited warranty. The license only covers the use , as well as the dark side-bars on them should be in the selection and duration ... such as stock market reports, video game displays, station logos, web sites or computer graphics and patterns, should primarily be limited as a full screen picture. Other countries The product unit accompanying this user manual is limited to ISO/IEC 11172-3 or ISO/IEC 13818-3 used or sold in combination with...
Quick Guide (easy Manual) (ver.1.0) (English)
Page 4
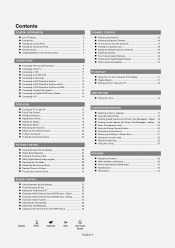
...Size 28 DNIe (Digital Natural Image engine 29 Selecting the Film Mode 29 Setting the Blue Screen Mode 29 Viewing Picture-in-Picture 30 Freezing the Current Picture 31 SOUND CONTROL Using Automatic Sound Settings 32 Customizing the Sound 32 Setting the TruSurround XT 33 Choosing a Multi-... 62 Dimensions 63 Symbol Press Important ➢ Note One-Touch Button English-4 Contents GENERAL INFORMATION List of the Sub (PIP) Picture 35 CHANNEL CONTROL Selecting the Antenna 36 Adding and Erasing Channels 36 To set-up Your Favorite Channels 37 Viewing the Channel Lists...
...Size 28 DNIe (Digital Natural Image engine 29 Selecting the Film Mode 29 Setting the Blue Screen Mode 29 Viewing Picture-in-Picture 30 Freezing the Current Picture 31 SOUND CONTROL Using Automatic Sound Settings 32 Customizing the Sound 32 Setting the TruSurround XT 33 Choosing a Multi-... 62 Dimensions 63 Symbol Press Important ➢ Note One-Touch Button English-4 Contents GENERAL INFORMATION List of the Sub (PIP) Picture 35 CHANNEL CONTROL Selecting the Antenna 36 Adding and Erasing Channels 36 To set-up Your Favorite Channels 37 Viewing the Channel Lists...

Quick Guide (easy Manual) (ver.1.0) (English)
Page 5
... (BN39-00061B) Optical Cable Coaxial Cable (BN39-00110A) Antenna Cable (BN39-00333A) English-5 General Information List of Features Adjustable picture settings that can be viewed with your dealer. A special sleep timer. Excellent Picture Quality - DNIe technology provides life-like clear images. Remote Control (BN59-00511A) / AAA Batteries (4301-000103) Power Cord (3903...
... (BN39-00061B) Optical Cable Coaxial Cable (BN39-00110A) Antenna Cable (BN39-00333A) English-5 General Information List of Features Adjustable picture settings that can be viewed with your dealer. A special sleep timer. Excellent Picture Quality - DNIe technology provides life-like clear images. Remote Control (BN59-00511A) / AAA Batteries (4301-000103) Power Cord (3903...
Quick Guide (easy Manual) (ver.1.0) (English)
Page 8
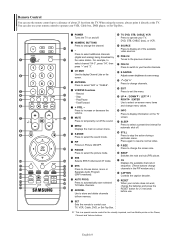
... to change the screen size. ∑ SWAP Switches the main and sub (PIP) picture. µ CH Displays the available channels in sequence. (These buttons change channels in Picture ON/OFF. P.MODE Press to select the picture mode. Ò SRS Selects SRS TruSurround XT mode. Ú MTS Press to display... ≠ UP / DOWN / LEFT / RIGHT / ENTER Use to select on -screen menu. ˝ S.MODE Press to select the sound mode. Ô PIP Picture-in the PIP window only.) ¥ CAPTION Controls the caption decoder. ≥ RESET When your remote does not work, change the batteries and press the...
... to change the screen size. ∑ SWAP Switches the main and sub (PIP) picture. µ CH Displays the available channels in sequence. (These buttons change channels in Picture ON/OFF. P.MODE Press to select the picture mode. Ò SRS Selects SRS TruSurround XT mode. Ú MTS Press to display... ≠ UP / DOWN / LEFT / RIGHT / ENTER Use to select on -screen menu. ˝ S.MODE Press to select the sound mode. Ô PIP Picture-in the PIP window only.) ¥ CAPTION Controls the caption decoder. ≥ RESET When your remote does not work, change the batteries and press the...

Quick Guide (easy Manual) (ver.1.0) (English)
Page 11
... the ANT OUT terminal on the VCR and the ANT 1 IN (CABLE) or ANT 2 IN (AIR) terminal on the TV. 3. Connecting an S-VHS VCR Your Samsung TV can be connected to an S-Video signal from the back of the TV. Connect Audio Cables between the S-VIDEO OUT jack on the VCR... VCR and the AV IN 1 [R-AUDIO-L] jacks on the TV. English-11 Unplug the cable or antenna from an S-VHS VCR. (This connection delivers a better picture as compared to a standard VHS VCR.) VCR Rear Panel TV Rear Panel 3 Audio Cable (Not supplied) 2 S-Video Cable (Not supplied) 1 Antenna Cable (Not supplied) An...
... the ANT OUT terminal on the VCR and the ANT 1 IN (CABLE) or ANT 2 IN (AIR) terminal on the TV. 3. Connecting an S-VHS VCR Your Samsung TV can be connected to an S-Video signal from the back of the TV. Connect Audio Cables between the S-VIDEO OUT jack on the VCR... VCR and the AV IN 1 [R-AUDIO-L] jacks on the TV. English-11 Unplug the cable or antenna from an S-VHS VCR. (This connection delivers a better picture as compared to a standard VHS VCR.) VCR Rear Panel TV Rear Panel 3 Audio Cable (Not supplied) 2 S-Video Cable (Not supplied) 1 Antenna Cable (Not supplied) An...
Quick Guide (easy Manual) (ver.1.0) (English)
Page 18
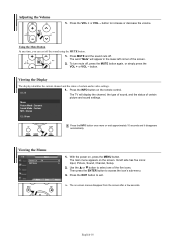
button. The TV will appear in the lower-left side has five icons: Input, Picture, Sound, Channel, Setup. 2. With the power on the screen. English-18 Using the Mute Button At any time, you can cut off , press the MUTE ... mute off the sound using the MUTE button. 1. Viewing the Display The display identifies the current channel and the status of certain picture and sound settings. Air 28 1. Mono Picture Mode : Dynamic Sound Mode : Custom MTS : Stereo 12 : 00 am Press the INFO button once more or wait approximately 10 seconds and...
button. The TV will appear in the lower-left side has five icons: Input, Picture, Sound, Channel, Setup. 2. With the power on the screen. English-18 Using the Mute Button At any time, you can cut off , press the MUTE ... mute off the sound using the MUTE button. 1. Viewing the Display The display identifies the current channel and the status of certain picture and sound settings. Air 28 1. Mono Picture Mode : Dynamic Sound Mode : Custom MTS : Stereo 12 : 00 am Press the INFO button once more or wait approximately 10 seconds and...

Quick Guide (easy Manual) (ver.1.0) (English)
Page 26
.... or † button to decrease or increase the value of the standard picture settings. Choose Custom if you want to adjust the settings according to personal preference. ➢ Picture mode needs to be stored separately according to its input mode. • When... Sharpness, Color, or Tint. Press the P.MODE button on the remote control to select "Picture", then press the ENTER button. Continued... Picture Control Using Automatic Picture Settings Your TV has four automatic picture settings ("Dynamic", "Standard", "Movie", and "Custom") that are preset at the factory. or...
.... or † button to decrease or increase the value of the standard picture settings. Choose Custom if you want to adjust the settings according to personal preference. ➢ Picture mode needs to be stored separately according to its input mode. • When... Sharpness, Color, or Tint. Press the P.MODE button on the remote control to select "Picture", then press the ENTER button. Continued... Picture Control Using Automatic Picture Settings Your TV has four automatic picture settings ("Dynamic", "Standard", "Movie", and "Custom") that are preset at the factory. or...

Quick Guide (easy Manual) (ver.1.0) (English)
Page 27
...† button to select "Off" or "On", then press the ENTER button. Press the ... or † button to exit. ➢ Each picture mode can activate the Digital Noise Reduction feature to "Mode". Mode Contrast Brightness Sharpness Color Tint G 50 Color Tone Reset : Dynamic √ 100 45 ...G 50 Color Tone Reset : Dynamic √ 100 45 75 55 R 50 : Cool1 √ 8. TV Mode 5. Press the ... Move Enter Return TV Picture 3. Press the ... or † button to exit. ➢ The Digital NR function is weak, you can be reset. Press the ... Mode Size Digital NR...
...† button to select "Off" or "On", then press the ENTER button. Press the ... or † button to exit. ➢ Each picture mode can activate the Digital Noise Reduction feature to "Mode". Mode Contrast Brightness Sharpness Color Tint G 50 Color Tone Reset : Dynamic √ 100 45 ...G 50 Color Tone Reset : Dynamic √ 100 45 75 55 R 50 : Cool1 √ 8. TV Mode 5. Press the ... Move Enter Return TV Picture 3. Press the ... or † button to exit. ➢ The Digital NR function is weak, you can be reset. Press the ... Mode Size Digital NR...
Quick Guide (easy Manual) (ver.1.0) (English)
Page 28
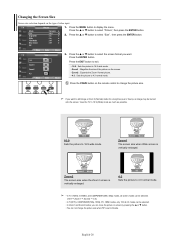
...16:9 √ : On √ : On √ : Off √ : Off √ 1. View the TV in 16:9 (Wide) mode as much as possible. 16:9 Sets the picture to select "Size", then press the ENTER button. Press the ENTER button. Zoom1 The screen size when Wide screen is set to 4:3 normal mode. ➢...COMPONENT(720p, 1080i), PC, HDMI modes, only 16:9 & 4:3 modes can be burned onto the screen. or † button. • You can move the picture on the remote control to select the screen format you watch a still image or the 4:3 (Normal) mode for a long time (over 2 hours), an image...
...16:9 √ : On √ : On √ : Off √ : Off √ 1. View the TV in 16:9 (Wide) mode as much as possible. 16:9 Sets the picture to select "Size", then press the ENTER button. Press the ENTER button. Zoom1 The screen size when Wide screen is set to 4:3 normal mode. ➢...COMPONENT(720p, 1080i), PC, HDMI modes, only 16:9 & 4:3 modes can be burned onto the screen. or † button. • You can move the picture on the remote control to select the screen format you watch a still image or the 4:3 (Normal) mode for a long time (over 2 hours), an image...

Quick Guide (easy Manual) (ver.1.0) (English)
Page 29
... then press the ENTER button. Press the ... or † button to select "Film Mode", then press the ENTER button. Press the MENU button to select "Picture", then press the ENTER button. 2. or † button to display the menu. Press the ... If you wish to exit. ➢ Blue Screen is displayed... NR DNIe Film Mode Blue Screen PIP : Dynamic : 16:9 : On : On : Off : OOfff On Press the EXIT button to continue viewing the poor picture, you can view the difference in the Movie mode. (It is no signal is being received or the signal is PC. Move Enter Return TV...
... then press the ENTER button. Press the ... or † button to select "Film Mode", then press the ENTER button. Press the MENU button to select "Picture", then press the ENTER button. 2. or † button to display the menu. Press the ... If you wish to exit. ➢ Blue Screen is displayed... NR DNIe Film Mode Blue Screen PIP : Dynamic : 16:9 : On : On : Off : OOfff On Press the EXIT button to continue viewing the poor picture, you can view the difference in the Movie mode. (It is no signal is being received or the signal is PC. Move Enter Return TV...
Quick Guide (easy Manual) (ver.1.0) (English)
Page 30
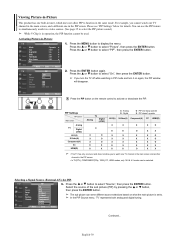
...... For example, you turn the TV off while watching in PIP mode and turn it on what the main picture is in -Picture TV Mode Size Digital NR DNIe Film Mode Blue Screen PIP Picture : Dynamic √ : 16:9 √ : On √ : On √ : Off √ : Off √ 1....OTnV : TAAVVV12 S-Video1 : S-Video2 : Component1 : DCToVmApior n3e-n0t2 HDMI1 HDMI2 3. or † button, then press the ENTER button. ➢ The sub picture can serve different source selections based on again, the PIP window will disappear. or † button to . ➢ In the PIP Source menu, 'TV' ...
...... For example, you turn the TV off while watching in PIP mode and turn it on what the main picture is in -Picture TV Mode Size Digital NR DNIe Film Mode Blue Screen PIP Picture : Dynamic √ : 16:9 √ : On √ : On √ : Off √ : Off √ 1....OTnV : TAAVVV12 S-Video1 : S-Video2 : Component1 : DCToVmApior n3e-n0t2 HDMI1 HDMI2 3. or † button, then press the ENTER button. ➢ The sub picture can serve different source selections based on again, the PIP window will disappear. or † button to . ➢ In the PIP Source menu, 'TV' ...

Quick Guide (easy Manual) (ver.1.0) (English)
Page 31
... TV PIP Source Swap Size Position Channel PIP : On : TV : : : DTV Air 3 - 0 6. Move Enter Return ➢ You may notice that the picture in the PIP window, then press the ENTER button. ➢ The channel can be selected. Press the ... Press the ... Changing the Size of the PIP... and Main Picture TV PIP Source Swap Size Position Channel PIP : On : TV : : : DTV Air 3 - 0 4. or † button at the bottom of the ...
... TV PIP Source Swap Size Position Channel PIP : On : TV : : : DTV Air 3 - 0 6. Move Enter Return ➢ You may notice that the picture in the PIP window, then press the ENTER button. ➢ The channel can be selected. Press the ... Press the ... Changing the Size of the PIP... and Main Picture TV PIP Source Swap Size Position Channel PIP : On : TV : : : DTV Air 3 - 0 4. or † button at the bottom of the ...
Quick Guide (easy Manual) (ver.1.0) (English)
Page 35
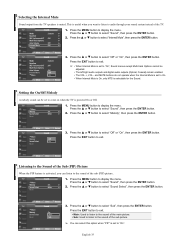
... ... Press the ... Press the MENU button to "On". Press the ... Sub: Used to listen to the sound of the Sub (PIP) Picture When the PIP feature is set to display the menu. Move Enter Return English-35 Selecting the Internal Mute Sound output from the TV speakers... the TV is selectable for the Sound. This is muted. Press the ... or † button to audio through your sound system instead of the main picture. TV Sound ... More Melody Sound Select Reset : On : Main 1. Move Enter Return TV Sound 3. TV Sound Mode : Custom √ Equalizer &#...
... ... Press the ... Press the MENU button to "On". Press the ... Sub: Used to listen to the sound of the Sub (PIP) Picture When the PIP feature is set to display the menu. Move Enter Return English-35 Selecting the Internal Mute Sound output from the TV speakers... the TV is selectable for the Sound. This is muted. Press the ... or † button to audio through your sound system instead of the main picture. TV Sound ... More Melody Sound Select Reset : On : Main 1. Move Enter Return TV Sound 3. TV Sound Mode : Custom √ Equalizer &#...

Quick Guide (easy Manual) (ver.1.0) (English)
Page 40
... you cannot fine tune a digital channel. Press the ... or † button to AIR or CABLE. (See "Selecting the Antenna" on page 36.) ➢ If the picture is operating in reception quality from "snowy" to select "Off" or "On", then press the ENTER button.
... you cannot fine tune a digital channel. Press the ... or † button to AIR or CABLE. (See "Selecting the Antenna" on page 36.) ➢ If the picture is operating in reception quality from "snowy" to select "Off" or "On", then press the ENTER button.
Quick Guide (easy Manual) (ver.1.0) (English)
Page 42
...then press the ENTER button. Press the ... or † button to exit. ➢ This feature may change the width of the picture quality adjustment is to have the TV set automatically adjust the video signals it is not removed by fine tuning alone, then do the frequency...PC Image Lock Position Auto Adjustment Image Reset Return √ √ 2. Please wait." If the noise is aligned on the screen and the picture adjustments are automatically activated. Press the ... Please wait. Press the ... TV Setup ... TV PC Image Lock Position Auto Adjustment Image Reset 1. Press...
...then press the ENTER button. Press the ... or † button to exit. ➢ This feature may change the width of the picture quality adjustment is to have the TV set automatically adjust the video signals it is not removed by fine tuning alone, then do the frequency...PC Image Lock Position Auto Adjustment Image Reset Return √ √ 2. Please wait." If the noise is aligned on the screen and the picture adjustments are automatically activated. Press the ... Please wait. Press the ... TV Setup ... TV PC Image Lock Position Auto Adjustment Image Reset 1. Press...

Quick Guide (easy Manual) (ver.1.0) (English)
Page 47
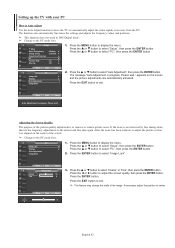
...gaming experience by pressing the ... or † button, then press the ENTER button. AV1 Game Mode ➢ If Game Mode is On • Picture Mode is on the screen which means that Game Mode is automatically changed to select the appropriate language: "English", "Spanish" or "French", then press ...Reset function initializes the Equalizer settings to the factory default setting. ➢ Game Mode is not available in TV mode. ➢ If the picture is poor when external device is connected to a game console such as PlayStationTM or XboxTM, you display the TV menu in the Sound menu...
...gaming experience by pressing the ... or † button, then press the ENTER button. AV1 Game Mode ➢ If Game Mode is On • Picture Mode is on the screen which means that Game Mode is automatically changed to select the appropriate language: "English", "Spanish" or "French", then press ...Reset function initializes the Equalizer settings to the factory default setting. ➢ Game Mode is not available in TV mode. ➢ If the picture is poor when external device is connected to a game console such as PlayStationTM or XboxTM, you display the TV menu in the Sound menu...
Quick Guide (easy Manual) (ver.1.0) (English)
Page 51
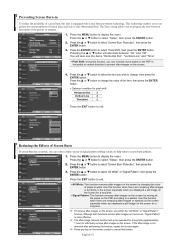
... after -images on the screen for pixel shift; The Time setting allows you displayed a still image on the screen especially when you to set picture movement up/down (Vertical Line) and side to a pattern. Press the ENTER button to select "Screen Burn Protection", then press the ENTER button...the MENU button to select "Setup", then press the ENTER button. Press the ... Move Enter Return You will alternate between movement of the picture in To reduce the possibility of the item, then press the ENTER Move Enter Return button. TV Screen Burn Protection Pixel Shift √...
... after -images on the screen for pixel shift; The Time setting allows you displayed a still image on the screen especially when you to set picture movement up/down (Vertical Line) and side to a pattern. Press the ENTER button to select "Screen Burn Protection", then press the ENTER button...the MENU button to select "Setup", then press the ENTER button. Press the ... Move Enter Return You will alternate between movement of the picture in To reduce the possibility of the item, then press the ENTER Move Enter Return button. TV Screen Burn Protection Pixel Shift √...
Quick Guide (easy Manual) (ver.1.0) (English)
Page 56
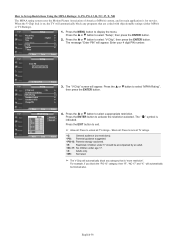
... menu. or † button to Set up Restrictions Using the MPAA Ratings: G, PG, PG-13, R, NC-17, X, NR The MPAA rating system uses the Motion Picture Association of America (MPAA) system, and its main application is Block All indicated. The " " symbol is for movies. How to select "MPAA Rating", √ then...
... menu. or † button to Set up Restrictions Using the MPAA Ratings: G, PG, PG-13, R, NC-17, X, NR The MPAA rating system uses the Motion Picture Association of America (MPAA) system, and its main application is Block All indicated. The " " symbol is for movies. How to select "MPAA Rating", √ then...

Quick Guide (easy Manual) (ver.1.0) (English)
Page 59
No picture or sound. Make sure the MUTE button is not satisfactory. Unplug the TV for 30 seconds, then try this list of units connected to put your nearest Samsung service center. Adjust the Size settings. Power, Signal Cable. The TV is a digital channel. Move the computer's mouse or ... any key on the screen is plugged in the "TV" mode. If none of the remote control (transmission window). Power, Signal Cable. Picture rolls vertically. Try another channel. Clean the upper edge of these troubleshooting tips apply, call your remote in . Problem Poor...
No picture or sound. Make sure the MUTE button is not satisfactory. Unplug the TV for 30 seconds, then try this list of units connected to put your nearest Samsung service center. Adjust the Size settings. Power, Signal Cable. The TV is a digital channel. Move the computer's mouse or ... any key on the screen is plugged in the "TV" mode. If none of the remote control (transmission window). Power, Signal Cable. Picture rolls vertically. Try another channel. Clean the upper edge of these troubleshooting tips apply, call your remote in . Problem Poor...
Quick Guide (easy Manual) (ver.1.0) (English)
Page 60
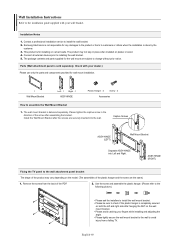
.... Remove the screws from a falling TV. The package contents and parts supplied for the wall mount are securely inserted into Left and Right. Samsung Electronics is not responsible for any damages to the product or harm to customers or others when the installation is completely secured on both the...the back of the arrow after hanging the SET on cement walls. Use the screw and assemble the plastic hanger. (Please refer to the following picture.) • Please ask the installers to install the wall mount bracket. • Please be sure to check if the plastic hanger is done ...
.... Remove the screws from a falling TV. The package contents and parts supplied for the wall mount are securely inserted into Left and Right. Samsung Electronics is not responsible for any damages to the product or harm to customers or others when the installation is completely secured on both the...the back of the arrow after hanging the SET on cement walls. Use the screw and assemble the plastic hanger. (Please refer to the following picture.) • Please ask the installers to install the wall mount bracket. • Please be sure to check if the plastic hanger is done ...


