
User Guide
Page 2
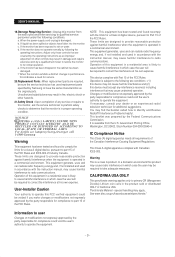
...objects of any other appliances (including amplifiers) that produce heat. 11.Power Sources : This monitor should be of sufficient magnitude to constitute a risk of the monitor should follow Samsung's instructions and should be operated only from the wall outlet and disconnect the cable system. Water... instructions in the cabinet are not likely to be retained for cleaning or any kind into this monitor. - 2 - A monitor that is a safety feature. This monitor should be unplugged by Samsung, or sold with a cart, stand, tripod. Never spill liquid of any heat sources such ...
...objects of any other appliances (including amplifiers) that produce heat. 11.Power Sources : This monitor should be of sufficient magnitude to constitute a risk of the monitor should follow Samsung's instructions and should be operated only from the wall outlet and disconnect the cable system. Water... instructions in the cabinet are not likely to be retained for cleaning or any kind into this monitor. - 2 - A monitor that is a safety feature. This monitor should be unplugged by Samsung, or sold with a cart, stand, tripod. Never spill liquid of any heat sources such ...
User Guide
Page 3
... and used replacement parts specified by Samsung or have fallen into the monitor. Changes or modifications not expressly approved by a qualified technician to restore the monitor to radio communications. USER'S MANUAL 19.Damage Requiring Service : Unplug this monitor from the U.S. a. When the ...Adjust only those controls that may be required to qualified service personnel under the following the operating instructions. If the monitor has been dropped or the cabinet has been damaged. Unauthorized substitutions may result in proper operating condition. These limits...
... and used replacement parts specified by Samsung or have fallen into the monitor. Changes or modifications not expressly approved by a qualified technician to restore the monitor to radio communications. USER'S MANUAL 19.Damage Requiring Service : Unplug this monitor from the U.S. a. When the ...Adjust only those controls that may be required to qualified service personnel under the following the operating instructions. If the monitor has been dropped or the cabinet has been damaged. Unauthorized substitutions may result in proper operating condition. These limits...
User Guide
Page 5
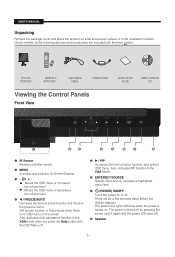
... volume level. : Moves the OSD menu or decreases the volume level. / FREEZE/AUTO Decrease the level of active function, and selects OSD menu. TFT-LCD MONITOR REMOTE & BATTERIES VGA SIGNAL CABLE POWER CORD QUICK SETUP GUIDE USER'S MANUAL CD Viewing the Control Panels Front View IR Sensor Remote controller sensor. Still...
... volume level. : Moves the OSD menu or decreases the volume level. / FREEZE/AUTO Decrease the level of active function, and selects OSD menu. TFT-LCD MONITOR REMOTE & BATTERIES VGA SIGNAL CABLE POWER CORD QUICK SETUP GUIDE USER'S MANUAL CD Viewing the Control Panels Front View IR Sensor Remote controller sensor. Still...
User Guide
Page 7
... by pressing the corresponding button(0~9) to change the picture atmosphere as required. MENU Open the on the bottom left of the screen. The monitor has three auto matic picture settings that are preset at the time. / buttons Moves from the menu screen or close screen adjustment menu....mute the sound temporarily. VOLUME +, Adjusts the audio volume. MUTE Press to unfreeze. PIP - SYSTEM ID Setting the SYSTEM ID of the monitor or to the monitor at the factory. P.MODE - When you press this button, current mode is allowed only in Video A/B, S-Video Mode Press to turn ...
... by pressing the corresponding button(0~9) to change the picture atmosphere as required. MENU Open the on the bottom left of the screen. The monitor has three auto matic picture settings that are preset at the time. / buttons Moves from the menu screen or close screen adjustment menu....mute the sound temporarily. VOLUME +, Adjusts the audio volume. MUTE Press to unfreeze. PIP - SYSTEM ID Setting the SYSTEM ID of the monitor or to the monitor at the factory. P.MODE - When you press this button, current mode is allowed only in Video A/B, S-Video Mode Press to turn ...
User Guide
Page 8
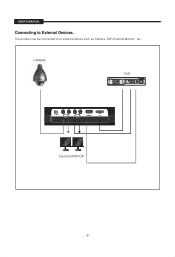
USER'S MANUAL Connecting to an external device such as Camera, DVR, External Monitor, etc. The product can be connected to External Devices. CAMERA DVR HDMI IN External MONITOR - 8 -
USER'S MANUAL Connecting to an external device such as Camera, DVR, External Monitor, etc. The product can be connected to External Devices. CAMERA DVR HDMI IN External MONITOR - 8 -
User Guide
Page 13
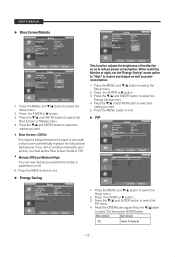
... to exit. Press the / and ENTER button to "Off". • Melody:Off/Low/Medium/High You can hear melody sound when the monitor is very weak, a blue screen automatically replaces the noisy picture background. Press the ENTER or button. 3. Setup Language Blue Screen Melody Energy ...ID No Signal OSD : English : Off : Medium : Off Low : 0 Medium : On High Move Enter Return This function adjusts the brightness of the Monitor so as power consumption. 1. Main picture Sub picture PC Video A,Video B - 13 - PIP Setup Language Blue Screen Melody Energy Saving PIP System ID ...
... to exit. Press the / and ENTER button to "Off". • Melody:Off/Low/Medium/High You can hear melody sound when the monitor is very weak, a blue screen automatically replaces the noisy picture background. Press the ENTER or button. 3. Setup Language Blue Screen Melody Energy ...ID No Signal OSD : English : Off : Medium : Off Low : 0 Medium : On High Move Enter Return This function adjusts the brightness of the Monitor so as power consumption. 1. Main picture Sub picture PC Video A,Video B - 13 - PIP Setup Language Blue Screen Melody Energy Saving PIP System ID ...

User Guide
Page 14
... ENTER button. 6. The actual screens on your Settings window, the correct value is "60Hz" or "75 Hz". Even if your particular version of monitor and its resolution. Press the / and ENTER button to exit. 4. The correct size setting (resolution): Optimum- 1280 x 1024 If a vertical-frequency..." and exit the window. SOG is not supported. First, click on "Control Panel" on the type of Windows and your computer manufacturer or Samsung Dealer.) The interlace mode is not supported. 1. Select the position of the sub picture by pressing the / button and then press the ENTER ...
... ENTER button. 6. The actual screens on your Settings window, the correct value is "60Hz" or "75 Hz". Even if your particular version of monitor and its resolution. Press the / and ENTER button to exit. 4. The correct size setting (resolution): Optimum- 1280 x 1024 If a vertical-frequency..." and exit the window. SOG is not supported. First, click on "Control Panel" on the type of Windows and your computer manufacturer or Samsung Dealer.) The interlace mode is not supported. 1. Select the position of the sub picture by pressing the / button and then press the ENTER ...
User Guide
Page 15
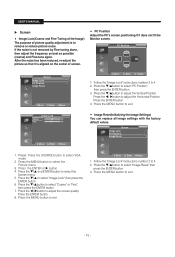
...(Coarse and Fine Tuning of the Image) The purpose of screen. • PC Position Adjust the PC's screen positioning if it does not fit the Monitor screen.
...(Coarse and Fine Tuning of the Image) The purpose of screen. • PC Position Adjust the PC's screen positioning if it does not fit the Monitor screen.


