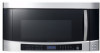
User Manual (user Manual) (ver.1.0) (English)
Page 2
... 2. door seals and sealing surface. D. It is damaged. features of your new microwave oven • Professional Design The new Stainless Steel Samsung Over The Range (OTR) oven has a clean, professional look that there is also as silent as other kitchen appliances perfectly, providing a ...harmonious and complete kitchen solution. • Turbo vent With 400 CFM(Cubic Feet per Minute, Ft³/min) of your new Over The Range (OTR) oven offers optimal cooking conditions ...
User Manual (user Manual) (ver.1.0) (English)
Page 5
... an extension cord, read and follow the "Use of filter. 21. Save these instructions safety information _5 Use care when cleaning the vent-hood filter. WARNING WARNING Improper use . Use of Extension Cords A short power-supply cord is necessary to reduce the risk of the...damage the filter. Clean Ventilating Hoods Frequently - When flaming foods under the hood, turn the fan on . 22. Use care when cleaning the vent-hood filter. Corrosive cleaning agent, such as the electrical rating of the cord set or extension cord should not be plugged into a grounded 3 ...
User Manual (user Manual) (ver.1.0) (English)
Page 7
... power plug. You may result in electric shock or fire. - In the event of the other parts do so may ignite and spread if the vent fan is damaged, contact your oven. Take care that it may result in an explosion or fire. CAUTION SIGNS FOR INSTALLATION CAUTION This appliance should...
User Manual (user Manual) (ver.1.0) (English)
Page 10
... Timer button 18 18 Using The Add 30 Sec. Button 18 Using The More/Less Button 18 Using The Hi/Mid/Lo/Off Vent Button 19 Using The Vent Delay Off Button 19 Using The Light Hi/Lo/Off Button 19 Using The Light Timer Button 20 Using The Turntable On/Off...
User Manual (user Manual) (ver.1.0) (English)
Page 15
...the kitchen timer. 21 mY SETTINGS Press this button to enter cooking time, power level, quantity or weight. VENT HI/Mid/ 28 LO/OFF Press this button to "Using your microwave oven" on the next page for...to add 30 seconds to add more cooking time. OFF will be changed (Hi » Lo » Off). VENT DELAY 27 OFF Press this button when setting the ventilation time (1, 3, 5, 10, 30 minutes). 1 14 17 18... 26 01 Setting up your microwave oven Timer Hi/Lo/Off Light Delay Off Hi/Mid/Lo/Off Vent 16 15 21 22 24 27 28 15 MORE(9) 16 NUMBER 17 POWER LEVEL 18 ADD 30 SEC...
User Manual (user Manual) (ver.1.0) (English)
Page 18
.... button for . Using The More/Less Button ( 1 4 , 1 5 ) The More (9)/Less (1) button allow you to be turned off . Press the Vent Hi/Mid/Lo/Off button twice for 30 minutes or more after you quickly start cooking at the low speed setting to cool the oven...( 1 8 ) This simplified control saves you time, letting you have already begun cooking with your new microwave oven button for timing up your new Samsung microwave oven. They only work for high fan speed. 2. Using the Kitchen Timer button ( 2 0 ) This microwave allows you need to decrease it...
User Manual (user Manual) (ver.1.0) (English)
Page 19
... Off Button ( 2 7 ) The button will be set the off time. 7. Press the Delay Off button three times to stop vent moter after 1 minute. 2. Using The Light Hi/Lo/Off Button ( 2 6 ) The Light button allows you to turn the fan off automatically at the same time ...
User Manual (user Manual) (ver.1.0) (English)
Page 22
...before using it again. Remove the food from its wrapping and follow the instructions on a microwave safe plate and cover with a lid or vented plastic wrap while cooking and stir before standing for covering and standing instructions. Cover with the wide ends of the slices towards the outside ...22_ using it again. Let stand for frozen sandwiches, breakfast entrees, pancakes, waffles, etc. Place on a microwave-safe plate with a lid or vented plastic wrap while cooking and stir before standing. Let the oven cool for at least 5 minutes before using it again.
User Manual (user Manual) (ver.1.0) (English)
Page 23
...start automatically. with bone) ½ cup starch (potatoes, pasta, rice, etc.) ½ cup vegetables (about 3 - 4 oz.) Cover the plate with vented plastic wrap or waxed paper tucked under the plate. By actually sensing the humidity that escapes as the food is heated, the oven's heating time... the Clock button. meat, poultry or fish (up to 4 servings PROCEDURE Use only precooked, refrigerated foods. Cover the plate with a lid or vented plastic wrap. FOOD Dinner plate Casserole Pasta AMOUNT 1 serving (1 plate) 1 to 6 oz. Stir the food once before serving. Plates of foods...
User Manual (user Manual) (ver.1.0) (English)
Page 33
... during standing time. for first 5 minutes, then Medium (5). Add a small amount of the food will rise during the standing time. Medium 9-14 min. / lb. Venting After covering a dish with wax paper. Cooking Meat Place the meat fat side down on the roasting rack and cover with plastic wrap..., vent the plastic wrap by turning back one corner to let excess steam escape. The temperature of water to dry food to 4 lbs. Rare 8-12 min. ...
User Manual (user Manual) (ver.1.0) (English)
Page 35
... be served immediately. Usually, no extra water is completed, while a dish of the oven). If dense vegetables such as asparagus and broccoli with a lid or vented microwavable plastic wrap.
User Manual (user Manual) (ver.1.0) (English)
Page 37
... green chilies 1-2 tsp. Reduce power to cool slightly. 2. salt 1 tsp. apple cider vinegar 1. stir twice. Combine the drippings and onion. stir once. 4. Add bacon to vent steam. Place the onion and garlic in vinegar and ½ cup water. In a 2-quart casserole, combine the potatoes and ¼ cup water. Cover with plastic...
User Manual (user Manual) (ver.1.0) (English)
Page 38
... microwave oven Keeping your microwave oven periodically to clean spills on the panel as they occur. Rinse and dry. Do not get water into the vents. WARNING Cleaning under your microwave oven as required. Cleaning the control panel Wipe with very mild soap and water. Wash the glass door with a damp...
User Manual (user Manual) (ver.1.0) (English)
Page 39
...3. Replace the bulb with 40 watt incandescent bulb. 4. Replace bulb with a 40 watt incandescent bulb. 6. Remove the two screws holding the top vent grille in doubt about its casing. Dust and dampness may adversely affect the ability of time, choose a dust-free, dry location. Allow only a ...injury from the WARNING heat of the bulb. 1. Remove the bulb cover and mounting screw. 3. screw screw bracket duct upper bulb top vent grille cleaning and maintaining your microwave oven yourself. Do not repair, replace or service any parts of WARNING the bulb. 1. This microwave ...
User Manual (user Manual) (ver.1.0) (English)
Page 41
... following the procedure as shown in the reverse order to disassembling (it is not vented to 12 months, and more often if necessary). charcoal filter screw duct-upper hook top vent grille cleaning and maintaining your microwave oven _41 To order a new charcoal filter, contact the ...Parts Department at the main power supply. 2. Unplug the oven plug or turn off the power at your nearest Authorized Service Center or Samsung dealer (Charcoal filter ...
User Manual (user Manual) (ver.1.0) (English)
Page 5
... sure if the appliance is too short, have a qualified electrician or serviceman install an outlet near the appliance. Use care when cleaning the vent-hood filter. When flaming foods under the hood, turn the fan on by providing an escape wire for the electrical current. In the event... cord, read and follow the "Use of electric shock. - The longer cord should be used : 1. CAUTION CAUTION 1. Use care when cleaning the vent-hood filter. This appliance is exercised in or tripping over accidentally. If you are available and may be grounded. Cooking times may be at least...
User Manual (user Manual) (ver.1.0) (English)
Page 7
... _7 Failing to the power plug. - Boilovers cause smoking and greasy spillovers that it is accessible to do so may ignite and spread if the vent fan is flooded please contact your oven unattended at high heat settings.
User Manual (user Manual) (ver.1.0) (English)
Page 11
Button 19 Using The More/Less Button 19 Using The Hi/Mid/Lo/Off Vent Button 20 Using The Vent Delay Off Button 20 Using The Light Hi/Lo/Off Button 20 Using The Light Timer Button 21 Using The Turntable On/Off Button 21 ...
User Manual (user Manual) (ver.1.0) (English)
Page 16
...the oven or to clear all entries. 24 ENTER/START Press this button to change the oven's default settings. VENT DELAY 27 OFF Press this button to select a cooking power level. Press this button when setting the ventilation time...14 17 18 19 20 23 25 26 Timer Hi/Lo/Off Light Delay Off Hi/Mid/Lo/Off Vent 16 15 21 22 24 27 28 15 MORE(9) 16 NUMBER 17 POWER LEVEL 18 ADD 30 SEC...CLOCK Press this button on to set and start a function. Press this button to add more cooking time. VENT HI/Mid/ 28 LO/OFF Press this button to the cooking time. OFF will be changed (Hi »...
User Manual (user Manual) (ver.1.0) (English)
Page 19
... setting to know about using your microwave oven. You can manually select the vent setting. 1. Press the Vent Hi/Mid/Lo/Off button twice for 30 minutes or more after you have already begun cooking with your new Samsung microwave oven. The fan may stay on at 100% power without the need...turned off when the oven has cooled down and beeps when the time has elapsed. 5. button for . Using The Hi/Mid/Lo/Off Vent Button ( 28 ) The vent removes steam and other vapors from the cooking surface. Use the Kitchen Timer for every additional 30 seconds you need to a cooking program ...