User Manual (user Manual) (ver.1.0) (English)
Page 5
... with the provided installation instructions. 6. Do not overcook food. As with narrow necks. Keep cord away from paper or plastic bags before cleaning. 18. If the door is not always present. c. Use this appliance only for example, closed , turn oven off, and disconnect the power cord, or shut off power at the fuse or circuit breaker panel. Never try to the door. 13. Remove wire twist-ties from...
... with the provided installation instructions. 6. Do not overcook food. As with narrow necks. Keep cord away from paper or plastic bags before cleaning. 18. If the door is not always present. c. Use this appliance only for example, closed , turn oven off, and disconnect the power cord, or shut off power at the fuse or circuit breaker panel. Never try to the door. 13. Remove wire twist-ties from...
User Manual (user Manual) (ver.1.0) (English)
Page 6
... serviceman install an outlet near the appliance. Use care when cleaning the vent-hood filter. Cooking times may damage the filter. The plug must be plugged into a grounded 3 prong outlet. If the power-supply cord is used if care is on by providing an escape wire for the electrical current. Clean Ventilating Hoods Frequently - Corrosive cleaning agent, such as the electrical rating of filter. 2. WARNING WARNING Improper use an extension cord, the interior light may...
... serviceman install an outlet near the appliance. Use care when cleaning the vent-hood filter. Cooking times may damage the filter. The plug must be plugged into a grounded 3 prong outlet. If the power-supply cord is used if care is on by providing an escape wire for the electrical current. Clean Ventilating Hoods Frequently - Corrosive cleaning agent, such as the electrical rating of filter. 2. WARNING WARNING Improper use an extension cord, the interior light may...
User Manual (user Manual) (ver.1.0) (English)
Page 7
... oven to direct sunlight and water (rain drops). - Save these instructions safety information _7 Your oven should be the only connected on the interior or exterior of the oven, broken door latches, cracks in electric shock or fire. - This may result in electric shock or fire. Sharing a wall socket with other heating or cooking appliance beneath this appliance. Do not use a damaged power plug, damaged power cord...
... oven to direct sunlight and water (rain drops). - Save these instructions safety information _7 Your oven should be the only connected on the interior or exterior of the oven, broken door latches, cracks in electric shock or fire. - This may result in electric shock or fire. Sharing a wall socket with other heating or cooking appliance beneath this appliance. Do not use a damaged power plug, damaged power cord...
User Manual (user Manual) (ver.1.0) (English)
Page 8
... vent fan is opened, the fire may spread. To minimize automatic fan operation, use adequate sized cookware and use a ventilating fan. - If materials inside . Never try to repair, disassemble, or modify the appliance yourself. - You may result in electric shock or fire. - Unplug the power plug when the appliance is flooded please contact your nearest service center : Failing to electromagnetic waves. - Failing to electric leakage. Take care...
... vent fan is opened, the fire may spread. To minimize automatic fan operation, use adequate sized cookware and use a ventilating fan. - If materials inside . Never try to repair, disassemble, or modify the appliance yourself. - You may result in electric shock or fire. - Unplug the power plug when the appliance is flooded please contact your nearest service center : Failing to electromagnetic waves. - Failing to electric leakage. Take care...
User Manual (user Manual) (ver.1.0) (English)
Page 9
... burns. Carefully remove container coverings, directing steam away from the wall socket and contact your nearest service center. - Handle with reduced physical, sensory or mental capabilities use aluminum foil, metal objects (such as containers, forks, etc.) or containers with wet hands. - After heating baby food, stir well to do so may result in electric shock or fire. Do not touch the power plug...
... burns. Carefully remove container coverings, directing steam away from the wall socket and contact your nearest service center. - Handle with reduced physical, sensory or mental capabilities use aluminum foil, metal objects (such as containers, forks, etc.) or containers with wet hands. - After heating baby food, stir well to do so may result in electric shock or fire. Do not touch the power plug...

User Manual (user Manual) (ver.1.0) (English)
Page 10
... spray volatile material such as a sink or glass object. - Take care that children do so may result in narrow-necked bottles. Do not abruptly cool the door, the inside of the oven clean. Do not defrost frozen beverages in corrosion. Do not store anything directly on the appliance. - Remove seals and lids before use sealed containers. SEVERE WARNING SIGNS FOR...
... spray volatile material such as a sink or glass object. - Take care that children do so may result in narrow-necked bottles. Do not abruptly cool the door, the inside of the oven clean. Do not defrost frozen beverages in corrosion. Do not store anything directly on the appliance. - Remove seals and lids before use sealed containers. SEVERE WARNING SIGNS FOR...
User Manual (user Manual) (ver.1.0) (English)
Page 11
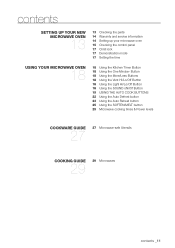
... service information 14 Setting up your microwave oven 15 Checking the control panel 17 Child lock 17 Demonstration mode 17 Setting the time using your microwave oven 18 18 Using the Kitchen Timer Button 18 Using the One Minute+ Button 18 Using the More/Less Buttons 18 Using the Vent Hi/Lo/Off Button 18 Using the Light Hi/Lo/Off Button 18 Using the SOUND oN/Off Button 19 USING THE AUTO COOK BUTTONS 22 Using the Auto Defrost button 23 Using the Auto Reheat button 25 Using the SOFTEN/MELT button 25 Microwave cooking times & Power levels...
... service information 14 Setting up your microwave oven 15 Checking the control panel 17 Child lock 17 Demonstration mode 17 Setting the time using your microwave oven 18 18 Using the Kitchen Timer Button 18 Using the One Minute+ Button 18 Using the More/Less Buttons 18 Using the Vent Hi/Lo/Off Button 18 Using the Light Hi/Lo/Off Button 18 Using the SOUND oN/Off Button 19 USING THE AUTO COOK BUTTONS 22 Using the Auto Defrost button 23 Using the Auto Reheat button 25 Using the SOFTEN/MELT button 25 Microwave cooking times & Power levels...
User Manual (user Manual) (ver.1.0) (English)
Page 12
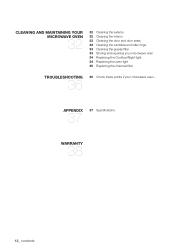
cleaning and maintaining your microwave oven 32 32 Cleaning the exterior 32 Cleaning the interior 32 Cleaning the door and door seals 32 Cleaning the turntable and roller rings 33 Cleaning the grease filter 33 Storing and repairing your microwave oven 34 Replacing the Cooktop/Night light 34 Replacing the oven light 35 Replacing the charcoal filter troubleshooting 36 36 Check these points if your microwave oven... appendix 37 37 Specifications warranty 38 12_ contents
cleaning and maintaining your microwave oven 32 32 Cleaning the exterior 32 Cleaning the interior 32 Cleaning the door and door seals 32 Cleaning the turntable and roller rings 33 Cleaning the grease filter 33 Storing and repairing your microwave oven 34 Replacing the Cooktop/Night light 34 Replacing the oven light 35 Replacing the charcoal filter troubleshooting 36 36 Check these points if your microwave oven... appendix 37 37 Specifications warranty 38 12_ contents
User Manual (user Manual) (ver.1.0) (English)
Page 13
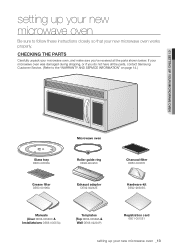
... Samsung Customer Service. (Refer to the "WARRANTY AND SERVICE INFORMATION" on page 14.) 01 Setting up your microwave oven Glass tray DE63-00536A Grease filter DE63-00196A Microwave oven Roller guide ring DE92-90495C Exhaust adaptor DE92-90242E Charcoal filter DE63-00367E Hardware-kit DE92-90505G Manuals (User DE68-03588C & Installataions DE68-03587A) Templates (Top DE68-03589A & Wall DE68-02230P) Registration card 6801-001581 setting up your new microwave oven Be sure to follow these instructions...
... Samsung Customer Service. (Refer to the "WARRANTY AND SERVICE INFORMATION" on page 14.) 01 Setting up your microwave oven Glass tray DE63-00536A Grease filter DE63-00196A Microwave oven Roller guide ring DE92-90495C Exhaust adaptor DE92-90242E Charcoal filter DE63-00367E Hardware-kit DE92-90505G Manuals (User DE68-03588C & Installataions DE68-03587A) Templates (Top DE68-03589A & Wall DE68-02230P) Registration card 6801-001581 setting up your new microwave oven Be sure to follow these instructions...
User Manual (user Manual) (ver.1.0) (English)
Page 16
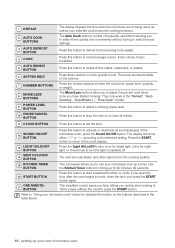
...", "Auto Cooking", "One Minute +", "Time Cook" modes. Press the number buttons to set cook times once you to select a cooking power level. Press this button to stop the oven or to clear all sounds (beeps) of the buttons. The items are listed beside of the microwave oven, press the Sound On/Off button. Press this button to enter the cook time, power level, quantity, or weight. Sound On/Off 12 BUTTON Press this button to start cooking at 100% power without having to cook specific foods. Use the Kitchen Timer button for night light...
...", "Auto Cooking", "One Minute +", "Time Cook" modes. Press the number buttons to set cook times once you to select a cooking power level. Press this button to stop the oven or to clear all sounds (beeps) of the buttons. The items are listed beside of the microwave oven, press the Sound On/Off button. Press this button to enter the cook time, power level, quantity, or weight. Sound On/Off 12 BUTTON Press this button to start cooking at 100% power without having to cook specific foods. Use the Kitchen Timer button for night light...
User Manual (user Manual) (ver.1.0) (English)
Page 17
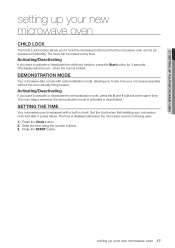
... microwave operates without the oven actually being used. 1. Setting the time Your microwave oven is not being heated. 01 Setting up your microwave oven setting up your microwave oven and after a power failure. Activating/Deactivating If you want to activate or deactivate the child lock function, press the Start button for 3 seconds. Press the Clock button. 2. Demonstration mode Your microwave also comes with a built-in clock. Press the START button. The oven beeps whenever the demonstration mode is locked. Enter the time using the number buttons...
... microwave operates without the oven actually being used. 1. Setting the time Your microwave oven is not being heated. 01 Setting up your microwave oven setting up your microwave oven and after a power failure. Activating/Deactivating If you want to activate or deactivate the child lock function, press the Start button for 3 seconds. Press the Clock button. 2. Demonstration mode Your microwave also comes with a built-in clock. Press the START button. The oven beeps whenever the demonstration mode is locked. Enter the time using the number buttons...

User Manual (user Manual) (ver.1.0) (English)
Page 18
... the need to turn off . Press the Kitchen Timer button. 2. Press the Vent Hi/Lo/Off button three times to know about using the number buttons. 3. Press the Light Hi/Lo/Off button once for the night light 3. Touch the Sound ON/OFF button the display shows On. 2. Press the One Minute+ button for every additional minute you to use your microwave oven Using the One Minute+ Button This simplified control saves you time, letting you quickly start cooking...
... the need to turn off . Press the Kitchen Timer button. 2. Press the Vent Hi/Lo/Off button three times to know about using the number buttons. 3. Press the Light Hi/Lo/Off button once for the night light 3. Touch the Sound ON/OFF button the display shows On. 2. Press the One Minute+ button for every additional minute you to use your microwave oven Using the One Minute+ Button This simplified control saves you time, letting you quickly start cooking...
User Manual (user Manual) (ver.1.0) (English)
Page 20
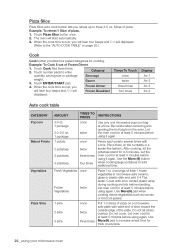
... four beeps and End will displayed. (Refer to the "AUTO COOK TABLE" on page 20.) Cook Cook button provides four preset categories for cooking. Touch Pizza Slice button once. 2. The oven will Frozen Breakfast displayed. Use the More (9) button when cooking larger potatoes to enter Category quantity, serving size or package Beverage weight. 3. Let oven cool for at least 5 minutes before using again. Be careful when removing and opening the hot bag from the oven. Touch Cook...
... four beeps and End will displayed. (Refer to the "AUTO COOK TABLE" on page 20.) Cook Cook button provides four preset categories for cooking. Touch Pizza Slice button once. 2. The oven will Frozen Breakfast displayed. Use the More (9) button when cooking larger potatoes to enter Category quantity, serving size or package Beverage weight. 3. Let oven cool for at least 5 minutes before using again. Be careful when removing and opening the hot bag from the oven. Touch Cook...
User Manual (user Manual) (ver.1.0) (English)
Page 22
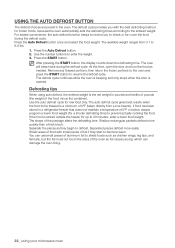
... food has been stored in the oven. If the food is opened. The oven will beep twice during the defrost cycle. At this time, open the door and turn over the food during the defrost cycle. Using the Auto Defrost button The defrost choices are preset in a refrigerator-freezer that does not maintain a temperature of 5°F or below, always program a lower food weight (for frozen foods, because the oven automatically sets the defrosting times according to defrost...
... food has been stored in the oven. If the food is opened. The oven will beep twice during the defrost cycle. At this time, open the door and turn over the food during the defrost cycle. Using the Auto Defrost button The defrost choices are preset in a refrigerator-freezer that does not maintain a temperature of 5°F or below, always program a lower food weight (for frozen foods, because the oven automatically sets the defrosting times according to defrost...
User Manual (user Manual) (ver.1.0) (English)
Page 24
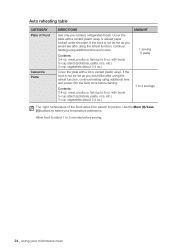
... hot as you would like after using the reheat function, continue heating using additional time and power. meat, poultry or fish (up to 6 oz. meat, poultry or fish (up to 6 oz. Contents: 3-4 oz. Stir the food once before serving. 24_ using additional time and power. Auto reheating table CATEGORY Plate of the food varies from person to person. Use the More (9)/Less (1) buttons to select your microwave oven...
... hot as you would like after using the reheat function, continue heating using additional time and power. meat, poultry or fish (up to 6 oz. meat, poultry or fish (up to 6 oz. Contents: 3-4 oz. Stir the food once before serving. 24_ using additional time and power. Auto reheating table CATEGORY Plate of the food varies from person to person. Use the More (9)/Less (1) buttons to select your microwave oven...

User Manual (user Manual) (ver.1.0) (English)
Page 29
... creates friction and the resulting heat cooks the food. for 160 °F - for 145 °F - Well Done Power Level: High (10) for 170 °F - for first 5 minutes, then Medium (5). INSTRUCTIONS Place the roast fat-side down on the roasting rack and cover with wax paper. Let stand for 10 to 4 lbs. FOOD Beef Rare REMOVE FROM OVEN AFTER STANDING (10 MIN...
... creates friction and the resulting heat cooks the food. for 160 °F - for 145 °F - Well Done Power Level: High (10) for 170 °F - for first 5 minutes, then Medium (5). INSTRUCTIONS Place the roast fat-side down on the roasting rack and cover with wax paper. Let stand for 10 to 4 lbs. FOOD Beef Rare REMOVE FROM OVEN AFTER STANDING (10 MIN...
User Manual (user Manual) (ver.1.0) (English)
Page 34
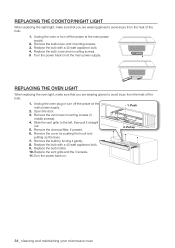
... charcoal filter, if present. 6. Replace the bulb with a 40 watt appliance bulb. 4. Put up the lever. 7. Replace the bulb cover and mounting screws. 5 Turn the power back on . 1. Remove the vent cover mounting screws (3 middle screws). 4. Replace the vent grille and the 3 screws. 11. Turn the power back on at the main power supply. 2. Replacing the Cooktop/Night light When replacing the night light, make sure that you are wearing gloves to avoid injury from the heat of the bulb. 1. Open the door. 3. Replacing the oven light When replacing...
... charcoal filter, if present. 6. Replace the bulb with a 40 watt appliance bulb. 4. Put up the lever. 7. Replace the bulb cover and mounting screws. 5 Turn the power back on . 1. Remove the vent cover mounting screws (3 middle screws). 4. Replace the vent grille and the 3 screws. 11. Turn the power back on at the main power supply. 2. Replacing the Cooktop/Night light When replacing the night light, make sure that you are wearing gloves to avoid injury from the heat of the bulb. 1. Open the door. 3. Replacing the oven light When replacing...
User Manual (user Manual) (ver.1.0) (English)
Page 35
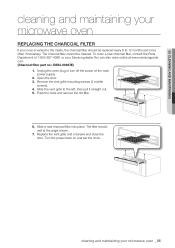
... and remove the old filter. 6. Turn the power back on and set the clock. The charcoal filter cannot be replaced every 6 to 12 months and more often if necessary. Replace the vent grille and 3 screws and close the door. 05 Cleaning and maintaining cleaning and maintaining your microwave oven Replacing the charcoal filter If your oven is vented to the inside, the charcoal filter should rest at the angle shown. 7. cleaning and maintaining your microwave oven _35 Remove the vent grille mounting screws (3 middle screws). 4.
... and remove the old filter. 6. Turn the power back on and set the clock. The charcoal filter cannot be replaced every 6 to 12 months and more often if necessary. Replace the vent grille and 3 screws and close the door. 05 Cleaning and maintaining cleaning and maintaining your microwave oven Replacing the charcoal filter If your oven is vented to the inside, the charcoal filter should rest at the angle shown. 7. cleaning and maintaining your microwave oven _35 Remove the vent grille mounting screws (3 middle screws). 4.

User Manual (user Manual) (ver.1.0) (English)
Page 36
... the interior oven walls. Is the power going off before the set time has elapsed? Reset the clock and any blown fuses. This is similar to interference caused by a wall switch, make sure the wall switch is controlled by other appliance doesn't work, call a qualified electrician to repair the wall outlet. Causes TV or radio interference. Plug a different appliance into a different outlet. Reset the circuit breaker or replace any cooking instructions. The display...
... the interior oven walls. Is the power going off before the set time has elapsed? Reset the clock and any blown fuses. This is similar to interference caused by a wall switch, make sure the wall switch is controlled by other appliance doesn't work, call a qualified electrician to repair the wall outlet. Causes TV or radio interference. Plug a different appliance into a different outlet. Reset the circuit breaker or replace any cooking instructions. The display...
User Manual (user Manual) (ver.1.0) (English)
Page 38
... found to be defective during in-home service repair can only be necessary to remove, repair and return the product. Otherwise, transportation to and from state to SAMSUNG or SAMSUNG's authorized service center. altered product or serial numbers; glass tray or turntable; SAMSUNG does not warrant uninterrupted or error-free operation of the purchaser. cosmetic damage or exterior finish; reduced magnetron power output related to : damage which damage...
... found to be defective during in-home service repair can only be necessary to remove, repair and return the product. Otherwise, transportation to and from state to SAMSUNG or SAMSUNG's authorized service center. altered product or serial numbers; glass tray or turntable; SAMSUNG does not warrant uninterrupted or error-free operation of the purchaser. cosmetic damage or exterior finish; reduced magnetron power output related to : damage which damage...


