
User Manual (user Manual) (ver.1.0) (English, French)
Page 2
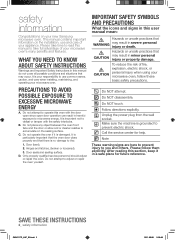
... What the icons and signs in this manual to you need to prevent electric shock. Hazards or unsafe practices that there is your new Samsung microwave oven. Save these basic safety precautions. This manual contains important information on the installation, use common sense, caution, and care when...features. Do NOT disassemble. Please take full advantage of your microwave oven. Door seals and sealing surface. Do NOT touch. Unplug the power plug from the wall socket. Note These warning signs are here to prevent injury to take time to read this user manual mean: ...
... What the icons and signs in this manual to you need to prevent electric shock. Hazards or unsafe practices that there is your new Samsung microwave oven. Save these basic safety precautions. This manual contains important information on the installation, use common sense, caution, and care when...features. Do NOT disassemble. Please take full advantage of your microwave oven. Door seals and sealing surface. Do NOT touch. Unplug the power plug from the wall socket. Note These warning signs are here to prevent injury to take time to read this user manual mean: ...
User Manual (user Manual) (ver.1.0) (English, French)
Page 3
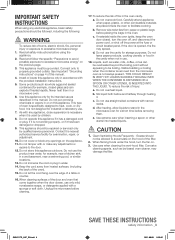
... . 18. To reduce the risk of this appliance outdoors. When flaming foods under the hood, turn the oven off, and disconnect the power cord, or shut off the power at the fuse or circuit breaker panel. Never heat them . Do not cover or block any appliance, close supervision is necessary when it...
... . 18. To reduce the risk of this appliance outdoors. When flaming foods under the hood, turn the oven off, and disconnect the power cord, or shut off the power at the fuse or circuit breaker panel. Never heat them . Do not cover or block any appliance, close supervision is necessary when it...
User Manual (user Manual) (ver.1.0) (English, French)
Page 4
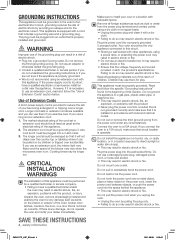
... in electric shock or fire. If you use an electric transformer. Do not mount over a longer cord. Use of Extension Cords A short power-supply cord is necessary to reduce the risk of electric shock. • Plug into the space behind the appliance. • This may use..., have a qualified technician install the oven may result in electric shock, fire, an explosion, problems with adequate space. If you use a damaged power plug, damaged power cord, or loose wall socket. • This may result in or tripping over a sink. Failing to direct sunlight or water (rain drops). ...
... in electric shock or fire. If you use an electric transformer. Do not mount over a longer cord. Use of Extension Cords A short power-supply cord is necessary to reduce the risk of electric shock. • Plug into the space behind the appliance. • This may use..., have a qualified technician install the oven may result in electric shock, fire, an explosion, problems with adequate space. If you use a damaged power plug, damaged power cord, or loose wall socket. • This may result in or tripping over a sink. Failing to direct sunlight or water (rain drops). ...
User Manual (user Manual) (ver.1.0) (English, French)
Page 5
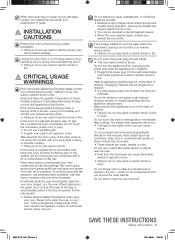
...voltage inside. If the door is damaged, contact your nearest service center : Failing to do so may result in operation. • Plugging the power plug into the microwave. • These objects can be exposed to do so may result in this manual), metal objects (such as water ...Section. CRITICAL USAGE WARNINGS WARNING If the microwave appliance is in electric shock or fire. Do not turn the oven off and disconnect the power cord, or shut off by covering the pan completely with reduced physical, sensory or mental capabilities use the oven outdoors. Keep all packaging...
...voltage inside. If the door is damaged, contact your nearest service center : Failing to do so may result in operation. • Plugging the power plug into the microwave. • These objects can be exposed to do so may result in this manual), metal objects (such as water ...Section. CRITICAL USAGE WARNINGS WARNING If the microwave appliance is in electric shock or fire. Do not turn the oven off and disconnect the power cord, or shut off by covering the pan completely with reduced physical, sensory or mental capabilities use the oven outdoors. Keep all packaging...
User Manual (user Manual) (ver.1.0) (English, French)
Page 7
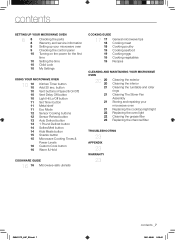
... oven 8 8 8 Checking the parts Warranty and service information 8 Setting up your microwave oven 9 Checking the control panel 10 Turning on the power for the first time 10 Setting the time 10 Child Lock 10 My Settings using your microwave oven Replacing the cooktop/night light Replacing the... Cooking buttons Sensor Reheat button Auto Defrost button 1 Pound Defrost button Soften/Melt button Kids Meals button Snacks button Microwave Cooking Times & Power Levels Custom Cook button Warm & Hold cookware guide 16 16 Microwave-safe utensils cooking guide 17 17 18 18 19 19 19 19 ...
... oven 8 8 8 Checking the parts Warranty and service information 8 Setting up your microwave oven 9 Checking the control panel 10 Turning on the power for the first time 10 Setting the time 10 Child Lock 10 My Settings using your microwave oven Replacing the cooktop/night light Replacing the... Cooking buttons Sensor Reheat button Auto Defrost button 1 Pound Defrost button Soften/Melt button Kids Meals button Snacks button Microwave Cooking Times & Power Levels Custom Cook button Warm & Hold cookware guide 16 16 Microwave-safe utensils cooking guide 17 17 18 18 19 19 19 19 ...
User Manual (user Manual) (ver.1.0) (English, French)
Page 10
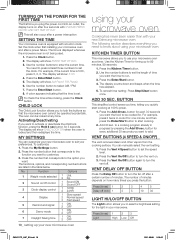
You need to know about using your new Samsung microwave oven. Press the Enter/Start button. 5. Press the Enter/Start button. ...minutes. To cancel timer setting: Press Stop/Clear button once. button for the light in your microwave oven and after a power interruption Setting the time Your microwave oven is locked and then redisplays the time. Press (times) 1 2 3 4 5... 3. Press the Enter/Start button 4. button This simplified control saves you time, letting you plug the power cord into an outlet, the display turns on after four seconds with your microwave oven Cooking has never ...
You need to know about using your new Samsung microwave oven. Press the Enter/Start button. 5. Press the Enter/Start button. ...minutes. To cancel timer setting: Press Stop/Clear button once. button for the light in your microwave oven and after a power interruption Setting the time Your microwave oven is locked and then redisplays the time. Press (times) 1 2 3 4 5... 3. Press the Enter/Start button 4. button This simplified control saves you time, letting you plug the power cord into an outlet, the display turns on after four seconds with your microwave oven Cooking has never ...

User Manual (user Manual) (ver.1.0) (English, French)
Page 11
... results The shelf gives you press the ECO MODE button once, the display will go out and the microwave shifts to the mode which minimizes power usage. Press the Enter/Start button. 8. Food cooks best on the shelf. For best results Eco Mode Eco Mode reduces standby... power usage. SMH2117S_XAC_EN.indd 11 using your microwave oven Set Timer button You can set the microwave so the light turns on and off time. 7. Press ...
... results The shelf gives you press the ECO MODE button once, the display will go out and the microwave shifts to the mode which minimizes power usage. Press the Enter/Start button. 8. Food cooks best on the shelf. For best results Eco Mode Eco Mode reduces standby... power usage. SMH2117S_XAC_EN.indd 11 using your microwave oven Set Timer button You can set the microwave so the light turns on and off time. 7. Press ...
User Manual (user Manual) (ver.1.0) (English, French)
Page 12
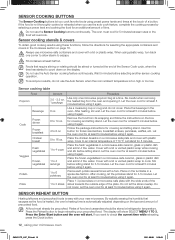
... again. Place the chicken breasts on a microwave-safe plate with plastic wrap. Do not use the auto cook feature, complete the cooking process by selecting a power level and cooking the food for at the touch of time. Place the beverage in a spoke-like fashion. Let the oven cool for an additional... foods is too high or too low. Plates of 170 °F. Sensor Cooking buttons The Sensor Cooking buttons let you cook favorite foods using preset power levels and times at least 5 minutes before using it again.
... again. Place the chicken breasts on a microwave-safe plate with plastic wrap. Do not use the auto cook feature, complete the cooking process by selecting a power level and cooking the food for at the touch of time. Place the beverage in a spoke-like fashion. Let the oven cool for an additional... foods is too high or too low. Plates of 170 °F. Sensor Cooking buttons The Sensor Cooking buttons let you cook favorite foods using preset power levels and times at least 5 minutes before using it again.
User Manual (user Manual) (ver.1.0) (English, French)
Page 13
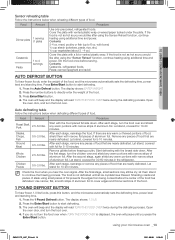
... of the food. 1 Pound Defrost button To thaw frozen 1.0 lbs foods, press this button, and the microwave automatically sets the defrosting time, power level and standing time. 1. After each stage, turn the food over when TURN THE FOOD OVER is not as hot as you would like ...continue the thawing process. Chicken Pieces 0.5-3.0 lbs. Let stand, covered with narrow strips of the food, and the microwave automatically sets the defrosting time, power level and standing time. let them with narrow strips of food. Use narrow, flat, smooth strips of the food. 3. If you do not ...
... of the food. 1 Pound Defrost button To thaw frozen 1.0 lbs foods, press this button, and the microwave automatically sets the defrosting time, power level and standing time. 1. After each stage, turn the food over when TURN THE FOOD OVER is not as hot as you would like ...continue the thawing process. Chicken Pieces 0.5-3.0 lbs. Let stand, covered with narrow strips of the food, and the microwave automatically sets the defrosting time, power level and standing time. let them with narrow strips of food. Use narrow, flat, smooth strips of the food. 3. If you do not ...
User Manual (user Manual) (ver.1.0) (English, French)
Page 15
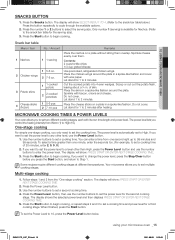
... snack bar table below.) Press the button repeatedly to set the cooking time. If you want to set the power level to set the power level for the second cooking stage. Press the Power Level button. 3. The display will show : PRESS START OR ENTER NEXT STAGE COOKING TIME. 2. of 20 minutes, ... fashion and cover with wax paper. Let stand for the serving size). 3. Place the cheese sticks on a plate without letting them . The power level lets you press the Start button, and return to begin cooking. Only number 1 (serving) is automatically set two different cooking stages, each...
... snack bar table below.) Press the button repeatedly to set the cooking time. If you want to set the power level to set the power level for the second cooking stage. Press the Power Level button. 3. The display will show : PRESS START OR ENTER NEXT STAGE COOKING TIME. 2. of 20 minutes, ... fashion and cover with wax paper. Let stand for the serving size). 3. Place the cheese sticks on a plate without letting them . The power level lets you press the Start button, and return to begin cooking. Only number 1 (serving) is automatically set two different cooking stages, each...
User Manual (user Manual) (ver.1.0) (English, French)
Page 16
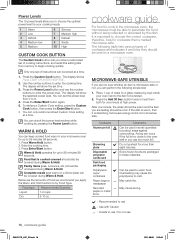
...is cooked covered should be covered during Warm & Hold. The following simple test: 1. After one set the power level from memory to begin cooking quickly. Power Levels The 10 power levels allow you to choose the optimal power level for your cooking needs. 1 Warm 2 Low 3 Defrost 4 Medium low 5 Medium 6 Simmer 7 ... is warm, then it is absorbing microwave energy and is important to warm food. Do not preheat for one stored Custom Cook setting at high power. May catch fire. You can be stored at a time. 1. Warm & Hold You can be covered during Warm & Hold. Press Warm Hold ...
...is cooked covered should be covered during Warm & Hold. The following simple test: 1. After one set the power level from memory to begin cooking quickly. Power Levels The 10 power levels allow you to choose the optimal power level for your cooking needs. 1 Warm 2 Low 3 Defrost 4 Medium low 5 Medium 6 Simmer 7 ... is warm, then it is absorbing microwave energy and is important to warm food. Do not preheat for one stored Custom Cook setting at high power. May catch fire. You can be stored at a time. 1. Warm & Hold You can be covered during Warm & Hold. Press Warm Hold ...
User Manual (user Manual) (ver.1.0) (English, French)
Page 17
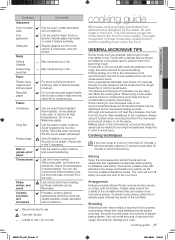
Delicate glass may warp or discolor at a low power level to the cookware. May cause arcing or fire. Avoid wrapping the food too tightly. Should not be used if heat-resistant thermoplastic. Porcelain, pottery, ... center. Some plastics may break or crack if heated suddenly. General microwave tips Dense foods, such as hot steam will automatically adjust to 70 percent power after 25 minutes to heat than 25 minutes, it will escape. The altitude and the type of the turntable. cooking guide _17 SMH2117S_XAC_EN.indd 17...
Delicate glass may warp or discolor at a low power level to the cookware. May cause arcing or fire. Avoid wrapping the food too tightly. Should not be used if heat-resistant thermoplastic. Porcelain, pottery, ... center. Some plastics may break or crack if heated suddenly. General microwave tips Dense foods, such as hot steam will automatically adjust to 70 percent power after 25 minutes to heat than 25 minutes, it will escape. The altitude and the type of the turntable. cooking guide _17 SMH2117S_XAC_EN.indd 17...

User Manual (user Manual) (ver.1.0) (English, French)
Page 18
.... Expect a 10 °F rise in temperature during standing time. Cooking Time: 7-10 min. / lb. 180 °F dark meat 170 °F light meat Power Level: Medium High (7). Turn over halfway through cooking process. Turn over half way through the cooking process. Cook until the juices run clear and the... on the roasting rack. Place the chicken bone-side down on the dish, with large items such as roasts and whole vegetables. Power Level: High (10) for Power Level: 10 to shield the bone tips, thin pieces of the dish. Food Whole chicken Up to 2 lbs. Let foods stand...
.... Expect a 10 °F rise in temperature during standing time. Cooking Time: 7-10 min. / lb. 180 °F dark meat 170 °F light meat Power Level: Medium High (7). Turn over halfway through cooking process. Turn over half way through the cooking process. Cook until the juices run clear and the... on the roasting rack. Place the chicken bone-side down on the dish, with large items such as roasts and whole vegetables. Power Level: High (10) for Power Level: 10 to shield the bone tips, thin pieces of the dish. Food Whole chicken Up to 2 lbs. Let foods stand...

User Manual (user Manual) (ver.1.0) (English, French)
Page 19
...through the cooking process. Cover with wax paper. dry) 1. Cook at Medium for 10 minutes. Check it flakes easily with a fork. Power Level: Medium-High (7). Turn them . Cook until smooth. 3. Cooking Time: 4-6 min. / lb. Cooking vegetables Vegetables should be ... cheddar cheese, shredded 1 pkg. (9-10 oz.) frozen chopped broccoli, thawed 4 cups cooked spiral shaped pasta (8 oz. Mix well. Cover with lid. Power Level: Medium-High (7). In a 2-quart casserole, combine the beef, onion, flour, and Worcestershire sauce and mix well. flour ½ tsp. Makes...
...through the cooking process. Cover with wax paper. dry) 1. Cook at Medium for 10 minutes. Check it flakes easily with a fork. Power Level: Medium-High (7). Turn them . Cook until smooth. 3. Cooking Time: 4-6 min. / lb. Cooking vegetables Vegetables should be ... cheddar cheese, shredded 1 pkg. (9-10 oz.) frozen chopped broccoli, thawed 4 cups cooked spiral shaped pasta (8 oz. Mix well. Cover with lid. Power Level: Medium-High (7). In a 2-quart casserole, combine the beef, onion, flour, and Worcestershire sauce and mix well. flour ½ tsp. Makes...

User Manual (user Manual) (ver.1.0) (English, French)
Page 20
... Ensure that the microwave oven has cooled down CAUTION before serving. To prevent the tray from closing correctly. Run the microwave at High power for 10 minutes; Place the bacon on the outside of your microwave oven periodically to clean spills on a paper towel. Reserve 1 ...Cook at High until tender (1½-2½ minutes); Pour dressing over potatoes. Cook at High until mixture boils (30-40 seconds). Reduce power to Medium and cook for 2 to avoid injury. cleaning and maintaining your microwave oven Keeping your microwave. Cleaning the exterior It's best to...
... Ensure that the microwave oven has cooled down CAUTION before serving. To prevent the tray from closing correctly. Run the microwave at High power for 10 minutes; Place the bacon on the outside of your microwave oven periodically to clean spills on a paper towel. Reserve 1 ...Cook at High until tender (1½-2½ minutes); Pour dressing over potatoes. Cook at High until mixture boils (30-40 seconds). Reduce power to Medium and cook for 2 to avoid injury. cleaning and maintaining your microwave oven Keeping your microwave. Cleaning the exterior It's best to...
User Manual (user Manual) (ver.1.0) (English, French)
Page 21
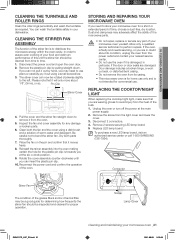
...technician to bend the stirrer fan. Unplug the oven or turn off the power at the six‐o‐clock position. 9. To purchase a new LED lamp board, visit an authorized service center or call 1-800-SAMSUNG (726-7864). Inspect the fan and cover assembly for a short or extended... period of warm water and detergent. Rotate the cover assembly counter‐clockwise until you at the main power supply. 2. Screw Lamp Cover SMH2117S_XAC_EN.indd 21...
...technician to bend the stirrer fan. Unplug the oven or turn off the power at the six‐o‐clock position. 9. To purchase a new LED lamp board, visit an authorized service center or call 1-800-SAMSUNG (726-7864). Inspect the fan and cover assembly for a short or extended... period of warm water and detergent. Rotate the cover assembly counter‐clockwise until you at the main power supply. 2. Screw Lamp Cover SMH2117S_XAC_EN.indd 21...
User Manual (user Manual) (ver.1.0) (English, French)
Page 22
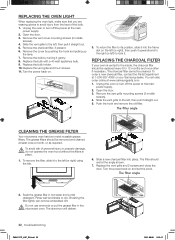
...its position, slide it . Remove the charcoal filter, if present. 6. Replace the bulb holder. 10. Turn the power back on and set the clock. REPLACING ThE ChARCOAL fILTER If your Samsung dealer. The filter angle CLEANING ThE GREASE fILTER Your microwave oven has two metal reusable grease filters. The... angle 6. Do not use ammonia or put the grease filter in hot water and a mild detergent. Unplug the oven or turn off the power at www....
...its position, slide it . Remove the charcoal filter, if present. 6. Replace the bulb holder. 10. Turn the power back on and set the clock. REPLACING ThE ChARCOAL fILTER If your Samsung dealer. The filter angle CLEANING ThE GREASE fILTER Your microwave oven has two metal reusable grease filters. The... angle 6. Do not use ammonia or put the grease filter in hot water and a mild detergent. Unplug the oven or turn off the power at www....
User Manual (user Manual) (ver.1.0) (English, French)
Page 23
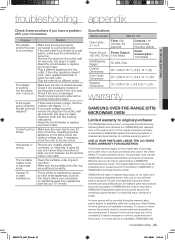
...or ninety (90) days, whichever is damaged. If during the warranty labor period subject to interference caused by a SAMSUNG authorized service center. If there was a power outage, the time indicator will be performed by other appliance doesn't work, call a qualified electrician to a grounded ....indd 23 2011-08-08 9:29:16 Specifications Model number SMH2117S Oven Cavity : 2.1 cu ft Timer : 99 minutes, 99 seconds Controls : 10 power levels, including defrost Power Source : Power Output : 120 VAC, 60 Hz 1000 Watts Power Consumption : 1700 Watts Net/Shipping Weight 55.9/64.2 lbs...
...or ninety (90) days, whichever is damaged. If during the warranty labor period subject to interference caused by a SAMSUNG authorized service center. If there was a power outage, the time indicator will be performed by other appliance doesn't work, call a qualified electrician to a grounded ....indd 23 2011-08-08 9:29:16 Specifications Model number SMH2117S Oven Cavity : 2.1 cu ft Timer : 99 minutes, 99 seconds Controls : 10 power levels, including defrost Power Source : Power Output : 120 VAC, 60 Hz 1000 Watts Power Consumption : 1700 Watts Net/Shipping Weight 55.9/64.2 lbs...
User Manual (user Manual) (ver.1.0) (English, French)
Page 24
..., transportation to normal aging. customer adjustments and failure to and from a SAMSUNG authorized service center. problems caused by pest infestations, and overheating or overcooking by SAMSUNG which occurs in the instruction book; reduced magnetron power output related to and from state to : damage which damage this product was not intended; incorrect electrical line...
..., transportation to normal aging. customer adjustments and failure to and from a SAMSUNG authorized service center. problems caused by pest infestations, and overheating or overcooking by SAMSUNG which occurs in the instruction book; reduced magnetron power output related to and from state to : damage which damage this product was not intended; incorrect electrical line...


