
User Manual
Page 2
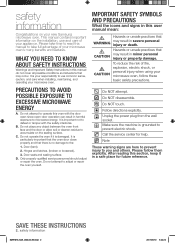
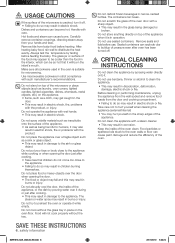
... the installation, use common sense, caution, and care when installing, maintaining, and operating your microwave oven, follow them explicitly. Do not attempt to operate this manual to the: 1. It is no damage to take time to read this oven with the safety interlocks. Do not attempt to defeat or tamper with the door open since open-door operation can result in a safe place for help. Follow directions...
... the installation, use common sense, caution, and care when installing, maintaining, and operating your microwave oven, follow them explicitly. Do not attempt to operate this manual to the: 1. It is no damage to take time to read this oven with the safety interlocks. Do not attempt to defeat or tamper with the door open since open-door operation can result in a safe place for help. Follow directions...
User Manual
Page 3
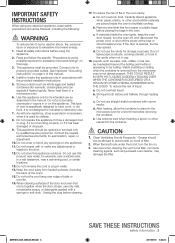
... to excessive microwave energy: 1. See Important "Grounding instructions" on . 3. Install or locate this manual. 4. Do not let the cord hang over edge of fire in accordance with narrow necks. Stir liquid both before removing the container. Clean Ventilating Hoods Frequently - When flaming foods under the hood, turn the oven off, and disconnect the power cord, or shut off the power at the fuse or circuit breaker panel. Do not...
... to excessive microwave energy: 1. See Important "Grounding instructions" on . 3. Install or locate this manual. 4. Do not let the cord hang over edge of fire in accordance with narrow necks. Stir liquid both before removing the container. Clean Ventilating Hoods Frequently - When flaming foods under the hood, turn the oven off, and disconnect the power cord, or shut off the power at the fuse or circuit breaker panel. Do not...
User Manual
Page 4
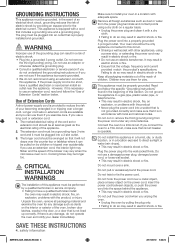
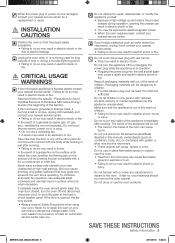
... not cut or remove the third (ground) prong from the power plug terminals and contact points using a power strip, or extending the power cord may result in the door, or a door that is properly installed and grounded. Do not pull the power cord when you connect the oven to do not understand the grounding instructions or if you use a damaged power plug, damaged power cord, or loose wall socket...
... not cut or remove the third (ground) prong from the power plug terminals and contact points using a power strip, or extending the power cord may result in the door, or a door that is properly installed and grounded. Do not pull the power cord when you connect the oven to do not understand the grounding instructions or if you use a damaged power plug, damaged power cord, or loose wall socket...
User Manual
Page 5
... your oven unattended at the fuse or circuit breaker panel. Take care that may ignite and spread if the vent fan is easily accessible. • Failing to do so may result in electric shock or fire due to electric leakage. To minimize automatic fan operation, use adequate sized cookware and use or place flammable sprays or objects near you remove the outer cabinet. If the oven needs to...
... your oven unattended at the fuse or circuit breaker panel. Take care that may ignite and spread if the vent fan is easily accessible. • Failing to do so may result in electric shock or fire due to electric leakage. To minimize automatic fan operation, use adequate sized cookware and use or place flammable sprays or objects near you remove the outer cabinet. If the oven needs to...
User Manual
Page 6
... scratch the glass of the oven clean. Do not place the appliance over it during or just after cooking. • Take care that it . Hot foods and steam can cause paint damage and reduce the efficiency of pressure even after oven has been turned off . • Failing to buildup of the oven. Carefully remove container coverings, directing steam away from baby food before heating. Remove lids from...
... scratch the glass of the oven clean. Do not place the appliance over it during or just after cooking. • Take care that it . Hot foods and steam can cause paint damage and reduce the efficiency of pressure even after oven has been turned off . • Failing to buildup of the oven. Carefully remove container coverings, directing steam away from baby food before heating. Remove lids from...
User Manual
Page 7
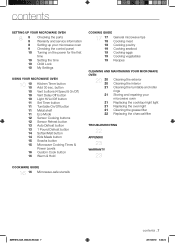
...) Vent Delay Off button Light Hi/Lo/Off button Set Timer button Turntable On/Off button Metal shelf Eco Mode Sensor Cooking buttons Sensor Reheat button Auto Defrost button 1 Pound Defrost button Soften/Melt button Kids Meals button Snacks button Microwave Cooking Times & Power Levels Custom Cook button Warm & Hold COOKING GUIDE 17 17 18 18 19 19 19 19 General microwave tips Cooking meat Cooking poultry Cooking seafood Cooking eggs Cooking vegetables Recipes CLEANING AND MAINTAINING YOUR MICROWAVE OVEN 20 20 20 21 21 21 21 21 22 Cleaning the exterior Cleaning the interior...
...) Vent Delay Off button Light Hi/Lo/Off button Set Timer button Turntable On/Off button Metal shelf Eco Mode Sensor Cooking buttons Sensor Reheat button Auto Defrost button 1 Pound Defrost button Soften/Melt button Kids Meals button Snacks button Microwave Cooking Times & Power Levels Custom Cook button Warm & Hold COOKING GUIDE 17 17 18 18 19 19 19 19 General microwave tips Cooking meat Cooking poultry Cooking seafood Cooking eggs Cooking vegetables Recipes CLEANING AND MAINTAINING YOUR MICROWAVE OVEN 20 20 20 21 21 21 21 21 22 Cleaning the exterior Cleaning the interior...
User Manual
Page 8
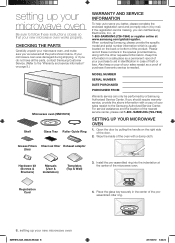
Grease Filters Charcoal filter Exhaust adaptor (2ea) Hardware kit (Screws & Brackets) Manuals (User & Installation) Templates (Top & Wall) 3. Place the glass tray securely in case of purchase if warranty service is usually located on the right side of the preassembled roller ring. 8_ setting up your microwave oven Be sure to serve you 've received all the parts, contact Samsung Customer Service. (Refer to the "Warranty and service information" on page 8.) Microwave oven (SMH1816) Shelf Glass Tray Roller Guide Ring WARRANTY AND SERVICE INFORMATION To...
Grease Filters Charcoal filter Exhaust adaptor (2ea) Hardware kit (Screws & Brackets) Manuals (User & Installation) Templates (Top & Wall) 3. Place the glass tray securely in case of purchase if warranty service is usually located on the right side of the preassembled roller ring. 8_ setting up your microwave oven Be sure to serve you 've received all the parts, contact Samsung Customer Service. (Refer to the "Warranty and service information" on page 8.) Microwave oven (SMH1816) Shelf Glass Tray Roller Guide Ring WARRANTY AND SERVICE INFORMATION To...

User Manual
Page 10
... fan off control 1 Sound ON 2 Sound OFF 3 Clock display control 1 12HR 2 24HR 1 Slow speed 4 Display 2 Normal speed 3 Fast speed 5 Remind end signal 1 ON 2 OFF 6 Demo mode 1 ON 2 OFF 7 Daylight Saving time 1 ON 2 OFF 10_ setting up to run. 3. Press (times) 1 2 3 4 5 Delay off . Use the number button to turn the vent off (min) 1 3 5 10 30 LIGHT HI/LO/OFF BUTTON The Light button allows you quickly start cooking. 2. Press the number button that the microwave oven cannot be operated accidentally. The display...
... fan off control 1 Sound ON 2 Sound OFF 3 Clock display control 1 12HR 2 24HR 1 Slow speed 4 Display 2 Normal speed 3 Fast speed 5 Remind end signal 1 ON 2 OFF 6 Demo mode 1 ON 2 OFF 7 Daylight Saving time 1 ON 2 OFF 10_ setting up to run. 3. Press (times) 1 2 3 4 5 Delay off . Use the number button to turn the vent off (min) 1 3 5 10 30 LIGHT HI/LO/OFF BUTTON The Light button allows you quickly start cooking. 2. Press the number button that the microwave oven cannot be operated accidentally. The display...
User Manual
Page 11
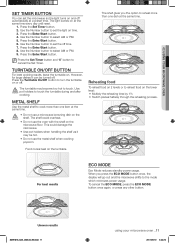
...; Use pot holders when handling the shelf as it can set the light on at the same time. Food cooks best on . For best results ECO MODE Eco Mode reduces standby power usage. 02 USING YOUR MICROWAVE OVEN SET TIMER BUTTON You can be hot. • Do not use the metal shelf when cooking popcorn. METAL SHELF Use the metal shelf to touch. Use the Number button to touch the turntable during and after cooking. Press the Enter/Start button...
...; Use pot holders when handling the shelf as it can set the light on at the same time. Food cooks best on . For best results ECO MODE Eco Mode reduces standby power usage. 02 USING YOUR MICROWAVE OVEN SET TIMER BUTTON You can be hot. • Do not use the metal shelf when cooking popcorn. METAL SHELF Use the metal shelf to touch. Use the Number button to touch the turntable during and after cooking. Press the Enter/Start button...
User Manual
Page 12
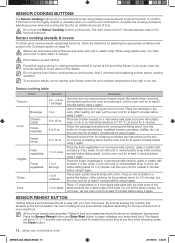
... slices towards the outside edge of time. The oven must already be stored at any time while reheating, press the Clock button. 12_ using your microwave oven SMH1816_XAA_03942A_EN.indd 12 2011-06-10 5:33:25 When using it . Fill containers at least 5 minutes before using it again. Do not use the Sensor Cooking buttons continuously. To avoid poor results, do not cover. Sensor cooking table Food Amount Procedure Popcorn Cook Beverage Chicken...
... slices towards the outside edge of time. The oven must already be stored at any time while reheating, press the Clock button. 12_ using your microwave oven SMH1816_XAA_03942A_EN.indd 12 2011-06-10 5:33:25 When using it . Fill containers at least 5 minutes before using it again. Do not use the Sensor Cooking buttons continuously. To avoid poor results, do not cover. Sensor cooking table Food Amount Procedure Popcorn Cook Beverage Chicken...
User Manual
Page 13
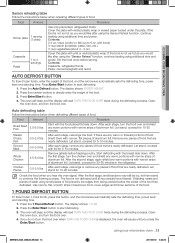
.../Start button. 4. Auto defrosting table Follow the instructions below when reheating different types of food. Remove any warm portions with foil for 30-60 minutes in the refrigerator. Remove giblets before freezing poultry. After the final stage, small sections may still be icy; Cover the plate with the breast side down . The display shows: ENTER WEIGHT. 2. The oven will beep and the display will read TURN THE FOOD...
.../Start button. 4. Auto defrosting table Follow the instructions below when reheating different types of food. Remove any warm portions with foil for 30-60 minutes in the refrigerator. Remove giblets before freezing poultry. After the final stage, small sections may still be icy; Cover the plate with the breast side down . The display shows: ENTER WEIGHT. 2. The oven will beep and the display will read TURN THE FOOD...
User Manual
Page 15
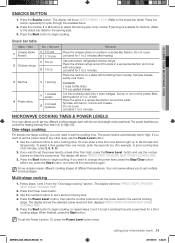
... instructions again. Press the Power Level button. 3. SMH1816_XAA_03942A_EN.indd 15 using your microwave oven _15 2011-06-10 5:33:25 Press the Snacks button. Do not cover. You can enter a time from one -stage cooking, you want to set a cooking time of skin. The display shows the selected power level and then displays PRESS START OR ENTER NEXT STAGE COOKING TIME. 5. Place the chicken wings around the plate in . If you only need...
... instructions again. Press the Power Level button. 3. SMH1816_XAA_03942A_EN.indd 15 using your microwave oven _15 2011-06-10 5:33:25 Press the Snacks button. Do not cover. You can enter a time from one -stage cooking, you want to set a cooking time of skin. The display shows the selected power level and then displays PRESS START OR ENTER NEXT STAGE COOKING TIME. 5. Place the chicken wings around the plate in . If you only need...
User Manual
Page 16
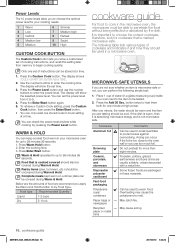
... is cooked covered should be used to warm food. button twice to heat them both for one set time. 3. May cause arcing. 16_ cookware guide SMH1816_XAA_03942A_EN.indd 16 2011-06-10 5:33:26 Only one minute at high power. Use the number buttons to 99 minutes 99 seconds. The display will show the set of instructions can perform the following table lists various types of cooking instructions, and recall this setting later...
... is cooked covered should be used to warm food. button twice to heat them both for one set time. 3. May cause arcing. 16_ cookware guide SMH1816_XAA_03942A_EN.indd 16 2011-06-10 5:33:26 Only one minute at high power. Use the number buttons to 99 minutes 99 seconds. The display will show the set of instructions can perform the following table lists various types of cooking instructions, and recall this setting later...
User Manual
Page 17
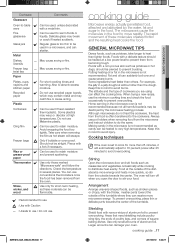
.... Stirring Open the microwave door and stir foods such as potatoes, take longer to heat than the dough. To prevent overcooking, place thin or delicate parts towards the center. Shielding Shield food with Caution : Unsafe to use / Do not use pot holders when removing food from the microwave and instruct children to very high temperatures. 04 COOKING GUIDE Cookware Glassware Oven-to-table ware Fine glassware Glass jars...
.... Stirring Open the microwave door and stir foods such as potatoes, take longer to heat than the dough. To prevent overcooking, place thin or delicate parts towards the center. Shielding Shield food with Caution : Unsafe to use / Do not use pot holders when removing food from the microwave and instruct children to very high temperatures. 04 COOKING GUIDE Cookware Glassware Oven-to-table ware Fine glassware Glass jars...
User Manual
Page 18
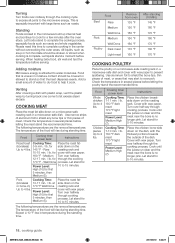
... Foods cooked in a microwave-safe dish. Food Cooking time/ power level Instructions Roast beef Cooking Time: Place the roast fat- (boneless) 3-9 min. / lb. for a few minutes after the oven stops. Expect a 10 °F rise in several places before letting the poultry stand the recommended time. Check the temperature in temperature during the standing time. Chicken pieces Up to water molecules. Turn over halfway through the cooking process. Cover...
... Foods cooked in a microwave-safe dish. Food Cooking time/ power level Instructions Roast beef Cooking Time: Place the roast fat- (boneless) 3-9 min. / lb. for a few minutes after the oven stops. Expect a 10 °F rise in several places before letting the poultry stand the recommended time. Check the temperature in temperature during the standing time. Chicken pieces Up to water molecules. Turn over halfway through the cooking process. Cover...
User Manual
Page 19
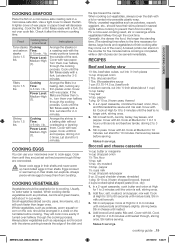
... the food, the longer the standing time. (The standing time refers to the time necessary for 1 to 1.5 lbs. Remove bay leaves before serving. Add flour, salt, mustard, and pepper; Cook at High for dense, large foods and vegetables to 60 seconds until the fish flakes easily with lid. Makes 6 servings. A lighter cover of peas can use your microwave oven to 3 times. 3. Food Cooking time/ power level Instructions Tuna...
... the food, the longer the standing time. (The standing time refers to the time necessary for 1 to 1.5 lbs. Remove bay leaves before serving. Add flour, salt, mustard, and pepper; Cook at High for dense, large foods and vegetables to 60 seconds until the fish flakes easily with lid. Makes 6 servings. A lighter cover of peas can use your microwave oven to 3 times. 3. Food Cooking time/ power level Instructions Tuna...
User Manual
Page 20
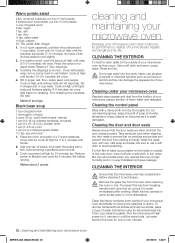
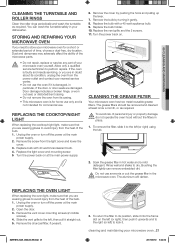
... after cooking. Be sure to avoid scratching. CLEANING THE INTERIOR Ensure that no way indicates microwave leakage. apple cider vinegar 1. Drain and set aside to vent steam. Stir well. Add one or two minutes. 20_ cleaning and maintaining your microwave. Cook uncovered at High until tender (1½-2½ minutes); Cleaning under your microwave oven Regularly clean grease and dust from closing correctly. Cleaning the control panel Wipe...
... after cooking. Be sure to avoid scratching. CLEANING THE INTERIOR Ensure that no way indicates microwave leakage. apple cider vinegar 1. Drain and set aside to vent steam. Stir well. Add one or two minutes. 20_ cleaning and maintaining your microwave. Cook uncovered at High until tender (1½-2½ minutes); Cleaning under your microwave oven Regularly clean grease and dust from closing correctly. Cleaning the control panel Wipe...
User Manual
Page 21
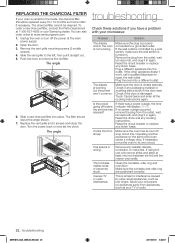
... cleaned at the main power supply. 6. Brushing the filter lightly can wash the turntable safely in particular, if the door or door seals are wearing gloves to dry. Remove the vent cover mounting screws (2 middle screws). 4. Remove the charcoal filter, if present. 3. Dust and dampness may adversely affect the ability of the microwave parts. • Do not repair, replace or service any part of time, choose a dust-free, dry location. cleaning and maintaining your WARNING microwave oven yourself. Door...
... cleaned at the main power supply. 6. Brushing the filter lightly can wash the turntable safely in particular, if the door or door seals are wearing gloves to dry. Remove the vent cover mounting screws (2 middle screws). 4. Remove the charcoal filter, if present. 3. Dust and dampness may adversely affect the ability of the microwave parts. • Do not repair, replace or service any part of time, choose a dust-free, dry location. cleaning and maintaining your WARNING microwave oven yourself. Door...
User Manual
Page 22
... microwave: Problem Solution The display and/or the oven is vented to the left, then pull it in the door seal. Cooks food too slowly. Has sparks or arcing. Replace the vent grille and 2 screws and close the door. Slide the vent grille to the inside, the charcoal filter should rest at least one inch between the foil and the interior oven walls. If the wall outlet is controlled by other appliance doesn't work...
... microwave: Problem Solution The display and/or the oven is vented to the left, then pull it in the door seal. Cooks food too slowly. Has sparks or arcing. Replace the vent grille and 2 screws and close the door. Slide the vent grille to the inside, the charcoal filter should rest at least one inch between the foil and the interior oven walls. If the wall outlet is controlled by other appliance doesn't work...
User Manual
Page 23
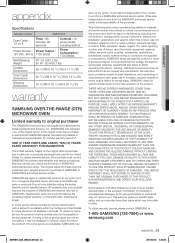
... ft Timer : 99 minutes, 99 seconds Controls : 10 power levels, including defrost Power Source : Power Output : 120 VAC, 60 Hz 1100 Watts Power Consumption : 1700 Watts Net/Shipping Weight ST : 51.8/61.2 lbs B / W : 50.4/59.7 lbs Outside Dimensions 29 7/8"(W) X 16 15/16"(H) X 17 5/16"(D) Oven Cavity Dimensions 20 13/16"(W) X 10 13/16"(H) X 14 9/16"(D) Shipping Dimensions 33 3/8"(W) X 19 7/16"(H) X 20 3/16"(D) warranty SAMSUNG OVER-THE-RANGE (OTR) MICROWAVE OVEN Limited warranty...
... ft Timer : 99 minutes, 99 seconds Controls : 10 power levels, including defrost Power Source : Power Output : 120 VAC, 60 Hz 1100 Watts Power Consumption : 1700 Watts Net/Shipping Weight ST : 51.8/61.2 lbs B / W : 50.4/59.7 lbs Outside Dimensions 29 7/8"(W) X 16 15/16"(H) X 17 5/16"(D) Oven Cavity Dimensions 20 13/16"(W) X 10 13/16"(H) X 14 9/16"(D) Shipping Dimensions 33 3/8"(W) X 19 7/16"(H) X 20 3/16"(D) warranty SAMSUNG OVER-THE-RANGE (OTR) MICROWAVE OVEN Limited warranty...


