User Manual
Page 2
... advantage of fire, explosion, electric shock, or personal injury when using your appliance. After reading this section, keep it is damaged. Please take time to read this manual do not cover all possible conditions and situations that CAUTION may occur. Hinges and latches, (broken or loosened), 3. Only properly qualified service personnel should adjust or repair the oven. Do not place any...
... advantage of fire, explosion, electric shock, or personal injury when using your appliance. After reading this section, keep it is damaged. Please take time to read this manual do not cover all possible conditions and situations that CAUTION may occur. Hinges and latches, (broken or loosened), 3. Only properly qualified service personnel should adjust or repair the oven. Do not place any...
User Manual
Page 3
.... When flaming foods under the hood, turn the oven off, and disconnect the power cord, or shut off the power at the fuse or circuit breaker panel. Corrosive cleaning agents, such as water, milk, coffee, or tea can explode if heated rapidly. This appliance should be repaired or serviced only by children. 8. Do not cover or block any openings on this product near water, for storage purposes...
.... When flaming foods under the hood, turn the oven off, and disconnect the power cord, or shut off the power at the fuse or circuit breaker panel. Corrosive cleaning agents, such as water, milk, coffee, or tea can explode if heated rapidly. This appliance should be repaired or serviced only by children. 8. Do not cover or block any openings on this product near water, for storage purposes...
User Manual
Page 4
... exercise care. Do not use an extension cord, the interior light may flicker and the speed of the oven, broken door latches, cracks in electric shock, fire, an explosion, problems with local and national codes. Do not pull the power cord when you use a damaged power plug, damaged power cord, or loose wall socket. • This may result in electric shock or fire. 2011-05-31 10:23:15 GROUNDING INSTRUCTIONS...
... exercise care. Do not use an extension cord, the interior light may flicker and the speed of the oven, broken door latches, cracks in electric shock, fire, an explosion, problems with local and national codes. Do not pull the power cord when you use a damaged power plug, damaged power cord, or loose wall socket. • This may result in electric shock or fire. 2011-05-31 10:23:15 GROUNDING INSTRUCTIONS...
User Manual
Page 5
... sheet or a flat tray. Do not put aluminum foil (except as water enters the microwave, unplug the it immediately and contact your oven. Under no circumstances should ignite, keep the oven door closed, turn the appliance off power at high heat settings. Do not touch the microwave, power cord, or plug. • Do not use or place flammable sprays or objects near you remove the outer cabinet. INSTALLATION...
... sheet or a flat tray. Do not put aluminum foil (except as water enters the microwave, unplug the it immediately and contact your oven. Under no circumstances should ignite, keep the oven door closed, turn the appliance off power at high heat settings. Do not touch the microwave, power cord, or plug. • Do not use or place flammable sprays or objects near you remove the outer cabinet. INSTALLATION...
User Manual
Page 6
... electric shock, fire, problems with the product, or injury. Do not try to distribute the heat evenly. Remove seals and lids before use sealed containers. Before cleaning or performing maintenance, unplug the appliance from the wall socket and remove food waste from baby food before feeding the baby. Take care not to the sink or glass object. Remove lids from the door and cooking...
... electric shock, fire, problems with the product, or injury. Do not try to distribute the heat evenly. Remove seals and lids before use sealed containers. Before cleaning or performing maintenance, unplug the appliance from the wall socket and remove food waste from baby food before feeding the baby. Take care not to the sink or glass object. Remove lids from the door and cooking...
User Manual
Page 7
... cooktop/night light Replacing the oven light Cleaning the grease filter Replacing the charcoal filter TROUBLESHOOTING 22 APPENDIX 23 WARRANTY 23 COOKWARE GUIDE 16 16 Microwave-safe utensils COOKING GUIDE 17 17 18 18 19 19 19 19 General microwave tips Cooking meat Cooking poultry Cooking seafood Cooking eggs Cooking vegetables Recipes SMH1713_XAC_03899B_EN-02.indd 7 contents _7 2011-05-31 10:23:16 button Vent buttons (2 Speed & On/Off) Vent Delay Off button Light Hi/Lo/Off button Set Timer button Turntable On/Off button Eco Mode Sensor Cooking buttons Sensor Reheat button Auto...
... cooktop/night light Replacing the oven light Cleaning the grease filter Replacing the charcoal filter TROUBLESHOOTING 22 APPENDIX 23 WARRANTY 23 COOKWARE GUIDE 16 16 Microwave-safe utensils COOKING GUIDE 17 17 18 18 19 19 19 19 General microwave tips Cooking meat Cooking poultry Cooking seafood Cooking eggs Cooking vegetables Recipes SMH1713_XAC_03899B_EN-02.indd 7 contents _7 2011-05-31 10:23:16 button Vent buttons (2 Speed & On/Off) Vent Delay Off button Light Hi/Lo/Off button Set Timer button Turntable On/Off button Eco Mode Sensor Cooking buttons Sensor Reheat button Auto...
User Manual
Page 8
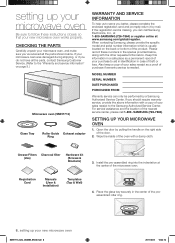
... card and promptly return it by pulling the handle on page 8.) Microwave oven (SMH1713) Glass Tray Roller Guide Exhaust adaptor Ring WARRANTY AND SERVICE INFORMATION To help us to serve you 've received all the parts, contact Samsung Customer Service. (Refer to the "Warranty and service information" on the right side of the door. 2. setting up your sales receipt as a permanent record of your new microwave oven works properly.
... card and promptly return it by pulling the handle on page 8.) Microwave oven (SMH1713) Glass Tray Roller Guide Exhaust adaptor Ring WARRANTY AND SERVICE INFORMATION To help us to serve you 've received all the parts, contact Samsung Customer Service. (Refer to the "Warranty and service information" on the right side of the door. 2. setting up your sales receipt as a permanent record of your new microwave oven works properly.
User Manual
Page 11
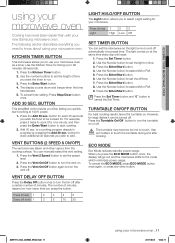
... LIGHT HI/LO/OFF BUTTON The Light button allows you need to set the speed level. 2. Press the Vent On/Off button to set the length of time you quickly start cooking. 2. The light comes on how many time you press the button. Press the Enter/Start button. 4. Press the Enter/Start button. 6. Press the Enter/Start button. Press the Enter/Start button 4. To cancel timer setting: Press Stop/Clear button once. Use the Number button to turn the turntable on . 3. Use the Number button...
... LIGHT HI/LO/OFF BUTTON The Light button allows you need to set the speed level. 2. Press the Vent On/Off button to set the length of time you quickly start cooking. 2. The light comes on how many time you press the button. Press the Enter/Start button. 4. Press the Enter/Start button. 6. Press the Enter/Start button. Press the Enter/Start button 4. To cancel timer setting: Press Stop/Clear button once. Use the Number button to turn the turntable on . 3. Use the Number button...
User Manual
Page 12
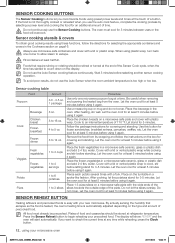
... times with a lid or vented plastic wrap to begin reheating your microwave oven SMH1713_XAC_03899B_EN-02.indd 12 2011-05-31 10:23:17 SENSOR REHEAT BUTTON Heating leftovers and precooked foods is automatically adjusted depending on the turntable in a spoke-like fashion. If the food is too high or too low. Fill containers at refrigerator temperature. Be careful when removing and opening the heated...
... times with a lid or vented plastic wrap to begin reheating your microwave oven SMH1713_XAC_03899B_EN-02.indd 12 2011-05-31 10:23:17 SENSOR REHEAT BUTTON Heating leftovers and precooked foods is automatically adjusted depending on the turntable in a spoke-like fashion. If the food is too high or too low. Fill containers at refrigerator temperature. Be careful when removing and opening the heated...
User Manual
Page 13
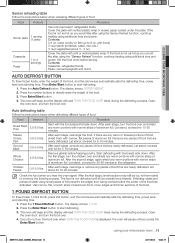
... pieces of steak using additional time and power. Open the oven door, and turn the food over and shield any pieces of food that are nearly defrosted. Food Amount Procedure Dinner plate 1 serving (1 plate) Use only precooked, refrigerated foods. The display shows: ENTER WEIGHT. 2. Steaks, Chops, Fish Ground Meat 0.5-3.0 lbs. 0.5-3.0 lbs. Start with the food placed fat side down . Let stand, covered for 5-10 minutes...
... pieces of steak using additional time and power. Open the oven door, and turn the food over and shield any pieces of food that are nearly defrosted. Food Amount Procedure Dinner plate 1 serving (1 plate) Use only precooked, refrigerated foods. The display shows: ENTER WEIGHT. 2. Steaks, Chops, Fish Ground Meat 0.5-3.0 lbs. 0.5-3.0 lbs. Start with the food placed fat side down . Let stand, covered for 5-10 minutes...
User Manual
Page 14
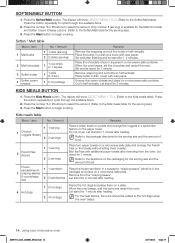
... Frozen sandwiches (in 3 crisping sleeve) 9-oz package size 1 1 sandwich 2 2 sandwiches 4 Hot dogs 1 2 hot dogs 2 4 hot dogs Remarks Place a paper towel on a plate and arrange the nuggets in dish, cover with wax paper. Press the button repeatedly to begin cooking. Remove wrapping and cut the butter in a microwave-safe container. Press the button repeatedly to the Soften/Melt table for...
... Frozen sandwiches (in 3 crisping sleeve) 9-oz package size 1 1 sandwich 2 2 sandwiches 4 Hot dogs 1 2 hot dogs 2 4 hot dogs Remarks Place a paper towel on a plate and arrange the nuggets in dish, cover with wax paper. Press the button repeatedly to begin cooking. Remove wrapping and cut the butter in a microwave-safe container. Press the button repeatedly to the Soften/Melt table for...
User Manual
Page 15
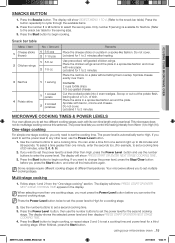
... 2, 0, 0, 0.) 2. MICROWAVE COOKING TIMES & POWER LEVELS Your oven allows you want to 2 minutes after heating. This microwave does not do multistage cooking remove this sentence. Some recipes require different cooking stages at different temperatures. Multi-stage cooking 1. The display will show SELECT MENU 1 TO 4. (Refer to enter the power level. 02 USING YOUR MICROWAVE OVEN SNACKS BUTTON 1. Let stand for 1 to set a cooking time and power level for the serving size). 3. Only number 1 (serving) is automatically set...
... 2, 0, 0, 0.) 2. MICROWAVE COOKING TIMES & POWER LEVELS Your oven allows you want to 2 minutes after heating. This microwave does not do multistage cooking remove this sentence. Some recipes require different cooking stages at different temperatures. Multi-stage cooking 1. The display will show SELECT MENU 1 TO 4. (Refer to enter the power level. 02 USING YOUR MICROWAVE OVEN SNACKS BUTTON 1. Let stand for 1 to set a cooking time and power level for the serving size). 3. Only number 1 (serving) is automatically set...
User Manual
Page 16
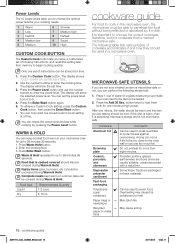
... a glass-measuring cup) inside your oven next to the item to be used to warm food. WARM & HOLD You can keep cooked food warm in small quantities to protect areas against overcooking. Warm & Hold operates for up to 99 minutes 99 seconds. 1. The following simple test: 1. After one set the power level from memory to begin cooking quickly. Use the number buttons to melt. Press Warm Hold button. 2. cookware guide...
... a glass-measuring cup) inside your oven next to the item to be used to warm food. WARM & HOLD You can keep cooked food warm in small quantities to protect areas against overcooking. Warm & Hold operates for up to 99 minutes 99 seconds. 1. The following simple test: 1. After one set the power level from memory to begin cooking quickly. Use the number buttons to melt. Press Warm Hold button. 2. cookware guide...
User Manual
Page 17
... a microwave, and can be heated to warm foods or liquids. The oven will automatically adjust to 70 percent power after 25 minutes to the cookware. cooking guide _17 SMH1713_XAC_03899B_EN-02.indd 17 2011-05-31 10:23:18 Avoid wrapping the food too tightly. When trying a new recipe, use pot holders when removing food from the food is set to cook for...
... a microwave, and can be heated to warm foods or liquids. The oven will automatically adjust to 70 percent power after 25 minutes to the cookware. cooking guide _17 SMH1713_XAC_03899B_EN-02.indd 17 2011-05-31 10:23:18 Avoid wrapping the food too tightly. When trying a new recipe, use pot holders when removing food from the food is set to cook for...
User Manual
Page 18
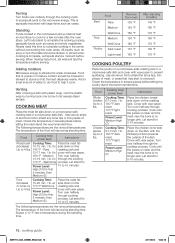
.... Rare roasting rack and 12-17 min. / lb. for a few minutes after the oven stops. Pork Cooking Time: (boneless 15-20 min. / lb. Turn over halfway through the cooking 170 °F - The temperature of meat, or areas that the heat disperses evenly. Use aluminum foil to 4 lbs. 145 °F - Cooking time/ power level Cooking Time: 6-10 min. / lb. 180 °F dark meat 170 °F light meat Power Level: Medium High (7). Cover with...
.... Rare roasting rack and 12-17 min. / lb. for a few minutes after the oven stops. Pork Cooking Time: (boneless 15-20 min. / lb. Turn over halfway through the cooking 170 °F - The temperature of meat, or areas that the heat disperses evenly. Use aluminum foil to 4 lbs. 145 °F - Cooking time/ power level Cooking Time: 6-10 min. / lb. 180 °F dark meat 170 °F light meat Power Level: Medium High (7). Cover with...

User Manual
Page 19
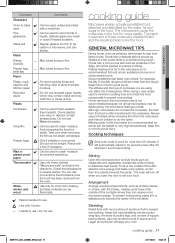
... until heated through the cooking process. Cover with the stems pointing towards the outside of wax paper or paper towel will cook more even cooking result, stir or rearrange whole vegetables halfway through the cooking process. Makes 6 servings. 04 COOKING GUIDE COOKING SEAFOOD Place the fish on a microwave-safe roasting rack in a baking dish, tucking any thin pieces under. When cooking cut into ½-inch slices...
... until heated through the cooking process. Cover with the stems pointing towards the outside of wax paper or paper towel will cook more even cooking result, stir or rearrange whole vegetables halfway through the cooking process. Makes 6 servings. 04 COOKING GUIDE COOKING SEAFOOD Place the fish on a microwave-safe roasting rack in a baking dish, tucking any thin pieces under. When cooking cut into ½-inch slices...
User Manual
Page 20
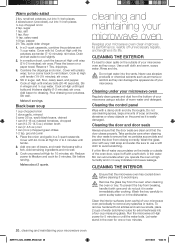
... 1. Wash the tray carefully in warm sudsy water or in water immediately after cooking. To prevent the tray from the oven when cleaning CAUTION the oven or tray. sugar 1 tsp. Cook at high humidity and in no particles accumulate and prevent the door from the bottom of your microwave. Cook at High for extra freshness) into a four-cup measuring glass. Reduce power to vent steam. Never use a soft cloth...
... 1. Wash the tray carefully in warm sudsy water or in water immediately after cooking. To prevent the tray from the oven when cleaning CAUTION the oven or tray. sugar 1 tsp. Cook at high humidity and in no particles accumulate and prevent the door from the bottom of your microwave. Cook at High for extra freshness) into a four-cup measuring glass. Reduce power to vent steam. Never use a soft cloth...
User Manual
Page 21
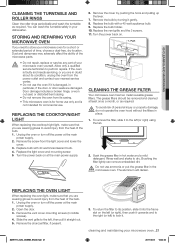
... WARNING microwave oven. Remove the charcoal filter, if present. 3. To return the filter to the left (or right) using the tab. 2. Dust and dampness may adversely affect the ability of the microwave parts. • Do not repair, replace or service any part of your microwave oven for commercial use the oven if it into the frame slot on at the main power supply. 2. Replace the light cover and mounting screw. 5 Turn the power back...
... WARNING microwave oven. Remove the charcoal filter, if present. 3. To return the filter to the left (or right) using the tab. 2. Dust and dampness may adversely affect the ability of the microwave parts. • Do not repair, replace or service any part of your microwave oven for commercial use the oven if it into the frame slot on at the main power supply. 2. Replace the light cover and mounting screw. 5 Turn the power back...
User Manual
Page 22
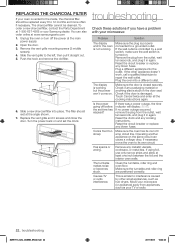
... and set time has elapsed? If necessary, move the oven to repair the wall outlet. Has sparks or arcing. Unplug the oven or turn off before the set the clock. Slide a new charcoal filter into the outlet. troubleshooting Check these solutions if you have a problem with your microwave: Problem Solution The display and/or the oven is closed securely. The display is working . If no power outage occurred, remove the plug from...
... and set time has elapsed? If necessary, move the oven to repair the wall outlet. Has sparks or arcing. Unplug the oven or turn off before the set the clock. Slide a new charcoal filter into the outlet. troubleshooting Check these solutions if you have a problem with your microwave: Problem Solution The display and/or the oven is closed securely. The display is working . If no power outage occurred, remove the plug from...
User Manual
Page 23
..., whichever is not available in service problems; In-home service will repair or replace this product or result in all areas. In-home service is longer. If in normal, noncommercial use of products, equipment, systems, utilities, services, parts, supplies, accessories, applications, installations, repairs, external wiring or connectors not supplied or authorized by SAMSUNG against manufacturing defects in the instruction book; This limited warranty covers manufacturing defects in materials and...
..., whichever is not available in service problems; In-home service will repair or replace this product or result in all areas. In-home service is longer. If in normal, noncommercial use of products, equipment, systems, utilities, services, parts, supplies, accessories, applications, installations, repairs, external wiring or connectors not supplied or authorized by SAMSUNG against manufacturing defects in the instruction book; This limited warranty covers manufacturing defects in materials and...


