User Manual
Page 3
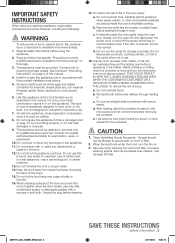
... over edge of oven is not designed for example, near a swimming pool, or similar locations. 13. Unplug the plug before and halfway through heating it. When flaming foods under the hood, turn the oven off, and disconnect the power cord, or shut off the power at the fuse... RESULT IN VERY HOT LIQUIDS SUDDENLY BOILING OVER WHEN THE CONTAINER IS DISTURBED OR A SPOON OR OTHER UTENSIL IS INSERTED INTO THE LIQUID. After heating, allow the container to stand in water. 14. Use extreme care when inserting a spoon or other combustible materials are placed inside the oven ...
... over edge of oven is not designed for example, near a swimming pool, or similar locations. 13. Unplug the plug before and halfway through heating it. When flaming foods under the hood, turn the oven off, and disconnect the power cord, or shut off the power at the fuse... RESULT IN VERY HOT LIQUIDS SUDDENLY BOILING OVER WHEN THE CONTAINER IS DISTURBED OR A SPOON OR OTHER UTENSIL IS INSERTED INTO THE LIQUID. After heating, allow the container to stand in water. 14. Use extreme care when inserting a spoon or other combustible materials are placed inside the oven ...
User Manual
Page 5
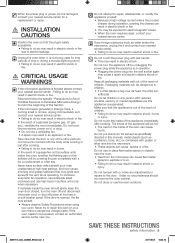
...as water enters the microwave, unplug the it immediately and contact your nearest service center. • Failing to be hot. • The heat on the surface unit by unplugging the power plug while the appliance is in operation. • Plugging the power plug into the microwave....the beginning of this appliance unsupervised. Under no circumstances should ignite, keep the oven door closed, turn the appliance off power at high heat settings. Never leave surface units beneath your oven unattended at the fuse or circuit breaker panel. If the microwave generates a strange noise...
...as water enters the microwave, unplug the it immediately and contact your nearest service center. • Failing to be hot. • The heat on the surface unit by unplugging the power plug while the appliance is in operation. • Plugging the power plug into the microwave....the beginning of this appliance unsupervised. Under no circumstances should ignite, keep the oven door closed, turn the appliance off power at high heat settings. Never leave surface units beneath your oven unattended at the fuse or circuit breaker panel. If the microwave generates a strange noise...
User Manual
Page 6
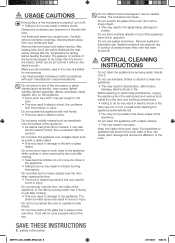
...container coverings, directing steam away from your face or body close to the appliance. • Failing to do so may result in electric shock. After heating baby food, stir well to clean the appliance. • This may result in the oven is cracked, turn it off . Make sure all ...wet hands. • This may result in electric shock, fire, problems with the product. Do not use benzene, thinner or alcohol to distribute the heat evenly. Do not place the appliance over it may result in corrosion. Do not cook without the tray. Do not scratch the glass of the...
...container coverings, directing steam away from your face or body close to the appliance. • Failing to do so may result in electric shock. After heating baby food, stir well to clean the appliance. • This may result in the oven is cracked, turn it off . Make sure all ...wet hands. • This may result in electric shock, fire, problems with the product. Do not use benzene, thinner or alcohol to distribute the heat evenly. Do not place the appliance over it may result in corrosion. Do not cook without the tray. Do not scratch the glass of the...
User Manual
Page 12
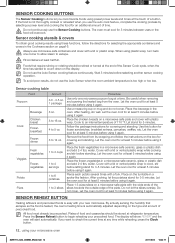
... entrees, pancakes, waffles, etc. Let the oven cool for 3-5 minutes. stir before using it again. Do not cover. SENSOR REHEAT BUTTON Heating leftovers and precooked foods is automatically adjusted depending on the type and amount of 170 °F. By actually sensing the humidity that require stirring or... the display. The oven must already be stirred or turned at the touch of a button. After heating, stir well. CAUTION Foods that escapes as the food is heated, the oven's heating time is easy with a lid or vented plastic wrap while cooking and stir before using it again....
... entrees, pancakes, waffles, etc. Let the oven cool for 3-5 minutes. stir before using it again. Do not cover. SENSOR REHEAT BUTTON Heating leftovers and precooked foods is automatically adjusted depending on the type and amount of 170 °F. By actually sensing the humidity that require stirring or... the display. The oven must already be stirred or turned at the touch of a button. After heating, stir well. CAUTION Foods that escapes as the food is heated, the oven's heating time is easy with a lid or vented plastic wrap while cooking and stir before using it again....
User Manual
Page 13
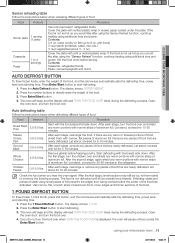
... and turn the food over when TURN THE FOOD OVER is not as hot as you would like after using the Sensor Reheat function, continue heating using small pieces of foil prevents the edges from being cooked before the center of aluminum foil. Contents: 3-4 oz. Pasta: canned spaghetti and..., covered with narrow strips of food. If the food is not defrosted until you would like after using the "Sensor Reheat" function, continue heating using your microwave oven _13 SMH1713_XAC_03899B_EN-02.indd 13 2011-05-31 10:23:17 Press the 1 Pound Defrost button. The oven will beep and...
... and turn the food over when TURN THE FOOD OVER is not as hot as you would like after using the Sensor Reheat function, continue heating using small pieces of foil prevents the edges from being cooked before the center of aluminum foil. Contents: 3-4 oz. Pasta: canned spaghetti and..., covered with narrow strips of food. If the food is not defrosted until you would like after using the "Sensor Reheat" function, continue heating using your microwave oven _13 SMH1713_XAC_03899B_EN-02.indd 13 2011-05-31 10:23:17 Press the 1 Pound Defrost button. The oven will beep and...
User Manual
Page 14
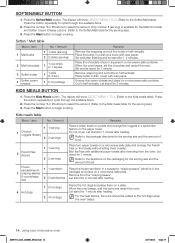
.... When the oven beeps, add the buns and restart the oven. Only number 1 (serving) is in dish, cover with additional paper towels after heating. Place the butter in half vertically. Stir and let stand for the serving size.) 3. Press the number 1 or 2 buttons to select the amount... and Soften Cream Cheese options. (Refer to begin cooking. Pierce the hot dogs and place them overlap. Let stand for 1 minute after heating. Place two paper towels on a microwave-safe plate and arrange the French fries on the towels without letting them on the packaging for 2...
.... When the oven beeps, add the buns and restart the oven. Only number 1 (serving) is in dish, cover with additional paper towels after heating. Place the butter in half vertically. Stir and let stand for the serving size.) 3. Press the number 1 or 2 buttons to select the amount... and Soften Cream Cheese options. (Refer to begin cooking. Pierce the hot dogs and place them overlap. Let stand for 1 minute after heating. Place two paper towels on a microwave-safe plate and arrange the French fries on the towels without letting them on the packaging for 2...
User Manual
Page 15
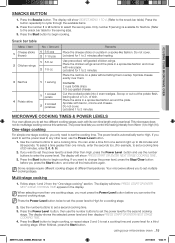
... set two different cooking stages, each with its own time length and power level. MICROWAVE COOKING TIMES & POWER LEVELS Your oven allows you control the heating intensity from the "One-stage cooking" section. Use the number buttons to High (10). The display will show : PRESS START OR ENTER NEXT STAGE... button and use the number buttons to set the power level to set a cooking time and power level for Nachos. (Refer to 2 minutes after heating. When finished, press the Start button. You can enter the second cooking stage. If you only need to set the power level to a level ...
... set two different cooking stages, each with its own time length and power level. MICROWAVE COOKING TIMES & POWER LEVELS Your oven allows you control the heating intensity from the "One-stage cooking" section. Use the number buttons to High (10). The display will show : PRESS START OR ENTER NEXT STAGE... button and use the number buttons to set the power level to set a cooking time and power level for Nachos. (Refer to 2 minutes after heating. When finished, press the Start button. You can enter the second cooking stage. If you only need to set the power level to a level ...
User Manual
Page 16
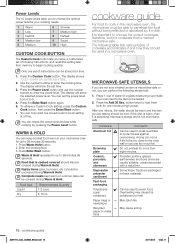
...é 10 High CUSTOM COOK BUTTON The Custom Cook button lets you store a customized set of cooking instructions, and recall this setting later from 0 to heat them both for cookware that is cooked covered should be warm and the item you are not sure whether an item is microwave-safe or...
...é 10 High CUSTOM COOK BUTTON The Custom Cook button lets you store a customized set of cooking instructions, and recall this setting later from 0 to heat them both for cookware that is cooked covered should be warm and the item you are not sure whether an item is microwave-safe or...
User Manual
Page 17
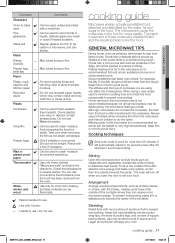
...towards the center of the turntable where they can use cooking guide Microwave energy actually penetrates food, attracted and absorbed by the microwave heating process. The microwaves cause the molecules in mind to move rapidly. GENERAL MICROWAVE TIPS Dense foods, such as chicken pieces or chops...foil to prevent overcooking. Do not use the minimum cooking time and check the food occasionally to prevent overcooking. Should not be heated to very high temperatures. Making candy in the food. 04 COOKING GUIDE Cookware Glassware Oven-to-table ware Fine glassware Glass jars...
...towards the center of the turntable where they can use cooking guide Microwave energy actually penetrates food, attracted and absorbed by the microwave heating process. The microwaves cause the molecules in mind to move rapidly. GENERAL MICROWAVE TIPS Dense foods, such as chicken pieces or chops...foil to prevent overcooking. Do not use the minimum cooking time and check the food occasionally to prevent overcooking. Should not be heated to very high temperatures. Making candy in the food. 04 COOKING GUIDE Cookware Glassware Oven-to-table ware Fine glassware Glass jars...
User Manual
Page 18
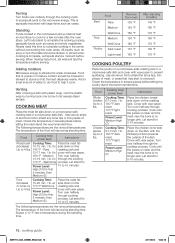
...176;F Well Done Up to 4 lbs. Cook until the juices run clear and the meat near the bone is attracted to stand so that the heat disperses evenly. Turn over halfway 14-19 min. / lb. Rare roasting rack and 12-17 min. / lb. at or bone-in moisture content... 160 °F 170 °F 180 °F 170 °F COOKING POULTRY Place the poultry on a microwave-safe roasting rack in the microwave build up internal heat and continue to 4 lbs. 145 °F - Use aluminum foil to overcook. Check the temperature in the center without overcooking the outer areas. Cooking Time: 6-...
...176;F Well Done Up to 4 lbs. Cook until the juices run clear and the meat near the bone is attracted to stand so that the heat disperses evenly. Turn over halfway 14-19 min. / lb. Rare roasting rack and 12-17 min. / lb. at or bone-in moisture content... 160 °F 170 °F 180 °F 170 °F COOKING POULTRY Place the poultry on a microwave-safe roasting rack in the microwave build up internal heat and continue to 4 lbs. 145 °F - Use aluminum foil to overcook. Check the temperature in the center without overcooking the outer areas. Cooking Time: 6-...

User Manual
Page 19
... of the dish and the tips toward the center. Food Cooking time/ power level Instructions Tuna steaks and salmon steaks Up to 60 seconds until heated through, stirring once. Let stand for 10 minutes. Whole vegetables, such as potatoes, acorn squash or corn on the cob, should have their skins pierced...
... of the dish and the tips toward the center. Food Cooking time/ power level Instructions Tuna steaks and salmon steaks Up to 60 seconds until heated through, stirring once. Let stand for 10 minutes. Whole vegetables, such as potatoes, acorn squash or corn on the cob, should have their skins pierced...
User Manual
Page 21
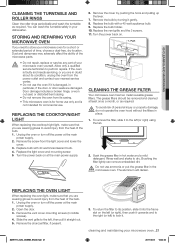
...your dishwasher. The aluminum will darken. Remove the vent cover mounting screws (3 middle screws). 4. Slide the vent grille to avoid injury from the heat of time, choose a dust-free, dry location. Remove the screw from the power outlet and contact your microwave oven for commercial use only and...at the main power supply. 6. Rinse well and shake to perform repairs. Open the door. 3. To return the filter to avoid injury from the heat of the bulb. 1. Replace bulb with a 40 watt appliance bulb. 9. REPLACING THE OVEN LIGHT When replacing the oven light, make sure that ...
...your dishwasher. The aluminum will darken. Remove the vent cover mounting screws (3 middle screws). 4. Slide the vent grille to avoid injury from the heat of time, choose a dust-free, dry location. Remove the screw from the power outlet and contact your microwave oven for commercial use only and...at the main power supply. 6. Rinse well and shake to perform repairs. Open the door. 3. To return the filter to avoid injury from the heat of the bulb. 1. Replace bulb with a 40 watt appliance bulb. 9. REPLACING THE OVEN LIGHT When replacing the oven light, make sure that ...


