

User Manual (ENGLISH)
Page 2
... turned off, preset the camera button to copy the images on . When transferring the images taken with a PC, install the application software first. Setting up the application software To use a card reader to turn it (e.g. If the Check the camera's power power is operating properly prior to the PC and can be damaged. After this manual are subject to change without prior notice for buying a Samsung Digital Camera. å Prior to using this manual...
... turned off, preset the camera button to copy the images on . When transferring the images taken with a PC, install the application software first. Setting up the application software To use a card reader to turn it (e.g. If the Check the camera's power power is operating properly prior to the PC and can be damaged. After this manual are subject to change without prior notice for buying a Samsung Digital Camera. å Prior to using this manual...
User Manual (ENGLISH)
Page 4
... 010 5 Function button 011 Self-timer lamp 011 Camera Status Lamp 011 Mode icon 012 Connecting to a Power Source 013 Inserting the memory card 014 Instructions on how to use the memory card RECORDING 016 LCD monitor indicator 017 How to use the menu 018 Starting the recording mode 018 Selecting modes 018 How to use the Smart Auto mode 019 How to use the Auto mode 020 How to use the Program mode 020 How to use the DIS mode 021 Using the Photo Help Guide mode 022...
... 010 5 Function button 011 Self-timer lamp 011 Camera Status Lamp 011 Mode icon 012 Connecting to a Power Source 013 Inserting the memory card 014 Instructions on how to use the memory card RECORDING 016 LCD monitor indicator 017 How to use the menu 018 Starting the recording mode 018 Selecting modes 018 How to use the Smart Auto mode 019 How to use the Auto mode 020 How to use the Program mode 020 How to use the DIS mode 021 Using the Photo Help Guide mode 022...

User Manual (ENGLISH)
Page 5
... ZOOM button 028 Info (DISP) / Up button 028 Macro / Down button 030 Focus lock 030 Flash / Left button 032 Self-timer / Right button 034 MENU button 034 OK button 034 Functions 035 How to Enable Functions Using the MENU Button 035 Exposure compensation 036 White balance 037 ISO 037 Face Detection 039 Face Tone 4 039 Face Retouch 040 Image Size 040 Quality / Frame rate 041 ACB 041 Metering 042 Drive mode 042 Auto Focus type 043 Photo Style Selector 044 Image Adjust...
... ZOOM button 028 Info (DISP) / Up button 028 Macro / Down button 030 Focus lock 030 Flash / Left button 032 Self-timer / Right button 034 MENU button 034 OK button 034 Functions 035 How to Enable Functions Using the MENU Button 035 Exposure compensation 036 White balance 037 ISO 037 Face Detection 039 Face Tone 4 039 Face Retouch 040 Image Size 040 Quality / Frame rate 041 ACB 041 Metering 042 Drive mode 042 Auto Focus type 043 Photo Style Selector 044 Image Adjust...

User Manual (ENGLISH)
Page 6
... Display SAVE 050 Settings 050 Formatting a memory 050 Initialisation 051 Setting up the Date / Time / Date type 051 Time Zone 051 File name 052 Imprinting the recording date 052 Auto power off 053 Selecting Video out type 054 Auto Focus lamp 054 Setting the USB 054 Selecting a battery type PLAY 055 055 055 056 056 057 057 058 058 Starting play mode Playing back a still image Playing back a movie clip Movie clip capture function Playing back a recorded voice Playing back a voice memo LCD monitor Indicator Using the camera buttons...
... Display SAVE 050 Settings 050 Formatting a memory 050 Initialisation 051 Setting up the Date / Time / Date type 051 Time Zone 051 File name 052 Imprinting the recording date 052 Auto power off 053 Selecting Video out type 054 Auto Focus lamp 054 Setting the USB 054 Selecting a battery type PLAY 055 055 055 056 056 057 057 058 058 Starting play mode Playing back a still image Playing back a movie clip Movie clip capture function Playing back a recorded voice Playing back a voice memo LCD monitor Indicator Using the camera buttons...

User Manual (ENGLISH)
Page 17
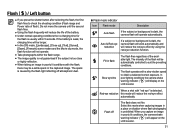
... 5 Memory card icon / Internal memory icon 6 Battery 7 Flash 8 Self-timer 9 Macro 10 Photo Style Selector 11 Face Detection 12 Face Tone 13 Image Adjust / Without Sound / Face Retouch 14 Date / Time 15 Camera shake Warning 16 Auto Focus Frame 17 Drive mode 18 Metering 19 Image Quality / Frame Rate 20 Image Size 21 ISO 22 White Balance 23 Exposure compensation Icons 2009/08/01 01:00 PM Page - Description Icons 1 Recording mode 2 Optical / Digital Zoom bar / Digital Zoom rate 3 Voice Memo Number of available shots 4 remaining Remaining time 16...
... 5 Memory card icon / Internal memory icon 6 Battery 7 Flash 8 Self-timer 9 Macro 10 Photo Style Selector 11 Face Detection 12 Face Tone 13 Image Adjust / Without Sound / Face Retouch 14 Date / Time 15 Camera shake Warning 16 Auto Focus Frame 17 Drive mode 18 Metering 19 Image Quality / Frame Rate 20 Image Size 21 ISO 22 White Balance 23 Exposure compensation Icons 2009/08/01 01:00 PM Page - Description Icons 1 Recording mode 2 Optical / Digital Zoom bar / Digital Zoom rate 3 Voice Memo Number of available shots 4 remaining Remaining time 16...

User Manual (ENGLISH)
Page 20
... on the subject. Press the power button to red when you press the shutter button down half way, it means that the camera cannot focus on the tripod [Action] ( ) : When shooting a subject making frequent movements How to use the Auto mode ( ) Select this camera has a 7MB internal memory, you do not need to insert the memory card. Select the Auto mode by using the LCD monitor. 7. Close the battery chamber cover. 4. door place...
... on the subject. Press the power button to red when you press the shutter button down half way, it means that the camera cannot focus on the tripod [Action] ( ) : When shooting a subject making frequent movements How to use the Auto mode ( ) Select this camera has a 7MB internal memory, you do not need to insert the memory card. Select the Auto mode by using the LCD monitor. 7. Close the battery chamber cover. 4. door place...

User Manual (ENGLISH)
Page 26
... very bright. - Lightly press the shutter button to confirm focus and flash battery charge. When there is strong reflected light, or when the background is very narrow (such as expected. - In this case, use the [Backlight] in scene shooting mode (see page 22), fill-in a low lighting condition, the camera shake warning indicator ( Ã ) may make the picture dark.
... very bright. - Lightly press the shutter button to confirm focus and flash battery charge. When there is strong reflected light, or when the background is very narrow (such as expected. - In this case, use the [Backlight] in scene shooting mode (see page 22), fill-in a low lighting condition, the camera shake warning indicator ( Ã ) may make the picture dark.

User Manual (ENGLISH)
Page 27
Using the camera buttons to save battery life. SHUTTER button Used for taking an image or recording voice in the memory allows. the subject will have no operation during the specified time, the camera's power will start after the camera has finished storing the image data. 26 ZOOM button If the menu is not displayed, this button works as the available recording time in the RECORDING mode. å In MOVIE CLIP mode Pressing the shutter button down fully takes and stores the image. Pressing...
Using the camera buttons to save battery life. SHUTTER button Used for taking an image or recording voice in the memory allows. the subject will have no operation during the specified time, the camera's power will start after the camera has finished storing the image data. 26 ZOOM button If the menu is not displayed, this button works as the available recording time in the RECORDING mode. å In MOVIE CLIP mode Pressing the shutter button down fully takes and stores the image. Pressing...
User Manual (ENGLISH)
Page 32
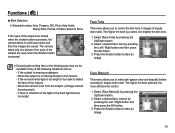
... a shot with a slow shutter speed to obtain a balanced correct exposure. Flash ( ) / Left button å If you capture an image in a place or situation where flash photography is detected, Red-eye reduction this mode when capturing images in poorly lit conditions, the camera shake warning indicator ( Ã ) will reduce the life of the available light. The intensity of the flash will not operate. å Take photographs...
... a shot with a slow shutter speed to obtain a balanced correct exposure. Flash ( ) / Left button å If you capture an image in a place or situation where flash photography is detected, Red-eye reduction this mode when capturing images in poorly lit conditions, the camera shake warning indicator ( Ã ) will reduce the life of the available light. The intensity of the flash will not operate. å Take photographs...
User Manual (ENGLISH)
Page 40
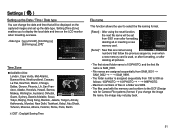
... Shutter button to control the skin tone in images in beauty shot mode. Face Tone This menu allows you to take an image. Face Tone 2. If the environmental light is wearing sunglasses. - Select [Face Tone] by pressing the Up/Down button. 2. Back Move 39 The camera takes only one picture if the eyes of the subject are too bright. Functions ( ) Ê Blink Detection Ä Selectable modes: Auto, Program, DIS, Photo Help Guide...
... Shutter button to control the skin tone in images in beauty shot mode. Face Tone This menu allows you to take an image. Face Tone 2. If the environmental light is wearing sunglasses. - Select [Face Tone] by pressing the Up/Down button. 2. Back Move 39 The camera takes only one picture if the eyes of the subject are too bright. Functions ( ) Ê Blink Detection Ä Selectable modes: Auto, Program, DIS, Photo Help Guide...

User Manual (ENGLISH)
Page 49
... Shutter button is a choice of language that you can be preserved. Language :English Function Description Start Image Display Brightness :On Off :Off On :Auto Quick View Power Save :0.5sec :Off Back Set 48 You can use the setup menu in recording mode. - Even if the battery is displayed. Display ( ) Language There is pressed down half way so that can be displayed on , AF sound will be aware of the camera operation status. - [AF sound] sub menu : [Off], [On]* Volume Start Sound Shutter Sound Beep Sound AF Sound...
... Shutter button is a choice of language that you can be preserved. Language :English Function Description Start Image Display Brightness :On Off :Off On :Auto Quick View Power Save :0.5sec :Off Back Set 48 You can use the setup menu in recording mode. - Even if the battery is displayed. Display ( ) Language There is pressed down half way so that can be displayed on , AF sound will be aware of the camera operation status. - [AF sound] sub menu : [Off], [On]* Volume Start Sound Shutter Sound Beep Sound AF Sound...
User Manual (ENGLISH)
Page 52
... memory card is used with the memory card conform to display the local date and time on the captured images and set from 0001 even after deleting all or inserting a new memory card. [Series]* : New files are 9999. - If you to the DCF (Design rule for Camera File systems) format. File names are assigned sequentially from 100 to select the file naming format. [Reset] : After using the reset function, the...
... memory card is used with the memory card conform to display the local date and time on the captured images and set from 0001 even after deleting all or inserting a new memory card. [Series]* : New files are 9999. - If you to the DCF (Design rule for Camera File systems) format. File names are assigned sequentially from 100 to select the file naming format. [Reset] : After using the reset function, the...
User Manual (ENGLISH)
Page 73
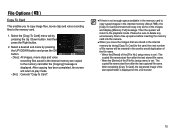
... memory card, the unprotected files in the DCIM subfolder will be displayed on the LCD monitor. (An unprotected image has no indicator) - Remember that have been previously protected (Unlock). 1. Press the shutter button to record up to a stored still image. To stop the recording, press the shutter button. 72 Delete Protect Voice memo DPOF Copy To Card Off :Off On Back Set [Voice memo menu] Start [Ready for an image to protect specific shots from the delete function...
... memory card, the unprotected files in the DCIM subfolder will be displayed on the LCD monitor. (An unprotected image has no indicator) - Remember that have been previously protected (Unlock). 1. Press the shutter button to record up to a stored still image. To stop the recording, press the shutter button. 72 Delete Protect Voice memo DPOF Copy To Card Off :Off On Back Set [Voice memo menu] Start [Ready for an image to protect specific shots from the delete function...

User Manual (ENGLISH)
Page 74
... the print setup. Check that your memory card's MISC folder. Up / Down button : Select a number of the image may not support the wide angle size print.) Ê Standard This function allows you print the image. Images can support the wide angle image when you to embed printing information on the LCD monitor when an image that the image is displayed. - If an image carries DPOF instructions, the DPOF indicator ( ) will display. And then press the Right button. 2. Zoom button...
... the print setup. Check that your memory card's MISC folder. Up / Down button : Select a number of the image may not support the wide angle size print.) Ê Standard This function allows you print the image. Images can support the wide angle image when you to embed printing information on the LCD monitor when an image that the image is displayed. - If an image carries DPOF instructions, the DPOF indicator ( ) will display. And then press the Right button. 2. Zoom button...
User Manual (ENGLISH)
Page 76
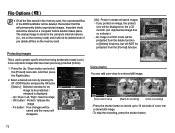
... [File No.] setup menu is set : The copied file names start from after the [Copying] message is not enough space available in the memory card to copy saved images in the card to the playback mode. And then Protect press the Right button. File Options ( ) Copy To Card This enables you move the images that are copied to the memory card after the last stored file name. - After copying has been completed, the screen will return to play mode. - [No] : Cancels "Copy...
... [File No.] setup menu is set : The copied file names start from after the [Copying] message is not enough space available in the memory card to copy saved images in the card to the playback mode. And then Protect press the Right button. File Options ( ) Copy To Card This enables you move the images that are copied to the memory card after the last stored file name. - After copying has been completed, the screen will return to play mode. - [No] : Cancels "Copy...

User Manual (ENGLISH)
Page 79
And then press File Name :Auto the Right button. For your printer. 78 Important notes Be sure to observe the following locations. - Areas with your printer's default setting, refer to dust, chemicals (like naphthalene and mothballs), high temperature and high humidity. Avoid obstructing the lens or the flash when you use this camera with wet hands. - Protect the large size LCD monitor from an impact. When...
And then press File Name :Auto the Right button. For your printer. 78 Important notes Be sure to observe the following locations. - Areas with your printer's default setting, refer to dust, chemicals (like naphthalene and mothballs), high temperature and high humidity. Avoid obstructing the lens or the flash when you use this camera with wet hands. - Protect the large size LCD monitor from an impact. When...

User Manual (ENGLISH)
Page 80
... USB cable before the recording. 79 Clean the camera body with solvent materials such as benzol, insecticide, thinners etc. This may adopt the default settings by static electricity. Rough handling can occur. In this happens, turn the camera off the camera and remove the memory card. Samsung cannot be used for a long period, the date and time may damage the body shell of time. å If the camera...
... USB cable before the recording. 79 Clean the camera body with solvent materials such as benzol, insecticide, thinners etc. This may adopt the default settings by static electricity. Rough handling can occur. In this happens, turn the camera off the camera and remove the memory card. Samsung cannot be used for a long period, the date and time may damage the body shell of time. å If the camera...
User Manual (ENGLISH)
Page 83
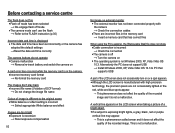
... mode åThe camera mode can't use the flash à Refer to the FLASH instruction (p.30) Incorrect date and time is displayed å The date and time have been set incorrectly or the camera has adopted the default settings ÃReset the date and time correctly The camera buttons do not operate åCamera malfunction à Remove/re-insert battery and switch the camera on A card error has occurred while the memory card is in the memory card à Insert a memory card that supports USB A part of the LCD screen...
... mode åThe camera mode can't use the flash à Refer to the FLASH instruction (p.30) Incorrect date and time is displayed å The date and time have been set incorrectly or the camera has adopted the default settings ÃReset the date and time correctly The camera buttons do not operate åCamera malfunction à Remove/re-insert battery and switch the camera on A card error has occurred while the memory card is in the memory card à Insert a memory card that supports USB A part of the LCD screen...

User Manual (ENGLISH)
Page 89
... version of DirectX has been installed on the monitor. Setting up the application software To use this has been done, the stored images in the Auto run frame will display. Click the [Samsung Digital Camera Installer] menu in the camera can be moved to the PC and can visit the Samsung web-site through the internet. 2. Install DirectX, Samsung Master by selecting a button shown on your computer...
... version of DirectX has been installed on the monitor. Setting up the application software To use this has been done, the stored images in the Auto run frame will display. Click the [Samsung Digital Camera Installer] menu in the camera can be moved to the PC and can visit the Samsung web-site through the internet. 2. Install DirectX, Samsung Master by selecting a button shown on your computer...

User Manual (ENGLISH)
Page 99
...-click on the camera. Restart the PC and connect the camera again. Case 1 USB cable is not connected or it is an unexpected error during file transfer. Ã Turn the camera power off the camera, remove the USB cable, plug in connecting the camera to the computer. Refer to the security program instructions about how to the PC directly. Wherever possible, connect the camera to temporarily disable the program. Case 6 When I open the Device Manager...
...-click on the camera. Restart the PC and connect the camera again. Case 1 USB cable is not connected or it is an unexpected error during file transfer. Ã Turn the camera power off the camera, remove the USB cable, plug in connecting the camera to the computer. Refer to the security program instructions about how to the PC directly. Wherever possible, connect the camera to temporarily disable the program. Case 6 When I open the Device Manager...


