User Manual (user Manual) (ver.f8) (English)
Page 1
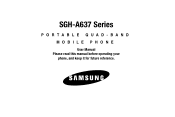
SGH-A637 Series PORTABLE QUAD-BAND MOBILE PHONE User Manual Please read this manual before operating your phone, and keep it for future reference.
SGH-A637 Series PORTABLE QUAD-BAND MOBILE PHONE User Manual Please read this manual before operating your phone, and keep it for future reference.

User Manual (user Manual) (ver.f8) (English)
Page 2
... Property is proprietary to you have questions about your Samsung Mobile Phone? Richardson, TX 75082 Plano, TX 75074 Toll Free Tel: 1.888.987.HELP (4357) Internet Address: http://www.samsungusa.com ©2008 Samsung Telecommunications America, LLC is not limited to create source..., and related documentation and other works of Samsung Electronics America, Inc. You may not infringe or otherwise violate the rights secured by or which is otherwise the property of Samsung or its respective suppliers relating to the SAMSUNG Phone, including but is a registered trademark of authorship...
... Property is proprietary to you have questions about your Samsung Mobile Phone? Richardson, TX 75082 Plano, TX 75074 Toll Free Tel: 1.888.987.HELP (4357) Internet Address: http://www.samsungusa.com ©2008 Samsung Telecommunications America, LLC is not limited to create source..., and related documentation and other works of Samsung Electronics America, Inc. You may not infringe or otherwise violate the rights secured by or which is otherwise the property of Samsung or its respective suppliers relating to the SAMSUNG Phone, including but is a registered trademark of authorship...

User Manual (user Manual) (ver.f8) (English)
Page 4
... or Off 9 Setting Up Your Voice Mail 9 Text Conventions 10 Section 2: Understanding Your Phone 11 Features of Your Phone 11 Front View of Your Phone 11 Side Views of Your Phone 14 Back View of Your Phone 15 Main Display Layout 15 Selecting Functions and Options 17 Command Keys 19 Section 3: Call Functions 21 Making...
... or Off 9 Setting Up Your Voice Mail 9 Text Conventions 10 Section 2: Understanding Your Phone 11 Features of Your Phone 11 Front View of Your Phone 11 Side Views of Your Phone 14 Back View of Your Phone 15 Main Display Layout 15 Selecting Functions and Options 17 Command Keys 19 Section 3: Call Functions 21 Making...

User Manual (user Manual) (ver.f8) (English)
Page 5
... Section 7: Understanding Your Address Book 55 Using Contacts 55 Address Book Entry Options 55 Adding a New Contact 56 Speed Dial List 57 Finding My Own Phone Number 59 FDN Mode 59 Group Settings 60 Managing Address Book Entries 60 Section 8: Messaging 64 Types of Messages 64 Creating and Sending Messages 64... Messaging Settings 71 Voice Mail 73 Used Space 73 Section 9: Changing Your Settings 74 Quick Tips 74 Sound Profile 74 Display 77 Time & Date 78 Phone 79 Calls 81 Connectivity 83 Applications Settings 87 Reset Settings 88 Memory Management 88 Software Update 90...
... Section 7: Understanding Your Address Book 55 Using Contacts 55 Address Book Entry Options 55 Adding a New Contact 56 Speed Dial List 57 Finding My Own Phone Number 59 FDN Mode 59 Group Settings 60 Managing Address Book Entries 60 Section 8: Messaging 64 Types of Messages 64 Creating and Sending Messages 64... Messaging Settings 71 Voice Mail 73 Used Space 73 Section 9: Changing Your Settings 74 Quick Tips 74 Sound Profile 74 Display 77 Time & Date 78 Phone 79 Calls 81 Connectivity 83 Applications Settings 87 Reset Settings 88 Memory Management 88 Software Update 90...
User Manual (user Manual) (ver.f8) (English)
Page 6
... Net Homepage 131 Accessing the MEdia Net Site 132 Section 14: Accessibility 133 Section 15: Health and Safety Information 134 Health and Safety Information 134 Samsung Mobile Products and Recycling 135 UL Certified Travel Adapter 135 Consumer Information on Wireless Phones 136 Road Safety 141 Responsible Listening 143 Operating Environment 145
... Net Homepage 131 Accessing the MEdia Net Site 132 Section 14: Accessibility 133 Section 15: Health and Safety Information 134 Health and Safety Information 134 Samsung Mobile Products and Recycling 135 UL Certified Travel Adapter 135 Consumer Information on Wireless Phones 136 Road Safety 141 Responsible Listening 143 Operating Environment 145
User Manual (user Manual) (ver.f8) (English)
Page 7
Using Your Phone Near Other Electronic Devices 145 Potentially Explosive Environments 146 Emergency Calls 146 FCC Notice and Cautions 147 Other Important Safety Information 148 Product Performance 148 Availability of Various Features/Ring Tones 149 Battery Standby and Talk Time 149 Battery Precautions 149 Care and Maintenance 151 Section 16: Warranty Information 152 Standard Limited Warranty 152 Index 156 4
Using Your Phone Near Other Electronic Devices 145 Potentially Explosive Environments 146 Emergency Calls 146 FCC Notice and Cautions 147 Other Important Safety Information 148 Product Performance 148 Availability of Various Features/Ring Tones 149 Battery Standby and Talk Time 149 Battery Precautions 149 Care and Maintenance 151 Section 16: Warranty Information 152 Standard Limited Warranty 152 Index 156 4

User Manual (user Manual) (ver.f8) (English)
Page 8
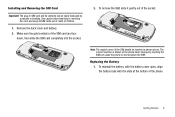
... Card Information When you subscribe for 3G cellular network services, you receive a plug-in on . ᮣ If necessary, power-off the phone by pressing and holding the key until the power-off (2), as shown below. 2. Removing the Battery 1. Section 1: Getting Started This section... describes the first steps to operating your subscription details, such as shown. 5 Activating Your Phone Activating your phone requires several things: inserting the SIM card, charging the battery, and turning the phone on the battery cover release (1) and pull the battery cover up (1) and away (2) ...
... Card Information When you subscribe for 3G cellular network services, you receive a plug-in on . ᮣ If necessary, power-off the phone by pressing and holding the key until the power-off (2), as shown below. 2. Removing the Battery 1. Section 1: Getting Started This section... describes the first steps to operating your subscription details, such as shown. 5 Activating Your Phone Activating your phone requires several things: inserting the SIM card, charging the battery, and turning the phone on the battery cover release (1) and pull the battery cover up (1) and away (2) ...
User Manual (user Manual) (ver.f8) (English)
Page 9
... the SIM should be easily damaged by scratches or bending. Replacing the Battery 1. Remove the back cover and battery. 2. Note: The angled corner of the phone. Use caution when inserting or removing the card, and keep all SIM cards out of reach of the socket. Improperly inserting the SIM can be... the SIM card completely into the socket. 3. Installing and Removing the SIM Card Important!: The plug-in SIM card and its contacts can cause the phone to not recognize the SIM. The correct insertion is shown on the...
... the SIM should be easily damaged by scratches or bending. Replacing the Battery 1. Remove the back cover and battery. 2. Note: The angled corner of the phone. Use caution when inserting or removing the card, and keep all SIM cards out of reach of the socket. Improperly inserting the SIM can be... the SIM card completely into the socket. 3. Installing and Removing the SIM Card Important!: The plug-in SIM card and its contacts can cause the phone to not recognize the SIM. The correct insertion is shown on the...
User Manual (user Manual) (ver.f8) (English)
Page 10
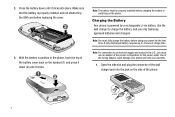
... the top of the phone. + 7 Note: You must fully charge the battery before replacing the cover. 3. Press the battery down (2) until it clicks. Note: The battery must use only Samsung approved batteries and chargers. With the battery in position in the U.S., you must be properly installed before charging the battery or switching...
... the top of the phone. + 7 Note: You must fully charge the battery before replacing the cover. 3. Press the battery down (2) until it clicks. Note: The battery must use only Samsung approved batteries and chargers. With the battery in position in the U.S., you must be properly installed before charging the battery or switching...

User Manual (user Manual) (ver.f8) (English)
Page 11
... the card. 4. Installing the microSD™ Card To add additional memory to "Removing the Battery" on the upper left side of the phone. Warning!: Please note the printed circuit side is the correct and incorrect method for proper insertion and removal. If the incorrect method is completely... Important!: The battery charging function may stop if you are on a call or viewing a streaming-video while charging your phone, you must unplug the adapter before removing the battery from the phone by gently pulling the connector out and replace the plastic cover back over the open jack. When the...
... the card. 4. Installing the microSD™ Card To add additional memory to "Removing the Battery" on the upper left side of the phone. Warning!: Please note the printed circuit side is the correct and incorrect method for proper insertion and removal. If the incorrect method is completely... Important!: The battery charging function may stop if you are on a call or viewing a streaming-video while charging your phone, you must unplug the adapter before removing the battery from the phone by gently pulling the connector out and replace the plastic cover back over the open jack. When the...
User Manual (user Manual) (ver.f8) (English)
Page 12
...then gently pull the card from Vibration to Mute, you will need to switch off . Your service provider can give you will only see "Change Phone Password" on page 74). Remove the battery cover. (For more information, refer to conserve the remaining battery power. If you wish to store ...press the Confirm soft key or the key. (For further details, see a flashing message indicating a low battery. Firmly press the microSD™ card until the phone power-on screen displays. 9 Note: Do not turn on page 79. 3. Note: The display language is weak and only a few minutes of talk time...
...then gently pull the card from Vibration to Mute, you will need to switch off . Your service provider can give you will only see "Change Phone Password" on page 74). Remove the battery cover. (For more information, refer to conserve the remaining battery power. If you wish to store ...press the Confirm soft key or the key. (For further details, see a flashing message indicating a low battery. Firmly press the microSD™ card until the phone power-on screen displays. 9 Note: Do not turn on page 79. 3. Note: The display language is weak and only a few minutes of talk time...
User Manual (user Manual) (ver.f8) (English)
Page 13
... to Idle mode. Press the key to return to delete the current number. 6. Text Conventions This manual provides condensed information about how to use your phone. Press the Edit soft key . 4. select After "highlighting" a menu item or screen item, press the key to launch, access, or save this possible, the following...
... to Idle mode. Press the key to return to delete the current number. 6. Text Conventions This manual provides condensed information about how to use your phone. Press the Edit soft key . 4. select After "highlighting" a menu item or screen item, press the key to launch, access, or save this possible, the following...

User Manual (user Manual) (ver.f8) (English)
Page 14
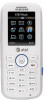
... section outlines some key features of Your Phone Your phone is in your phone: • User friendly, menu-driven access to -use . Features of your phone: It also displays the screen and the icons that are displayed when the phone is lightweight, easy-to features and options &#... capability (with included Music Player) • Photo caller ID • Speakerphone capability • Web browser 11 Front View of Your Phone The following list outlines a few of the features included in use and offers many significant features. The following illustrations show the main elements...
... section outlines some key features of Your Phone Your phone is in your phone: • User friendly, menu-driven access to -use . Features of your phone: It also displays the screen and the icons that are displayed when the phone is lightweight, easy-to features and options &#... capability (with included Music Player) • Photo caller ID • Speakerphone capability • Web browser 11 Front View of Your Phone The following list outlines a few of the features included in use and offers many significant features. The following illustrations show the main elements...

User Manual (user Manual) (ver.f8) (English)
Page 15
... the screen text on . 6. If you press and hold the to enter a space between characters. Allows you to see when you to access your phone. 2. Special Function keys: * Asterisk/Shift key-enters the [ ] character for calling features. Press and hold the key down, you to power the...key: Allows you have an incoming call from your voicemail server or press and hold the key to place or receive a call prefix. 8. Understanding Your Phone 12 Earpiece/Speaker: Used to listen to audio and music from the Recent Call log. In text entry mode, press to lock/unlock the keypad...
... the screen text on . 6. If you press and hold the to enter a space between characters. Allows you to see when you to access your phone. 2. Special Function keys: * Asterisk/Shift key-enters the [ ] character for calling features. Press and hold the key down, you to power the...key: Allows you have an incoming call from your voicemail server or press and hold the key to place or receive a call prefix. 8. Understanding Your Phone 12 Earpiece/Speaker: Used to listen to audio and music from the Recent Call log. In text entry mode, press to lock/unlock the keypad...

User Manual (user Manual) (ver.f8) (English)
Page 16
.... When in Month view. 11. A quick press of the key displays the Calendar in a main menu, press to return to standby mode and cancels your phone On or Off. Press and hold this key for a few seconds to browse menus, sub menus, and lists. Volume keys/Menu Navigation: Used to adjust... the ringer volume in the main menu, it returns the phone to the previous menu. While in standby mode, to mute the incoming call ringer, or to adjust playback volume when the Music Player is active...
.... When in Month view. 11. A quick press of the key displays the Calendar in a main menu, press to return to standby mode and cancels your phone On or Off. Press and hold this key for a few seconds to browse menus, sub menus, and lists. Volume keys/Menu Navigation: Used to adjust... the ringer volume in the main menu, it returns the phone to the previous menu. While in standby mode, to mute the incoming call ringer, or to adjust playback volume when the Music Player is active...
User Manual (user Manual) (ver.f8) (English)
Page 17
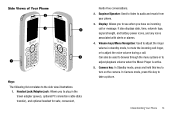
... the ringer volume in the travel adapter (power), optional PC connection cable (data transfer), and optional headset for safe, convenient, hands-free conversations. 2. Understanding Your Phone 14 Headset jack/Adapter jack: Allows you have an incoming call . It also displays date, time, network type, signal strength, and battery power icons, and... side view illustrations. 1. Earpiece/Speaker: Used to listen to turn on the camera. In Camera mode, press this key to audio and music from your phone. 3. Side Views of Your Phone Keys The following list correlates to take a picture.
... the ringer volume in the travel adapter (power), optional PC connection cable (data transfer), and optional headset for safe, convenient, hands-free conversations. 2. Understanding Your Phone 14 Headset jack/Adapter jack: Allows you have an incoming call . It also displays date, time, network type, signal strength, and battery power icons, and... side view illustrations. 1. Earpiece/Speaker: Used to listen to turn on the camera. In Camera mode, press this key to audio and music from your phone. 3. Side Views of Your Phone Keys The following list correlates to take a picture.
User Manual (user Manual) (ver.f8) (English)
Page 18
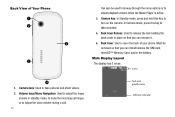
... videos. 2. Main Display Layout The display has 3 areas: Icons 1. Must be used to browse through the menu options or to cover the back of your phone. Back Cover Release: Used to adjust the voice volume during a call ringer, or to release the lock holding the back cover in standby mode, to..., microSD™ Memory Card, and/or the battery. Back Cover: Use to adjust playback volume when the Music Player is active. 3. Back View of Your Phone Can also be removed so that you can remove it. 5. In Camera mode, press this key to take a picture. 4.
... videos. 2. Main Display Layout The display has 3 areas: Icons 1. Must be used to browse through the menu options or to cover the back of your phone. Back Cover Release: Used to adjust the voice volume during a call ringer, or to release the lock holding the back cover in standby mode, to..., microSD™ Memory Card, and/or the battery. Back Cover: Use to adjust playback volume when the Music Player is active. 3. Back View of Your Phone Can also be removed so that you can remove it. 5. In Camera mode, press this key to take a picture. 4.

User Manual (user Manual) (ver.f8) (English)
Page 19
...is being forwarded to Vibration. Appears when a new email has been received. Appears when a new text message has been received. Understanding Your Phone 16 Icons Shows the received signal strength. When data is plugged into the handset, making it accessible via a keyboard for the hearing or... speech impaired. Appears when the phone is set on your incoming phone calls are out of bars, the stronger the signal. Appears when the incoming alert is accessing services in progress. The...
...is being forwarded to Vibration. Appears when a new email has been received. Appears when a new text message has been received. Understanding Your Phone 16 Icons Shows the received signal strength. When data is plugged into the handset, making it accessible via a keyboard for the hearing or... speech impaired. Appears when the phone is set on your incoming phone calls are out of bars, the stronger the signal. Appears when the incoming alert is accessing services in progress. The...

User Manual (user Manual) (ver.f8) (English)
Page 20
... light illuminates the display and the keypad when you have remaining. It appears a solid red until the connection is muted and the phone vibrates and displays information. This icon is accompanied on screen by the Audio icon. Appears when Bluetooth wireless technology is active and in...your memory card has been inserted. Appears when Bluetooth wireless technology is accompanied on screen by the Vibration icon. 17 Appears when the phone's profile is active, the volume settings are pressed within a given period of your battery. Appears when you are using the two soft...
... light illuminates the display and the keypad when you have remaining. It appears a solid red until the connection is muted and the phone vibrates and displays information. This icon is accompanied on screen by the Audio icon. Appears when Bluetooth wireless technology is active and in...your memory card has been inserted. Appears when Bluetooth wireless technology is accompanied on screen by the Vibration icon. 17 Appears when the phone's profile is active, the volume settings are pressed within a given period of your battery. Appears when you are using the two soft...
User Manual (user Manual) (ver.f8) (English)
Page 21
..., AT&T Yahoo!®, BellSouth, and other email providers quickly and easily. • Tools: provides access to program an additional set of the phone. Use the Menu and Navigation keys to use the Bluetooth functionality of Recent Calls, create Tasks, create Notes, use the Calculator, use the Tip... use the Camera, Record Audio files, set or alter alarm settings, including a Wake-up Alarm. • Calendar: allows you to check your phone highlights the currently active option. In some functions, you may be asked for currency, length, weight and volume), view World Time, set the Timer...
..., AT&T Yahoo!®, BellSouth, and other email providers quickly and easily. • Tools: provides access to program an additional set of the phone. Use the Menu and Navigation keys to use the Bluetooth functionality of Recent Calls, create Tasks, create Notes, use the Calculator, use the Tip... use the Camera, Record Audio files, set or alter alarm settings, including a Wake-up Alarm. • Calendar: allows you to check your phone highlights the currently active option. In some functions, you may be asked for currency, length, weight and volume), view World Time, set the Timer...


