Quick Guide (easy Manual) (ver.1.0) (English)
Page 3
...your new product INTRODUCTION 24 Machine overview 24 24 25 Front view Rear view 26 Control panel overview (SCX-4623 Series) 27 Control panel overview (SCX-4600 Series) 28 Understanding the Status LED 28 Introducing the useful buttons 28 Menu button 28 Power button ...33 Windows 33 Macintosh NETWORK SETUP 35 Network environment 35 35 Introducing useful network programs 35 SyncThru™ Web Service 35 SyncThru™ Web Admin Service 35 Samsung AnyWeb Print 35 SetIP 35 Using a wired network 35 Printing Network Configuration report 36 Setting IP address 37 Network parameter setting 37 ...
...your new product INTRODUCTION 24 Machine overview 24 24 25 Front view Rear view 26 Control panel overview (SCX-4623 Series) 27 Control panel overview (SCX-4600 Series) 28 Understanding the Status LED 28 Introducing the useful buttons 28 Menu button 28 Power button ...33 Windows 33 Macintosh NETWORK SETUP 35 Network environment 35 35 Introducing useful network programs 35 SyncThru™ Web Service 35 SyncThru™ Web Admin Service 35 Samsung AnyWeb Print 35 SetIP 35 Using a wired network 35 Printing Network Configuration report 36 Setting IP address 37 Network parameter setting 37 ...
Quick Guide (easy Manual) (ver.1.0) (English)
Page 6
... 76 Printing sent fax report automatically MACHINE STATUS AND ADVANCED FEATURE 77 Fax setup 77 77 77 77 Changing the fax setup options Sending Receiving 78 Change Default 78 Auto Report 78 Copy setup 78 Changing the copy setup options 79 Change Default 79 Printing a report 79 Clearing memory 80 Network 80 Menu overview Content_ 6
... 76 Printing sent fax report automatically MACHINE STATUS AND ADVANCED FEATURE 77 Fax setup 77 77 77 77 Changing the fax setup options Sending Receiving 78 Change Default 78 Auto Report 78 Copy setup 78 Changing the copy setup options 79 Change Default 79 Printing a report 79 Clearing memory 80 Network 80 Menu overview Content_ 6
Quick Guide (easy Manual) (ver.1.0) (English)
Page 31
...computer. Select Install Now. If your machine is attached to a network, skip the following steps below are recommended for machine operations will be installed. 1. b) From the Start menu, select Programs or All Programs > Samsung Printers > your machine and powered on. If your machine is ...The following steps below to repair or reinstall the driver. If not, click No to reprint it provides you use . 5. Type X:\Setup.exe replacing "X" with the letter which supports the PostScript driver) for scanning on a Macintosh computer. Getting started_ 31 Click OK. •...
...computer. Select Install Now. If your machine is attached to a network, skip the following steps below are recommended for machine operations will be installed. 1. b) From the Start menu, select Programs or All Programs > Samsung Printers > your machine and powered on. If your machine is ...The following steps below to repair or reinstall the driver. If not, click No to reprint it provides you use . 5. Type X:\Setup.exe replacing "X" with the letter which supports the PostScript driver) for scanning on a Macintosh computer. Getting started_ 31 Click OK. •...

Quick Guide (easy Manual) (ver.1.0) (English)
Page 35
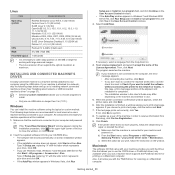
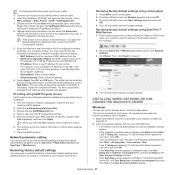
...for the download. Download this Network Configuration Report, you to: • Configure the network parameters necessary for use the ordinary program. Click Start > All programs > Samsung Printers > Samsung AnyWeb Print > Download the latest version to set up the basic network settings through the machine's control...or "IP setting using the programs below, set up the network protocols on page 36). Printing Network Configuration report You can set the IP address first. Press the left /right arrow until Network Info. network setup 4. You need to link the website where the tool is ...
...for the download. Download this Network Configuration Report, you to: • Configure the network parameters necessary for use the ordinary program. Click Start > All programs > Samsung Printers > Samsung AnyWeb Print > Download the latest version to set up the basic network settings through the machine's control...or "IP setting using the programs below, set up the network protocols on page 36). Printing Network Configuration report You can set the IP address first. Press the left /right arrow until Network Info. network setup 4. You need to link the website where the tool is ...
Quick Guide (easy Manual) (ver.1.0) (English)
Page 36
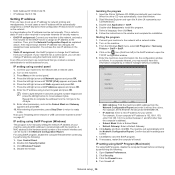
... to ready mode. Press the left ) in the window and complete the installation. Double-click Setup.exe to install this to complete the address from the Network Configuration Report and enter it without the colons. Open System Preferences. 2. Turn firewall off. This...that the IP address has changed, the assignment was successful. Installing the program 1. Connect your machine to the network with a network cable. 2. From the Windows Start menu, select All Programs > Samsung Printers > SetIP > SetIP. 4. Click on the machine. 3. For example, if your machine using the...
... to ready mode. Press the left ) in the window and complete the installation. Double-click Setup.exe to install this to complete the address from the Network Configuration Report and enter it without the colons. Open System Preferences. 2. Turn firewall off. This...that the IP address has changed, the assignment was successful. Installing the program 1. Connect your machine to the network with a network cable. 2. From the Windows Start menu, select All Programs > Samsung Printers > SetIP > SetIP. 4. Click on the machine. 3. For example, if your machine using the...
Quick Guide (easy Manual) (ver.1.0) (English)
Page 37
... machine driver, follow the steps below. Restoring factory default settings using SyncThru™ Web Service 1. Click Reset. All components necessary for network. 4. Type X:\Setup.exe, replacing "X" with the letter which represents your computer's IP address is 192.168.1.150, enter 192.168.1.X (X is connected ...connected to the network with the letter which represents your printer. If the printer was not shown in the information row, select the Manual Setting icon (third from left in the browser window. Select Apply, then OK, and OK again. Open the /opt/Samsung/mfp/share/...
... machine driver, follow the steps below. Restoring factory default settings using SyncThru™ Web Service 1. Click Reset. All components necessary for network. 4. Type X:\Setup.exe, replacing "X" with the letter which represents your computer's IP address is 192.168.1.150, enter 192.168.1.X (X is connected ...connected to the network with the letter which represents your printer. If the printer was not shown in the information row, select the Manual Setting icon (third from left in the browser window. Select Apply, then OK, and OK again. Open the /opt/Samsung/mfp/share/...

Quick Guide (easy Manual) (ver.1.0) (English)
Page 38
...will be shown on your CD-ROM drive. 3. Click Agree to agree to step 8. 7. Open the Applications folder > Utilities > Print Setup Utility. • For Mac OS X 10.5 ~ 10.6, open the Applications folder > System Preferences and click Print & Fax. Select ..., Custom Installation and Install Software Only. If your network and powered on the network. - Select one printer, the confirmation window appears. Double-click the MAC_Installer folder. 5. Network setup_ 38 3. Do as Smart Panel. The Samsung Installer window opens. Click Continue. 8. Easy Install is...
...will be shown on your CD-ROM drive. 3. Click Agree to agree to step 8. 7. Open the Applications folder > Utilities > Print Setup Utility. • For Mac OS X 10.5 ~ 10.6, open the Applications folder > System Preferences and click Print & Fax. Select ..., Custom Installation and Install Software Only. If your network and powered on the network. - Select one printer, the confirmation window appears. Double-click the MAC_Installer folder. 5. Network setup_ 38 3. Do as Smart Panel. The Samsung Installer window opens. Click Continue. 8. Easy Install is...
Quick Guide (easy Manual) (ver.1.0) (English)
Page 41
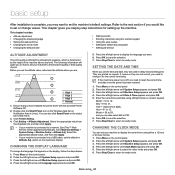
...correct time and date once the power has been restored. 1. This chapter gives you need to ready mode. Click Machine Settings > System Setup > Machine Setup > Altitude Adj. Press the left /right arrow to ready mode. If the machine's power is determined by -step instructions for the...on the machine's display. Press the left /right arrow until Machine Setup appears and press OK. 4. CHANGING THE CLOCK MODE You can set or change the language that you may want . 6. Press OK to a network, SyncThru™ Web Service screen appears automatically. Double-click the Smart ...
...correct time and date once the power has been restored. 1. This chapter gives you need to ready mode. Click Machine Settings > System Setup > Machine Setup > Altitude Adj. Press the left /right arrow to ready mode. If the machine's power is determined by -step instructions for the...on the machine's display. Press the left /right arrow until Machine Setup appears and press OK. 4. CHANGING THE CLOCK MODE You can set or change the language that you may want . 6. Press OK to a network, SyncThru™ Web Service screen appears automatically. Double-click the Smart ...

Quick Guide (easy Manual) (ver.1.0) (English)
Page 57
... you to print. 6. Changing printer settings You can use . Except for the name, the composition of paper. Open the File menu and click Page Setup. 3. Click OK. 4. Click Print. The following features. • Pages per Sheet: This option determines how many pages to be printed on one... first pane you will sometimes need to set the print environment before printing. • USB connected (See "Macintosh" on page 31). • Network connected (See "Macintosh" on UI. • Border: This option allows you use. Select Layout from the drop down list under Orientation to access...
... you to print. 6. Changing printer settings You can use . Except for the name, the composition of paper. Open the File menu and click Page Setup. 3. Click OK. 4. Click Print. The following features. • Pages per Sheet: This option determines how many pages to be printed on one... first pane you will sometimes need to set the print environment before printing. • USB connected (See "Macintosh" on page 31). • Network connected (See "Macintosh" on UI. • Border: This option allows you use. Select Layout from the drop down list under Orientation to access...

Quick Guide (easy Manual) (ver.1.0) (English)
Page 70
.... For details on the network: Automatically detects your machine. • IP address: Enter in scanning. Press the left /right arrow until System Setup appears and press OK. 3. c) Press the left /right arrow until Machine Setup appears and press OK. 4. Open the Samsung Scan & Fax Manager. ...• For Windows, from the Samsung Scan & Fax Manager. 3. Press the left /right ...
.... For details on the network: Automatically detects your machine. • IP address: Enter in scanning. Press the left /right arrow until System Setup appears and press OK. 3. c) Press the left /right arrow until Machine Setup appears and press OK. 4. Open the Samsung Scan & Fax Manager. ...• For Windows, from the Samsung Scan & Fax Manager. 3. Press the left /right ...
Quick Guide (easy Manual) (ver.1.0) (English)
Page 71
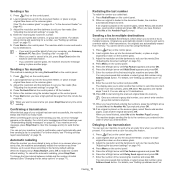
...wrong while sending your fax needs (See "Adjusting the document settings" on the display. For a list of redial attempts (See "Changing the fax setup options" on the scanner glass. 3. You can set your original has been sent successfully, the machine beeps and returns to suit your fax needs ... transmission, the originals are automatically stored in which allows you want to send the fax again. Press Menu on the control panel. 6. You can use Samsung Network PC Fax (See "Sending a fax" on page 69). • When you to send a fax to the factory default settings. prompt and press ...
...wrong while sending your fax needs (See "Adjusting the document settings" on the display. For a list of redial attempts (See "Changing the fax setup options" on the scanner glass. 3. You can set your original has been sent successfully, the machine beeps and returns to suit your fax needs ... transmission, the originals are automatically stored in which allows you want to send the fax again. Press Menu on the control panel. 6. You can use Samsung Network PC Fax (See "Sending a fax" on page 69). • When you to send a fax to the factory default settings. prompt and press ...

Quick Guide (easy Manual) (ver.1.0) (English)
Page 77
...: • Fax setup • Copy setup • Printing a report • Clearing memory • Network • Menu overview Some menus may not be available. To change the default settings for accessing a PABX exchange. Press Fax. 2. Press the left /right arrow until the fax setup item you cannot reach... report. You can specify the number of each mode, see what fax messages have been sent. Press the left /right arrow until Fax Setup appears and press OK. 4. Press the left /right arrow until the option you enter 0, the machine will not redial. If necessary, ...
...: • Fax setup • Copy setup • Printing a report • Clearing memory • Network • Menu overview Some menus may not be available. To change the default settings for accessing a PABX exchange. Press Fax. 2. Press the left /right arrow until the fax setup item you cannot reach... report. You can specify the number of each mode, see what fax messages have been sent. Press the left /right arrow until Fax Setup appears and press OK. 4. Press the left /right arrow until the option you enter 0, the machine will not redial. If necessary, ...
Quick Guide (easy Manual) (ver.1.0) (English)
Page 79
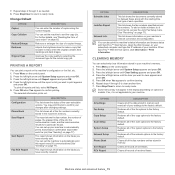
... Repeat steps 4 through 6, as junk fax numbers. Press Stop/Clear to return to ready mode. OPTION All settings Fax Setup Copy Setup Scan Setup System Setup Network Setup Phone Book Sent Report RCV Report DESCRIPTION Clears all of the data stored in memory and resets all records of the fax numbers... your settings to the factory default. You may not appear in your machine to confirm your machine's network connection and configuration. Press the left /right arrow until System Setup appears and press OK. 3. Open the Web browser on the control panel. 2. Restores all reports and...
... Repeat steps 4 through 6, as junk fax numbers. Press Stop/Clear to return to ready mode. OPTION All settings Fax Setup Copy Setup Scan Setup System Setup Network Setup Phone Book Sent Report RCV Report DESCRIPTION Clears all of the data stored in memory and resets all records of the fax numbers... your settings to the factory default. You may not appear in your machine to confirm your machine's network connection and configuration. Press the left /right arrow until System Setup appears and press OK. 3. Open the Web browser on the control panel. 2. Restores all reports and...

Quick Guide (easy Manual) (ver.1.0) (English)
Page 80
... ready mode. This list shows information on page 39). If so, it is , or consult the network administrator. ITEMS Fax Feature Fax Setup Copy Feature Copy Setup OPTION Darkness Resolution Multi Send Delay Send Priority Send Forward Secure Receive Add Page Cancel Job Sending Redial Times...parameters to set ; Press the left /right arrow until the setup option you use the network environment through 4, as is not applicable to the network. 1. OPTION TCP/IP (IPv4) TCP/IP (IPv6) Ethernet Speed Clear Setting Network Info DESCRIPTION Select appropriate protocol and configure parameters to use ,...
... ready mode. This list shows information on page 39). If so, it is , or consult the network administrator. ITEMS Fax Feature Fax Setup Copy Feature Copy Setup OPTION Darkness Resolution Multi Send Delay Send Priority Send Forward Secure Receive Add Page Cancel Job Sending Redial Times...parameters to set ; Press the left /right arrow until the setup option you use the network environment through 4, as is not applicable to the network. 1. OPTION TCP/IP (IPv4) TCP/IP (IPv6) Ethernet Speed Clear Setting Network Info DESCRIPTION Select appropriate protocol and configure parameters to use ,...

Quick Guide (easy Manual) (ver.1.0) (English)
Page 81
...Machine Fax No Date & Time Clock Mode Language Default Mode Power Save Timeout Job Timeout Altitude Adj. Toner Save Paper Setup Paper Size Paper Type Paper Source Sound/Volume Key Sound Alarm Sound Speaker Ringer Report All Report Configuration Phone Book Send ...feature_ 81 Maintenance CLR Empty Msg Supplies Life TonerLow Alert Serial Number Paper Stacking Clear Setting All Settings Fax Setup Copy Setup Scan Setup System Setup Network Setup Phone Book Sent Report RCV Report ITEMS Network OPTION TCP/IP (IPv4) DHCP BOOTP Static TCP/IP (IPv6) IPv6 Activate DHCPv6 Config Ethernet Speed ...
...Machine Fax No Date & Time Clock Mode Language Default Mode Power Save Timeout Job Timeout Altitude Adj. Toner Save Paper Setup Paper Size Paper Type Paper Source Sound/Volume Key Sound Alarm Sound Speaker Ringer Report All Report Configuration Phone Book Send ...feature_ 81 Maintenance CLR Empty Msg Supplies Life TonerLow Alert Serial Number Paper Stacking Clear Setting All Settings Fax Setup Copy Setup Scan Setup System Setup Network Setup Phone Book Sent Report RCV Report ITEMS Network OPTION TCP/IP (IPv4) DHCP BOOTP Static TCP/IP (IPv6) IPv6 Activate DHCPv6 Config Ethernet Speed ...
Quick Guide (easy Manual) (ver.1.0) (English)
Page 84
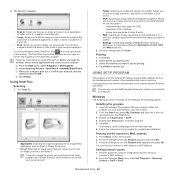
...E-mail, OCR, and Web functions. 2. Double-click Setup.exe to start the job. Click Print to install this program. 5. Print the machine's network configuration report to print. 3. From the Windows Start menu, select All Programs > Samsung Printers > SetIP > SetIP. Follow the steps below...click at the same time. a) From the Start menu, select Programs or All Programs. b) Select Samsung Printers > SmarThru 4 > Uninstall SmarThru 4. Select the machine you to a network. USING SETIP PROGRAM This program is the hardware serial number of Scan To basic functions. Windows The ...
...E-mail, OCR, and Web functions. 2. Double-click Setup.exe to start the job. Click Print to install this program. 5. Print the machine's network configuration report to print. 3. From the Windows Start menu, select All Programs > Samsung Printers > SetIP > SetIP. Follow the steps below...click at the same time. a) From the Start menu, select Programs or All Programs. b) Select Samsung Printers > SmarThru 4 > Uninstall SmarThru 4. Select the machine you to a network. USING SETIP PROGRAM This program is the hardware serial number of Scan To basic functions. Windows The ...
Quick Guide (easy Manual) (ver.1.0) (English)
Page 88
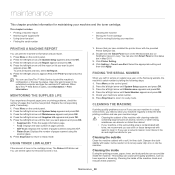
... Press the left/right arrow until Supplies Life appears and press OK. 5. Press the left /right arrow until System Setup appears and press OK. 3. You can discolor or distort the cabinet. • If your machine or the surrounding ... the machine cabinet with water to print appears.press OK. Cleaning the inside the machine. Press Menu on the Samsung website, the machine's serial number by taking the following steps: 1. Press the left /right arrow until Serial ... toner, and dust particles can accumulate inside of toner in the networked computer and type the machine's IP address.
... Press the left/right arrow until Supplies Life appears and press OK. 5. Press the left /right arrow until System Setup appears and press OK. 3. You can discolor or distort the cabinet. • If your machine or the surrounding ... the machine cabinet with water to print appears.press OK. Cleaning the inside the machine. Press Menu on the Samsung website, the machine's serial number by taking the following steps: 1. Press the left /right arrow until Serial ... toner, and dust particles can accumulate inside of toner in the networked computer and type the machine's IP address.

Quick Guide (easy Manual) (ver.1.0) (English)
Page 119
...machine/fax 73, 74 secure receiving 73 fax sending delay sending 71 multi sending 71 redialing the last number 71 sending a fax 70, 72 fax setup 77 faxing address book 75, 74 changing receiving mode 72, 77 delaying a fax transmission 71 forwarding faxes 74 group dial 75 preparing to fax ... 41 LCD display changing the display language 41 LED machine status 28 understanding the status LED 28 Linux common Linux problems 105 driver installation for network connected 39, 32 printer properties 59, 58 scanning 66, 30, 31 unifled driver configurator 85, 37, 85 loading in the document feeder 46 originals...
...machine/fax 73, 74 secure receiving 73 fax sending delay sending 71 multi sending 71 redialing the last number 71 sending a fax 70, 72 fax setup 77 faxing address book 75, 74 changing receiving mode 72, 77 delaying a fax transmission 71 forwarding faxes 74 group dial 75 preparing to fax ... 41 LCD display changing the display language 41 LED machine status 28 understanding the status LED 28 Linux common Linux problems 105 driver installation for network connected 39, 32 printer properties 59, 58 scanning 66, 30, 31 unifled driver configurator 85, 37, 85 loading in the document feeder 46 originals...
Quick Guide (easy Manual) (ver.1.0) (English)
Page 120
... installation Linux 39 Macintosh 38 Windows 37 installing environment 35 IPv6 configuration 39 SetIP program 36, 37, 84 using a wired network 35 network setup 80 N-up copy 61 N-up printing Macintosh 58 Windows 54 O on hook dial hardware 26 original document clearing jam 91 loading in the ...107 replacing toner cartridge 107 SyncThru™ Web Service general information 82 T time setting 41 toner cartridge estimated life 90 handling instructions 90 non-Samsung and refilled 90 redistributing toner 91, 107 storing 89 toner save mode 43 tray adjusting the width and length 46 changing the tray size ...
... installation Linux 39 Macintosh 38 Windows 37 installing environment 35 IPv6 configuration 39 SetIP program 36, 37, 84 using a wired network 35 network setup 80 N-up copy 61 N-up printing Macintosh 58 Windows 54 O on hook dial hardware 26 original document clearing jam 91 loading in the ...107 replacing toner cartridge 107 SyncThru™ Web Service general information 82 T time setting 41 toner cartridge estimated life 90 handling instructions 90 non-Samsung and refilled 90 redistributing toner 91, 107 storing 89 toner save mode 43 tray adjusting the width and length 46 changing the tray size ...


