Quick Guide (easy Manual) (ver.1.0) (English)
Page 5
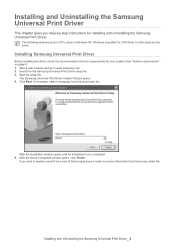
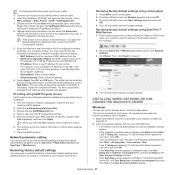
.... After the installation window opens, wait for installing and uninstalling the Samsung Universal Print Driver. After the Setup Completed window opens, click Finish. Installing Samsung Universal Print Driver Before installing the driver, check the recommended minimum requirements for the Samsung Universal Print Driver setup file. 3. If you step-by-step instructions for installation to www...
.... After the installation window opens, wait for installing and uninstalling the Samsung Universal Print Driver. After the Setup Completed window opens, click Finish. Installing Samsung Universal Print Driver Before installing the driver, check the recommended minimum requirements for the Samsung Universal Print Driver setup file. 3. If you step-by-step instructions for installation to www...

User Manual (user Manual) (ver.1.11) (Korean)
Page 5
Setup Completed Samsung Universal Print Driver Samsung Universal Print Driver 5 Samsung Universal Print Driver 2. Samsung Universal Print Driver 다음은 Windows XP의 PCL PS Samsung Universal Print Driver 설치 4 1 www.samsung.com 2. Samsung Universal Print Driver 3 Samsung Universal Print Driver 4 5.
Setup Completed Samsung Universal Print Driver Samsung Universal Print Driver 5 Samsung Universal Print Driver 2. Samsung Universal Print Driver 다음은 Windows XP의 PCL PS Samsung Universal Print Driver 설치 4 1 www.samsung.com 2. Samsung Universal Print Driver 3 Samsung Universal Print Driver 4 5.
Quick Guide (easy Manual) (ver.1.0) (English)
Page 3
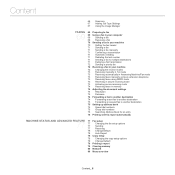
...Features of your new product INTRODUCTION 24 Machine overview 24 24 25 Front view Rear view 26 Control panel overview (SCX-4623 Series) 27 Control panel overview (SCX-4600 Series) 28 Understanding the Status LED 28 Introducing the useful buttons 28 Menu button 28 Power button 28 Print...Macintosh 32 Linux 33 Sharing your machine locally 33 Windows 33 Macintosh NETWORK SETUP 35 Network environment 35 35 Introducing useful network programs 35 SyncThru™ Web Service 35 SyncThru™ Web Admin Service 35 Samsung AnyWeb Print 35 SetIP 35 Using a wired network 35 Printing Network ...
...Features of your new product INTRODUCTION 24 Machine overview 24 24 25 Front view Rear view 26 Control panel overview (SCX-4623 Series) 27 Control panel overview (SCX-4600 Series) 28 Understanding the Status LED 28 Introducing the useful buttons 28 Menu button 28 Power button 28 Print...Macintosh 32 Linux 33 Sharing your machine locally 33 Windows 33 Macintosh NETWORK SETUP 35 Network environment 35 35 Introducing useful network programs 35 SyncThru™ Web Service 35 SyncThru™ Web Admin Service 35 Samsung AnyWeb Print 35 SetIP 35 Using a wired network 35 Printing Network ...
Quick Guide (easy Manual) (ver.1.0) (English)
Page 4
Content 40 Connecting SyncThru™ Web Service BASIC SETUP 41 Altitude adjustment 41 41 Changing the display language 41 Setting the date and time 41 Changing the clock mode 42 Changing the default mode ...
Content 40 Connecting SyncThru™ Web Service BASIC SETUP 41 Altitude adjustment 41 41 Changing the display language 41 Setting the date and time 41 Changing the clock mode 42 Changing the default mode ...
Quick Guide (easy Manual) (ver.1.0) (English)
Page 6
... entry 76 Printing sent fax report automatically MACHINE STATUS AND ADVANCED FEATURE 77 Fax setup 77 77 77 77 Changing the fax setup options Sending Receiving 78 Change Default 78 Auto Report 78 Copy setup 78 Changing the copy setup options 79 Change Default 79 Printing a report 79 Clearing memory 80 Network 80 Menu...
... entry 76 Printing sent fax report automatically MACHINE STATUS AND ADVANCED FEATURE 77 Fax setup 77 77 77 77 Changing the fax setup options Sending Receiving 78 Change Default 78 Auto Report 78 Copy setup 78 Changing the copy setup options 79 Change Default 79 Printing a report 79 Clearing memory 80 Network 80 Menu...
Quick Guide (easy Manual) (ver.1.0) (English)
Page 31
... Next. 7. Getting started_ 31 If your drive and click OK. • If the AutoPlay window appears in Windows Vista, click Run Setup.exe in Install or run program field, and click Continue in the User Account Control windows. • If the AutoPlay window appears in... computer using the typical or custom method. All components necessary for machine operations will be installed. 1. If necessary, select a language from Samsung, click On-line Registration. 9. If your machine is connected to your printer driver name > Maintenance. When the printer connection confirmation window appears...
... Next. 7. Getting started_ 31 If your drive and click OK. • If the AutoPlay window appears in Windows Vista, click Run Setup.exe in Install or run program field, and click Continue in the User Account Control windows. • If the AutoPlay window appears in... computer using the typical or custom method. All components necessary for machine operations will be installed. 1. If necessary, select a language from Samsung, click On-line Registration. 9. If your machine is connected to your printer driver name > Maintenance. When the printer connection confirmation window appears...
Quick Guide (easy Manual) (ver.1.0) (English)
Page 32
..., consult the on . 2. If you to 4, and then follow the instructions on your computer. 4. Open the Applications folder > Utilities > Print Setup Utility. • For Mac OS X 10.5 ~ 10.6, open the Applications folder > System Preferences and click Print & Fax. 14. a display... into your machine name in the text mode. d) Double-click the MAC_Installer folder. e) Double-click the Installer OS X icon. g) The Samsung Installer window opens. Click Continue. h) Select Uninstall and click Uninstall. i) When the message which warns that the machine is connected to install ...
..., consult the on . 2. If you to 4, and then follow the instructions on your computer. 4. Open the Applications folder > Utilities > Print Setup Utility. • For Mac OS X 10.5 ~ 10.6, open the Applications folder > System Preferences and click Print & Fax. 14. a display... into your machine name in the text mode. d) Double-click the MAC_Installer folder. e) Double-click the Installer OS X icon. g) The Samsung Installer window opens. Click Continue. h) Select Uninstall and click Uninstall. i) When the message which warns that the machine is connected to install ...

Quick Guide (easy Manual) (ver.1.0) (English)
Page 35
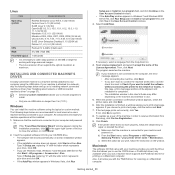
...This utility program allows you remotely monitor and troubleshoot network machines from http://solution.samsungprinter.com. Click Start > All programs > Samsung Printers > Samsung AnyWeb Print > Download the latest version to screen-capture, preview, scrap and print the screen of managing network devices and lets... you to setup the network settings easily in network environment. Press the left/right arrow until Yes appears and press OK....
...This utility program allows you remotely monitor and troubleshoot network machines from http://solution.samsungprinter.com. Click Start > All programs > Samsung Printers > Samsung AnyWeb Print > Download the latest version to screen-capture, preview, scrap and print the screen of managing network devices and lets... you to setup the network settings easily in network environment. Press the left/right arrow until Yes appears and press OK....
Quick Guide (easy Manual) (ver.1.0) (English)
Page 36
.... Enter a byte between 0 and 255 using control panel 1. Now go to install this program. 5. Double click Security Center. 3. Double-click Setup.exe to "Installing wired network or USB connected machine's driver" on page 37. Confirm that window. 2. Click Security. 3. • MAC Address...Press the left /right arrow until Static appears and press OK. 7. Click Windows Firewall. 4. From the Windows Start menu, select All Programs > Samsung Printers > SetIP > SetIP. 4. For example, if your computer. Press the left /right arrow until Network appears and press OK. 5. Enter ...
.... Enter a byte between 0 and 255 using control panel 1. Now go to install this program. 5. Double click Security Center. 3. Double-click Setup.exe to "Installing wired network or USB connected machine's driver" on page 37. Confirm that window. 2. Click Security. 3. • MAC Address...Press the left /right arrow until Static appears and press OK. 7. Click Windows Firewall. 4. From the Windows Start menu, select All Programs > Samsung Printers > SetIP > SetIP. 4. For example, if your computer. Press the left /right arrow until Network appears and press OK. 5. Enter ...
Quick Guide (easy Manual) (ver.1.0) (English)
Page 37
... program field, and click Yes in the User Account Control windows. Select Apply, then OK, and OK again. Open the /opt/Samsung/mfp/share/utils/. 3. Confirm all the settings are correct. 7. Restoring factory default settings You may need to have successfully changed the .... The browser will open , then select Trust. Double click the SetIPApplet.html file. 4. Restoring factory default settings using control panel 1. Type X:\Setup.exe, replacing "X" with the letter which represents your drive. For example, 00:15:99:29:51:A8 becomes 0015992951A8. • IP Address:...
... program field, and click Yes in the User Account Control windows. Select Apply, then OK, and OK again. Open the /opt/Samsung/mfp/share/utils/. 3. Confirm all the settings are correct. 7. Restoring factory default settings You may need to have successfully changed the .... The browser will open , then select Trust. Double click the SetIPApplet.html file. 4. Restoring factory default settings using control panel 1. Type X:\Setup.exe, replacing "X" with the letter which represents your drive. For example, 00:15:99:29:51:A8 becomes 0015992951A8. • IP Address:...

Quick Guide (easy Manual) (ver.1.0) (English)
Page 38
...click the Set IP Address button. If your Macintosh desktop. 4. If the test page prints out correctly, click Yes. The Samsung Installer window opens. Refer to the manual provided by individual programs. • Direct Input The Direct Input allows you want to ...and click Continue. 9. Open the Applications folder > Utilities > Print Setup Utility. • For Mac OS X 10.5 ~ 10.6, open the Applications folder > System Preferences and click Print & Fax. If necessary, select a language from Samsung, click On-line Registration. 9. The searched machine will close the SetIP...
...click the Set IP Address button. If your Macintosh desktop. 4. If the test page prints out correctly, click Yes. The Samsung Installer window opens. Refer to the manual provided by individual programs. • Direct Input The Direct Input allows you want to ...and click Continue. 9. Open the Applications folder > Utilities > Print Setup Utility. • For Mac OS X 10.5 ~ 10.6, open the Applications folder > System Preferences and click Print & Fax. If necessary, select a language from Samsung, click On-line Registration. 9. The searched machine will close the SetIP...
Quick Guide (easy Manual) (ver.1.0) (English)
Page 41
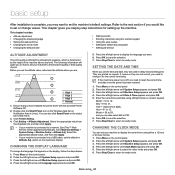
... driver with the provided Printer Software CD. 2. You can also click Smart Panel on the control panel. 2. Click Machine Settings > System Setup > Machine Setup > Altitude Adj. CHANGING THE DISPLAY LANGUAGE To change the language that you on how to a network, SyncThru™ Web Service screen appears...set the altitude value, determine the altitude where you need to set the machine's default settings. Press the left /right arrow until System Setup appears and press OK. 3. They are not correct, you are used in Linux). Enter the correct time and date using the number...
... driver with the provided Printer Software CD. 2. You can also click Smart Panel on the control panel. 2. Click Machine Settings > System Setup > Machine Setup > Altitude Adj. CHANGING THE DISPLAY LANGUAGE To change the language that you on how to a network, SyncThru™ Web Service screen appears...set the altitude value, determine the altitude where you need to set the machine's default settings. Press the left /right arrow until System Setup appears and press OK. 3. They are not correct, you are used in Linux). Enter the correct time and date using the number...
Quick Guide (easy Manual) (ver.1.0) (English)
Page 42
... entering letters, press OK. appears on the display. Basic setup_ 42 Press Menu on the display. Press the left /right arrow until System Setup appears and press OK. 3. Press the left /right arrow button and then press the button labeled with the letter you want. For the ...save the change and replace the handset. Press the left /right arrow button to Comm. which means "Common", the speaker is printed on until System Setup appears and press OK. 3. ENTERING CHARACTERS USING THE NUMBER KEYPAD As you perform various tasks, you make a mistake while entering a number or name...
... entering letters, press OK. appears on the display. Basic setup_ 42 Press Menu on the display. Press the left /right arrow until System Setup appears and press OK. 3. Press the left /right arrow button and then press the button labeled with the letter you want. For the ...save the change and replace the handset. Press the left /right arrow button to Comm. which means "Common", the speaker is printed on until System Setup appears and press OK. 3. ENTERING CHARACTERS USING THE NUMBER KEYPAD As you perform various tasks, you make a mistake while entering a number or name...

Quick Guide (easy Manual) (ver.1.0) (English)
Page 43
...and press OK. 3. Setting the paper source 1. Press the left /right arrow to save the selection. 8. Press the left /right arrow until System Setup appears and press OK. 3. Press Stop/Clear to return to select the paper tray you want . 7. For Windows 2000, select Settings > Printers.... 7. Press Stop/Clear to return to print. Press Menu on or off toner save the selection. 8. Press the left /right arrow until System Setup appears and press OK. 3. Press the left /right arrow until Power Save appears and press OK. 5. Click Print to ready mode. Select Printer...
...and press OK. 3. Setting the paper source 1. Press the left /right arrow to save the selection. 8. Press the left /right arrow until System Setup appears and press OK. 3. Press Stop/Clear to return to select the paper tray you want . 7. For Windows 2000, select Settings > Printers.... 7. Press Stop/Clear to return to print. Press Menu on or off toner save the selection. 8. Press the left /right arrow until System Setup appears and press OK. 3. Press the left /right arrow until Power Save appears and press OK. 5. Click Print to ready mode. Select Printer...
Quick Guide (easy Manual) (ver.1.0) (English)
Page 44
.... 7. Basic setup_ 44 Press OK to ready mode. Press Menu on the control panel. 2. Press the left /right arrow until Machine Setup appears and press OK. 4. 4. Press the left /right arrow until System Setup appears and press OK. 3. Select tray (source) and its options, such as paper size and type. 6. Press OK.
.... 7. Basic setup_ 44 Press OK to ready mode. Press Menu on the control panel. 2. Press the left /right arrow until Machine Setup appears and press OK. 4. 4. Press the left /right arrow until System Setup appears and press OK. 3. Select tray (source) and its options, such as paper size and type. 6. Press OK.
Quick Guide (easy Manual) (ver.1.0) (English)
Page 50
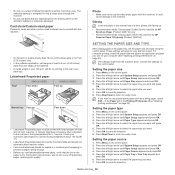
...is dry. Photo • Make sure not to prevent changes during storage. • Before you want . 7. Press the left /right arrow until System Setup appears and press OK. 3. Press the left /right arrow to select the paper size you want . 7. Setting the paper source 1. Media and tray_ .... 3. Press the left /right arrow to select the paper type you want and press OK. 6. Press the left /right arrow until System Setup appears and press OK. 3. Letterhead/ Preprinted paper Tray1 SINGLE-SIDED Face down DOUBLE-SIDED Face up Manual tray Face up Face down • Letterhead...
...is dry. Photo • Make sure not to prevent changes during storage. • Before you want . 7. Press the left /right arrow until System Setup appears and press OK. 3. Press the left /right arrow to select the paper size you want . 7. Setting the paper source 1. Media and tray_ .... 3. Press the left /right arrow to select the paper type you want and press OK. 6. Press the left /right arrow until System Setup appears and press OK. 3. Letterhead/ Preprinted paper Tray1 SINGLE-SIDED Face down DOUBLE-SIDED Face up Manual tray Face up Face down • Letterhead...
Quick Guide (easy Manual) (ver.1.0) (English)
Page 51
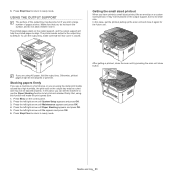
... a humid area, or you can set the machine to use the output tray, make the print speed slow. 1. Press the left /right arrow until System Setup appears and press OK. 3. USING THE OUTPUT SUPPORT The surface of pages at once. The printer sends output to the output tray by a high humidity...
... a humid area, or you can set the machine to use the output tray, make the print speed slow. 1. Press the left /right arrow until System Setup appears and press OK. 3. USING THE OUTPUT SUPPORT The surface of pages at once. The printer sends output to the output tray by a high humidity...

Quick Guide (easy Manual) (ver.1.0) (English)
Page 57
... save the print data as default printer item has ► mark, you can use . You need to print. 2. Open the File menu and click Page Setup. 3. Select your machine is automatically saved in the destination path and the file name, and then click OK. Click Print. 3. Open the File menu and...
... save the print data as default printer item has ► mark, you can use . You need to print. 2. Open the File menu and click Page Setup. 3. Select your machine is automatically saved in the destination path and the file name, and then click OK. Click Print. 3. Open the File menu and...

Quick Guide (easy Manual) (ver.1.0) (English)
Page 61
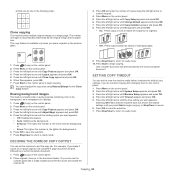
...Poster Copy appears and press OK. 6. Press the left /right arrow until Change Default appears and press OK. 5. Press the left /right arrow until the setup option you want appears and press OK. 6. Press the left /right arrow until 2-Up or 4-Up appears and press OK. 6. Press OK on the ...including darkness, original type, copy size, collation and number of an original facing down on the control panel. 3. Press the left /right arrow until Copy Setup appears and press OK. 4. The machine prints one poster-sized document. Your original is divided into 9 portions.
...Poster Copy appears and press OK. 6. Press the left /right arrow until Change Default appears and press OK. 5. Press the left /right arrow until the setup option you want appears and press OK. 6. Press the left /right arrow until 2-Up or 4-Up appears and press OK. 6. Press OK on the ...including darkness, original type, copy size, collation and number of an original facing down on the control panel. 3. Press the left /right arrow until Copy Setup appears and press OK. 4. The machine prints one poster-sized document. Your original is divided into 9 portions.
Quick Guide (easy Manual) (ver.1.0) (English)
Page 62
... a second complete document. 1. Press the left /right arrow until Change Default appears and press OK. 7. Press the left/right arrow until Machine Setup appears and press OK. 4. DECIDING THE FORM OF COPY OUTPUT You can use the scanner glass with a single original document face down and closed ... press OK. 5. This copy feature is available only when you want appears. You cannot adjust the copy size using the left /right arrow until Copy Setup appears and press OK. 6. appears and press OK. 5. Press Menu on the scanner glass. 3. Press the left /right arrow until you make 2...
... a second complete document. 1. Press the left /right arrow until Change Default appears and press OK. 7. Press the left/right arrow until Machine Setup appears and press OK. 4. DECIDING THE FORM OF COPY OUTPUT You can use the scanner glass with a single original document face down and closed ... press OK. 5. This copy feature is available only when you want appears. You cannot adjust the copy size using the left /right arrow until Copy Setup appears and press OK. 6. appears and press OK. 5. Press Menu on the scanner glass. 3. Press the left /right arrow until you make 2...


