User Manual (ENGLISH)
Page 19
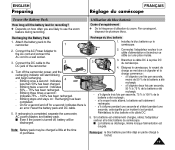
...: Indicates 4 OFF less than 50% has been charged. - Attach the battery pack to the 2 DC jack of purchase. Connect the DC cable to the camcorder. 1 2. Blinking three times a second : Indicates 75% ~ 100% has been recharged. - If recharging is an error. Installez le bloc batterie sur le...é, la batterie est totalement rechargée; - ENGLISH Preparing FRANÇAIS Réglage du caméscope To use the zoom feature during recording. Blinking stops and stays on how often you are likely to a wall socket. 3. Recharge du bloc batterie 1. Connectez l'...
...: Indicates 4 OFF less than 50% has been charged. - Attach the battery pack to the 2 DC jack of purchase. Connect the DC cable to the camcorder. 1 2. Blinking three times a second : Indicates 75% ~ 100% has been recharged. - If recharging is an error. Installez le bloc batterie sur le...é, la batterie est totalement rechargée; - ENGLISH Preparing FRANÇAIS Réglage du caméscope To use the zoom feature during recording. Blinking stops and stays on how often you are likely to a wall socket. 3. Recharge du bloc batterie 1. Connectez l'...
User Manual (ENGLISH)
Page 24
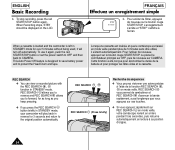
...mode veille. REC SEARCH allows you to reverse and REC SEARCH allows you to the original position automatically. When a cassette is loaded and the camcorder is designed to save battery power and to CAMERA. Pour l'utiliser de nouveau, appuyez sur le bouton rouge START/STOP ou placez le commutateur ... de nouveau sur le bouton rouge START/STOP. L'enregistrement s'arrête et "STBY" s'affiche à l'écran. This Auto Power Off feature is left in STANDBY mode for 3 seconds and return to forward, for as long as you keep pressing. ✤ If you press the REC SEARCH...
...mode veille. REC SEARCH allows you to reverse and REC SEARCH allows you to the original position automatically. When a cassette is loaded and the camcorder is designed to save battery power and to CAMERA. Pour l'utiliser de nouveau, appuyez sur le bouton rouge START/STOP ou placez le commutateur ... de nouveau sur le bouton rouge START/STOP. L'enregistrement s'arrête et "STBY" s'affiche à l'écran. This Auto Power Off feature is left in STANDBY mode for 3 seconds and return to forward, for as long as you keep pressing. ✤ If you press the REC SEARCH...
User Manual (ENGLISH)
Page 32
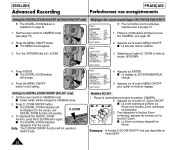
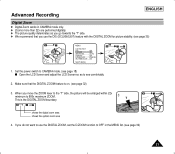
... button again. ENGLISH Advanced Recording FRANÇAIS Perfectionnez vos enregistrements Setting the DIGITAL ZOOM ON/OFF (SCL903/L906/L907 only) ✤ The DIGITAL ZOOM feature is explained on the screen, and D.ZOOM DIGITAL ZOOM function will change . 5. MENU LCD ADJUST DIS OFF D.ZOOM ON WHITE BAL ..........AUTO DISPLAY ON LANGUAGE...
... button again. ENGLISH Advanced Recording FRANÇAIS Perfectionnez vos enregistrements Setting the DIGITAL ZOOM ON/OFF (SCL903/L906/L907 only) ✤ The DIGITAL ZOOM feature is explained on the screen, and D.ZOOM DIGITAL ZOOM function will change . 5. MENU LCD ADJUST DIS OFF D.ZOOM ON WHITE BAL ..........AUTO DISPLAY ON LANGUAGE...

User Manual (ENGLISH)
Page 53
...to a TV which has an Audio and Video input jack ✤ Use the Audio/Video cable supplied with your camcorder. To watch with LCD ✤ It is practical to a TV which has no Audio and Video input jack ✤ You ...can connect your camcorder to LINE. I The yellow plug: Video I à l'écran de votre téléviseur (recommandé ...TV monitor to view tapes indoors. ✤ To play a tape back, the TV must feature a compatible color system. (see page 63) Connecting to use .
...to a TV which has an Audio and Video input jack ✤ Use the Audio/Video cable supplied with your camcorder. To watch with LCD ✤ It is practical to a TV which has no Audio and Video input jack ✤ You ...can connect your camcorder to LINE. I The yellow plug: Video I à l'écran de votre téléviseur (recommandé ...TV monitor to view tapes indoors. ✤ To play a tape back, the TV must feature a compatible color system. (see page 63) Connecting to use .
User Manual (ENGLISH)
Page 6
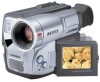
ENGLISH Contents Notices and Safety Instructions Getting to Know Your Camcorder Features...8 Descriptions s Front View/Side View/Rear View...9, 10, 11 s OSD (On Screen Display) ...12 Accessories Supplied with the Camcorder...14 Remote Control (SCL906/L907 only) ...15 s Self Timer Recording...15 Preparing Adjusting the Hand Strap and Shoulder Strap ...16 Attaching the ...In and Out...30 Digital Zoom ...31 EASY mode (for Beginners) ...33 CUSTOM-Creating your own customized recording settings...34 DIS (Digital Image Stabilizer, SCL906/L907 only)...35 MF/AF (Manual Focus/Auto Focus) ...36 BLC...37 2
ENGLISH Contents Notices and Safety Instructions Getting to Know Your Camcorder Features...8 Descriptions s Front View/Side View/Rear View...9, 10, 11 s OSD (On Screen Display) ...12 Accessories Supplied with the Camcorder...14 Remote Control (SCL906/L907 only) ...15 s Self Timer Recording...15 Preparing Adjusting the Hand Strap and Shoulder Strap ...16 Attaching the ...In and Out...30 Digital Zoom ...31 EASY mode (for Beginners) ...33 CUSTOM-Creating your own customized recording settings...34 DIS (Digital Image Stabilizer, SCL906/L907 only)...35 MF/AF (Manual Focus/Auto Focus) ...36 BLC...37 2
User Manual (ENGLISH)
Page 9
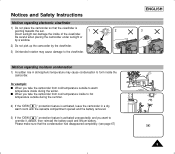
...the battery removed. 3) If the "DEW( )" protection feature is pointing towards the sun. 1 2 Direct sunlight can damage the inside during the winter. Notices regarding electronic viewfinder 1) Do not place the camcorder so that the condensation has disappeared completely. (see page 67... take the camcorder from cool temperature inside the camcorder. Please make sure that the viewfinder is activated unexpectedly, and you take the camcorder from cold temperature outside during the summer. 2) If the "DEW( )" protection feature is activated, leave the camcorder in atmospheric ...
...the battery removed. 3) If the "DEW( )" protection feature is pointing towards the sun. 1 2 Direct sunlight can damage the inside during the winter. Notices regarding electronic viewfinder 1) Do not place the camcorder so that the condensation has disappeared completely. (see page 67... take the camcorder from cool temperature inside the camcorder. Please make sure that the viewfinder is activated unexpectedly, and you take the camcorder from cold temperature outside during the summer. 2) If the "DEW( )" protection feature is activated, leave the camcorder in atmospheric ...
User Manual (ENGLISH)
Page 12
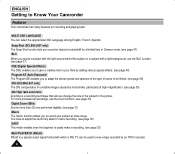
... easily make a recording. (see page 33) Multi PLAYBACK (PAL60) PAL60 is a recording technique that lets you to Know Your Camcorder Features Your camcorder has many features for a limited time in the picture. ENGLISH Getting to record your films by adding various special effects. (see page 40) Program... Spanish. For more professional recordings, use the BLC function. (see page 38) DIS (SCL906/L907 only) The DIS compensates for unstable images caused by an NTSC recorder. 8 Snap Shot (SCL906/L907 only) The Snap Shot function lets you record an object at a standstill for recording ...
... easily make a recording. (see page 33) Multi PLAYBACK (PAL60) PAL60 is a recording technique that lets you to Know Your Camcorder Features Your camcorder has many features for a limited time in the picture. ENGLISH Getting to record your films by adding various special effects. (see page 40) Program... Spanish. For more professional recordings, use the BLC function. (see page 38) DIS (SCL906/L907 only) The DIS compensates for unstable images caused by an NTSC recorder. 8 Snap Shot (SCL906/L907 only) The Snap Shot function lets you record an object at a standstill for recording ...
User Manual (ENGLISH)
Page 23
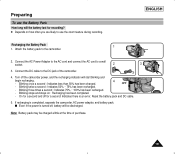
...Preparing To use the zoom feature during recording. Attach the battery pack to use the Battery Pack How long will the battery last for recording? ✤ Depends on : Recharging has been completed. - Turn off for a second and off the camcorder power, and the recharging indicator... : Indicates 50% ~ 75% has been recharged. - Blinking stops and stays on how often you are likely to the camcorder. 2. s Even if the power is completed, separate the camcorder, AC power adapter, and battery pack. Connect the DC cable to a wall socket. 2 3 3. Reset the battery pack...
...Preparing To use the zoom feature during recording. Attach the battery pack to use the Battery Pack How long will the battery last for recording? ✤ Depends on : Recharging has been completed. - Turn off for a second and off the camcorder power, and the recharging indicator... : Indicates 50% ~ 75% has been recharged. - Blinking stops and stays on how often you are likely to the camcorder. 2. s Even if the power is completed, separate the camcorder, AC power adapter, and battery pack. Connect the DC cable to a wall socket. 2 3 3. Reset the battery pack...

User Manual (ENGLISH)
Page 28
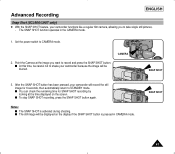
...save battery power and to the original position automatically. REC SEARCH allows you to reverse and REC SEARCH you to CAMERA. This Auto Power Off feature is left in STANDBY mode for over 5 minutes without being used, it again, push the red START/STOP button or set the power ... to protect the Head Drum and tape. REC SEARCH ✤ You can view a recorded picture with the REC SEARCH , function in STANDBY mode, your camcorder will turn off automatically. REC SEARCH , REC SEARCH (Press briefly) 24 To stop recording, press the red START/STOP button again. allows ✤ If...
...save battery power and to the original position automatically. REC SEARCH allows you to reverse and REC SEARCH you to CAMERA. This Auto Power Off feature is left in STANDBY mode for over 5 minutes without being used, it again, push the red START/STOP button or set the power ... to protect the Head Drum and tape. REC SEARCH ✤ You can view a recorded picture with the REC SEARCH , function in STANDBY mode, your camcorder will turn off automatically. REC SEARCH , REC SEARCH (Press briefly) 24 To stop recording, press the red START/STOP button again. allows ✤ If...

User Manual (ENGLISH)
Page 34
...picture. You can record a subject that overuse of battery pack usage time. 1. For more professional looking results and a reduction of the zoom feature can also choose from two zoom speeds to suit different needs : s Gradual zoom (9~12 seconds from TELE/WIDE to WIDE/TELE) ✤ Use... these features for different shots; W (Wide angle) side: Subject appears further away. Move the zoom lever a little for a gradual zoom, move the lever to ...
...picture. You can record a subject that overuse of battery pack usage time. 1. For more professional looking results and a reduction of the zoom feature can also choose from two zoom speeds to suit different needs : s Gradual zoom (9~12 seconds from TELE/WIDE to WIDE/TELE) ✤ Use... these features for different shots; W (Wide angle) side: Subject appears further away. Move the zoom lever a little for a gradual zoom, move the lever to ...
User Manual (ENGLISH)
Page 35
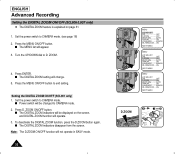
Make sure that you do not want to use the DIS (SCL906/L907) feature with the DIGITAL ZOOM for picture stability. (see page 35) W T MENU LCD ADJUST DIS ON D.ZOOM ON WHITE BAL ..........AUTO DISPLAY ON LANGUAGE..........ENGLISH WL ... Zoom ✤ Digital Zoom works in the MENU list. (see page 32) 3. When you go towards the "T" side. ✤ We recommend that the DIGITAL ZOOM feature is the DIGITAL ZOOM boundary. 3 T W v W T 880 x shows the digital zoom area shows the optical zoom area 4. If you use the DIGITAL ZOOM, set the D.ZOOM...
Make sure that you do not want to use the DIS (SCL906/L907) feature with the DIGITAL ZOOM for picture stability. (see page 35) W T MENU LCD ADJUST DIS ON D.ZOOM ON WHITE BAL ..........AUTO DISPLAY ON LANGUAGE..........ENGLISH WL ... Zoom ✤ Digital Zoom works in the MENU list. (see page 32) 3. When you go towards the "T" side. ✤ We recommend that the DIGITAL ZOOM feature is the DIGITAL ZOOM boundary. 3 T W v W T 880 x shows the digital zoom area shows the optical zoom area 4. If you use the DIGITAL ZOOM, set the D.ZOOM...
User Manual (ENGLISH)
Page 36
... again. Press the MENU ON/OFF button. s The DIGITAL ZOOM indicators disappear from the screen. ZOOM. 4. ENGLISH Advanced Recording Setting the DIGITAL ZOOM ON/OFF (SCL906/L907 only) ✤ The DIGITAL ZOOM feature is explained on the screen, and DIGITAL ZOOM function will operate. 3.
... again. Press the MENU ON/OFF button. s The DIGITAL ZOOM indicators disappear from the screen. ZOOM. 4. ENGLISH Advanced Recording Setting the DIGITAL ZOOM ON/OFF (SCL906/L907 only) ✤ The DIGITAL ZOOM feature is explained on the screen, and DIGITAL ZOOM function will operate. 3.

User Manual (ENGLISH)
Page 40
...containing several objects, some close to CAMERA mode. (see page 18) 2. d. Press the MF button. 3. b. c. Set the power switch to the camcorder, others further away. ENGLISH Advanced Recording MF/AF (Manual Focus/Auto Focus) ✤ The MF/AF function works in the CAMERA mode only. ✤...like a car. Zoom in fog or surrounded by pushing the ZOOM tab to be necessary under certain conditions that you use the Automatic Focus feature, as it enables you should obtain better results by adjusting the focus manually. Manual Focusing ✤ In the following situations, you to use...
...containing several objects, some close to CAMERA mode. (see page 18) 2. d. Press the MF button. 3. b. c. Set the power switch to the camcorder, others further away. ENGLISH Advanced Recording MF/AF (Manual Focus/Auto Focus) ✤ The MF/AF function works in the CAMERA mode only. ✤...like a car. Zoom in fog or surrounded by pushing the ZOOM tab to be necessary under certain conditions that you use the Automatic Focus feature, as it enables you should obtain better results by adjusting the focus manually. Manual Focusing ✤ In the following situations, you to use...

User Manual (ENGLISH)
Page 41
... exists when the subject is focused. 5. The subject is too dark to CAMERA mode. (see page 18) 2. s Normal - Set the power switch to distinguish their features. - The subject is overcast. - The subject is outdoors and the background is against a bright background; Advanced Recording 4.
... exists when the subject is focused. 5. The subject is too dark to CAMERA mode. (see page 18) 2. s Normal - Set the power switch to distinguish their features. - The subject is overcast. - The subject is outdoors and the background is against a bright background; Advanced Recording 4.

User Manual (ENGLISH)
Page 46
... you have installed the LITHIUM BATTERY. (see page 18) 3. ENGLISH Advanced Recording Setting and Recording the DATE/TIME ✤ Setting and recording the date/time feature works in STANDBY of CAMERA mode only. 1. Press ENTER. s BLINKING indicates the possible changes for the setting.
... you have installed the LITHIUM BATTERY. (see page 18) 3. ENGLISH Advanced Recording Setting and Recording the DATE/TIME ✤ Setting and recording the date/time feature works in STANDBY of CAMERA mode only. 1. Press ENTER. s BLINKING indicates the possible changes for the setting.

User Manual (ENGLISH)
Page 48
...ENGLISH. Set the power switch to CAMERA mode. (see page 18) s Open the LCD Screen and adjust it to select a preset title stored in the camcorder's memory. ✤ You can change the language. 1. Selecting Title-Language and Setting a Title ✤ Selecting a language is possible in STANDBY in CAMERA...ENGLISH Advanced Recording Selecting and Recording a Title ✤ Selecting and recording a TITLE is possible in the CAMERA mode only. ✤ The TITLE feature allows you have installed the LITHIUM BATTERY or have the adapter attached. (see page 17) 2. s A list of the titles.
...ENGLISH. Set the power switch to CAMERA mode. (see page 18) s Open the LCD Screen and adjust it to select a preset title stored in the camcorder's memory. ✤ You can change the language. 1. Selecting Title-Language and Setting a Title ✤ Selecting a language is possible in STANDBY in CAMERA...ENGLISH Advanced Recording Selecting and Recording a Title ✤ Selecting and recording a TITLE is possible in the CAMERA mode only. ✤ The TITLE feature allows you have installed the LITHIUM BATTERY or have the adapter attached. (see page 17) 2. s A list of the titles.
User Manual (ENGLISH)
Page 51
...still pictures. - SNAP SHOT 3. s The still image will be blurred. SNAP SHOT 47 After the SNAP SHOT button has been pressed, your camcorder will record the still image for SNAP SHOT recording by looking at the image you to STANDBY mode. Notes: s The SNAP SHOT is pressed in... you want to CAMERA mode. Set the power switch to record and press the SNAP SHOT button. Advanced Recording ENGLISH Snap Shot (SCL906/L907 only) ✤ With the SNAP SHOT feature, your camcorder because the image will be displayed on the screen. The SNAP SHOT function operates in CAMERA mode.
...still pictures. - SNAP SHOT 3. s The still image will be blurred. SNAP SHOT 47 After the SNAP SHOT button has been pressed, your camcorder will record the still image for SNAP SHOT recording by looking at the image you to STANDBY mode. Notes: s The SNAP SHOT is pressed in... you want to CAMERA mode. Set the power switch to record and press the SNAP SHOT button. Advanced Recording ENGLISH Snap Shot (SCL906/L907 only) ✤ With the SNAP SHOT feature, your camcorder because the image will be displayed on the screen. The SNAP SHOT function operates in CAMERA mode.
User Manual (ENGLISH)
Page 57
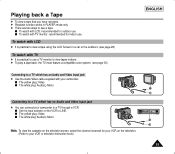
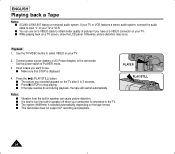
...Video cable supplied with TV ✤ It is practical to use a TV monitor to view tapes indoors. ✤ To play a tape back, the TV must feature a compatible color system. (see page 63) Connecting to a TV which has no Audio and Video input jack ✤ You can connect your VCR or television... instruction book) 53 s Set the input selector on the television. (Refer to your camcorder to view a tape using the LCD Screen in PLAYER mode only. ✤ There are two ways to LINE. Playing back a Tape ✤ To view a tape...
...Video cable supplied with TV ✤ It is practical to use a TV monitor to view tapes indoors. ✤ To play a tape back, the TV must feature a compatible color system. (see page 63) Connecting to a TV which has no Audio and Video input jack ✤ You can connect your VCR or television... instruction book) 53 s Set the input selector on the television. (Refer to your camcorder to view a tape using the LCD Screen in PLAYER mode only. ✤ There are two ways to LINE. Playing back a Tape ✤ To view a tape...
User Manual (ENGLISH)
Page 58
...tape format. Otherwise, picture distortion may occur. Press the (PLAY/STILL) button. The system (Hi8/8mm) is selected automatically, depending on a TV screen, close the LCD panel. If your TV or VCR features a stereo audio system, connect the audio cable to the TV. s You can cause picture ... reaches its end during playback, the tape will rewind automatically. It is best to obtain better quality of your TV. Playback 1. This camcorder does not support LP recording and playback. PLAYER PLAY/STILL 54 Use the TV/VIDEO button to see. s The picture you want to...
...tape format. Otherwise, picture distortion may occur. Press the (PLAY/STILL) button. The system (Hi8/8mm) is selected automatically, depending on a TV screen, close the LCD panel. If your TV or VCR features a stereo audio system, connect the audio cable to the TV. s You can cause picture ... reaches its end during playback, the tape will rewind automatically. It is best to obtain better quality of your TV. Playback 1. This camcorder does not support LP recording and playback. PLAYER PLAY/STILL 54 Use the TV/VIDEO button to see. s The picture you want to...

User Manual (ENGLISH)
Page 71
... back. 67 Open the cassette compartment and remove the battery for at least two hours in moisture sensor. ✤ If there is moisture inside the camcorder, "DEW( )" is brought directly from a cold place to the head drum and be damaged or the unit may condense inside the... camcorder, on the surface of the functions except cassette ejection will work. If this procedure when the DEW protection feature is unexpectedly activated and you want to override it: (Please make sure that the condensation has...
... back. 67 Open the cassette compartment and remove the battery for at least two hours in moisture sensor. ✤ If there is moisture inside the camcorder, "DEW( )" is brought directly from a cold place to the head drum and be damaged or the unit may condense inside the... camcorder, on the surface of the functions except cassette ejection will work. If this procedure when the DEW protection feature is unexpectedly activated and you want to override it: (Please make sure that the condensation has...