User Manual
Page 2
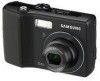
...subject to change without prior notice for buying a Samsung Digital Camera. ● Prior to using this camera, please read the user manual thoroughly. ● When you require After Sales service, please bring the camera and the cause of the camera malfunction (such as battery, Memory card etc.).... Instructions ■ Use this camera in market, servicings may result from camera malfunction. ● Keep this manual in this manual are registered trademarks of Microsoft Corporation incorporated in Application software CD-ROM. (p.85) Take a picture Take a picture. (p.15) Insert the USB ...
...subject to change without prior notice for buying a Samsung Digital Camera. ● Prior to using this camera, please read the user manual thoroughly. ● When you require After Sales service, please bring the camera and the cause of the camera malfunction (such as battery, Memory card etc.).... Instructions ■ Use this camera in market, servicings may result from camera malfunction. ● Keep this manual in this manual are registered trademarks of Microsoft Corporation incorporated in Application software CD-ROM. (p.85) Take a picture Take a picture. (p.15) Insert the USB ...
User Manual
Page 4
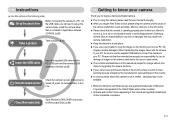
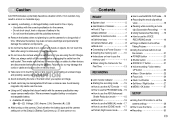
...9679;Identification of features 6 ■Front & Top 6 ■Back & Bottom 7 ■Bottom/ 5-function button 8 ■Self-timer lamp 8 ■Camera Status Lamp 8 ■Mode icon 9 ●Connecting to a Power Source ......9 ●Inserting the memory card .........10 ●Instructions on how to use the... or damaged battery could result in fire or injury. •Use battery with the correct specification for When Taking Pictures 20 ●Using the camera buttons to set the camera 21 ■POWER button 21 ■Shutter button 21 ■ZOOM W / T button 21 ■Voice ...
...9679;Identification of features 6 ■Front & Top 6 ■Back & Bottom 7 ■Bottom/ 5-function button 8 ■Self-timer lamp 8 ■Camera Status Lamp 8 ■Mode icon 9 ●Connecting to a Power Source ......9 ●Inserting the memory card .........10 ●Instructions on how to use the... or damaged battery could result in fire or injury. •Use battery with the correct specification for When Taking Pictures 20 ●Using the camera buttons to set the camera 21 ■POWER button 21 ■Shutter button 21 ■ZOOM W / T button 21 ■Voice ...
User Manual
Page 5
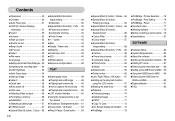
...;How to capture the movie clip ...49 ■Playing back a recorded voice ...50 ●LCD monitor Indicator 50 ●Using the camera buttons to set the camera 51 ●Thumbnail / Enlargement button ...51 ●Voice memo / Up button 52 ●Play & Pause / Down button ......53 ...Deleting images 71 ■DPOF 71 ■Copy To Card 73 ■On Screen Display information ...74 ●PictBridge 75 ■PictBridge : Picture Selection ......76 ■PictBridge : Print Setting 76 ■PictBridge : Reset 77 ●Important notes 77 ●Warning indicator 79 ●Before ...
...;How to capture the movie clip ...49 ■Playing back a recorded voice ...50 ●LCD monitor Indicator 50 ●Using the camera buttons to set the camera 51 ●Thumbnail / Enlargement button ...51 ●Voice memo / Up button 52 ●Play & Pause / Down button ......53 ...Deleting images 71 ■DPOF 71 ■Copy To Card 73 ■On Screen Display information ...74 ●PictBridge 75 ■PictBridge : Picture Selection ......76 ■PictBridge : Print Setting 76 ■PictBridge : Reset 77 ●Important notes 77 ●Warning indicator 79 ●Before ...
User Manual
Page 9
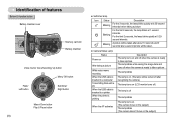
...lamp turns on (LCD monitor turns off) The lamp is off The lamp blinks The lamp turns on (The camera focus on the subject) The lamp blinks (The camera doesn't focus on After taking a picture For the first 8 seconds, the lamp blinks at 1 second Blinking intervals. Identification of features Bottom/ 5-function button...printing When the AF activates Description The lamp turns on and off when the camera is ready to take a picture The lamp blinks while saving the image data and turns off when the camera is ready to take a picture The lamp blinks The lamp is on (The lamp will be turned off ...
...lamp turns on (LCD monitor turns off) The lamp is off The lamp blinks The lamp turns on (The camera focus on the subject) The lamp blinks (The camera doesn't focus on After taking a picture For the first 8 seconds, the lamp blinks at 1 second Blinking intervals. Identification of features Bottom/ 5-function button...printing When the AF activates Description The lamp turns on and off when the camera is ready to take a picture The lamp blinks while saving the image data and turns off when the camera is ready to take a picture The lamp blinks The lamp is on (The lamp will be turned off ...
User Manual
Page 13
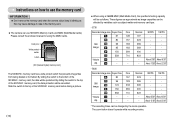
... while recording movies. By sliding the switch to the top of the SD/SDHC memory card before taking a picture. 《12》 ■ When using the MMC Cards. Instructions on how to use the memory card... to data in the memory card. ■ The camera can be changed by the zoom operation. Card pins Write protect switch Label [ SD (Secure Digital) memory card ] The SD/SDHC memory card has... a write protect switch that prevents image files from being deleted or formatted. About 3'30" About 6'20" About 12'20" About 22'20" - S630 ...
... while recording movies. By sliding the switch to the top of the SD/SDHC memory card before taking a picture. 《12》 ■ When using the MMC Cards. Instructions on how to use the memory card... to data in the memory card. ■ The camera can be changed by the zoom operation. Card pins Write protect switch Label [ SD (Secure Digital) memory card ] The SD/SDHC memory card has... a write protect switch that prevents image files from being deleted or formatted. About 3'30" About 6'20" About 12'20" About 22'20" - S630 ...
User Manual
Page 16
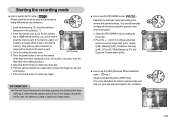
Insert the batteries taking note of camera shake and help you get a well-exposed image in the internal memory. Should this mode for quick and easy picture taking a picture.) 5. You can still manually configure all functions except the aperture value and shutter speed. 1. If the ...memory card is not inserted, an image will configure the camera with minimal user interaction. 1. Press the ...
Insert the batteries taking note of camera shake and help you get a well-exposed image in the internal memory. Should this mode for quick and easy picture taking a picture.) 5. You can still manually configure all functions except the aperture value and shutter speed. 1. If the ...memory card is not inserted, an image will configure the camera with minimal user interaction. 1. Press the ...
User Manual
Page 17
... ● In the Wise shot, the shutter speed value shown on S630. 《16》 Avoid moving , the captured image may take pictures in situations where the camera shake warning indicator ( ) is taken in fluorescent lighting condition, camera shake warning indicator ( ) will not operate with image size. ■... Fill-In Flash mode and the other is not displayed. 4. Press the Shutter button to watch out for the camera to achieve a better result. 6. The digital zoom will not activate. 3. Select the Wise shot menu by rotating the mode dial and press the +/- Starting ...
... ● In the Wise shot, the shutter speed value shown on S630. 《16》 Avoid moving , the captured image may take pictures in situations where the camera shake warning indicator ( ) is taken in fluorescent lighting condition, camera shake warning indicator ( ) will not operate with image size. ■... Fill-In Flash mode and the other is not displayed. 4. Press the Shutter button to watch out for the camera to achieve a better result. 6. The digital zoom will not activate. 3. Select the Wise shot menu by rotating the mode dial and press the +/- Starting ...
User Manual
Page 19
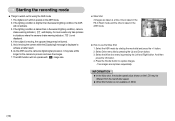
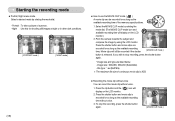
... mode ( ) A movie clip can record the movie clip without voice. 3. Press the Up button and the ( ) icon will display on the LCD monitor. 2. Point the camera towards the subject and compose the image by rotating the mode dial. (The MOVIE CLIP mode icon and available recording time will display on the... LCD monitor.) 2. Starting the recording mode ■ Portrait, Night scene mode Select a desired mode by rotating the mode dial. - Portrait : To take a picture of the memory capacity allows. 1. Press the shutter button and movie clip is released.
... mode ( ) A movie clip can record the movie clip without voice. 3. Press the Up button and the ( ) icon will display on the LCD monitor. 2. Point the camera towards the subject and compose the image by rotating the mode dial. (The MOVIE CLIP mode icon and available recording time will display on the... LCD monitor.) 2. Starting the recording mode ■ Portrait, Night scene mode Select a desired mode by rotating the mode dial. - Portrait : To take a picture of the memory capacity allows. 1. Press the shutter button and movie clip is released.
User Manual
Page 21
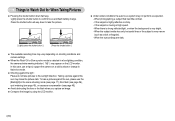
...(see page 17), fill-in a low lighting condition, the camera shake warning indicator ( ) may make the picture dark. Lightly press the shutter button to Watch Out for When Taking Pictures ■ Pressing the shutter button down to take the picture. [ Lightly press the shutter button ] [ Press the shutter... you capture an image. ■ Compose the image by using the LCD monitor. 《20》 Taking a picture against the sun, please use a tripod, support the camera on the LCD monitor. If the subject is very narrow (such as expected. - When photographing a subject that has...
...(see page 17), fill-in a low lighting condition, the camera shake warning indicator ( ) may make the picture dark. Lightly press the shutter button to Watch Out for When Taking Pictures ■ Pressing the shutter button down to take the picture. [ Lightly press the shutter button ] [ Press the shutter... you capture an image. ■ Compose the image by using the LCD monitor. 《20》 Taking a picture against the sun, please use a tripod, support the camera on the LCD monitor. If the subject is very narrow (such as expected. - When photographing a subject that has...

User Manual
Page 24
... menu is showing, press the DOWN button to move from the moment the picture is possible that camera shake will stop the voice memo. You can use the MACRO / DOWN button to take macro pictures. Press the shutter button and take a picture within 20cm in the Macro mode, select the FLASH OFF mode. 《... ■ While the menu is showing, press the UP button to move down the sub menu. Rotate the MODE DIAL to shake the camera. ● When you take a picture. In the middle of 40cm between you can add your voice-over to page 19 for ten seconds from the main menu to...
... menu is showing, press the DOWN button to move from the moment the picture is possible that camera shake will stop the voice memo. You can use the MACRO / DOWN button to take macro pictures. Press the shutter button and take a picture within 20cm in the Macro mode, select the FLASH OFF mode. 《... ■ While the menu is showing, press the UP button to move down the sub menu. Rotate the MODE DIAL to shake the camera. ● When you take a picture. In the middle of 40cm between you can add your voice-over to page 19 for ten seconds from the main menu to...

User Manual
Page 25
...camera to recompose your finger from the SHUTTER button, the focus lock function will be captured. 2. If you release your picture as desired, and then press the SHUTTER button completely to avoid taking an unwanted picture...X X Mode SCENE Normal O ∞ X X ∞ Macro X X O O X Auto Macro X X X X X Mode - Macro X X X X - With the SHUTTER button still pressed down to take the picture. Normal ∞ O ∞ O - Ensure the subject is focused on the subject. 3. The image to be cancelled. 1. When the green auto focus frame lights up, it...
...camera to recompose your finger from the SHUTTER button, the focus lock function will be captured. 2. If you release your picture as desired, and then press the SHUTTER button completely to avoid taking an unwanted picture...X X Mode SCENE Normal O ∞ X X ∞ Macro X X O O X Auto Macro X X X X X Mode - Macro X X X X - With the SHUTTER button still pressed down to take the picture. Normal ∞ O ∞ O - Ensure the subject is focused on the subject. 3. The image to be cancelled. 1. When the green auto focus frame lights up, it...

User Manual
Page 28
...OK button - MENU / OK button ■ MENU button - When you press the SHUTTER button, the picture will be taken after about 10 seconds and 2 seconds later a second picture will return the LCD to each camera mode will allow an [ Selecting the 2 SEC self-timer ] interval of VOICE RECORDING mode. 2. There...specified time has elapsed. When the menu is displayed on the LCD monitor, this button is taken. •Double self-timer ( ) : A picture will be displayed on the flash charge time. 3. When using the flash, the 2-second self-timer may be displayed for MOVIE CLIP and STILL...
...OK button - MENU / OK button ■ MENU button - When you press the SHUTTER button, the picture will be taken after about 10 seconds and 2 seconds later a second picture will return the LCD to each camera mode will allow an [ Selecting the 2 SEC self-timer ] interval of VOICE RECORDING mode. 2. There...specified time has elapsed. When the menu is displayed on the LCD monitor, this button is taken. •Double self-timer ( ) : A picture will be displayed on the flash charge time. 3. When using the flash, the 2-second self-timer may be displayed for MOVIE CLIP and STILL...

User Manual
Page 31
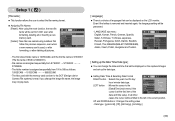
... Vivid+ Back OK Set [ PROGRAM mode ] Icon Menu Description Soft+ Soft The edges of the picture you want to navigate through the menus. This effect is suitable for each camera mode appears. Turn on the memory. RECORDING Sharpness Contrast Auto Focus OSD Info Normal Normal Center AF ... soft. ● [High], [Normal], [Low] menus are sharp. This makes the image be saved. However, there is stored on the camera and press the MENU button. RECORDING Sharpness Contrast Auto Focus OSD Info Normal Normal Center AF Full Move Change 4. Normal The edges of the image...
... Vivid+ Back OK Set [ PROGRAM mode ] Icon Menu Description Soft+ Soft The edges of the picture you want to navigate through the menus. This effect is suitable for each camera mode appears. Turn on the memory. RECORDING Sharpness Contrast Auto Focus OSD Info Normal Normal Center AF ... soft. ● [High], [Normal], [Low] menus are sharp. This makes the image be saved. However, there is stored on the camera and press the MENU button. RECORDING Sharpness Contrast Auto Focus OSD Info Normal Normal Center AF Full Move Change 4. Normal The edges of the image...
User Manual
Page 34
...the [Date&Time] main menu if the cursor is at the first item of S630 is removed and inserted again, the language setting will be displayed on the captured ..., Russian, Portuguese, Dutch, Danish, Swedish, Finnish, Thai, BAHASA(MALAY/ INDONESIAN), Arabic, Czech, Polish, Hungarian and Turkish. In all pictures. Date type : [yy/mm/dd], [Off], [dd/mm/yy], [mm/dd/yy] 《33》 Setup 1 ( ... ] ■ There is used with the memory card conform to the DCF (Design rule for Camera File systems) format. File names are named using numbers that will be preserved. - The files...
...the [Date&Time] main menu if the cursor is at the first item of S630 is removed and inserted again, the language setting will be displayed on the captured ..., Russian, Portuguese, Dutch, Danish, Swedish, Finnish, Thai, BAHASA(MALAY/ INDONESIAN), Arabic, Czech, Polish, Hungarian and Turkish. In all pictures. Date type : [yy/mm/dd], [Off], [dd/mm/yy], [mm/dd/yy] 《33》 Setup 1 ( ... ] ■ There is used with the memory card conform to the DCF (Design rule for Camera File systems) format. File names are named using numbers that will be preserved. - The files...

User Manual
Page 41
...To take an image, press the shutter button. 6 Pressing the + / - And then the voice memo will be deleted. ● After taking a picture. Edit 6 Pressing the Shutter button SH Capture Move [ After changing the frame position ] 《40》 Composite shooting ■ You can use the... OK Set Select a desired menu by using the LCD monitor. 2. The images captured before will start. Press the shutter button half way down and the camera is activated ] Pressing the Up / Down / Left / Right button 6 SH Capture +/- Press the + / - button SH Capture +/- Special Effect (E ...
...To take an image, press the shutter button. 6 Pressing the + / - And then the voice memo will be deleted. ● After taking a picture. Edit 6 Pressing the Shutter button SH Capture Move [ After changing the frame position ] 《40》 Composite shooting ■ You can use the... OK Set Select a desired menu by using the LCD monitor. 2. The images captured before will start. Press the shutter button half way down and the camera is activated ] Pressing the Up / Down / Left / Right button 6 SH Capture +/- Press the + / - button SH Capture +/- Special Effect (E ...

User Manual
Page 43
...9632; Date & Time information will not be printed on the stored image taken with Photo Frame menu. ● Press the E button in an available camera modes FUN Up / Down PHOTO FRAME button Move E Exit Frame OK Set OK Save +/- After taking the 2nd shot again ] 《42》... [ The final picture ] You can add 9 types of composite shot after taking the 4th shot ] Pressing the Shutter button 6 6 SH Capture +/- Delete [ After taking the last...
...9632; Date & Time information will not be printed on the stored image taken with Photo Frame menu. ● Press the E button in an available camera modes FUN Up / Down PHOTO FRAME button Move E Exit Frame OK Set OK Save +/- After taking the 2nd shot again ] 《42》... [ The final picture ] You can add 9 types of composite shot after taking the 4th shot ] Pressing the Shutter button 6 6 SH Capture +/- Delete [ After taking the last...

User Manual
Page 46
... the [ PROGRAM mode ] centre is exposed correctly, regardless of the back lighting. ※ If the subject is better to take brighter pictures. - [Multi] : Exposure will be biased towards the centre of the captured images. Mode Icon Sub menu File Format STILL IMAGE mode ...● This file format complies with the DCF (Design rule for Camera File system). ● JPEG (Joint Photographic Experts Group) : JPEG is most commonly used for light. The higher the compression ratio, the lower the picture quality. Quality / Frame rate ■You can compress the files ...
... the [ PROGRAM mode ] centre is exposed correctly, regardless of the back lighting. ※ If the subject is better to take brighter pictures. - [Multi] : Exposure will be biased towards the centre of the captured images. Mode Icon Sub menu File Format STILL IMAGE mode ...● This file format complies with the DCF (Design rule for Camera File system). ● JPEG (Joint Photographic Experts Group) : JPEG is most commonly used for light. The higher the compression ratio, the lower the picture quality. Quality / Frame rate ■You can compress the files ...

User Manual
Page 47
...select ISO 80, 100, 200, 400. 《46》 One is taken in the ASR mode of a camera is rated by camera shake may be off automatically. ● If less than 3 pictures are taken at a time. The speed or specific light-sensitivity of S730 only(p.16) ● If the [...Continuous] or [AEB] sub menu is selected, the flash will increase as the ISO value increases, making the image appear coarse. * S630...
...select ISO 80, 100, 200, 400. 《46》 One is taken in the ASR mode of a camera is rated by camera shake may be off automatically. ● If less than 3 pictures are taken at a time. The speed or specific light-sensitivity of S730 only(p.16) ● If the [...Continuous] or [AEB] sub menu is selected, the flash will increase as the ISO value increases, making the image appear coarse. * S630...

User Manual
Page 48
...paper Shutter button : saves new custom white balance. - The custom white balance value will be applied, starting with the next picture you can select the most appropriate white balance setting for a given shooting environment by setting up the custom white balance. 1. ... WHITE BALANCE DAYLIGHT : For taking images under daylight fluorescent types of the camera so that the LCD monitor shows only white. 2. You can only select the Negative effect menu. AUTO : The camera automatically 6 selects the appropriate white balance settings, depending on the shooting environment....
...paper Shutter button : saves new custom white balance. - The custom white balance value will be applied, starting with the next picture you can select the most appropriate white balance setting for a given shooting environment by setting up the custom white balance. 1. ... WHITE BALANCE DAYLIGHT : For taking images under daylight fluorescent types of the camera so that the LCD monitor shows only white. 2. You can only select the Negative effect menu. AUTO : The camera automatically 6 selects the appropriate white balance settings, depending on the shooting environment....

User Manual
Page 49
...LCD monitor. ※ A negative exposure compensation value reduces the exposure. Press the play mode ■ If the memory card is inserted in the camera, all the camera functions apply only to fast forward the images played. EV -2 -1 0 +1 +2 2. button. ● Compensating Exposure 1. button, and then ... turned off. ■ You can also select the exposure value by using the camera buttons and LCD monitor. ● Playing back a still image 1. If you may not get good pictures. Select an image that a positive exposure compensation value increases the exposure and the ...
...LCD monitor. ※ A negative exposure compensation value reduces the exposure. Press the play mode ■ If the memory card is inserted in the camera, all the camera functions apply only to fast forward the images played. EV -2 -1 0 +1 +2 2. button. ● Compensating Exposure 1. button, and then ... turned off. ■ You can also select the exposure value by using the camera buttons and LCD monitor. ● Playing back a still image 1. If you may not get good pictures. Select an image that a positive exposure compensation value increases the exposure and the ...


