User Manual
Page 8
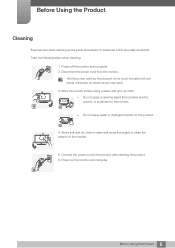
..., an electric shock may result. 3. Power off the monitor and computer. 2. Wipe the monitor screen using a clean, soft and dry cloth. Do not apply a cleaning agent that contains alcohol, solvent, or surfactant to the product after cleaning the ... hands. Before Using the Product Cleaning Exercise care when cleaning as the panel and exterior of the monitor. 5. Connect the power cord to the monitor. ! Do not spray water or detergent directly on the monitor and computer. ! 8 Before Using the Product Wet a soft and dry cloth in water and wring thoroughly to...
..., an electric shock may result. 3. Power off the monitor and computer. 2. Wipe the monitor screen using a clean, soft and dry cloth. Do not apply a cleaning agent that contains alcohol, solvent, or surfactant to the product after cleaning the ... hands. Before Using the Product Cleaning Exercise care when cleaning as the panel and exterior of the monitor. 5. Connect the power cord to the monitor. ! Do not spray water or detergent directly on the monitor and computer. ! 8 Before Using the Product Wet a soft and dry cloth in water and wring thoroughly to...
User Manual
Page 9
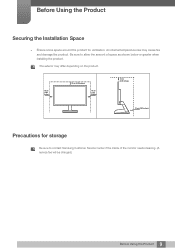
...Before Using the Product Securing the Installation Space Ensure some space around the product for storage Be sure to allow the amount of the monitor needs cleaning. (A service fee will be charged.) 9 Before Using the Product An internal temperature rise may differ depending on the product. 10 cm...cm (3.93 inches) 10 cm (3.93 inches) 10 cm (3.93 inches) 10 cm (3.93 inches) Precautions for ventilation. Be sure to contact Samsung Customer Service Center if the inside of space as shown below or greater when installing the product. The exterior may cause fire and damage the...
...Before Using the Product Securing the Installation Space Ensure some space around the product for storage Be sure to allow the amount of the monitor needs cleaning. (A service fee will be charged.) 9 Before Using the Product An internal temperature rise may differ depending on the product. 10 cm...cm (3.93 inches) 10 cm (3.93 inches) 10 cm (3.93 inches) 10 cm (3.93 inches) Precautions for ventilation. Be sure to contact Samsung Customer Service Center if the inside of space as shown below or greater when installing the product. The exterior may cause fire and damage the...
User Manual
Page 17
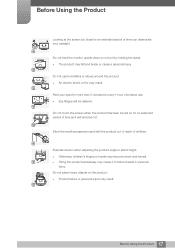
... of time can deteriorate your eyes for more than 5 minutes for an extended period of time as it will be relieved. ! Do not hold the monitor upside-down or move it to fall and break or cause a personal injury.
... of time can deteriorate your eyes for more than 5 minutes for an extended period of time as it will be relieved. ! Do not hold the monitor upside-down or move it to fall and break or cause a personal injury.
User Manual
Page 22
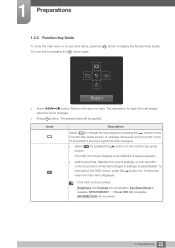
... [ ] button for each item will appear when the focus changes. Press [ ] button: The selected item will appear on the top left corner of your Monitor's feature appears. OSD control lock: Maintain the current settings, or lock the OSD control to prevent unintended changes to change the input signal by...
... [ ] button for each item will appear when the focus changes. Press [ ] button: The selected item will appear on the top left corner of your Monitor's feature appears. OSD control lock: Maintain the current settings, or lock the OSD control to prevent unintended changes to change the input signal by...

User Manual
Page 23
...next depth. - Value decreases in the slider. - Please run the corresponding function based on the function key guide screen. Move to turn the Monitor off by pressing the [ ] button on the actual icon and description. Move the option - Save the value and close Sublist. 23 1 Preparations ... Move to enable or disable Eye Saver Mode. Power saving mode or Non-signal mode), 2 direct keys for 2 seconds Power Off When the monitor displays the Main menu the DOME Type JOG Button could be different. Close Sublist without saving value. - Press to next depth. - DOME Type...
...next depth. - Value decreases in the slider. - Please run the corresponding function based on the function key guide screen. Move to turn the Monitor off by pressing the [ ] button on the actual icon and description. Move the option - Save the value and close Sublist. 23 1 Preparations ... Move to enable or disable Eye Saver Mode. Power saving mode or Non-signal mode), 2 direct keys for 2 seconds Power Off When the monitor displays the Main menu the DOME Type JOG Button could be different. Close Sublist without saving value. - Press to next depth. - DOME Type...
User Manual
Page 27
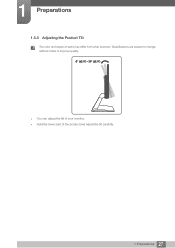
Specifications are subject to change without notice to improve quality. -2° (±2.0°) - 20° (±2.0°) You can adjust the tilt of your monitor. Hold the lower part of parts may differ from what is shown. 1 Preparations 1.3.3 Adjusting the Product Tilt The color and shape of the product and adjust the tilt carefully. 27 1 Preparations
Specifications are subject to change without notice to improve quality. -2° (±2.0°) - 20° (±2.0°) You can adjust the tilt of your monitor. Hold the lower part of parts may differ from what is shown. 1 Preparations 1.3.3 Adjusting the Product Tilt The color and shape of the product and adjust the tilt carefully. 27 1 Preparations
User Manual
Page 28
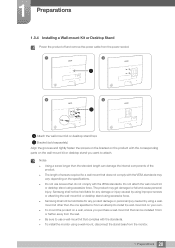
... screws required for any damage or injury caused by using improper screws or attaching the wall-mount kit or desktop stand using excessive force. Samsung shall not be installed 10cm or farther away from the wall. Be sure to attach. 1 Preparations 1.3.4 Installing a Wall-mount Kit or...on the specifications. Do not use a wall-mount kit that do not comply with the standards. To install the monitor using excessive force. Samsung shall not be held liable for a wall mount that does not comply with the VESA standards may get damaged or fall and cause ...
... screws required for any damage or injury caused by using improper screws or attaching the wall-mount kit or desktop stand using excessive force. Samsung shall not be installed 10cm or farther away from the wall. Be sure to attach. 1 Preparations 1.3.4 Installing a Wall-mount Kit or...on the specifications. Do not use a wall-mount kit that do not comply with the standards. To install the monitor using excessive force. Samsung shall not be held liable for a wall mount that does not comply with the VESA standards may get damaged or fall and cause ...
User Manual
Page 35
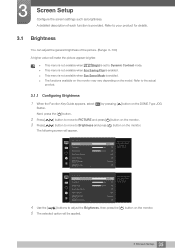
... screen. 3 Screen Setup Configure the screen settings such as brightness. Values closer to Brightness and press [ ] button on the monitor. 5 The selected option will be applied. 35 3 Screen Setup PICTURE Brightness Contrast Sharpness Eye Saver Mode Game Mode SMAAMSGUINCG Bright SMAAMSGUINCG... Mode is provided. Next, press the [ ] button. 2 Press [ 3 Press [ ] button to move to PICTURE and press [ ] button on the monitor. ] button to move to 100 mean a brighter screen. 4 Use the [ ] buttons to the actual product. 3.1.1 Configuring Brightness 1 When the Function Key Guide...
... screen. 3 Screen Setup Configure the screen settings such as brightness. Values closer to Brightness and press [ ] button on the monitor. 5 The selected option will be applied. 35 3 Screen Setup PICTURE Brightness Contrast Sharpness Eye Saver Mode Game Mode SMAAMSGUINCG Bright SMAAMSGUINCG... Mode is provided. Next, press the [ ] button. 2 Press [ 3 Press [ ] button to move to PICTURE and press [ ] button on the monitor. ] button to move to 100 mean a brighter screen. 4 Use the [ ] buttons to the actual product. 3.1.1 Configuring Brightness 1 When the Function Key Guide...
User Manual
Page 36
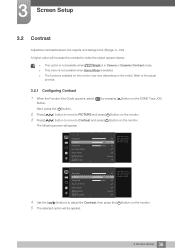
...Values closer to the actual product. 3.2.1 Configuring Contrast 1 When the Function Key Guide appears, select [ ] by pressing [ ] button on the monitor. 5 The selected option will be applied. 36 3 Screen Setup PICTURE Brightness Contrast Sharpness Eye Saver Mode Game Mode SMAAMSGUINCG Bright SMAAMSGUINCG Upscale 100 75 ... contrast level. Next, press the [ ] button. 2 Press [ 3 Press [ ] button to move to PICTURE and press [ ] button on the monitor. ] button to move to adjust the Contrast, then press the [ ] button on the DOME Type JOG Button. Values closer to 100 mean a bigger ...
...Values closer to the actual product. 3.2.1 Configuring Contrast 1 When the Function Key Guide appears, select [ ] by pressing [ ] button on the monitor. 5 The selected option will be applied. 36 3 Screen Setup PICTURE Brightness Contrast Sharpness Eye Saver Mode Game Mode SMAAMSGUINCG Bright SMAAMSGUINCG Upscale 100 75 ... contrast level. Next, press the [ ] button. 2 Press [ 3 Press [ ] button to move to PICTURE and press [ ] button on the monitor. ] button to move to adjust the Contrast, then press the [ ] button on the DOME Type JOG Button. Values closer to 100 mean a bigger ...
User Manual
Page 37
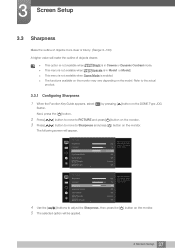
... selected option will be applied. 37 3 Screen Setup Refer to adjust the Sharpness, then press the [ ] button on the monitor. The following screen will appear. 3 Screen Setup 3.3 Sharpness Make the outline of objects more clear or blurry. (Range: 0~100) A higher value will...available when MSAAMSGUINCGUpscale is in Mode1 or Mode2. This menu is not available when Game Mode is enabled. The functions available on the monitor may vary depending on the DOME Type JOG Button. Values closer to 100 mean a sharper image. 4 Use the [ ] buttons to the actual product....
... selected option will be applied. 37 3 Screen Setup Refer to adjust the Sharpness, then press the [ ] button on the monitor. The following screen will appear. 3 Screen Setup 3.3 Sharpness Make the outline of objects more clear or blurry. (Range: 0~100) A higher value will...available when MSAAMSGUINCGUpscale is in Mode1 or Mode2. This menu is not available when Game Mode is enabled. The functions available on the monitor may vary depending on the DOME Type JOG Button. Values closer to 100 mean a sharper image. 4 Use the [ ] buttons to the actual product....
User Manual
Page 38
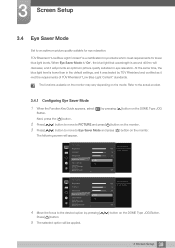
... [ ] by pressing [ Press [ ] button. 5 The selected option will appear. Next, press the [ ] button. 2 Press [ 3 Press [ ] button to move to PICTURE and press [ ] button on the monitor. ] button to move to an optimum picture quality suitable for eye relaxation. ] button on the DOME Type JOG Button. PICTURE Brightness Contrast Sharpness Eye Saver...;V Rheinland and certified as it will decrease, and it met the requirements of TÜV Rheinland "Low Blue Light Content" standards. The functions available on the monitor may vary depending on the...
... [ ] by pressing [ Press [ ] button. 5 The selected option will appear. Next, press the [ ] button. 2 Press [ 3 Press [ ] button to move to PICTURE and press [ ] button on the monitor. ] button to move to an optimum picture quality suitable for eye relaxation. ] button on the DOME Type JOG Button. PICTURE Brightness Contrast Sharpness Eye Saver...;V Rheinland and certified as it will decrease, and it met the requirements of TÜV Rheinland "Low Blue Light Content" standards. The functions available on the monitor may vary depending on the...
User Manual
Page 39
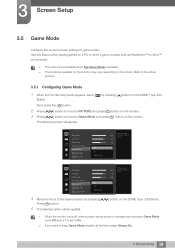
... menu is not available when Eye Saver Mode is set to On. If you want to the desired option by pressing [ ] button on the monitor. ] button to move to the actual product. 3.5.1 Configuring Game Mode 1 When the Function Key Guide appears, select [ ] by pressing [ Press [ ] button. 5 The selected...Always On 100 75 60 Off Custom Off Optimizes image settings for playing games. ] button on the DOME Type JOG Button. When the monitor turns off, enters power-saving mode or changes input sources, Game Mode turns Off even if it is enabled. The functions available on...
... menu is not available when Eye Saver Mode is set to On. If you want to the desired option by pressing [ ] button on the monitor. ] button to move to the actual product. 3.5.1 Configuring Game Mode 1 When the Function Key Guide appears, select [ ] by pressing [ Press [ ] button. 5 The selected...Always On 100 75 60 Off Custom Off Optimizes image settings for playing games. ] button on the DOME Type JOG Button. When the monitor turns off, enters power-saving mode or changes input sources, Game Mode turns Off even if it is enabled. The functions available on...
User Manual
Page 40
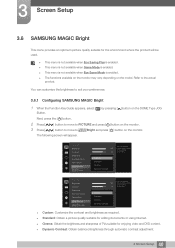
...Mode SMAAMSGUINCG Bright SMAAMSGUINCG Angle 100 75 60 Custom Custo5m0 Standard O50ff Cinema 22O00ff Dynamic Contrast Wide0 Set to suit your preferences. 3.6.1 Configuring SAMSUNG MAGIC Bright 1 When the Function Key Guide appears, select [ ] by pressing [ ] button on the DOME Type JOG Button. PICTURE... This menu is not available when Eye Saver Mode is enabled. The functions available on the monitor may vary depending on the monitor. Refer to an optimum picture quality suitable for enjoying video and DVD content. Dynamic Contrast: Obtain balanced ...
...Mode SMAAMSGUINCG Bright SMAAMSGUINCG Angle 100 75 60 Custom Custo5m0 Standard O50ff Cinema 22O00ff Dynamic Contrast Wide0 Set to suit your preferences. 3.6.1 Configuring SAMSUNG MAGIC Bright 1 When the Function Key Guide appears, select [ ] by pressing [ ] button on the DOME Type JOG Button. PICTURE... This menu is not available when Eye Saver Mode is enabled. The functions available on the monitor may vary depending on the monitor. Refer to an optimum picture quality suitable for enjoying video and DVD content. Dynamic Contrast: Obtain balanced ...
User Manual
Page 42
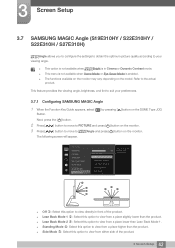
3 Screen Setup 3.7 SAMSUNG MAGIC Angle (S19E310HY / S22E310HY / S22E310H / S27E310H) MSAAMSGUINCGAngle allows you to configure the settings to obtain the optimum picture quality according to your viewing angle. This option is not ... Mode ˡ: Select this option to the actual product. Next, press the [ ] button. 2 Press [ ] button to move to PICTURE and press [ ] button on the monitor. 3 Press [ ] button to move to MSAAMSGUINCGAngle and press [ ] button on the model. PICTURE Brightness Contrast Sharpness Eye Saver Mode Game Mode SMAAMSGUINCG Bright SMAAMSGUINCG Angle...
3 Screen Setup 3.7 SAMSUNG MAGIC Angle (S19E310HY / S22E310HY / S22E310H / S27E310H) MSAAMSGUINCGAngle allows you to configure the settings to obtain the optimum picture quality according to your viewing angle. This option is not ... Mode ˡ: Select this option to the actual product. Next, press the [ ] button. 2 Press [ ] button to move to PICTURE and press [ ] button on the monitor. 3 Press [ ] button to move to MSAAMSGUINCGAngle and press [ ] button on the model. PICTURE Brightness Contrast Sharpness Eye Saver Mode Game Mode SMAAMSGUINCG Bright SMAAMSGUINCG Angle...

User Manual
Page 44
.... Next, press the [ ] button. 2 Press [ ] button to move to PICTURE and press [ ] button on the monitor. 3 Press [ ] button to move to the actual product. 3.8.1 Configuring SAMSUNG MAGIC Upscale 1 When the Function Key Guide appears, select [ ] by pressing [ ] button on the DOME Type JOG Button..... This menu is not available when Game Mode is enabled. The functions available on the monitor may vary depending on the monitor. PICTURE SMAAMSGUINCG Upscale Image Size HDMI Black Level Response Time H-Position V-Position Coarse off Mode1 Mode2 Enhance picture detail...
.... Next, press the [ ] button. 2 Press [ ] button to move to PICTURE and press [ ] button on the monitor. 3 Press [ ] button to move to the actual product. 3.8.1 Configuring SAMSUNG MAGIC Upscale 1 When the Function Key Guide appears, select [ ] by pressing [ ] button on the DOME Type JOG Button..... This menu is not available when Game Mode is enabled. The functions available on the monitor may vary depending on the monitor. PICTURE SMAAMSGUINCG Upscale Image Size HDMI Black Level Response Time H-Position V-Position Coarse off Mode1 Mode2 Enhance picture detail...
User Manual
Page 46
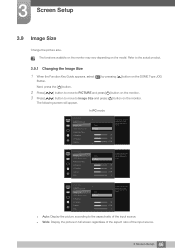
... aspect ratio of the input source. 46 3 Screen Setup 3 Screen Setup 3.9 Image Size Change the picture size. The functions available on the monitor may vary depending on the monitor. Refer to the aspect ratio of the input source. Wide: Display the picture in full screen regardless of the aspect ratio of..., select [ ] by pressing [ ] button on the DOME Type JOG Button. Next, press the [ ] button. 2 Press [ ] button to move to PICTURE and press [ ] button on the monitor. 3 Press [ ] button to move to Image Size and press [ ] button on the model.
... aspect ratio of the input source. 46 3 Screen Setup 3 Screen Setup 3.9 Image Size Change the picture size. The functions available on the monitor may vary depending on the monitor. Refer to the aspect ratio of the input source. Wide: Display the picture in full screen regardless of the aspect ratio of..., select [ ] by pressing [ ] button on the DOME Type JOG Button. Next, press the [ ] button. 2 Press [ ] button to move to PICTURE and press [ ] button on the monitor. 3 Press [ ] button to move to Image Size and press [ ] button on the model.
User Manual
Page 47
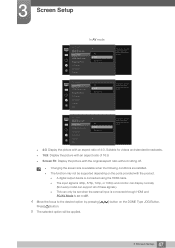
... picture with the product. A digital output device is connected using the HDMI cable. The input signal is 480p, 576p, 720p, or 1080p and monitor can display normally (Not every model can support all of 4:3. Suitable for videos and standard broadcasts. 16:9: Display the picture with an aspect ratio...
... picture with the product. A digital output device is connected using the HDMI cable. The input signal is 480p, 576p, 720p, or 1080p and monitor can display normally (Not every model can support all of 4:3. Suitable for videos and standard broadcasts. 16:9: Display the picture with an aspect ratio...
User Manual
Page 48
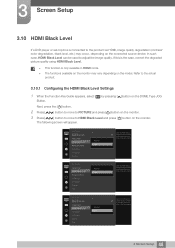
... following screen will appear. Next, press the [ ] button. 2 Press [ ] button to move to PICTURE and press [ ] button on the monitor. 3 Press [ ] button to move to the actual product. 3.10.1 Configuring the HDMI Black Level Settings 1 When the Function Key Guide appears, select [ ] by adjusting the .... 3 Screen Setup 3.10 HDMI Black Level If a DVD player or set-top box is only available in HDMI mode. The functions available on the monitor may occur, depending on the connected source device.
... following screen will appear. Next, press the [ ] button. 2 Press [ ] button to move to PICTURE and press [ ] button on the monitor. 3 Press [ ] button to move to the actual product. 3.10.1 Configuring the HDMI Black Level Settings 1 When the Function Key Guide appears, select [ ] by adjusting the .... 3 Screen Setup 3.10 HDMI Black Level If a DVD player or set-top box is only available in HDMI mode. The functions available on the monitor may occur, depending on the connected source device.
User Manual
Page 50
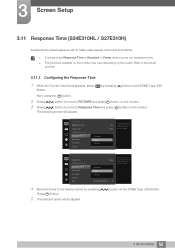
... option by pressing [ ] button on the DOME Type JOG Button. Next, press the [ ] button. 2 Press [ ] button to move to PICTURE and press [ ] button on the monitor. 3 Press [ ] button to move to Standard or Faster when you are not viewing a movie. The functions available on the... monitor may vary depending on the model. PICTURE Image Size HDMI Black Level Response Time H-Position V-Position Coarse Fine Standard Faster Fastest 4 Move the focus to ...
... option by pressing [ ] button on the DOME Type JOG Button. Next, press the [ ] button. 2 Press [ ] button to move to PICTURE and press [ ] button on the monitor. 3 Press [ ] button to move to Standard or Faster when you are not viewing a movie. The functions available on the... monitor may vary depending on the model. PICTURE Image Size HDMI Black Level Response Time H-Position V-Position Coarse Fine Standard Faster Fastest 4 Move the focus to ...
User Manual
Page 51
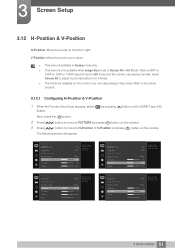
... 1080P signal is set to Screen Fit in 0-6 levels. The functions available on the monitor may vary depending on the monitor. Next, press the [ ] button. 2 Press [ 3 Press [ ] button to move to PICTURE and press [ ] button on the monitor. ] button to move to H-Position or V-Position and press [ ] button on the model.... This menu is available in Analog mode only. This menu is only available when Image Size is input in AV mode and the monitor can display normally, select Screen Fit to adjust horizontal position in AV Mode. Faster 50 50 2200 0 51 3 Screen Setup
... 1080P signal is set to Screen Fit in 0-6 levels. The functions available on the monitor may vary depending on the monitor. Next, press the [ ] button. 2 Press [ 3 Press [ ] button to move to PICTURE and press [ ] button on the monitor. ] button to move to H-Position or V-Position and press [ ] button on the model.... This menu is available in Analog mode only. This menu is only available when Image Size is input in AV mode and the monitor can display normally, select Screen Fit to adjust horizontal position in AV Mode. Faster 50 50 2200 0 51 3 Screen Setup


