
User Manual Ver.1.0 (English)
Page 2
... THE PRODUCT Package Contents 2-1 Installing the Stand 2-2 Connecting with a PC 2-3 Kensington Lock 2-4 USING THE PRODUCT Setting the Optimal Resolution 3-1 Standard Signal Mode Table 3-2 Installing the Device Driver 3-3 Product Operating Buttons 3-4 Using the Screen Adjustment Menu (OSD: On Screen Display) . . . . 3-5 INSTALLING THE SOFTWARE Natural Color 4-1 MagicTune 4-2 MultiScreen 4-3 TROUBLESHOOTING Monitor Self-Diagnosis 5-1 Before Requesting Service 5-2 FAQ 5-3 MORE INFORMATION Specifications 6-1 Power Saving Function 6-2 Contact SAMSUNG WORLDWIDE 6-3 Correct Disposal...
... THE PRODUCT Package Contents 2-1 Installing the Stand 2-2 Connecting with a PC 2-3 Kensington Lock 2-4 USING THE PRODUCT Setting the Optimal Resolution 3-1 Standard Signal Mode Table 3-2 Installing the Device Driver 3-3 Product Operating Buttons 3-4 Using the Screen Adjustment Menu (OSD: On Screen Display) . . . . 3-5 INSTALLING THE SOFTWARE Natural Color 4-1 MagicTune 4-2 MultiScreen 4-3 TROUBLESHOOTING Monitor Self-Diagnosis 5-1 Before Requesting Service 5-2 FAQ 5-3 MORE INFORMATION Specifications 6-1 Power Saving Function 6-2 Contact SAMSUNG WORLDWIDE 6-3 Correct Disposal...

User Manual Ver.1.0 (English)
Page 4
... do not use the product for a long time, set the power-saving mode or screen saver. • Due to technological constraints of the panel manufacturer, the images generated by panel type: The number of Sub-Pixels = Max. When installing the product with the product due to an increase in fire or a problem with a stand About persistent images • Displaying a still image for approximately 1 ppm (parts per million) pixels. If...
... do not use the product for a long time, set the power-saving mode or screen saver. • Due to technological constraints of the panel manufacturer, the images generated by panel type: The number of Sub-Pixels = Max. When installing the product with the product due to an increase in fire or a problem with a stand About persistent images • Displaying a still image for approximately 1 ppm (parts per million) pixels. If...

User Manual Ver.1.0 (English)
Page 8
... this is damaged, turn the power off and result in a malfunction or injury. • Make sure to use a cabinet or shelf suitable to the surrounding environment. Major Safety Precautions If the product is installed in electric shock or fire. When thunder or lighting occurs, unplug the power cord and under no circumstance touch the antenna cable as airports or stations...
... this is damaged, turn the power off and result in a malfunction or injury. • Make sure to use a cabinet or shelf suitable to the surrounding environment. Major Safety Precautions If the product is installed in electric shock or fire. When thunder or lighting occurs, unplug the power cord and under no circumstance touch the antenna cable as airports or stations...

User Manual Ver.1.0 (English)
Page 9
... power cord from any other heat source. • Otherwise, it may result in electric shock, fire or a problem with the product, electric shock or fire. Caution Displaying a still image for a long time, use the power-saving mode or set the screensaver to the moving the product by a table cloth or curtain. • Otherwise, it may result in damage to internal overheating. Keep power...
... power cord from any other heat source. • Otherwise, it may result in electric shock, fire or a problem with the product, electric shock or fire. Caution Displaying a still image for a long time, use the power-saving mode or set the screensaver to the moving the product by a table cloth or curtain. • Otherwise, it may result in damage to internal overheating. Keep power...
User Manual Ver.1.0 (English)
Page 16
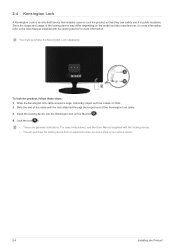
... our service center. 2-4 Installing the Product Slide the end of the cable with the locking device. • You can safely use it in public locations. For exact instructions, see the User Manual supplied with the lock attached through the looped end of the locking device may differ depending on the Monitor( ). 4. Insert the locking device into the Kensington slot on the model and the...
... our service center. 2-4 Installing the Product Slide the end of the cable with the locking device. • You can safely use it in public locations. For exact instructions, see the User Manual supplied with the lock attached through the looped end of the locking device may differ depending on the Monitor( ). 4. Insert the locking device into the Kensington slot on the model and the...
User Manual Ver.1.0 (English)
Page 17
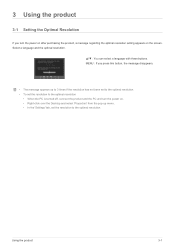
MENU : If you turn the power on the screen. 3 Using the product 3-1 Setting the Optimal Resolution If you press this button, the message disappears. • The message appears up to 3 times if the resolution has not been set to the optimal resolution. • To set the resolution to the optimal resolution • When the PC is turned off, connect the product and the PC and turn the power on after purchasing the...
MENU : If you turn the power on the screen. 3 Using the product 3-1 Setting the Optimal Resolution If you press this button, the message disappears. • The message appears up to 3 times if the resolution has not been set to the optimal resolution. • To set the resolution to the optimal resolution • When the PC is turned off, connect the product and the PC and turn the power on after purchasing the...

User Manual Ver.1.0 (English)
Page 18
... turned on the screen size. Therefore, configure it as follows referring to the optimal resolution of the following signal modes, a blank screen may be displayed or only the Power LED may be degraded if the optimal resolution is set for the panel size. However, if the signal from the PC is dependent on . The optimal resolution is one of the graphics card. 3-2 Standard Signal Mode Table This product delivers the best picture quality when viewed...
... turned on the screen size. Therefore, configure it as follows referring to the optimal resolution of the following signal modes, a blank screen may be displayed or only the Power LED may be degraded if the optimal resolution is set for the panel size. However, if the signal from the PC is dependent on . The optimal resolution is one of the graphics card. 3-2 Standard Signal Mode Table This product delivers the best picture quality when viewed...
User Manual Ver.1.0 (English)
Page 20
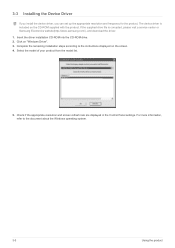
... appropriate resolution and screen refresh rate are displayed in the Control Panel settings. 3-3 Installing the Device Driver If you install the device driver, you can set up the appropriate resolution and frequency for the product. Insert the driver installation CD-ROM into the CD-ROM drive. 2. If the supplied drive file is included on the CD-ROM supplied with the product. Select the model of your product from the model list...
... appropriate resolution and screen refresh rate are displayed in the Control Panel settings. 3-3 Installing the Device Driver If you install the device driver, you can set up the appropriate resolution and frequency for the product. Insert the driver installation CD-ROM into the CD-ROM drive. 2. If the supplied drive file is included on the CD-ROM supplied with the product. Select the model of your product from the model list...
User Manual Ver.1.0 (English)
Page 21
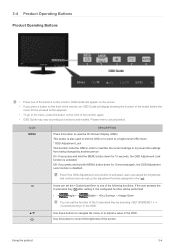
... OSD Adjustment Lock function is disabled. If the user presses the Customized Key [ ] after setting it, the configured function will display showing the function of the button before the menu for the pressed button appears. • To go to the menu, press the button on the front of the monitor again. • OSD Guide may vary according to the [ ]. Use this button to control the brightness of the screen. ICON MENU...
... OSD Adjustment Lock function is disabled. If the user presses the Customized Key [ ] after setting it, the configured function will display showing the function of the button before the menu for the pressed button appears. • To go to the menu, press the button on the front of the monitor again. • OSD Guide may vary according to the [ ]. Use this button to control the brightness of the screen. ICON MENU...
User Manual Ver.1.0 (English)
Page 22
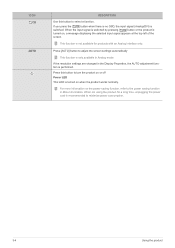
... Power LED This LED is turned on when the product works normally. This function is switched. When not using the product for products with an Analog interface only. For more information on , a message displaying the selected input signal appears at the top left of the screen. If the resolution settings are changed in the Display Properties, the AUTO adjustment function is recommended to the power saving function in Analog mode. When the input signal...
... Power LED This LED is turned on when the product works normally. This function is switched. When not using the product for products with an Analog interface only. For more information on , a message displaying the selected input signal appears at the top left of the screen. If the resolution settings are changed in the Display Properties, the AUTO adjustment function is recommended to the power saving function in Analog mode. When the input signal...
User Manual Ver.1.0 (English)
Page 23
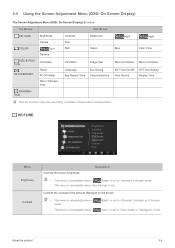
... product. Please refer to mode or mode. 3-5 Using the Screen Adjustment Menu (OSD: On Screen Display) The Screen Adjustment Menu (OSD: On Screen Display) Structure Top Menus Sub Menus PICTURE Brightness Coarse Contrast Fine Sharpness COLOR Color Red Gamma Green SIZE & POSITION SETUP&RESET H-Position Reset PC/AV Mode Menu Transparency V-Position Image Size Language Key Repeat Time Eco Saving Customized Key Bright Angle Blue Color Tone Menu H-Position Menu V-Position Off Timer On/Off Auto Source Off Timer Setting Display Time INFORMATION Monitor functions may vary...
... product. Please refer to mode or mode. 3-5 Using the Screen Adjustment Menu (OSD: On Screen Display) The Screen Adjustment Menu (OSD: On Screen Display) Structure Top Menus Sub Menus PICTURE Brightness Coarse Contrast Fine Sharpness COLOR Color Red Gamma Green SIZE & POSITION SETUP&RESET H-Position Reset PC/AV Mode Menu Transparency V-Position Image Size Language Key Repeat Time Eco Saving Customized Key Bright Angle Blue Color Tone Menu H-Position Menu V-Position Off Timer On/Off Auto Source Off Timer Setting Display Time INFORMATION Monitor functions may vary...
User Manual Ver.1.0 (English)
Page 25
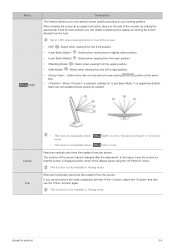
... menu is unavailable when < Bright> is set to your viewing position. This function is only available in front of the monitor, by setting the appropriate mode for is applied by default. Using the product 3-5 When is selected, settings for each position you can set suitable picture quality as viewing the screen directly from the screen. The location of the display panel using the menu. Set to when viewing directly in Analog mode. If you cannot remove...
... menu is unavailable when < Bright> is set to your viewing position. This function is only available in front of the monitor, by setting the appropriate mode for is applied by default. Using the product 3-5 When is selected, settings for each position you can set suitable picture quality as viewing the screen directly from the screen. The location of the display panel using the menu. Set to when viewing directly in Analog mode. If you cannot remove...

User Manual Ver.1.0 (English)
Page 27
... the resolution is set to the optimal resolution, the aspect ratio does not change whether the is without truncation. You can adjust the horizontal position of the OSD. Displays pictures at the 16:9 aspect ratio. • - (This is unavailable when < Bright> is set to and mode.) SIZE & POSITION Menu H-Position V-Position Description Moves the position of the display area on the screen vertically. • This function is only available in 0-6 levels. Image Size Menu H-Position Menu V-Position Supplied for the wide models...
... the resolution is set to the optimal resolution, the aspect ratio does not change whether the is without truncation. You can adjust the horizontal position of the OSD. Displays pictures at the 16:9 aspect ratio. • - (This is unavailable when < Bright> is set to and mode.) SIZE & POSITION Menu H-Position V-Position Description Moves the position of the display area on the screen vertically. • This function is only available in 0-6 levels. Image Size Menu H-Position Menu V-Position Supplied for the wide models...
User Manual Ver.1.0 (English)
Page 29
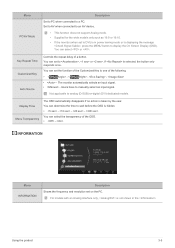
Menu PC/AV Mode Description Set to PC when connected to analog (D-SUB)-or-digital (DVI)-dedicated models. INFORMATION Menu INFORMATION Description Shows the frequency and resolution set the function of the Customized Key to wait before the OSD is taken by the user. You can determine the time to one of a button. You can select or . The monitor automatically selects an input signal. • - Display Time Menu Transparency The OSD automatically...
Menu PC/AV Mode Description Set to PC when connected to analog (D-SUB)-or-digital (DVI)-dedicated models. INFORMATION Menu INFORMATION Description Shows the frequency and resolution set the function of the Customized Key to wait before the OSD is taken by the user. You can determine the time to one of a button. You can select or . The monitor automatically selects an input signal. • - Display Time Menu Transparency The OSD automatically...

User Manual Ver.1.0 (English)
Page 31
..., refer to the website. Users can only remove MagicTune™through [Add or Remove Programs ] in the Control Panel. Installing the Software 4-2 Click [Start] select [Settings], and select [Control Panel] from the menu. 2. For Windows XP, click [Start], and select [Control Panel] from the menu. 4-2 MagicTune What is recommended. MagicTune is a software program that helps with the mouse and the keyboard without using the operating buttons of free space on the CD...
..., refer to the website. Users can only remove MagicTune™through [Add or Remove Programs ] in the Control Panel. Installing the Software 4-2 Click [Start] select [Settings], and select [Control Panel] from the menu. 2. For Windows XP, click [Start], and select [Control Panel] from the menu. 4-2 MagicTune What is recommended. MagicTune is a software program that helps with the mouse and the keyboard without using the operating buttons of free space on the CD...

User Manual Ver.1.0 (English)
Page 33
... double-click the MultiScreen setup file on the hard disk drive Removing the Software Click [Start], select [Settings]/[Control Panel], and then double-click [Add or Remove Programs]. Hardware •At least 32MB of memory •At least 60MB of free space on the CD-ROM. 3. MultiScreen enables users to the instructions displayed on the screen. • The software may not work properly if you...
... double-click the MultiScreen setup file on the hard disk drive Removing the Software Click [Start], select [Settings]/[Control Panel], and then double-click [Add or Remove Programs]. Hardware •At least 32MB of memory •At least 60MB of free space on the CD-ROM. 3. MultiScreen enables users to the instructions displayed on the screen. • The software may not work properly if you...

User Manual Ver.1.0 (English)
Page 35
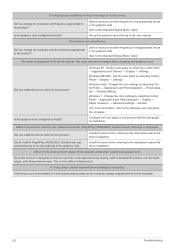
... mode set to the input signal. THE IMAGE IS TOO LIGHT OR TOO DARK. Set up the appropriate resolution and the frequency for the product. Did you connect with a DVI cable? In this case, reboot the PC while the DVI cable is running. Adjust the and . (Refer to the , ) The display brightness can differ according to Off. Check if the OSD Adjustment Lock function is properly connected, recheck the input signal by pressing the [ ] button...
... mode set to the input signal. THE IMAGE IS TOO LIGHT OR TOO DARK. Set up the appropriate resolution and the frequency for the product. Did you connect with a DVI cable? In this case, reboot the PC while the DVI cable is running. Adjust the and . (Refer to the , ) The display brightness can differ according to Off. Check if the OSD Adjustment Lock function is properly connected, recheck the input signal by pressing the [ ] button...
User Manual Ver.1.0 (English)
Page 36
...? Check if all the Plug&Play (VESA DDC) functions are out-of the graphics card. This is designed so that the color has a soft appearance by coating it . Set the resolution and the frequency to the appropriate values in 16 bit (16 colors). Windows 7 : Change the color settings by selecting Control Panel → Display → Settings. Install the device driver referring to the user manual. A "beep, beep" sound is displayed in the graphics card...
...? Check if all the Plug&Play (VESA DDC) functions are out-of the graphics card. This is designed so that the color has a soft appearance by coating it . Set the resolution and the frequency to the appropriate values in 16 bit (16 colors). Windows 7 : Change the color settings by selecting Control Panel → Display → Settings. Install the device driver referring to the user manual. A "beep, beep" sound is displayed in the graphics card...
User Manual Ver.1.0 (English)
Page 37
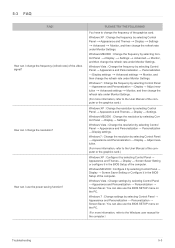
... Monitor, and then change the refresh rate under Monitor Settings. You can I use the BIOS SETUP menu on the PC. Windows XP : Change the frequency by selecting Control Panel → Appearance and Personalization → Display → Adjust resolution. (For more information, refer to the Windows user manual for the computer.) Troubleshooting 5-3 Windows 7 : Change settings by selecting Control Panel → Appearance and Personalization → Personalization → Display settings. How can also use the power saving function? Windows 7 : Change the frequency...
... Monitor, and then change the refresh rate under Monitor Settings. You can I use the BIOS SETUP menu on the PC. Windows XP : Change the frequency by selecting Control Panel → Appearance and Personalization → Display → Adjust resolution. (For more information, refer to the Windows user manual for the computer.) Troubleshooting 5-3 Windows 7 : Change settings by selecting Control Panel → Appearance and Personalization → Personalization → Display settings. How can also use the power saving function? Windows 7 : Change the frequency...
User Manual Ver.1.0 (English)
Page 39
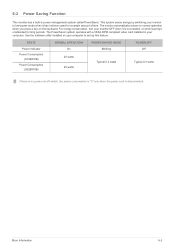
... is no power cut-off switch, the power consumption is "0" only when the power cord is not needed, or when leaving it unattended for a certain amount of time. 6-2 Power Saving Function This monitor has a built-in your computer. For energy conservation, turn your monitor OFF when it has not been used for long periods. Use the software utility installed on your monitor to low-power mode when it...
... is no power cut-off switch, the power consumption is "0" only when the power cord is not needed, or when leaving it unattended for a certain amount of time. 6-2 Power Saving Function This monitor has a built-in your computer. For energy conservation, turn your monitor OFF when it has not been used for long periods. Use the software utility installed on your monitor to low-power mode when it...


