User Manual (user Manual) (ver.8.0) (English)
Page 1
...SIGNS 2 OPERATING INSTRUCTIONS 4 SETTING UP THE REFRIGERATOR 4 MAJOR FEATURES 4 CONTROL PANEL 5 DIGITAL PANEL 6 TEMPERATURE CONTROL 7 ICE and COLD WATER DISPENSER 7 SHELVES and BINS 8 FOOD STORAGE GUIDE 9 CoolSelect ZoneTM Drawer GUIDE 11 REMOVING THE FREEZER ACCESSORIES 13 REMOVING THE REFRIGERATOR ACCESSORIES 13 BEVERAGE STATIONTM (RS2578 14 CLEANING THE ACCESSORIES 14 CHANGING THE INTERIOR LIGHT 15 WATER FILTER 16 DOORS ...16 INSTALLATION INSTRUCTIONS 17 INSTALLATION OF THE REFRIGERATOR 17 REMOVING THE REFRIGERATOR DOORS 18 REATTACHING THE REFRIGERATOR DOORS 21 LEVELING...
...SIGNS 2 OPERATING INSTRUCTIONS 4 SETTING UP THE REFRIGERATOR 4 MAJOR FEATURES 4 CONTROL PANEL 5 DIGITAL PANEL 6 TEMPERATURE CONTROL 7 ICE and COLD WATER DISPENSER 7 SHELVES and BINS 8 FOOD STORAGE GUIDE 9 CoolSelect ZoneTM Drawer GUIDE 11 REMOVING THE FREEZER ACCESSORIES 13 REMOVING THE REFRIGERATOR ACCESSORIES 13 BEVERAGE STATIONTM (RS2578 14 CLEANING THE ACCESSORIES 14 CHANGING THE INTERIOR LIGHT 15 WATER FILTER 16 DOORS ...16 INSTALLATION INSTRUCTIONS 17 INSTALLATION OF THE REFRIGERATOR 17 REMOVING THE REFRIGERATOR DOORS 18 REATTACHING THE REFRIGERATOR DOORS 21 LEVELING...
User Manual (user Manual) (ver.8.0) (English)
Page 2
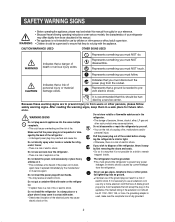
... trapped inside or outside the refrig- Represents that the power plug is needed to prevent electric shock. Make sure that a ground is not squashed or damaged by a service center. Do not use by children or infirm persons without adult supervision. • Children should be handled by the back of the refrigerator . • A damaged power plug may differ slightly from those described in this manual...
... trapped inside or outside the refrig- Represents that the power plug is needed to prevent electric shock. Make sure that a ground is not squashed or damaged by a service center. Do not use by children or infirm persons without adult supervision. • Children should be handled by the back of the refrigerator . • A damaged power plug may differ slightly from those described in this manual...
User Manual (user Manual) (ver.8.0) (English)
Page 3
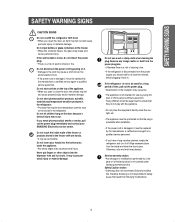
... excessmoisture from the power supply, you sense pharmaceutical smells or smoke, pull out the power plug immediately and contact your hands into the dispenser hole and ice chute. Do not insert your SAMSUNG Electronics service center. Never put bottles or glass containers in . If the refrigerator is disconnected from the inside walls of electric shock or fire. Service warranty section • Any changes or modifications...
... excessmoisture from the power supply, you sense pharmaceutical smells or smoke, pull out the power plug immediately and contact your hands into the dispenser hole and ice chute. Do not insert your SAMSUNG Electronics service center. Never put bottles or glass containers in . If the refrigerator is disconnected from the inside walls of electric shock or fire. Service warranty section • Any changes or modifications...
User Manual (user Manual) (ver.8.0) (English)
Page 4
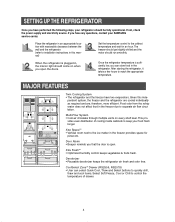
... following steps, your SAMSUNG service center. Place the refigerator in an appropriate location with reasonable clearance between the wall and the refrigerator. (refer to installation instructions in , the interior light should run smoothly. vides even distribution of drawer. 4 Once the refrigerator temperature is open the doors. MAJOR FEATURES Twin Cooling System • The refrigerator and the freezer have two evaporators. CoolSelect ZoneTM Drawer (RS2556, RS2578) • User can store food...
... following steps, your SAMSUNG service center. Place the refigerator in an appropriate location with reasonable clearance between the wall and the refrigerator. (refer to installation instructions in , the interior light should run smoothly. vides even distribution of drawer. 4 Once the refrigerator temperature is open the doors. MAJOR FEATURES Twin Cooling System • The refrigerator and the freezer have two evaporators. CoolSelect ZoneTM Drawer (RS2556, RS2578) • User can store food...
User Manual (user Manual) (ver.8.0) (English)
Page 5
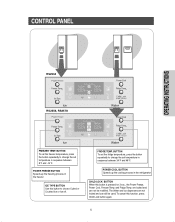
... freezer. ICE TYPE BUTTON Use this button is pressed for 3 sec., the Power Freeze, Power Cool, Freezer Temp. POWER COOL BUTTON Speeds up the freezing process in the refrigerator CHILD LOCK BUTTON When this button to choose Cubed or Crushed Ice or Ice off. The Water and Ice dispensers are locked and can still be modified. FRIDGE TEMP. are not locked and can not be used. and Fridge Temp. CONTROL PANEL OPERATING INSTRUCTIONS RS2534 RS2556, RS2578 FREEZER TEMP. BUTTON To set the fridge temperature, press the button repeatedly to change the set temperature...
... freezer. ICE TYPE BUTTON Use this button is pressed for 3 sec., the Power Freeze, Power Cool, Freezer Temp. POWER COOL BUTTON Speeds up the freezing process in the refrigerator CHILD LOCK BUTTON When this button to choose Cubed or Crushed Ice or Ice off. The Water and Ice dispensers are locked and can still be modified. FRIDGE TEMP. are not locked and can not be used. and Fridge Temp. CONTROL PANEL OPERATING INSTRUCTIONS RS2534 RS2556, RS2578 FREEZER TEMP. BUTTON To set the fridge temperature, press the button repeatedly to change the set temperature...
User Manual (user Manual) (ver.8.0) (English)
Page 6
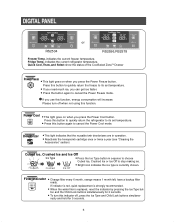
... refrigerator to stop making ice. • Bright icon indicates the ice type is replaced, reset the indicator by pressing the Ice Type but- If indicator is red, quick replacement is strongly recommended. • When the water filer is currently chosen. indicates the current refrigerator temperature. If you can get ice faster. • Press the button again to cancel the Power Cool mode. Please turn this button to quickly return the freeze to its set temperature. • If you need much ice...
... refrigerator to stop making ice. • Bright icon indicates the ice type is replaced, reset the indicator by pressing the Ice Type but- If indicator is red, quick replacement is strongly recommended. • When the water filer is currently chosen. indicates the current refrigerator temperature. If you can get ice faster. • Press the button again to cancel the Power Cool mode. Please turn this button to quickly return the freeze to its set temperature. • If you need much ice...
User Manual (user Manual) (ver.8.0) (English)
Page 7
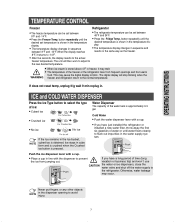
... the Fridge Temp. Ice stays in the dispenser opening to select the type of the water tank is obtained. This may occur. Push Push the ice dispenser lever with a cup. • Place a cup in line with a cup. • If you have just installed the refrigerator or installed a new water filter, throw away the first six glassfuls of water or until water flows cleanly to the normal temperature. The unit will stop blinking when...
... the Fridge Temp. Ice stays in the dispenser opening to select the type of the water tank is obtained. This may occur. Push Push the ice dispenser lever with a cup. • Place a cup in line with a cup. • If you have just installed the refrigerator or installed a new water filter, throw away the first six glassfuls of water or until water flows cleanly to the normal temperature. The unit will stop blinking when...
User Manual (user Manual) (ver.8.0) (English)
Page 8
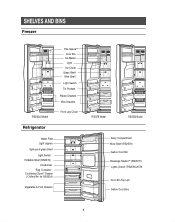
SHELVES AND BINS Freezer RS2534 Model Refrigerator Xtra SpaceTM Door Bin Ice Maker Light Ice Chute Glass Shelf Wire Shelf Light Switch Tilt Pockets Plastic Drawers Wire Drawers Front Leg Cover Water Filter Light (upper) Spill-proof glass Shelf Light Switch Foldable Shelf (RS2578) Deodorizer Egg Container CoolSelect ZoneTM Drawer ( Chilled Bin for RS2534) Vegetable & Fruit Drawers RS2578 Model RS2556 Model Dairy Compartment Wine Shelf (RS2578) Gallon Door Bin Beverage StationTM (RS2578) Lights (lower) (RS2556,2578) Door Bin Top Lips Gallon Door Bins 8
SHELVES AND BINS Freezer RS2534 Model Refrigerator Xtra SpaceTM Door Bin Ice Maker Light Ice Chute Glass Shelf Wire Shelf Light Switch Tilt Pockets Plastic Drawers Wire Drawers Front Leg Cover Water Filter Light (upper) Spill-proof glass Shelf Light Switch Foldable Shelf (RS2578) Deodorizer Egg Container CoolSelect ZoneTM Drawer ( Chilled Bin for RS2534) Vegetable & Fruit Drawers RS2578 Model RS2556 Model Dairy Compartment Wine Shelf (RS2578) Gallon Door Bin Beverage StationTM (RS2578) Lights (lower) (RS2556,2578) Door Bin Top Lips Gallon Door Bins 8
User Manual (user Manual) (ver.8.0) (English)
Page 11
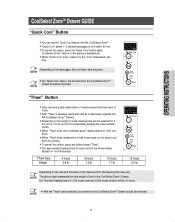
OPERATING INSTRUCTIONS CoolSelect ZoneTM Drawer GUIDE "Quick Cool" Button • You can be selected for 4 hrs, 6 hrs, 10 hrs, and 12 hrs sequentially, keeping the meat partially frozen. • When "Thaw" ends, the CoolSelect ZoneTM display returns to "chill" con- ting. NOTE • For "Quick Cool" option, the food stored in the CoolSelect ZoneTM Drawer should be removed. Ex) The total...
OPERATING INSTRUCTIONS CoolSelect ZoneTM Drawer GUIDE "Quick Cool" Button • You can be selected for 4 hrs, 6 hrs, 10 hrs, and 12 hrs sequentially, keeping the meat partially frozen. • When "Thaw" ends, the CoolSelect ZoneTM display returns to "chill" con- ting. NOTE • For "Quick Cool" option, the food stored in the CoolSelect ZoneTM Drawer should be removed. Ex) The total...
User Manual (user Manual) (ver.8.0) (English)
Page 13
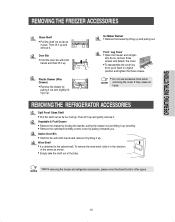
... in the direction of the tabs. • Before removing the freezer and refrigerator accessories, please move the stored foods to other space. Ice Maker Bucket • Remove the bucket by lifting it will go. OPERATING INSTRUCTIONS REMOVING THE FREEZER ACCESSORIES Glass Shelf • Pull the shelf out as far as it up. Door Bin • Hold the door bin with both hands and then lift it goes.
... in the direction of the tabs. • Before removing the freezer and refrigerator accessories, please move the stored foods to other space. Ice Maker Bucket • Remove the bucket by lifting it will go. OPERATING INSTRUCTIONS REMOVING THE FREEZER ACCESSORIES Glass Shelf • Pull the shelf out as far as it up. Door Bin • Hold the door bin with both hands and then lift it goes.
User Manual (user Manual) (ver.8.0) (English)
Page 14
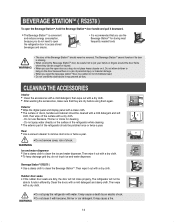
... exterior part of the refrigerator should be removed. CLEANING THE ACCESSORIES Interior • Clean the accessories with a mild detergent, then wipe out with a dry cloth. - Do not spray water directly on the door because there is a risk of personal injury or material damage. • When you open door as a tray, do not place heavy objects on it. WARNING Ice and water dispenser • Use a damp...
... exterior part of the refrigerator should be removed. CLEANING THE ACCESSORIES Interior • Clean the accessories with a mild detergent, then wipe out with a dry cloth. - Do not spray water directly on the door because there is a risk of personal injury or material damage. • When you open door as a tray, do not place heavy objects on it. WARNING Ice and water dispenser • Use a damp...
User Manual (user Manual) (ver.8.0) (English)
Page 16
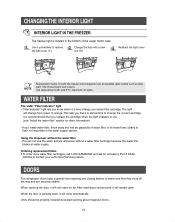
... tells you install water filter, throw away this first six glassfulls of the auger motor case. When opening and closing feature to make sure that it will remain open , it is located in the water supply system. When the door is time change from green to remove the light cover (➀). Using the dispenser without the water filter • You can not use the water and ice dispenser without a water filter cartridge because the water line blocks at...
... tells you install water filter, throw away this first six glassfulls of the auger motor case. When opening and closing feature to make sure that it will remain open , it is located in the water supply system. When the door is time change from green to remove the light cover (➀). Using the dispenser without the water filter • You can not use the water and ice dispenser without a water filter cartridge because the water line blocks at...
User Manual (user Manual) (ver.8.0) (English)
Page 17
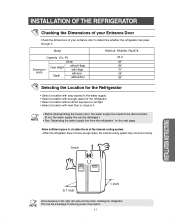
... space, the internal cooling system may not work correctly. 1 inch INSTALLATION INSTRUCTIONS 0.1 inch 1 inch NOTE Allow clearance to be disconnected. (If not, the water supply line can pass through it . NOTE • Before disassembling the freezer door, the water supply line needs to the right, left, back and top when installing the refrigerator. INSTALLATION OF THE REFRIGERATOR Checking the Dimensions of your Entrance Door Check the dimensions of reducing power consumption. 17
... space, the internal cooling system may not work correctly. 1 inch INSTALLATION INSTRUCTIONS 0.1 inch 1 inch NOTE Allow clearance to be disconnected. (If not, the water supply line can pass through it . NOTE • Before disassembling the freezer door, the water supply line needs to the right, left, back and top when installing the refrigerator. INSTALLATION OF THE REFRIGERATOR Checking the Dimensions of your Entrance Door Check the dimensions of reducing power consumption. 17
User Manual (user Manual) (ver.8.0) (English)
Page 24
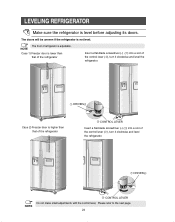
LEVELING REFRIGERATOR Make sure the refrigerator is adjustable. DIFFERENCE OF HEIGHT ➀ DRIVER(-) Case 2) Freezer door is higher than that of the refrigerator ➁ CONTROL LEVER Insert a flat-blade screwdriver (-) (➀) into a slot of the control lever (➁), turn it clockwise and level the refrigerator. DIFFERENCE OF HEIGHT ➀ DRIVER(-) NOTE ➁ CONTROL LEVER Do not make small adjustments with the control lever, Please refer to the next page. 24 NOTE Case...
LEVELING REFRIGERATOR Make sure the refrigerator is adjustable. DIFFERENCE OF HEIGHT ➀ DRIVER(-) Case 2) Freezer door is higher than that of the refrigerator ➁ CONTROL LEVER Insert a flat-blade screwdriver (-) (➀) into a slot of the control lever (➁), turn it clockwise and level the refrigerator. DIFFERENCE OF HEIGHT ➀ DRIVER(-) NOTE ➁ CONTROL LEVER Do not make small adjustments with the control lever, Please refer to the next page. 24 NOTE Case...
User Manual (user Manual) (ver.8.0) (English)
Page 25
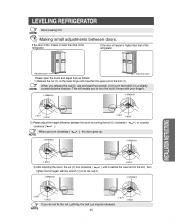
... ➂ WRENCH ➀ NUT ➁ BOLT ➀ NUT ➁ BOLT 2) Please adjust the height difference between doors. INSTALLATION INSTRUCTIONS Adjustment part Please open the doors and adjust then as follows: 1) Release the nut (①) on the lower hinge until it reaches the upper end of the refrigerator. NOTE Making small adjustments between the doors by turning the bolt (➁) clockwise ( clockwise ( ). ) or counter When you to...
... ➂ WRENCH ➀ NUT ➁ BOLT ➀ NUT ➁ BOLT 2) Please adjust the height difference between doors. INSTALLATION INSTRUCTIONS Adjustment part Please open the doors and adjust then as follows: 1) Release the nut (①) on the lower hinge until it reaches the upper end of the refrigerator. NOTE Making small adjustments between the doors by turning the bolt (➁) clockwise ( clockwise ( ). ) or counter When you to...
User Manual (user Manual) (ver.8.0) (English)
Page 26
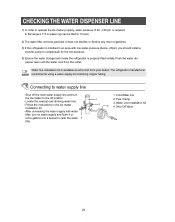
...- Locate the nearest cold drinking water line. - Follow the instructions in 10 secs. 2) The water filter removes particles. Cold Water line 2. penser lever until the water runs from your dealer. Pipe Clamp. 3. After connecting the water supply with low water pressure (below 20psi), you should install a booster pump to compensate for the low pressure. 4) Ensure the water storage tank inside the refrigerator is available at extra cost from the outlet. Water Line Installation Kit 4. Connecting to water supply line...
...- Locate the nearest cold drinking water line. - Follow the instructions in 10 secs. 2) The water filter removes particles. Cold Water line 2. penser lever until the water runs from your dealer. Pipe Clamp. 3. After connecting the water supply with low water pressure (below 20psi), you should install a booster pump to compensate for the low pressure. 4) Ensure the water storage tank inside the refrigerator is available at extra cost from the outlet. Water Line Installation Kit 4. Connecting to water supply line...
User Manual (user Manual) (ver.8.0) (English)
Page 27
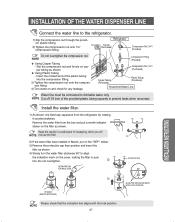
... POSITION. INSTALLATION OF THE WATER DISPENSER LINE Connect the water line to align the indication mark on the cover, locking the filter in March, put a month indicator sticker on the filter as shown. Do not overtighten. NOTE Using Copper Tubing - SEPARATION OF RED CAP (A) COVER FILTER INSTALLATION INSTRUCTIONS STICKER (MONTH INDICATION) Please check that the indication line aligns with the lock position. Remove the water filter from the refrigerator by rotating it counterclockwise. Install the water filter. 1) As...
... POSITION. INSTALLATION OF THE WATER DISPENSER LINE Connect the water line to align the indication mark on the cover, locking the filter in March, put a month indicator sticker on the filter as shown. Do not overtighten. NOTE Using Copper Tubing - SEPARATION OF RED CAP (A) COVER FILTER INSTALLATION INSTRUCTIONS STICKER (MONTH INDICATION) Please check that the indication line aligns with the lock position. Remove the water filter from the refrigerator by rotating it counterclockwise. Install the water filter. 1) As...
User Manual (user Manual) (ver.8.0) (English)
Page 28
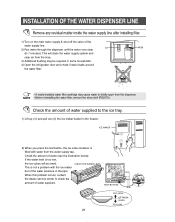
..., the ice cubes will clean the water supply system and clear air from the lines. 3) Additional flushing may cause water to check the amount of water supplied. When this problem occurs, contact the dealer service center to briefly spurt from the water supply tap. TEST BUTTON TOO HIGH OPTIMUM LEVEL TOO LOW 28 WATER • A newly-installed water filter cartridge may be small. INSTALLATION OF THE WATER DISPENSER LINE Remove any residual matter inside the water supply line after installing filter. 1) Turn on...
..., the ice cubes will clean the water supply system and clear air from the lines. 3) Additional flushing may cause water to check the amount of water supplied. When this problem occurs, contact the dealer service center to briefly spurt from the water supply tap. TEST BUTTON TOO HIGH OPTIMUM LEVEL TOO LOW 28 WATER • A newly-installed water filter cartridge may be small. INSTALLATION OF THE WATER DISPENSER LINE Remove any residual matter inside the water supply line after installing filter. 1) Turn on...
User Manual (user Manual) (ver.8.0) (English)
Page 29
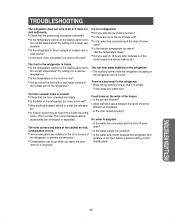
... the water line connected and the shut-off valve open ? • Is the freezer temperature too warm? (Set the temperature lower) • Did you store the food with a high water content in the refrigerator is frozen • Is the temperature control on the display panel set to the wall? This occurs because various accessories are hot; TROUBLESHOOTING The refrigerator does not work at all or it is airtight. Ice is not dispensed •...
... the water line connected and the shut-off valve open ? • Is the freezer temperature too warm? (Set the temperature lower) • Did you store the food with a high water content in the refrigerator is frozen • Is the temperature control on the display panel set to the wall? This occurs because various accessories are hot; TROUBLESHOOTING The refrigerator does not work at all or it is airtight. Ice is not dispensed •...
User Manual (user Manual) (ver.8.0) (English)
Page 30
... incorrect electrical line voltage, fluctuations and surges; Some states do not allow limitations on products purchased and used in the instruction book; Warranty service can only be presented upon request as stipulated herein, with new or reconditioned parts during the warranty labor period subject to provide for transportation of products, equipment, systems, utilities, services, parts, supplies, accessories, applications, installations, repairs, external plumbing and leaks, external wiring...
... incorrect electrical line voltage, fluctuations and surges; Some states do not allow limitations on products purchased and used in the instruction book; Warranty service can only be presented upon request as stipulated herein, with new or reconditioned parts during the warranty labor period subject to provide for transportation of products, equipment, systems, utilities, services, parts, supplies, accessories, applications, installations, repairs, external plumbing and leaks, external wiring...


