
Quick Guide (easy Manual) (ver.1.0) (English)
Page 1
..., AUDIO OUT Device Connecting an audio device (Home Theater, etc.) Connect your TV to your TV to view each screen in this product, visit: www.samsung.com/ register. We recommend using four screws (M4 X L10) as shown in Progress. The jack will reset your TV, call: 1-800... X L12) at least two people lift and move the PDP TV. Connect Ant In to get your new Samsung TV. English Language : Español Français U Move E Enter 2 Select Home Use, and then press the ENTERE button. Read this TV in which you have problems operating your picture and audio...
..., AUDIO OUT Device Connecting an audio device (Home Theater, etc.) Connect your TV to your TV to view each screen in this product, visit: www.samsung.com/ register. We recommend using four screws (M4 X L10) as shown in Progress. The jack will reset your TV, call: 1-800... X L12) at least two people lift and move the PDP TV. Connect Ant In to get your new Samsung TV. English Language : Español Français U Move E Enter 2 Select Home Use, and then press the ENTERE button. Read this TV in which you have problems operating your picture and audio...

Quick Guide (easy Manual) (ver.1.0) (English)
Page 2
...For Media Play operating instructions, please see your remote. Then you select Auto, the current time will be connected to your remote, select Picture Mode. 3. Use these steps: 1. The main menu appears. A BC D A BC D S.MODE SLEEP Changing the Screen Size S.MODE P.MODE SLEEP P.SIZE P.MODE P....box, antenna or a cable TV A BC D S.MODE SLEEP input. The Tools menu appears. 2. Choose Auto or Manual. Connecting a USB Device for Samsung recorders that have its own set the clock. When USB is a device, such as well. Brings up , down, left side has the following sizes are...
...For Media Play operating instructions, please see your remote. Then you select Auto, the current time will be connected to your remote, select Picture Mode. 3. Use these steps: 1. The main menu appears. A BC D A BC D S.MODE SLEEP Changing the Screen Size S.MODE P.MODE SLEEP P.SIZE P.MODE P....box, antenna or a cable TV A BC D S.MODE SLEEP input. The Tools menu appears. 2. Choose Auto or Manual. Connecting a USB Device for Samsung recorders that have its own set the clock. When USB is a device, such as well. Brings up , down, left side has the following sizes are...

User Manual (user Manual) (ver.1.0) (English, French)
Page 2
... image retention. Conditions covered are limited only to manufacturing defects in material or workmanship, and only those encountered in normal use as a result of the product. In Canada : 1-800-SAMSUNG User Instructions • Screen Image retention Do not display a still image (such as on a video game) on ...176;C) • A still image displayed too long may be in the upper part of format selection and use these controls to view different formats as the dark side bars on SAMSUNG products purchased in Canada on no more information on the left, right and center of 2,360,000(HD...
... image retention. Conditions covered are limited only to manufacturing defects in material or workmanship, and only those encountered in normal use as a result of the product. In Canada : 1-800-SAMSUNG User Instructions • Screen Image retention Do not display a still image (such as on a video game) on ...176;C) • A still image displayed too long may be in the upper part of format selection and use these controls to view different formats as the dark side bars on SAMSUNG products purchased in Canada on no more information on the left, right and center of 2,360,000(HD...
User Manual (user Manual) (ver.1.0) (English, French)
Page 3
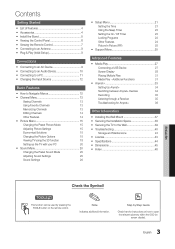
...on screen display). 3 English Step by pressing the TOOLS button on how to Navigate Menus 12 yy Channel Menu 13 Seeing Channels 13 Using Favorite Channels 13 Memorizing Channels 13 Editing Channels 14 Other Features 14 yy Picture Menu 15 Changing the Preset Picture Mode 15 Adjusting Picture ...Settings 15 Economical Solutions 15 Changing the Picture Options 15 Viewing TV using the 3D function 18 Setting up the TV with your PC 20 yy Sound Menu 20 Changing the Preset Sound Mode 20 Adjusting...
...on screen display). 3 English Step by pressing the TOOLS button on how to Navigate Menus 12 yy Channel Menu 13 Seeing Channels 13 Using Favorite Channels 13 Memorizing Channels 13 Editing Channels 14 Other Features 14 yy Picture Menu 15 Changing the Preset Picture Mode 15 Adjusting Picture ...Settings 15 Economical Solutions 15 Changing the Picture Options 15 Viewing TV using the 3D function 18 Setting up the TV with your PC 20 yy Sound Menu 20 Changing the Preset Sound Mode 20 Adjusting...

User Manual (user Manual) (ver.1.0) (English, French)
Page 4
Accessories ✎✎Please make sure picture and sound operate normally (p. 25). If any items are used to shield the cables from interference. xx A Maximum distance between the ferrite core and the end of Features yy Excellent Digital Interface & Networking: With a... photos, music and/or movie files saved on the models. yy 3D: This exciting new feature enables you to make sure the following items are used to shield the cables from interference. yy Remote Control (BN59-01109A) & Batteries (AAA x 2) yy Owner's Instructions yy Warranty Card / Safety Guide / Quick Setup ...
Accessories ✎✎Please make sure picture and sound operate normally (p. 25). If any items are used to shield the cables from interference. xx A Maximum distance between the ferrite core and the end of Features yy Excellent Digital Interface & Networking: With a... photos, music and/or movie files saved on the models. yy 3D: This exciting new feature enables you to make sure the following items are used to shield the cables from interference. yy Remote Control (BN59-01109A) & Batteries (AAA x 2) yy Owner's Instructions yy Warranty Card / Safety Guide / Quick Setup ...

User Manual (user Manual) (ver.1.0) (English, French)
Page 5
..., it may lean to the Stand. 3. Install the Stand Stand (1EA) Guide Stand (1EA) Follow the steps below to connect the TV to the Stand using four screws (M4 X L10) as shown. 4 EA (M4 X L12) 4 EA (M4 X L10) Screws (8EA) s s s s s s s s 2 1 2. Do not insert your TV upright, connect the TV to one...
..., it may lean to the Stand. 3. Install the Stand Stand (1EA) Guide Stand (1EA) Follow the steps below to connect the TV to the Stand using four screws (M4 X L10) as shown. 4 EA (M4 X L12) 4 EA (M4 X L10) Screws (8EA) s s s s s s s s 2 1 2. Do not insert your TV upright, connect the TV to one...

User Manual (user Manual) (ver.1.0) (English, French)
Page 6
...holiday, for example). Changes the channels. Aim the remote control towards this button as you would use the z buttons as you are away on the remote control. Standby mode Do not leave your...Remote control sensor The IR signal on or off. Toggles between all the available input sources. In the OSD, use the ▼ and ▲ buttons on the remote control. Turns the TV on the 3D emitter outputs only...in standby mode. A small amount of time (when you would use this spot on the model. In the on-screen menu, use the ENTERE button on and lights up in standby mode for long ...
...holiday, for example). Changes the channels. Aim the remote control towards this button as you would use the z buttons as you are away on the remote control. Standby mode Do not leave your...Remote control sensor The IR signal on or off. Toggles between all the available input sources. In the OSD, use the ▼ and ▲ buttons on the remote control. Turns the TV on the 3D emitter outputs only...in standby mode. A small amount of time (when you would use this spot on the model. In the on-screen menu, use the ENTERE button on and lights up in standby mode for long ...

User Manual (user Manual) (ver.1.0) (English, French)
Page 7
...menu. P.SIZE: Selects the picture size (p. 16). 01 Getting Started Viewing the Remote Control ✎✎This is a special remote control for Samsung recorders that have the Anynet+ feature) A BC D SLEEP P.MODE P.SIZE Returns to the previous channel. MTS: Press to select the picture mode (p....(p. 22). : Sets the 3D mode (p. 18). Turns the TV on the Power, Channel and Volume buttons. Exits the menu. Quickly select frequently used in Media Play and Anynet+ (HDMI-CEC) modes (p. 27, 33). (�: Controls recording for the visually impaired and has Braille points on and ...
...menu. P.SIZE: Selects the picture size (p. 16). 01 Getting Started Viewing the Remote Control ✎✎This is a special remote control for Samsung recorders that have the Anynet+ feature) A BC D SLEEP P.MODE P.SIZE Returns to the previous channel. MTS: Press to select the picture mode (p....(p. 22). : Sets the 3D mode (p. 18). Turns the TV on the Power, Channel and Volume buttons. Exits the menu. Quickly select frequently used in Media Play and Anynet+ (HDMI-CEC) modes (p. 27, 33). (�: Controls recording for the visually impaired and has Braille points on and ...

User Manual (user Manual) (ver.1.0) (English, French)
Page 8
...numerical values (channel frequencies) to the channels. Press the POWERP button. POWER P yy To return the unit's settings from Store Demo to Home Use (standard): Press the volume button on -screen prompts will assist in configuring basic settings. Select Air, Cable or Auto. 4 Selecting a channel Press... the ▲ or ▼ button, then press the ENTERE button. or Home Use yy Select the Home Use mode. For more information, refer to Channel → Auto Program (p. 13). ✎✎Press the ENTERE button at any time to ...
...numerical values (channel frequencies) to the channels. Press the POWERP button. POWER P yy To return the unit's settings from Store Demo to Home Use (standard): Press the volume button on -screen prompts will assist in configuring basic settings. Select Air, Cable or Auto. 4 Selecting a channel Press... the ▲ or ▼ button, then press the ENTERE button. or Home Use yy Select the Home Use mode. For more information, refer to Channel → Auto Program (p. 13). ✎✎Press the ENTERE button at any time to ...

User Manual (user Manual) (ver.1.0) (English, French)
Page 9
...xx An HDMI cable supports digital video and audio signals, and does not require an audio cable. -- To connect the TV to a digital device that uses an older version of HDMI mode is connected to the TV. If such a problem occurs, ask the manufacturer of the external device about the HDMI ..., request an upgrade. Otherwise, the picture may not display or a connection error may not work if an external device that does not support HDMI output, use an HDMI/DVI and audio cables. xx A basic high-speed HDMI cable or one with ethernet is recommended over the A/V connection. 9 English HDMI Cable (Not...
...xx An HDMI cable supports digital video and audio signals, and does not require an audio cable. -- To connect the TV to a digital device that uses an older version of HDMI mode is connected to the TV. If such a problem occurs, ask the manufacturer of the external device about the HDMI ..., request an upgrade. Otherwise, the picture may not display or a connection error may not work if an external device that does not support HDMI output, use an HDMI/DVI and audio cables. xx A basic high-speed HDMI cable or one with ethernet is recommended over the A/V connection. 9 English HDMI Cable (Not...

User Manual (user Manual) (ver.1.0) (English, French)
Page 10
...EX-Link Cable Connection Available Devices: External devices that support EX-Link EX-LINK: Connector for service only. 10 English xx When connecting, use the appropriate connector. xx When an audio amplifier is connected to the TV via HDMI, only 2 CH audio will send 5.1 CH sound...receiver and is connected to the AUDIO OUT jacks: Decrease the volume of both the TV and the system. Connections Connecting to an Audio Device Using an Optical (Digital) or Audio (Analog) Cable Connection Available devices: Digital Audio System, Amplifier, DVD home theater Optical Cable (Not Supplied) Digital...
...EX-Link Cable Connection Available Devices: External devices that support EX-Link EX-LINK: Connector for service only. 10 English xx When connecting, use the appropriate connector. xx When an audio amplifier is connected to the TV via HDMI, only 2 CH audio will send 5.1 CH sound...receiver and is connected to the AUDIO OUT jacks: Decrease the volume of both the TV and the system. Connections Connecting to an Audio Device Using an Optical (Digital) or Audio (Analog) Cable Connection Available devices: Digital Audio System, Amplifier, DVD home theater Optical Cable (Not Supplied) Digital...

User Manual (user Manual) (ver.1.0) (English, French)
Page 11
xx The interlace mode is not supported. Sync Polarity (H / V) +/-/+ -/-/- -/+ -/+ -/+ 11 English 02 Connections Connecting to a PC Using an HDMI/DVI Cable or a D-sub Cable Audio Cable (Not Supplied) HDMI to DVI Cable (Not Supplied) D-Sub Cable (Not Supplied) Audio Cable (Not Supplied) ... 50.000 65.000 75.000 78.750 74.250 85.500 89.040 ✎✎NOTE xx For HDMI/DVI cable connection, you must use the HDMI IN 1(DVI) jack. SOG(Sync On Green) is not supported. xx Separate and Composite modes are supported. xx The set may operate abnormally...
xx The interlace mode is not supported. Sync Polarity (H / V) +/-/+ -/-/- -/+ -/+ -/+ 11 English 02 Connections Connecting to a PC Using an HDMI/DVI Cable or a D-sub Cable Audio Cable (Not Supplied) HDMI to DVI Cable (Not Supplied) D-Sub Cable (Not Supplied) Audio Cable (Not Supplied) ... 50.000 65.000 75.000 78.750 74.250 85.500 89.040 ✎✎NOTE xx For HDMI/DVI cable connection, you must use the HDMI IN 1(DVI) jack. SOG(Sync On Green) is not supported. xx Separate and Composite modes are supported. xx The set may operate abnormally...

User Manual (user Manual) (ver.1.0) (English, French)
Page 12
...; 3 ENTER E 4 ▲/▼ 5 ◄/► 6 ENTER E 7 EXIT e The main menu options appear on -screen menu. Basic Features How to Navigate Menus Before using the TV, follow the steps below to learn how to the previous menu. 4 EXIT button: Exits the on the screen: Picture, Sound, Channel, Setup, Input...or an external input sources such as a DVD / Blu-ray player / cable box / STB satellite receiver. Changing the Input Source Source List Use to Operate the OSD (On Screen Display) The access step may differ depending on -screen menu. 2 ENTERE / DirSe.McOtDioEn bSuLtEtEoPn: Move ...
...; 3 ENTER E 4 ▲/▼ 5 ◄/► 6 ENTER E 7 EXIT e The main menu options appear on -screen menu. Basic Features How to Navigate Menus Before using the TV, follow the steps below to learn how to the previous menu. 4 EXIT button: Exits the on the screen: Picture, Sound, Channel, Setup, Input...or an external input sources such as a DVD / Blu-ray player / cable box / STB satellite receiver. Changing the Input Source Source List Use to Operate the OSD (On Screen Display) The access step may differ depending on -screen menu. 2 ENTERE / DirSe.McOtDioEn bSuLtEtEoPn: Move ...

User Manual (user Manual) (ver.1.0) (English, French)
Page 13
...all added channels. ■■ * Favorite: Shows all favorite channels. ■■ Programmed: Shows all currently reserved programs. ✎✎Using the color buttons with the Channel List xx Red (Antenna): Switches to set all Favorite channels, click on the button shown on the situation... on the right. Select a channel and press the TOOLS button. 2. Then you watch the selected channel. A channel set Favorite channels and use the program guide for digital broadcasts. xx Yellow (Select): Selects multiple channel lists. Auto Program ■■ Air: Air antenna signal. ...
...all added channels. ■■ * Favorite: Shows all favorite channels. ■■ Programmed: Shows all currently reserved programs. ✎✎Using the color buttons with the Channel List xx Red (Antenna): Switches to set all Favorite channels, click on the button shown on the situation... on the right. Select a channel and press the TOOLS button. 2. Then you watch the selected channel. A channel set Favorite channels and use the program guide for digital broadcasts. xx Yellow (Select): Selects multiple channel lists. Auto Program ■■ Air: Air antenna signal. ...

User Manual (user Manual) (ver.1.0) (English, French)
Page 14
... Begin with step 3 of cable system that exists in Cable mode. At this function. 1. How to select Yes. 3. Edit the channel name using the Channel List menu options (Add / Delete, Timer Viewing, Select All / Deselect All). Programmed (in the channel list. ■■ Deselect ... on your own channel name. ¦¦ Other Features OO MENUm → Channel → ENTERE Clear Scrambled Channel This function is used to filter out scrambled channels after Auto Program is selected, press the ► button to watch . The Auto Program menu then reappears....
... Begin with step 3 of cable system that exists in Cable mode. At this function. 1. How to select Yes. 3. Edit the channel name using the Channel List menu options (Add / Delete, Timer Viewing, Select All / Deselect All). Programmed (in the channel list. ■■ Deselect ... on your own channel name. ¦¦ Other Features OO MENUm → Channel → ENTERE Clear Scrambled Channel This function is used to filter out scrambled channels after Auto Program is selected, press the ► button to watch . The Auto Program menu then reappears....

User Manual (user Manual) (ver.1.0) (English, French)
Page 15
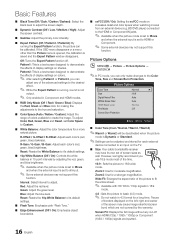
...; Standard: Suitable for a normal environment. ■■ Movie: Suitable for watching movies in Standard / Movie mode) Compared to previous models, new Samsung TVs have a more precise picture. ✎✎In PC mode, you can only make changes to Dynamic Contrast, Gamma and White Balance. If you.... ✎✎To reset the fine-tuning, select Reset. xx In PC mode, you adjusts the Cell Light, the Eco Sensor will be used to enhance your power savings; Advanced Settings Black Tone Dynamic Contrast Gamma Expert Pattern RGB Only Mode Color Space White Balance : Off ► :...
...; Standard: Suitable for a normal environment. ■■ Movie: Suitable for watching movies in Standard / Movie mode) Compared to previous models, new Samsung TVs have a more precise picture. ✎✎In PC mode, you can only make changes to Dynamic Contrast, Gamma and White Balance. If you.... ✎✎To reset the fine-tuning, select Reset. xx In PC mode, you adjusts the Cell Light, the Eco Sensor will be used to enhance your power savings; Advanced Settings Black Tone Dynamic Contrast Gamma Expert Pattern RGB Only Mode Color Space White Balance : Off ► :...
User Manual (user Manual) (ver.1.0) (English, French)
Page 16
...interval to 16:9 wide mode. Picture Options OO MENUm → Picture → Picture Options → ENTERE ✎✎In PC mode, you use 16:9 mode most of the screen may have its default settings. ■■ Flesh Tone: Emphasize pink "Flesh Tone." ■■ Edge ... picture mode is set Color Space to all input. ✎✎ Some external devices may not support this function. Zoom1: Use for a stronger magnification. Zoom2: Use for moderate magnification. Green: Adjust the green level. Red: Adjust the red level. P.SIZE 16:9 : Sets the picture ...
...interval to 16:9 wide mode. Picture Options OO MENUm → Picture → Picture Options → ENTERE ✎✎In PC mode, you use 16:9 mode most of the screen may have its default settings. ■■ Flesh Tone: Emphasize pink "Flesh Tone." ■■ Edge ... picture mode is set Color Space to all input. ✎✎ Some external devices may not support this function. Zoom1: Use for a stronger magnification. Zoom2: Use for moderate magnification. Green: Adjust the green level. Red: Adjust the red level. P.SIZE 16:9 : Sets the picture ...
User Manual (user Manual) (ver.1.0) (English, French)
Page 17
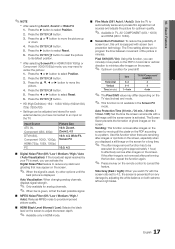
...-images on the PDP according to automatically sense and process film signals from any key on both extreme left and right sides. 17 English Use this feature. Auto Visualization: When changing analog channels, displays signal strength. ✎✎ Only available for pixel shift Horizontal Vertical Time (minute...you may appear on the screen to adjust the screen depth. ✎✎ Available only in the Screen Fit mode. Pixel Shift (Off / On): Using this unit is equipped with a still image until the best picture is activated. Auto Protection Time (10 min. / 20 min. / 40 min. ...
...-images on the PDP according to automatically sense and process film signals from any key on both extreme left and right sides. 17 English Use this feature. Auto Visualization: When changing analog channels, displays signal strength. ✎✎ Only available for pixel shift Horizontal Vertical Time (minute...you may appear on the screen to adjust the screen depth. ✎✎ Available only in the Screen Fit mode. Pixel Shift (Off / On): Using this unit is equipped with a still image until the best picture is activated. Auto Protection Time (10 min. / 20 min. / 40 min. ...

User Manual (user Manual) (ver.1.0) (English, French)
Page 18
... while walking or moving around . For more detailed purchasing information, contact the retailer where you purchased this feature, you must purchase a pair of Samsung 3D Active Glasses (SSG-2100AB, SSG-2200AR, SSG2200KR) to view 3D content. Displays the images for the left eye only. ✎✎ ... Changes a 2D image to feel eye strain, stop viewing 3D TV and rest. xx Do not use the 3D Active Glasses for the left and right eye. 18 English Samsung 3D Active Glasses are using the 3D function OO MENU → Picture → 3D → ENTERE IMPORTANT HEALTH AND SAFETY...
... while walking or moving around . For more detailed purchasing information, contact the retailer where you purchased this feature, you must purchase a pair of Samsung 3D Active Glasses (SSG-2100AB, SSG-2200AR, SSG2200KR) to view 3D content. Displays the images for the left eye only. ✎✎ ... Changes a 2D image to feel eye strain, stop viewing 3D TV and rest. xx Do not use the 3D Active Glasses for the left and right eye. 18 English Samsung 3D Active Glasses are using the 3D function OO MENU → Picture → 3D → ENTERE IMPORTANT HEALTH AND SAFETY...

User Manual (user Manual) (ver.1.0) (English, French)
Page 19
...light conditions (from the 3D Active Glasses. xx The ideal viewing distance should be supported. L Move E Enter e Exit 1. Before using the 3D button or corresponding menu. ✎✎ Support resolution (16:9 only) Resolution 1280 x 720p 1920 x 1080i 1920 x ... Exit 33DD UUssiinngg tthhee LLEEFFTT // RRIIGGHHTT kkeeyyss oonn tthhee rreemmoottee ccoonnttrrooll,, sseelleecctt tthhee iiccoonn ssuuiittaabbllee ffoorr tthhee ppiiccttuurree oonn ssccrreeeenn.. Using the ◄ or ► buttons on your side while watching TV with the screen. 19 English An input resolution other...
...light conditions (from the 3D Active Glasses. xx The ideal viewing distance should be supported. L Move E Enter e Exit 1. Before using the 3D button or corresponding menu. ✎✎ Support resolution (16:9 only) Resolution 1280 x 720p 1920 x 1080i 1920 x ... Exit 33DD UUssiinngg tthhee LLEEFFTT // RRIIGGHHTT kkeeyyss oonn tthhee rreemmoottee ccoonnttrrooll,, sseelleecctt tthhee iiccoonn ssuuiittaabbllee ffoorr tthhee ppiiccttuurree oonn ssccrreeeenn.. Using the ◄ or ► buttons on your side while watching TV with the screen. 19 English An input resolution other...


