Safety Guide (ENGLISH)
Page 1
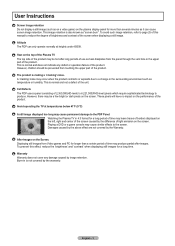
...SERVICING TO QUALIFIED PERSONNEL. To ensure reliable operation of this apparatus, and to contact an authorized service center, when installing your Samsung product before cleaning. • This appratus use any unusual sounds or smells coming from the outlet. Only a qualified technician ... outlets, extension cords or adaptors beyond their capacity, since this apparatus from the wall (see the information below.) * DLP TVs, Direct View Type TVs, and Projectors → 10cm * Products with heavy dust, high or low temperatures, high humidity, chemical substances and where it...
...SERVICING TO QUALIFIED PERSONNEL. To ensure reliable operation of this apparatus, and to contact an authorized service center, when installing your Samsung product before cleaning. • This appratus use any unusual sounds or smells coming from the outlet. Only a qualified technician ... outlets, extension cords or adaptors beyond their capacity, since this apparatus from the wall (see the information below.) * DLP TVs, Direct View Type TVs, and Projectors → 10cm * Products with heavy dust, high or low temperatures, high humidity, chemical substances and where it...

Safety Guide (ENGLISH)
Page 5
...circuit different from the U.S. It is available from that interference will be required to Identify and Resolve Radio/TV Interference Problems helpful. America QA Lab of Samsung 3351 Michelson Drive Suite #290, Irvine, CA92612 USA Warning User must accept any interference received, including ...Information Changes or modifications not expressly approved by one or more of the FCC Rules. Industry Canada Equipment Standard for product compliance: SAMSUNG ELECTRONICS CO., LTD. NOTE: This equipment has been tested and found to comply with NEMA configuration 5-15P type(parallel blades) ...
...circuit different from the U.S. It is available from that interference will be required to Identify and Resolve Radio/TV Interference Problems helpful. America QA Lab of Samsung 3351 Michelson Drive Suite #290, Irvine, CA92612 USA Warning User must accept any interference received, including ...Information Changes or modifications not expressly approved by one or more of the FCC Rules. Industry Canada Equipment Standard for product compliance: SAMSUNG ELECTRONICS CO., LTD. NOTE: This equipment has been tested and found to comply with NEMA configuration 5-15P type(parallel blades) ...
Safety Guide (ENGLISH)
Page 7
...-03242L-07.indd Sec1:7 - 7 - 2009-09-22 5:06:50 Mercury Statement (LCD Monitor, LCD TV, DLP Projection TV, Projector for energy efficiency. As an ENERGY STAR Partner, Samsung has determined that there is used, use caution when moving the cart/apparatus combination to rain or moisture, does... ENERGY STAR guidelines for USA only) Contains Mercury, Dispose According to certain features, settings and functionality in a rack or bookcase. Your Samsung TV is damaged, liquid has been spilled or objects have fallen into your safety. If the provided plug does not fit into the apparatus,...
...-03242L-07.indd Sec1:7 - 7 - 2009-09-22 5:06:50 Mercury Statement (LCD Monitor, LCD TV, DLP Projection TV, Projector for energy efficiency. As an ENERGY STAR Partner, Samsung has determined that there is used, use caution when moving the cart/apparatus combination to rain or moisture, does... ENERGY STAR guidelines for USA only) Contains Mercury, Dispose According to certain features, settings and functionality in a rack or bookcase. Your Samsung TV is damaged, liquid has been spilled or objects have fallen into your safety. If the provided plug does not fit into the apparatus,...
Quick Guide (ENGLISH)
Page 1
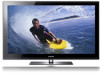
... Mississauga, Ontario L5R 4B2 Canada Plasma TV user manual BN68-01917B BN68-01917B-00 imagine the possibilities Thank you have any questions or comments relating to Samsung products, please contact the SAMSUNG customer care center. Contact SAMSUNG WORLD-WIDE If you for purchasing this Samsung product. Comment contacter Samsung dans le monde Si vous avez des...
... Mississauga, Ontario L5R 4B2 Canada Plasma TV user manual BN68-01917B BN68-01917B-00 imagine the possibilities Thank you have any questions or comments relating to Samsung products, please contact the SAMSUNG customer care center. Contact SAMSUNG WORLD-WIDE If you for purchasing this Samsung product. Comment contacter Samsung dans le monde Si vous avez des...
Quick Guide (ENGLISH)
Page 3
...still images from the panel through the vent hole in the surrounding environment such as temperature or humidity. Heat on the top of the Plasma TV The top side of the product may cause permanent damage to page 25 of this effect, reduce the 'brightness' and 'contrast' when ...cause similar effects to produce. Altitude The PDP can cause screen image retention. A 'cracking' noise may be hot after -images. Watching the Plasma TV in is not covered by the Warranty. Playing a DVD or a game console may produce partial after long periods of use as heat dissipates from Video...
...still images from the panel through the vent hole in the surrounding environment such as temperature or humidity. Heat on the top of the Plasma TV The top side of the product may cause permanent damage to page 25 of this effect, reduce the 'brightness' and 'contrast' when ...cause similar effects to produce. Altitude The PDP can cause screen image retention. A 'cracking' noise may be hot after -images. Watching the Plasma TV in is not covered by the Warranty. Playing a DVD or a game console may produce partial after long periods of use as heat dissipates from Video...
Quick Guide (ENGLISH)
Page 4
... Panel 6 ■ Viewing the Connection Panel 8 ■ Remote Control 9 Connections ■ Connecting VHF and UHF Antennas 10 ■ Connecting Cable TV 10 ■ Connecting a DVD / Blu-Ray Player or Cable Box / Satellite receiver (Set-Top Box) via HDMI 12 ■ Connecting a DVD...-Mount 48 ■ How to attach the Stand-Base 48 ■ Securing the TV to the Wall 49 ■ Wall Mount Kit Specifications (VESA 50 ■ Specifications 51 ■ Dimensions (PN50B550T2F/PN50B560T5F 52 ■ Dimensions (PN58B550T2F/PN58B560T5F 53 ■ Dimensions (PN63B550T2F 54 Symbol...
... Panel 6 ■ Viewing the Connection Panel 8 ■ Remote Control 9 Connections ■ Connecting VHF and UHF Antennas 10 ■ Connecting Cable TV 10 ■ Connecting a DVD / Blu-Ray Player or Cable Box / Satellite receiver (Set-Top Box) via HDMI 12 ■ Connecting a DVD...-Mount 48 ■ How to attach the Stand-Base 48 ■ Securing the TV to the Wall 49 ■ Wall Mount Kit Specifications (VESA 50 ■ Specifications 51 ■ Dimensions (PN50B550T2F/PN50B560T5F 52 ■ Dimensions (PN58B550T2F/PN58B560T5F 53 ■ Dimensions (PN63B550T2F 54 Symbol...
Quick Guide (ENGLISH)
Page 5
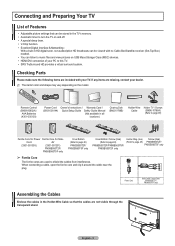
...Cable / Video Cable (PN58B550T2F/ PN58B560T5F only) Assembling the Cables Enclose the cables in the Holder-Wire Cable so that can be viewed with your TV. If any items are used to shield the cables from interference. Cord AV (3301-001305) (3301-001201) PN58B550T2F/ PN58B560T5F only Cover-Bottom ...-Bottom / Screw (2ea) (Refer to page 48) PN58B550T2F/PN58B560T5F/ PN63B550T2F only Holder-Ring (4ea) Screw (4ea) (Refer to page 48) PN50B550T2F/ PN50B560T5F only ➢ Ferrite Core The ferrite cores are missing, contact your PC to page 49) Ferrite Core for Power Ferrite Core for Side-...
...Cable / Video Cable (PN58B550T2F/ PN58B560T5F only) Assembling the Cables Enclose the cables in the Holder-Wire Cable so that can be viewed with your TV. If any items are used to shield the cables from interference. Cord AV (3301-001305) (3301-001201) PN58B550T2F/ PN58B560T5F only Cover-Bottom ...-Bottom / Screw (2ea) (Refer to page 48) PN58B550T2F/PN58B560T5F/ PN63B550T2F only Holder-Ring (4ea) Screw (4ea) (Refer to page 48) PN50B550T2F/ PN50B560T5F only ➢ Ferrite Core The ferrite cores are missing, contact your PC to page 49) Ferrite Core for Power Ferrite Core for Side-...
Quick Guide (ENGLISH)
Page 6
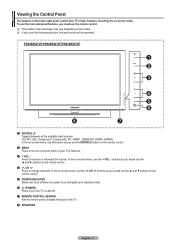
...lower-right panel control your TV's features. 3 + VOL - buttons as you would use this spot on the remote control. 4 < CH > Press to increase or decrease the volume. N The product color and shape may vary depending on -screen menu. PN50B550T2F/PN58B550T2F/PN63B550T2F 1 SOURCEE ...Toggles between all the available input sources (TV, AV1, AV2, Component1, Conponent2, PC, HDMI1, HDMI2/DVI, HDMI3, HDMI4). In the on -screen menu of...
...lower-right panel control your TV's features. 3 + VOL - buttons as you would use this spot on the remote control. 4 < CH > Press to increase or decrease the volume. N The product color and shape may vary depending on -screen menu. PN50B550T2F/PN58B550T2F/PN63B550T2F 1 SOURCEE ...Toggles between all the available input sources (TV, AV1, AV2, Component1, Conponent2, PC, HDMI1, HDMI2/DVI, HDMI3, HDMI4). In the on -screen menu of...

Quick Guide (ENGLISH)
Page 7
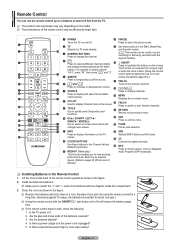
... remote control. 2 MENU Press to increase or decrease the volume. buttons as you would use the ▲ and ▼ buttons on -screen menu of your TV's features. 3 + VOL - In the on-screen menu, use the < CH > buttons as you would use the ◄ and ► buttons on the remote control. 4 ... mode. 6 REMOTE CONTROL SENSOR Aim the remote control towards this button as you use the ENTERE button on -screen menu, use this spot on the TV. 7 SPEAKERS 8 P POWER Touch the silver sensor below the (P) mark to change channels. Press to see an on the remote control. 5 POWER INDICATOR Blinks ...
... remote control. 2 MENU Press to increase or decrease the volume. buttons as you would use the ▲ and ▼ buttons on -screen menu of your TV's features. 3 + VOL - In the on-screen menu, use the < CH > buttons as you would use the ◄ and ► buttons on the remote control. 4 ... mode. 6 REMOTE CONTROL SENSOR Aim the remote control towards this button as you use the ENTERE button on -screen menu, use this spot on the TV. 7 SPEAKERS 8 P POWER Touch the silver sensor below the (P) mark to change channels. Press to see an on the remote control. 5 POWER INDICATOR Blinks ...
Quick Guide (ENGLISH)
Page 8
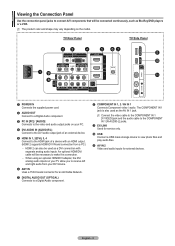
... IN 1 Connects Component video / audio. When using an optional HDMI/DVI adapter, the DVI analog audio inputs on your TV allow you to receive left and right audio from a PC.) - TV Rear Panel TV Side Panel 1 POWER IN Connects the supplied power cord. 2 AUDIO OUT Connect to a Digital Audio component. 3 PC IN [PC...
... IN 1 Connects Component video / audio. When using an optional HDMI/DVI adapter, the DVI analog audio inputs on your TV allow you to receive left and right audio from a PC.) - TV Rear Panel TV Side Panel 1 POWER IN Connects the supplied power cord. 2 AUDIO OUT Connect to a Digital Audio component. 3 PC IN [PC...
Quick Guide (ENGLISH)
Page 9
...; / RIGHT► / ENTER b EXIT Press to select channel "54-3", press "54", then press " " and "3". f MTS Press to select the picture mode. 2 TV % Use these buttons in the figure. 2. Close the cover as shown in the Channel list and Media Play function. # MEDIA.P (Media play) This function enables... Press to display and select the available video sources. ( MENU Displays the on-screen menu. 8 CH LIST Used to display Channel Lists on Samsung recorders with the diagram inside the compartment. 3. Use to select on-screen menu items and c P.SIZE change the channel. ( : This remote ...
...; / RIGHT► / ENTER b EXIT Press to select channel "54-3", press "54", then press " " and "3". f MTS Press to select the picture mode. 2 TV % Use these buttons in the figure. 2. Close the cover as shown in the Channel list and Media Play function. # MEDIA.P (Media play) This function enables... Press to display and select the available video sources. ( MENU Displays the on-screen menu. 8 CH LIST Used to display Channel Lists on Samsung recorders with the diagram inside the compartment. 3. Use to select on-screen menu items and c P.SIZE change the channel. ( : This remote ...

Quick Guide (ENGLISH)
Page 10
... have two antennas, see "Separate VHF and UHF Antennas". ❑ Antennas with 300 Ω Flat Twin Leads If you have two separate antennas for your TV (one VHF and one lead that looks like this , see "Antennas with 300 Ω Flat Twin Leads" below . 1. Use a screwdriver to the ...before connecting the antennas to the ANT OUT terminal on a 300-75 Ω adapter (not supplied). Connect the other end of this TV is connected to the TV. Connections Connecting VHF and UHF Antennas If your antenna has a set of leads that look like this , see "Antennas with 75 &#...
... have two antennas, see "Separate VHF and UHF Antennas". ❑ Antennas with 300 Ω Flat Twin Leads If you have two separate antennas for your TV (one VHF and one lead that looks like this , see "Antennas with 300 Ω Flat Twin Leads" below . 1. Use a screwdriver to the ...before connecting the antennas to the ANT OUT terminal on a 300-75 Ω adapter (not supplied). Connect the other end of this TV is connected to the TV. Connections Connecting VHF and UHF Antennas If your antenna has a set of leads that look like this , see "Antennas with 75 &#...

Quick Guide (ENGLISH)
Page 11
...Splitter IN CABLE OUT Cable Box Incoming cable Splitter IN CABLE OUT Cable Box A B RF (A/B) Switch 5. Incoming cable Splitter IN CABLE OUT A B RF (A/B) Switch TV Rear ANT IN After you have made this cable to the ANT IN terminal on the RF(A/B) switch. N This terminal might be labeled "ANT IN... splitter and the A-IN terminal on the cable box. 4. You will need a two-way splitter, an RF (A/B) switch, and four lengths of the TV. Find and disconnect the cable that Descrambles Some Channels If your TV to the cable box's output channel, which is connected to a two-way splitter.
...Splitter IN CABLE OUT Cable Box Incoming cable Splitter IN CABLE OUT Cable Box A B RF (A/B) Switch 5. Incoming cable Splitter IN CABLE OUT A B RF (A/B) Switch TV Rear ANT IN After you have made this cable to the ANT IN terminal on the RF(A/B) switch. N This terminal might be labeled "ANT IN... splitter and the A-IN terminal on the cable box. 4. You will need a two-way splitter, an RF (A/B) switch, and four lengths of the TV. Find and disconnect the cable that Descrambles Some Channels If your TV to the cable box's output channel, which is connected to a two-way splitter.
Quick Guide (ENGLISH)
Page 12
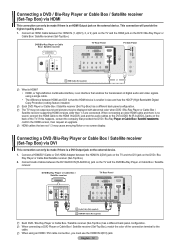
... Box / Satellite receiver (Set-Top Box). Connect a HDMI/DVI Cable or DVI-HDMI Adapter between the HDMI IN (1, 2(DVI), 3, or 4) jack on the TV and the HDMI jack on the DVD / BluRay Player or Cable Box/Satellite receiver (Set-Top Box). 2. N When using a single cable. • The difference... on the external device. When connecting an older HDMI cable and there is no screen display. DVD/Blu-Ray Player or Cable Box / Satellite receiver TV Rear Panel 2 Audio Cable (Not supplied) 1 HDMI/DVI Cable (Not supplied) N Each DVD / Blu-Ray Player or Cable Box / Satellite receiver (Set-...
... Box / Satellite receiver (Set-Top Box). Connect a HDMI/DVI Cable or DVI-HDMI Adapter between the HDMI IN (1, 2(DVI), 3, or 4) jack on the TV and the HDMI jack on the DVD / BluRay Player or Cable Box/Satellite receiver (Set-Top Box). 2. N When using a single cable. • The difference... on the external device. When connecting an older HDMI cable and there is no screen display. DVD/Blu-Ray Player or Cable Box / Satellite receiver TV Rear Panel 2 Audio Cable (Not supplied) 1 HDMI/DVI Cable (Not supplied) N Each DVD / Blu-Ray Player or Cable Box / Satellite receiver (Set-...
Quick Guide (ENGLISH)
Page 13
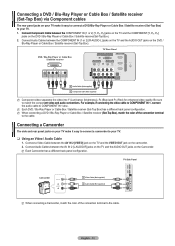
... a different back panel configuration. English - 13 Connecting a Camcorder The side and rear panel jacks on your TV make it easy to connect a camcorder to your TV. 1. ��C�o�n�n�e�c�t��C�o�m��p�o�n�e�... receiver (Set-Top Box) has a different back panel configuration. Connect a Video Cable between the AV IN 2 [L-AUDIO-R] jacks on the TV and the AUDIO OUT jacks on the Camcorder. Connecting a DVD / Blu-Ray Player or Cable Box / Satellite receiver (Set-Top Box)...
... a different back panel configuration. English - 13 Connecting a Camcorder The side and rear panel jacks on your TV make it easy to connect a camcorder to your TV. 1. ��C�o�n�n�e�c�t��C�o�m��p�o�n�e�... receiver (Set-Top Box) has a different back panel configuration. Connect a Video Cable between the AV IN 2 [L-AUDIO-R] jacks on the TV and the AUDIO OUT jacks on the Camcorder. Connecting a DVD / Blu-Ray Player or Cable Box / Satellite receiver (Set-Top Box)...
Quick Guide (ENGLISH)
Page 14
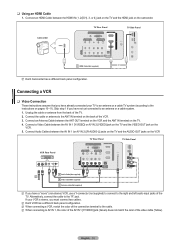
...connection terminal to the cable. Skip step 1 if you must connect two cables. N Each VCR has a different back panel configuration. English - 14 TV Rear Panel TV Side Panel Camcorder 1 HDMI Cable (Not supplied) or N Each Camcorder has a different back panel configuration. Connect a Video Cable between the AV IN...on the VCR. 5. Connect Audio Cables between the AV IN 1 [Y/VIDEO] or AV IN 2 [VIDEO] jack on the TV and the VIDEO OUT jack on the VCR TV Rear Panel TV Side Panel VCR Rear Panel 5 Audio Cable(Not supplied) 2 4 Video Cable(Not supplied) 3 Antenna cable(Not supplied) ...
...connection terminal to the cable. Skip step 1 if you must connect two cables. N Each VCR has a different back panel configuration. English - 14 TV Rear Panel TV Side Panel Camcorder 1 HDMI Cable (Not supplied) or N Each Camcorder has a different back panel configuration. Connect a Video Cable between the AV IN...on the VCR. 5. Connect Audio Cables between the AV IN 1 [Y/VIDEO] or AV IN 2 [VIDEO] jack on the TV and the VIDEO OUT jack on the VCR TV Rear Panel TV Side Panel VCR Rear Panel 5 Audio Cable(Not supplied) 2 4 Video Cable(Not supplied) 3 Antenna cable(Not supplied) ...
Quick Guide (ENGLISH)
Page 15
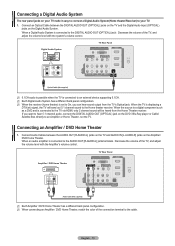
...Theater receiver. When an audio amplifier is set to On, you want to the AUDIO OUT [R-AUDIO-L] jacks terminals : Decrease the volume of the TV, and adjust the volume level with the system's volume control. N When the receiver (home theater) is connected to hear 5.1 channel audio, ... to an external device supporting 5.1CH. N When connecting an Amplifier / DVD Home Theater, match the color of the TV, and adjust the volume level with the Amplifier's volume control. TV Rear Panel Amplifier / DVD Home Theater Audio Cable (Not supplied) N Each Amplifier / DVD Home Theater has a different...
...Theater receiver. When an audio amplifier is set to On, you want to the AUDIO OUT [R-AUDIO-L] jacks terminals : Decrease the volume of the TV, and adjust the volume level with the system's volume control. N When the receiver (home theater) is connected to hear 5.1 channel audio, ... to an external device supporting 5.1CH. N When connecting an Amplifier / DVD Home Theater, match the color of the TV, and adjust the volume level with the Amplifier's volume control. TV Rear Panel Amplifier / DVD Home Theater Audio Cable (Not supplied) N Each Amplifier / DVD Home Theater has a different...
Quick Guide (ENGLISH)
Page 16
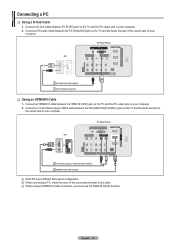
... your computer. 2. Connect an HDMI/DVI cable between the PC IN [AUDIO] jack on the TV and the Audio Out jack of the sound card on your computer. N When connecting a PC,.... Connect a 3.5 mm Stereo plug to 2RCA cable between PC IN [PC] jack on the TV and the PC output jack on your computer. 2. TV Rear Panel PC 2 PC Audio Cable (Not supplied) 1 D-Sub Cable (Not supplied) ❑... Stereo plug to the cable. Connect a D-Sub Cable between the DVI AUDIO IN [R-AUDIO-L] jack on the TV and the Audio Out jack of the connection terminal to 2 RCA Cable (Not supplied) 1 HDMI/DVI Cable ...
... your computer. 2. Connect an HDMI/DVI cable between the PC IN [AUDIO] jack on the TV and the Audio Out jack of the sound card on your computer. N When connecting a PC,.... Connect a 3.5 mm Stereo plug to 2RCA cable between PC IN [PC] jack on the TV and the PC output jack on your computer. 2. TV Rear Panel PC 2 PC Audio Cable (Not supplied) 1 D-Sub Cable (Not supplied) ❑... Stereo plug to the cable. Connect a D-Sub Cable between the DVI AUDIO IN [R-AUDIO-L] jack on the TV and the Audio Out jack of the connection terminal to 2 RCA Cable (Not supplied) 1 HDMI/DVI Cable ...
Quick Guide (ENGLISH)
Page 17
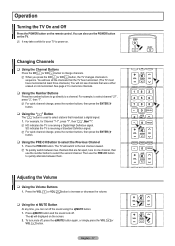
... 1. You can cut off , press the MMUTE button again, or simply press the VOL or VOL button. For example, to a channel. SD indicates the TV is receiving a Digital High Definition signal. Press the VOL or VOL button to increase or decrease the volume. ❑ Using the M MUTE Button At any... time, you press the CH or CH button, the TV changes channels in sequence. You will displayed on . Press MMUTE button and the sound cuts off. N For quick channel change , press the number buttons,...
... 1. You can cut off , press the MMUTE button again, or simply press the VOL or VOL button. For example, to a channel. SD indicates the TV is receiving a Digital High Definition signal. Press the VOL or VOL button to increase or decrease the volume. ❑ Using the M MUTE Button At any... time, you press the CH or CH button, the TV changes channels in sequence. You will displayed on . Press MMUTE button and the sound cuts off. N For quick channel change , press the number buttons,...

Quick Guide (ENGLISH)
Page 18
... control buttons clearly. 1. Viewing the Display The display identifies the current channel and the status of certain picture and sound settings. The TV will not be turned on which external input mode you are viewing. 1. English - 18 The Tools menu will be turned on for a moment.... TV #1 Fri, Dec 19 2:05 am O Press the INFO button once more detailed description of the remote control, the button backlight will appear. 2....
... control buttons clearly. 1. Viewing the Display The display identifies the current channel and the status of certain picture and sound settings. The TV will not be turned on which external input mode you are viewing. 1. English - 18 The Tools menu will be turned on for a moment.... TV #1 Fri, Dec 19 2:05 am O Press the INFO button once more detailed description of the remote control, the button backlight will appear. 2....


