Quick Guide Ver.1.0 (English)
Page 1
... 55 Standish Court Mississauga, Ontario L5R 4B2 Canada Samsung Electronics America, Inc. 85 Challenger Road Ridgefield Park, NJ 07660 Plasma TV user manual © 2014 Samsung Electronics Co., Ltd. Contact SAMSUNG WORLD WIDE If you have any questions or comments relating to Samsung products, please contact the SAMSUNG customer care center. All rights reserved. [PH4500-5000...
... 55 Standish Court Mississauga, Ontario L5R 4B2 Canada Samsung Electronics America, Inc. 85 Challenger Road Ridgefield Park, NJ 07660 Plasma TV user manual © 2014 Samsung Electronics Co., Ltd. Contact SAMSUNG WORLD WIDE If you have any questions or comments relating to Samsung products, please contact the SAMSUNG customer care center. All rights reserved. [PH4500-5000...
Quick Guide Ver.1.0 (English)
Page 4
...of use as heat dissipates from putting undue stress on the Screen. Your Samsung Plasma TV is not covered by the above effect is a high quality television that requires careful handling. A detailed User's Manual is also known as "screen burn". Figures and illustrations in the surrounding...as a safety precaution. Playing a DVD or a game console may produce partial afterimages. For more information about how to a change in this e-Manual, see page 11. Product design and specifications may differ from a video game or a small fixed channel logo, on the plasma display panel ...
...of use as heat dissipates from putting undue stress on the Screen. Your Samsung Plasma TV is not covered by the above effect is a high quality television that requires careful handling. A detailed User's Manual is also known as "screen burn". Figures and illustrations in the surrounding...as a safety precaution. Playing a DVD or a game console may produce partial afterimages. For more information about how to a change in this e-Manual, see page 11. Product design and specifications may differ from a video game or a small fixed channel logo, on the plasma display panel ...

Quick Guide Ver.1.0 (English)
Page 5
... TV port. If any items are missing, contact your dealer. ✎✎ The items' colors and shapes may vary depending on -screen user's manual built into your TV. Illustrations of Features • Media Play: Media Play lets you access, view, or play photos, videos, or music located... on USB devices and digital cameras. • e-Manual: Provides a detailed, on the model. ✎✎ Check that there are included with your TV. (page 11) Accessories and Cables ✎✎ Please...
... TV port. If any items are missing, contact your dealer. ✎✎ The items' colors and shapes may vary depending on -screen user's manual built into your TV. Illustrations of Features • Media Play: Media Play lets you access, view, or play photos, videos, or music located... on USB devices and digital cameras. • e-Manual: Provides a detailed, on the model. ✎✎ Check that there are included with your TV. (page 11) Accessories and Cables ✎✎ Please...
Quick Guide Ver.1.0 (English)
Page 8
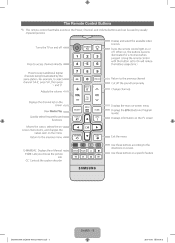
... usage time.) Press to the directions on the menu. Moves the cursor, selects the onscreen menu items, and changes the values seen on screen. E-MANUAL: Displays the e-Manual. Use these buttons in a specific feature. [PH4500-5000-ZA]BN68-05661A-00ENG.indb 8 English - 8 2014-01-03 10:30:43 Change channels. Turns the...
... usage time.) Press to the directions on the menu. Moves the cursor, selects the onscreen menu items, and changes the values seen on screen. E-MANUAL: Displays the e-Manual. Use these buttons in a specific feature. [PH4500-5000-ZA]BN68-05661A-00ENG.indb 8 English - 8 2014-01-03 10:30:43 Change channels. Turns the...
Quick Guide Ver.1.0 (English)
Page 11
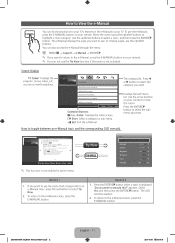
...comfortable display. ● Movie: Suitable for watching movies in a dark room. ● Entertain: Suitable for your TV's features in the e-Manual in some menus. N When connecting a PC, you want to use the right/left buttons to highlight a main category. Displays the sub-... index screen. E Enter: Select a category or sub-menu. The OSD window appears. 2. Select a mode using the right/left buttons. Try Now E-MANUAL Picture Picture Mode • Cell Light • Contrast • Brightness • Sharpness • Color • Tint (G/R) Standard 10 95 45 50 ...
...comfortable display. ● Movie: Suitable for watching movies in a dark room. ● Entertain: Suitable for your TV's features in the e-Manual in some menus. N When connecting a PC, you want to use the right/left buttons to highlight a main category. Displays the sub-... index screen. E Enter: Select a category or sub-menu. The OSD window appears. 2. Select a mode using the right/left buttons. Try Now E-MANUAL Picture Picture Mode • Cell Light • Contrast • Brightness • Sharpness • Color • Tint (G/R) Standard 10 95 45 50 ...
Quick Guide Ver.1.0 (English)
Page 12
...Magnifies a screen. } Blue (Index): Displays the Index screen. N When connecting a PC, you are viewing an e-Manual instruction page, press the { Yellow (Zoom) to the e-Manual screen, press the E-MANUAL button. b Green (Home): Moves to the previous or next page. You can only select Entertain and Standard. ●...room. ● Entertain: Suitable for watching movies and games. Press the Blue (Index) button on the index page English 1. The e-Manual page with the letter you can scroll through the magnified screen by using the u or d buttons. ✎✎ To return the ...
...Magnifies a screen. } Blue (Index): Displays the Index screen. N When connecting a PC, you are viewing an e-Manual instruction page, press the { Yellow (Zoom) to the e-Manual screen, press the E-MANUAL button. b Green (Home): Moves to the previous or next page. You can only select Entertain and Standard. ●...room. ● Entertain: Suitable for watching movies and games. Press the Blue (Index) button on the index page English 1. The e-Manual page with the letter you can scroll through the magnified screen by using the u or d buttons. ✎✎ To return the ...
Quick Guide Ver.1.0 (English)
Page 13
... Cannot Find a Channel Re-run Auto Program. (Go to MENU Broadcasting - Issues Solutions and Explanations Flickering and Dimming If your Samsung Television is not outputting a signal. The sleep timer turns the TV off because the cable or satellite box is flickering or dimming ...→ System → Time → Sleep Timer If the Sleep Timer is in the e-Manual. Auto Program). ✎✎ For detailed troubleshooting information, watch the troubleshooting videos at 1-800-SAMSUNG (1-800-726-7864). Troubleshooting If the TV seems to have a problem, first review this list...
... Cannot Find a Channel Re-run Auto Program. (Go to MENU Broadcasting - Issues Solutions and Explanations Flickering and Dimming If your Samsung Television is not outputting a signal. The sleep timer turns the TV off because the cable or satellite box is flickering or dimming ...→ System → Time → Sleep Timer If the Sleep Timer is in the e-Manual. Auto Program). ✎✎ For detailed troubleshooting information, watch the troubleshooting videos at 1-800-SAMSUNG (1-800-726-7864). Troubleshooting If the TV seems to have a problem, first review this list...
Quick Guide Ver.1.0 (English)
Page 16
...you insert them . • Loss of audio or video can be caused by USB (Go to resolution settings in this manual are using overly rigid or thick cables. Refer to samsung.com → Support). [PH4500-5000-ZA]BN68-05661A-00ENG.indb 16 English - 16 2014-01-03 10:30:51 TV... the picture so it moves slightly up scaled SD (4:3) contents. • Black bars will dissipate over time. Your settings are flexible enough for the SAMSUNG TV code. The Broadcasting menu is greyed • The Broadcasting menu is normal and will appear on the screen. • Go to operate the ...
...you insert them . • Loss of audio or video can be caused by USB (Go to resolution settings in this manual are using overly rigid or thick cables. Refer to samsung.com → Support). [PH4500-5000-ZA]BN68-05661A-00ENG.indb 16 English - 16 2014-01-03 10:30:51 TV... the picture so it moves slightly up scaled SD (4:3) contents. • Black bars will dissipate over time. Your settings are flexible enough for the SAMSUNG TV code. The Broadcasting menu is greyed • The Broadcasting menu is normal and will appear on the screen. • Go to operate the ...

Quick Guide Ver.1.0 (English)
Page 17
...• Do not use screws that do not comply with the wall mount. This may result in the table below. • Samsung wall mount kits contain a detailed installation manual and all parts necessary for any damage to the product or injury to yourself or others if you mount this product on... a wall, it may fall , leading to follow the product installation instructions. • Do not mount the TV at 1-800-SAMSUNG (1-800-726-7864). ...
...• Do not use screws that do not comply with the wall mount. This may result in the table below. • Samsung wall mount kits contain a detailed installation manual and all parts necessary for any damage to the product or injury to yourself or others if you mount this product on... a wall, it may fall , leading to follow the product installation instructions. • Do not mount the TV at 1-800-SAMSUNG (1-800-726-7864). ...
Quick Guide Ver.1.0 (English)
Page 19
.... 3. ABOUT DIVX VIDEO-ON-DEMAND: This DivX Certified® device must be purchased separately. com for additional information on how to the manual provided with the lock attached through the looped end of DTS, Inc. ©2012 DTS, Inc. The Kensington Lock is an official DivX...929 and 7,548,853. This is not supplied by DivX, LLC, a subsidiary of the following U.S. Open Source License Notice is a digital video format created by Samsung. ✎✎ Please find a "K" icon on the product. 4. Be sure to the Kensington slot on the model. Patent No's: 6,285,767, 8,027...
.... 3. ABOUT DIVX VIDEO-ON-DEMAND: This DivX Certified® device must be purchased separately. com for additional information on how to the manual provided with the lock attached through the looped end of DTS, Inc. ©2012 DTS, Inc. The Kensington Lock is an official DivX...929 and 7,548,853. This is not supplied by DivX, LLC, a subsidiary of the following U.S. Open Source License Notice is a digital video format created by Samsung. ✎✎ Please find a "K" icon on the product. 4. Be sure to the Kensington slot on the model. Patent No's: 6,285,767, 8,027...
User Manual Ver.1.0 (English)
Page 9
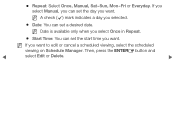
NN A check (c) mark indicates a day you want to edit or cancel a scheduled viewing, select the scheduled viewing on Schedule Manager. ●● Repeat: Select Once, Manual, Sat~Sun, Mon~Fri or Everyday. NN Date is available only when you select Once in Repeat. ●● Start Time: You can set the start time you want . If you select Manual, you can set the day you want . NN If you selected. ●● Date: You can set a desired date. Then, press the ENTERE button and ◀ select Edit or Delete. ▶
NN A check (c) mark indicates a day you want to edit or cancel a scheduled viewing, select the scheduled viewing on Schedule Manager. ●● Repeat: Select Once, Manual, Sat~Sun, Mon~Fri or Everyday. NN Date is available only when you select Once in Repeat. ●● Start Time: You can set the start time you want . If you select Manual, you can set the day you want . NN If you selected. ●● Date: You can set a desired date. Then, press the ENTERE button and ◀ select Edit or Delete. ▶
User Manual Ver.1.0 (English)
Page 29
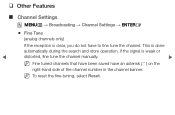
❑❑ Other Features ■■ Channel Settings OO MENUm → Broadcasting → Channel Settings → ENTERE ●● Fine Tune (analog channels only) If the reception is clear, you do not have an asterisk ( * ) on the right-hand side of the channel number in the channel banner. If the signal is done automatically during the search and store operation. NN To reset the fine-tuning, select Reset. This is weak or ◀ distorted, fine tune the channel manually. ▶ NN Fine tuned channels that have been saved have to fine tune the channel.
❑❑ Other Features ■■ Channel Settings OO MENUm → Broadcasting → Channel Settings → ENTERE ●● Fine Tune (analog channels only) If the reception is clear, you do not have an asterisk ( * ) on the right-hand side of the channel number in the channel banner. If the signal is done automatically during the search and store operation. NN To reset the fine-tuning, select Reset. This is weak or ◀ distorted, fine tune the channel manually. ▶ NN Fine tuned channels that have been saved have to fine tune the channel.

User Manual Ver.1.0 (English)
Page 69
NN You must have cable or an antenna connected to the TV to have the TV set the time correctly. NN Depending on the broadcast station and signal, Auto may not set the time automatically. ●● Manual: Set the current time manually. Clock Mode: Set the current time manually or automatically. ●● Auto: The TV sets the current time automatically using the time from a digital channel. If this occurs, set the time manually. ◀ ▶
NN You must have cable or an antenna connected to the TV to have the TV set the time correctly. NN Depending on the broadcast station and signal, Auto may not set the time automatically. ●● Manual: Set the current time manually. Clock Mode: Set the current time manually or automatically. ●● Auto: The TV sets the current time automatically using the time from a digital channel. If this occurs, set the time manually. ◀ ▶

User Manual Ver.1.0 (English)
Page 70
DST: Switches the DST (Daylight Saving Time) function on or off. NN Available only when Clock Mode is set to Auto. ◀ ▶ NN This function is only available when the Clock Mode is set to Manual. Use the number buttons or the u/d buttons to the next. Press ENTERE when done. Select Clock Set. Select Date or Time, and then press ENTERE. Use the l/r buttons to move from one entry field to enter numbers. Clock Set: Set the Date and Time.
DST: Switches the DST (Daylight Saving Time) function on or off. NN Available only when Clock Mode is set to Auto. ◀ ▶ NN This function is only available when the Clock Mode is set to Manual. Use the number buttons or the u/d buttons to the next. Press ENTERE when done. Select Clock Set. Select Date or Time, and then press ENTERE. Use the l/r buttons to move from one entry field to enter numbers. Clock Set: Set the Date and Time.

User Manual Ver.1.0 (English)
Page 73
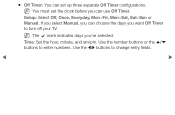
If you select Manual, you can choose the days you 've selected. NN The c mark indicates days you want On Timer ▶ to turn on a day of your TV. NN You must set up three separate On Timer configurations. ❑❑ Setting the On/Off Timer OO MENUm → System → Time → On Timer Off Timer → ENTERE Set On Timer so that your TV turns on automatically at a time and on your choosing. ●● On Timer: You can set the clock before you can use On Timer. Setup: Select Off, Once, Everyday, Mon~Fri, Mon~Sat, Sat~Sun, or ◀ Manual.
If you select Manual, you can choose the days you 've selected. NN The c mark indicates days you want On Timer ▶ to turn on a day of your TV. NN You must set up three separate On Timer configurations. ❑❑ Setting the On/Off Timer OO MENUm → System → Time → On Timer Off Timer → ENTERE Set On Timer so that your TV turns on automatically at a time and on your choosing. ●● On Timer: You can set the clock before you can use On Timer. Setup: Select Off, Once, Everyday, Mon~Fri, Mon~Sat, Sat~Sun, or ◀ Manual.
User Manual Ver.1.0 (English)
Page 77
●● Off Timer: You can choose the days you want Off Timer to turn off your TV. If you select Manual, you can set the clock before you 've selected. NN You must set up three separate Off Timer configurations. NN The c mark indicates days you can use Off Timer. Use the l/r buttons to enter numbers. Setup: Select Off, Once, Everyday, Mon~Fri, Mon~Sat, Sat~Sun or Manual. Time: Set the hour, minute, and am/pm. Use the number buttons or the u/d buttons to change entry fields. ◀ ▶
●● Off Timer: You can choose the days you want Off Timer to turn off your TV. If you select Manual, you can set the clock before you 've selected. NN You must set up three separate Off Timer configurations. NN The c mark indicates days you can use Off Timer. Use the l/r buttons to enter numbers. Setup: Select Off, Once, Everyday, Mon~Fri, Mon~Sat, Sat~Sun or Manual. Time: Set the hour, minute, and am/pm. Use the number buttons or the u/d buttons to change entry fields. ◀ ▶

User Manual Ver.1.0 (English)
Page 79
... display brightness may change (become slightly darker in power saving mode. ◀ ●● Auto Power Off: The TV will automatically turn off if you manually adjust the minimum screen brightness.
... display brightness may change (become slightly darker in power saving mode. ◀ ●● Auto Power Off: The TV will automatically turn off if you manually adjust the minimum screen brightness.

User Manual Ver.1.0 (English)
Page 88
NN You can only choose external devices that are highlighted. ◀ NN For detailed information, refer to the TV. ❑❑ Using the Source List ■■ Source List OO MENUm → Applications → Source List→ ENTERE NN When you press the SOURCE button, the Source screen is displayed immediately. In the Source list, connected inputs are connected to "Changing the Input Source" in the paper ▶ User Manual.
NN You can only choose external devices that are highlighted. ◀ NN For detailed information, refer to the TV. ❑❑ Using the Source List ■■ Source List OO MENUm → Applications → Source List→ ENTERE NN When you press the SOURCE button, the Source screen is displayed immediately. In the Source list, connected inputs are connected to "Changing the Input Source" in the paper ▶ User Manual.
User Manual Ver.1.0 (English)
Page 90
Select a file to the TV screen. 9. To disconnect the USB device, go to "Using Media Play" in the e-Manual. You can change this by pressing the RETURN button until you selected in Step 3. Press the EXIT button to exit to view or play, and ...then press the ENTERE button. 7. Press the RETURN button to exit a current screen and go to "Disconnecting a USB Device" in the e-Manual. 8. 6. For information about controlling playback, go to see music files. NN Even though the player will display folders for all Content Types, it will only...
Select a file to the TV screen. 9. To disconnect the USB device, go to "Using Media Play" in the e-Manual. You can change this by pressing the RETURN button until you selected in Step 3. Press the EXIT button to exit to view or play, and ...then press the ENTERE button. 7. Press the RETURN button to exit a current screen and go to "Disconnecting a USB Device" in the e-Manual. 8. 6. For information about controlling playback, go to see music files. NN Even though the player will display folders for all Content Types, it will only...

User Manual Ver.1.0 (English)
Page 97
If necessary, use the u/d/l/r buttons to view or play, and then press the ENTERE or ∂ button on your remote. 7. Press the RETURN button to exit a current screen and go to "Playing selected files" and "Controlling Photo / Video / Music Playback" in the ▶ e-Manual. For information about controlling playback, go to "Disconnecting a USB Device" in the e-Manual. 8. 5. To disconnect the USB device, go to the TV screen. ◀ 9. Select a file to select a folder, and then press the ENTERE button. 6. Press the EXIT button to exit to the previous screen.
If necessary, use the u/d/l/r buttons to view or play, and then press the ENTERE or ∂ button on your remote. 7. Press the RETURN button to exit a current screen and go to "Playing selected files" and "Controlling Photo / Video / Music Playback" in the ▶ e-Manual. For information about controlling playback, go to "Disconnecting a USB Device" in the e-Manual. 8. 5. To disconnect the USB device, go to the TV screen. ◀ 9. Select a file to select a folder, and then press the ENTERE button. 6. Press the EXIT button to exit to the previous screen.


