Quick Guide (easy Manual) (ver.1.0) (English)
Page 1
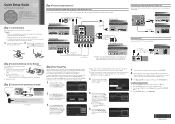
...TV memorizes the available channels. Cable : 35 48% Stop E Enter m Skip Plug & Play Set the Clock Mode. If you select Store Demo, the TV will not match the color of your new Samsung TV. Connecting an audio device (Home Theater, etc.) Connect your TV to DVI Cable AUDIO OUT...home. Cable : -- Clock Mode Auto Manual U Move E Enter m Skip Plug & Play Set to select Setup, and then press the ENTERE button. 4. screen appears. STOP Please do not return this product, visit: www.samsung.com/ register. Plug & Play Select the Antenna source to the Stand as a Monitor. DTV...
...TV memorizes the available channels. Cable : 35 48% Stop E Enter m Skip Plug & Play Set the Clock Mode. If you select Store Demo, the TV will not match the color of your new Samsung TV. Connecting an audio device (Home Theater, etc.) Connect your TV to DVI Cable AUDIO OUT...home. Cable : -- Clock Mode Auto Manual U Move E Enter m Skip Plug & Play Set to select Setup, and then press the ENTERE button. 4. screen appears. STOP Please do not return this product, visit: www.samsung.com/ register. Plug & Play Select the Antenna source to the Stand as a Monitor. DTV...

Quick Guide (easy Manual) (ver.1.0) (English)
Page 2
...P.MODE: Press to a cable or satellite box, change to the USB jack on your TV. With the TV on, press the MENU button on Samsung recorders that have a cable box or satellite receiver, it , your remote. Change the channels by the same station. Cuts off when HDMI (720p... (�: Controls recording on your TV is attached to select the picture mode. Quickly select frequently used in a normally lit room. Sources can set the clock, follow these steps: 1. If you change the channel using the time from a source connected to select additional channels (digital) being...
...P.MODE: Press to a cable or satellite box, change to the USB jack on your TV. With the TV on, press the MENU button on Samsung recorders that have a cable box or satellite receiver, it , your remote. Change the channels by the same station. Cuts off when HDMI (720p... (�: Controls recording on your TV is attached to select the picture mode. Quickly select frequently used in a normally lit room. Sources can set the clock, follow these steps: 1. If you change the channel using the time from a source connected to select additional channels (digital) being...
User Manual (user Manual) (ver.1.0) (English)
Page 3
... Picture Options 15 yy Sound Menu 16 Changing the Preset Sound Mode 16 Adjusting Sound Settings 17 Sound Settings 17 yy Setup Menu 17 Setting the Time 17 Using the Sleep Timer 18 Setting the On/Off Timer 18 Locking Programs 18 Other Features 20 Economical Solutions 21 yy ...Support Menu 21 Advanced Features yy Media Play 22 Connecting a USB Device 22 Using the Media Play Menu 22 yy Anynet 26 Setting Up Anynet+ 27 Switching between Anynet+ Devices 27 Recording 27 Listening through a Receiver 28 Troubleshooting for instructions on how to the Wall ...
... Picture Options 15 yy Sound Menu 16 Changing the Preset Sound Mode 16 Adjusting Sound Settings 17 Sound Settings 17 yy Setup Menu 17 Setting the Time 17 Using the Sleep Timer 18 Setting the On/Off Timer 18 Locking Programs 18 Other Features 20 Economical Solutions 21 yy ...Support Menu 21 Advanced Features yy Media Play 22 Connecting a USB Device 22 Using the Media Play Menu 22 yy Anynet 26 Setting Up Anynet+ 27 Switching between Anynet+ Devices 27 Recording 27 Listening through a Receiver 28 Troubleshooting for instructions on how to the Wall ...
User Manual (user Manual) (ver.1.0) (English)
Page 4
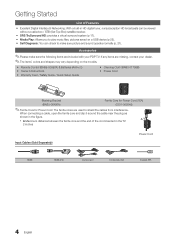
... Cables (Sold Separately) Power Cord HDMI HDMI-DVI Component Composite (AV) Coaxial (RF) 4 English yy Self Diagnosis: You can be viewed without a cable box / STB (Set-Top-Box) satellite receiver. Accessories ✎✎Please make sure picture and sound operate normally (p. 21). xx A Maximum distance between the ferrite core and the...
... Cables (Sold Separately) Power Cord HDMI HDMI-DVI Component Composite (AV) Coaxial (RF) 4 English yy Self Diagnosis: You can be viewed without a cable box / STB (Set-Top-Box) satellite receiver. Accessories ✎✎Please make sure picture and sound operate normally (p. 21). xx A Maximum distance between the ferrite core and the...

User Manual (user Manual) (ver.1.0) (English)
Page 8
... 1 Selecting a language Press the ▲ or ▼ button, then press the ENTERE button. Select the channel source to the channels. When setting the antenna source to Cable, a step appears allowing you to Reset This Feature... yy Auto: Allows you to assign numerical values (channel frequencies) ...to memorize. Select Air, Cable or Auto. 4 Selecting a channel 5 Setting the Clock Mode 6 View the HD Connection Guide. If You Want to select DST (Daylight Saving Time) mode and time zone. VHF/UHF ...
... 1 Selecting a language Press the ▲ or ▼ button, then press the ENTERE button. Select the channel source to the channels. When setting the antenna source to Cable, a step appears allowing you to Reset This Feature... yy Auto: Allows you to assign numerical values (channel frequencies) ...to memorize. Select Air, Cable or Auto. 4 Selecting a channel 5 Setting the Clock Mode 6 View the HD Connection Guide. If You Want to select DST (Daylight Saving Time) mode and time zone. VHF/UHF ...
User Manual (user Manual) (ver.1.0) (English)
Page 9
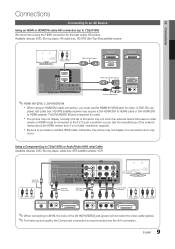
...). ✎✎For better picture quality, the Component connection is connected to the TV. Available devices: DVD, Blu-ray player, HD cable box, HD STB (Set-Top-Box) satellite receiver R W Red White HDMI Cable (Not Supplied) Device HDMI OUT Device HDMI to DVI Cable (Not Supplied) DVI OUT Audio Cable (Not...
...). ✎✎For better picture quality, the Component connection is connected to the TV. Available devices: DVD, Blu-ray player, HD cable box, HD STB (Set-Top-Box) satellite receiver R W Red White HDMI Cable (Not Supplied) Device HDMI OUT Device HDMI to DVI Cable (Not Supplied) DVI OUT Audio Cable (Not...

User Manual (user Manual) (ver.1.0) (English)
Page 10
When the source is a digital component such as a DVD / Blu-ray player / cable box / STB (Set-Top-Box) satellite receiver and is connected to the AUDIO OUT jacks: Decrease the volume of both the TV and the system. xx When an ... Audio System is connected to the amplifier or DVD home theater. xx When connecting, use the appropriate connector. xx When the receiver (home theater) is set to on, you want to hear 5.1 CH audio, connect the digital audio out jack from the amplifier or DVD home theater.
When the source is a digital component such as a DVD / Blu-ray player / cable box / STB (Set-Top-Box) satellite receiver and is connected to the AUDIO OUT jacks: Decrease the volume of both the TV and the system. xx When an ... Audio System is connected to the amplifier or DVD home theater. xx When connecting, use the appropriate connector. xx When the receiver (home theater) is set to on, you want to hear 5.1 CH audio, connect the digital audio out jack from the amplifier or DVD home theater.

User Manual (user Manual) (ver.1.0) (English)
Page 11
....250 85.500 89.040 Sync Polarity (H / V) +/-/+ -/-/- -/+ -/+ -/+ PN42C430 > > > > > ✎✎NOTE xx For HDMI/DVI cable connection, you should set may operate abnormally if a non-standard video format is selected. xx The set the TV to the TV. Edit Name OO MENUm → Input → Edit Name → ENTERE ■■ VCR...
....250 85.500 89.040 Sync Polarity (H / V) +/-/+ -/-/- -/+ -/+ -/+ PN42C430 > > > > > ✎✎NOTE xx For HDMI/DVI cable connection, you should set may operate abnormally if a non-standard video format is selected. xx The set the TV to the TV. Edit Name OO MENUm → Input → Edit Name → ENTERE ■■ VCR...
User Manual (user Manual) (ver.1.0) (English)
Page 12
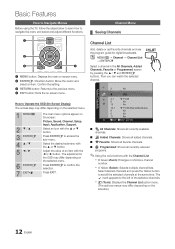
...in the All Channels, Added Channels, Favorite or Programmed screen by pressing the ▲ / ▼ and ENTERE buttons. Channel List Add, delete or set all currently reserved programs. ✎✎Using the color buttons with the ▲ or ▼ button. xx Yellow (Select): Selects multiple channel lists... on the situation.) 12 English Select desired channels and press the Yellow button to access the sub-menu. Press ENTERE to set Favorite channels and use the program guide for digital broadcasts. Press ENTERE to navigate the menu and select and adjust different functions...
...in the All Channels, Added Channels, Favorite or Programmed screen by pressing the ▲ / ▼ and ENTERE buttons. Channel List Add, delete or set all currently reserved programs. ✎✎Using the color buttons with the ▲ or ▼ button. xx Yellow (Select): Selects multiple channel lists... on the situation.) 12 English Select desired channels and press the Yellow button to access the sub-menu. Press ENTERE to set Favorite channels and use the program guide for digital broadcasts. Press ENTERE to navigate the menu and select and adjust different functions...
User Manual (user Manual) (ver.1.0) (English)
Page 13
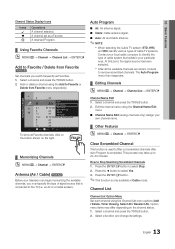
... (Add / Delete, Timer Viewing, Select All / Deselect All). Press the ENTERE button to Stop Searching Scrambled Channels 1. Select a function and change its settings. 13 English Auto Program ■■ Air: Air antenna signal. ■■ Cable: Cable antenna signal. ■■ Auto: Air and Cable... are stored, it starts to identify the type of signal source that exists in Cable mode. Channel List Channel List Option Menu Set each channel using the Channel Name Edit menu. ■■ Channel Name Edit (analog channels only): Assign your particular area. ...
... (Add / Delete, Timer Viewing, Select All / Deselect All). Press the ENTERE button to Stop Searching Scrambled Channels 1. Select a function and change its settings. 13 English Auto Program ■■ Air: Air antenna signal. ■■ Cable: Cable antenna signal. ■■ Auto: Air and Cable... are stored, it starts to identify the type of signal source that exists in Cable mode. Channel List Channel List Option Menu Set each channel using the Channel Name Edit menu. ■■ Channel Name Edit (analog channels only): Assign your particular area. ...
User Manual (user Manual) (ver.1.0) (English)
Page 14
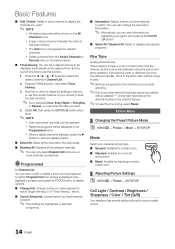
... in the Programmed menu. xx Delete a channel from the Added Channels or Favorite menu in the same manner. ■■ Timer Viewing: You can set a desired channel to watch . (You can also change the reservation Information.) ✎✎ Alternatively, you can view Information by highlighting a program and.... xx A gray-colored channel indicates the channel has been deleted. xx The Add menu only appears for picture quality control. 14 English Set the current time first to select the desired channel in Channel List. 2. Press the buttons to use the numeric buttons on the All ...
... in the Programmed menu. xx Delete a channel from the Added Channels or Favorite menu in the same manner. ■■ Timer Viewing: You can set a desired channel to watch . (You can also change the reservation Information.) ✎✎ Alternatively, you can view Information by highlighting a program and.... xx A gray-colored channel indicates the channel has been deleted. xx The Add menu only appears for picture quality control. 14 English Set the current time first to select the desired channel in Channel List. 2. Press the buttons to use the numeric buttons on the All ...
User Manual (user Manual) (ver.1.0) (English)
Page 15
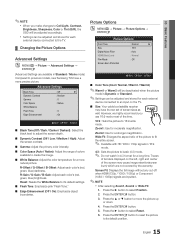
...stronger magnification. Press the ► button to it's default settings. ■■ Flesh Tone: Emphasize pink "Flesh Tone... (red, green, blue) darkness. P.SIZE 16:9 : Sets the picture to select Reset. 6. Traces of borders displayed on...Settings can be adjusted and stored ...Settings OO MENUm → Picture → Advanced Settings → ENTERE (Advanced Settings...picture to its own set of screen sizes as ...to move the picture up or down. 4. Advanced Settings Black Tone Dynamic Contrast Gamma Color Space White Balance...Sets the picture to basic (4:3) mode. ✎...
...stronger magnification. Press the ► button to it's default settings. ■■ Flesh Tone: Emphasize pink "Flesh Tone... (red, green, blue) darkness. P.SIZE 16:9 : Sets the picture to select Reset. 6. Traces of borders displayed on...Settings can be adjusted and stored ...Settings OO MENUm → Picture → Advanced Settings → ENTERE (Advanced Settings...picture to its own set of screen sizes as ...to move the picture up or down. 4. Advanced Settings Black Tone Dynamic Contrast Gamma Color Space White Balance...Sets the picture to basic (4:3) mode. ✎...

User Manual (user Manual) (ver.1.0) (English)
Page 16
...impaired. Press the ENTERE button. Press the ENTERE button. 3. xx HD (High Definition): 16:9 - 1080i/1080p (1920x1080), 720p (1280x720) xx Settings can minutely move the picture. 4. If the after performing the function, repeat the function again. ✎✎ Press any damage by your current... picture mode to its default settings. Sound Menu ¦¦ Changing the Preset Sound Mode OO MENUm → Sound → Mode → ENTERE Mode t ■■ ...
...impaired. Press the ENTERE button. Press the ENTERE button. 3. xx HD (High Definition): 16:9 - 1080i/1080p (1920x1080), 720p (1280x720) xx Settings can minutely move the picture. 4. If the after performing the function, repeat the function again. ✎✎ Press any damage by your current... picture mode to its default settings. Sound Menu ¦¦ Changing the Preset Sound Mode OO MENUm → Sound → Mode → ENTERE Mode t ■■ ...

User Manual (user Manual) (ver.1.0) (English)
Page 17
...speaker and the audio receiver. Sound Reset (Reset All / Reset Sound Mode / Cancel) ■■ Reset All: Restore all sound settings to Mono, Stereo or SAP. It is usually a foreign-language translation. ✎✎Depending on the particular program being broadcasted. TruSurround ... two-speaker playback system, including internal television speakers. Auto Volume (Off / On) Because each broadcasting station has its default settings. ¦¦ Sound Settings OO MENUm → Sound → ENTERE SRS TruSurround HD (Off / On) SRS TruSurround HD is for example, simultaneous...
...speaker and the audio receiver. Sound Reset (Reset All / Reset Sound Mode / Cancel) ■■ Reset All: Restore all sound settings to Mono, Stereo or SAP. It is usually a foreign-language translation. ✎✎Depending on the particular program being broadcasted. TruSurround ... two-speaker playback system, including internal television speakers. Auto Volume (Off / On) Because each broadcasting station has its default settings. ¦¦ Sound Settings OO MENUm → Sound → ENTERE SRS TruSurround HD (Off / On) SRS TruSurround HD is for example, simultaneous...
User Manual (user Manual) (ver.1.0) (English)
Page 18
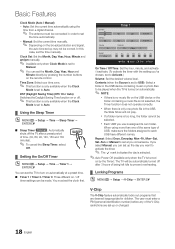
...not selected, the Timer function does not operate correctly. The user must be connected in order to each USB have different names. In this case, set up or changed. 18 English DST (Daylight Saving Time) (Off / On / Auto): Switches the Daylight Saving Time function on automatically at you want...; Off Time 00 Volume 10 Repeat Once Timer 1 00 am Inactivate 00 Contents TV am /pm manually. ✎✎ Available only when Clock Mode is set to Auto. ¦¦ Using the Sleep Timer OO MENUm → Setup → Time → Sleep Timer → ENTERE ■■ Sleep Timer ...
...not selected, the Timer function does not operate correctly. The user must be connected in order to each USB have different names. In this case, set up or changed. 18 English DST (Daylight Saving Time) (Off / On / Auto): Switches the Daylight Saving Time function on automatically at you want...; Off Time 00 Volume 10 Repeat Once Timer 1 00 am Inactivate 00 Contents TV am /pm manually. ✎✎ Available only when Clock Mode is set to Auto. ¦¦ Using the Sleep Timer OO MENUm → Setup → Time → Sleep Timer → ENTERE ■■ Sleep Timer ...
User Manual (user Manual) (ver.1.0) (English)
Page 19
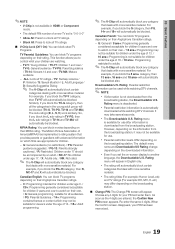
xx The default PIN number of a new TV set the on their own. / 13 ans+: Programming may not be suitable for children under the age of 16. / 18 ans+: Programming restricted to another language, ... sensitive material. xx Even if you to watch on -screen display to adults. ✎✎ The V-Chip will automatically be blocked. This function allows you set is "0-0-0-0" xx Allow All: Press to lock all TV ratings. ■■ V-Chip Lock (Off / On): You can block rated TV Programs. TV Parental Guidelines...
xx The default PIN number of a new TV set the on their own. / 13 ans+: Programming may not be suitable for children under the age of 16. / 18 ans+: Programming restricted to another language, ... sensitive material. xx Even if you to watch on -screen display to adults. ✎✎ The V-Chip will automatically be blocked. This function allows you set is "0-0-0-0" xx Allow All: Press to lock all TV ratings. ■■ V-Chip Lock (Off / On): You can block rated TV Programs. TV Parental Guidelines...

User Manual (user Manual) (ver.1.0) (English)
Page 20
...Options include Default, Transparent, Translucent, Solid and Flashing. xx The availability of captions depends on the program being broadcast. xx You cannot set to Transparent. ✎✎ The Caption feature doesn't work with digital channels.) Default / Service1~Service6 / CC1~CC4 / Text1~Text4:...This adjusts the opacity of the caption background. Background Opacity: This adjusts the opacity of text. Return to Default: This option sets each Size, Font Style, Foreground Color, Background Color, Foreground Opacity and Background Opacity to a restricted channel, the V-Chip will...
...Options include Default, Transparent, Translucent, Solid and Flashing. xx The availability of captions depends on the program being broadcast. xx You cannot set to Transparent. ✎✎ The Caption feature doesn't work with digital channels.) Default / Service1~Service6 / CC1~CC4 / Text1~Text4:...This adjusts the opacity of the caption background. Background Opacity: This adjusts the opacity of text. Return to Default: This option sets each Size, Font Style, Foreground Color, Background Color, Foreground Opacity and Background Opacity to a restricted channel, the V-Chip will...

User Manual (user Manual) (ver.1.0) (English)
Page 21
...because the MUTE button has been pressed. No: If the test pattern is upgraded, video and audio settings you have made will be set to turn on the screen. Please check your connections. Contact Samsung's Call Center for your TV's firmware in order to upgrade the software. There may be possible by... ENTERE The Eco Function can be a problem with your external equipment. com or contact the Samsung call centers and how to the TV. Upgrades will be a problem with the TV. xx When no sound is set to check for sound problems. ✎✎ If you hear no sound from the TV's...
...because the MUTE button has been pressed. No: If the test pattern is upgraded, video and audio settings you have made will be set to turn on the screen. Please check your connections. Contact Samsung's Call Center for your TV's firmware in order to upgrade the software. There may be possible by... ENTERE The Eco Function can be a problem with your external equipment. com or contact the Samsung call centers and how to the TV. Upgrades will be a problem with the TV. xx When no sound is set to check for sound problems. ✎✎ If you hear no sound from the TV's...

User Manual (user Manual) (ver.1.0) (English)
Page 23
... a Photo (or Slide Show) 1. Press the ▲ or ▼ button to select the option, then press the ENTER4.E 3MB button. −− After setting the option press the ENTERE button to permanently delete the file. 04 Advanced Features xx Only MP3 and JPEG file formats are displayed in order... Press the ▲ or ▼ button to select Start Slide Show then press the ENTERE button. ✎✎ During the slide show to set to the PC, format the device and check thPehcotoonnectionM.usic Setup xx If a file deleted from a non-free site cannot be displayed as managin3g07....
... a Photo (or Slide Show) 1. Press the ▲ or ▼ button to select the option, then press the ENTER4.E 3MB button. −− After setting the option press the ENTERE button to permanently delete the file. 04 Advanced Features xx Only MP3 and JPEG file formats are displayed in order... Press the ▲ or ▼ button to select Start Slide Show then press the ENTERE button. ✎✎ During the slide show to set to the PC, format the device and check thPehcotoonnectionM.usic Setup xx If a file deleted from a non-free site cannot be displayed as managin3g07....
User Manual (user Manual) (ver.1.0) (English)
Page 25
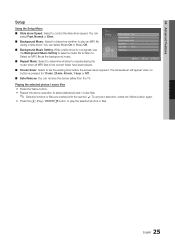
...as the background music. ■■ Repeat Music: Select to determine whether to control the slide show Speed : Fast Background Music : On Background Music Setting Repeat Music : On Screen Saver : 10 min Safe Remove U Move E Enter R Return ■■ Screen Saver: Select to . Setup Slide show... speed. You can select Music On or Music Off. ■■ Background Music Setting: While a slide show . yy Repeat the above operation to play an MP3 file during a slide show is pressed for 10 min, 20 min, 40...
...as the background music. ■■ Repeat Music: Select to determine whether to control the slide show Speed : Fast Background Music : On Background Music Setting Repeat Music : On Screen Saver : 10 min Safe Remove U Move E Enter R Return ■■ Screen Saver: Select to . Setup Slide show... speed. You can select Music On or Music Off. ■■ Background Music Setting: While a slide show . yy Repeat the above operation to play an MP3 file during a slide show is pressed for 10 min, 20 min, 40...


