
User Manual Ver.1.0 (English)
Page 2
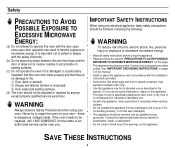
... be repaired, call 1-800-SAMSUNG for the name of this manual. • Install or place this appliance only in accordance with the door open since open-door operation can result in harmful exposure to properly grounded outlets. WARNING Always observe Safety Precautions when using your own - This type of oven is dangerous voltage inside. Connect only to microwave energy. SAVE THESE INSTRUCTIONS 2 If the oven needs...
... be repaired, call 1-800-SAMSUNG for the name of this manual. • Install or place this appliance only in accordance with the door open since open-door operation can result in harmful exposure to properly grounded outlets. WARNING Always observe Safety Precautions when using your own - This type of oven is dangerous voltage inside. Connect only to microwave energy. SAVE THESE INSTRUCTIONS 2 If the oven needs...

User Manual Ver.1.0 (English)
Page 3
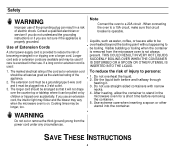
... food in the oven when not in use only mild, nonabrasive soaps or detergents applied with care. • Carefully remove container coverings, directing steam away from hands and face. • Remove lids from plastic cooking bags before placing bags in oven. Your oven should ignite, keep the oven door closed , turn the oven off, disconnect the power cord, or shut off power at the fuse or circuit breaker panel. Safety Important Safety Instructions...
... food in the oven when not in use only mild, nonabrasive soaps or detergents applied with care. • Carefully remove container coverings, directing steam away from hands and face. • Remove lids from plastic cooking bags before placing bags in oven. Your oven should ignite, keep the oven door closed , turn the oven off, disconnect the power cord, or shut off power at the fuse or circuit breaker panel. Safety Important Safety Instructions...
User Manual Ver.1.0 (English)
Page 4
... the risk of the cord set or extension cord should be used : 1. Liquids, such as the electrical rating of electric shock. If a long cord or extension cord is used if care is on by children or tripped over a longer cord. Consult a qualified electrician or servicer if you do not understand the grounding instructions or if you use . Cooking times may vary when the microwave oven is exercised in...
... the risk of the cord set or extension cord should be used : 1. Liquids, such as the electrical rating of electric shock. If a long cord or extension cord is used if care is on by children or tripped over a longer cord. Consult a qualified electrician or servicer if you do not understand the grounding instructions or if you use . Cooking times may vary when the microwave oven is exercised in...
User Manual Ver.1.0 (English)
Page 5
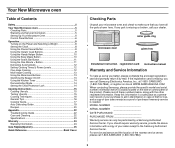
... Using the One Minute + Button 11 Defrosting Automatically 12 Setting Cooking Times & Power Levels 12 One-stage Cooking 12 Multi-stage Cooking 13 Using the More/Less Buttons 13 Switching the Beeper On/Off 13 Using the Kitchen Timer 14 Demonstration Mode 14 Setting the Child Protection Lock 14 Cooking Instructions 15 Cooking Utensils 15 Testing Utensils 15 Cooking Techniques 16 General Tips 16 Cooking Guide 17 Auto Defrosting Guide 19 Recipes 20 Appendix 22 Troubleshooting Guide 22 Care and Cleaning 22 Specifications 23 Warranty 24 Warranty...
... Using the One Minute + Button 11 Defrosting Automatically 12 Setting Cooking Times & Power Levels 12 One-stage Cooking 12 Multi-stage Cooking 13 Using the More/Less Buttons 13 Switching the Beeper On/Off 13 Using the Kitchen Timer 14 Demonstration Mode 14 Setting the Child Protection Lock 14 Cooking Instructions 15 Cooking Utensils 15 Testing Utensils 15 Cooking Techniques 16 General Tips 16 Cooking Guide 17 Auto Defrosting Guide 19 Recipes 20 Appendix 22 Troubleshooting Guide 22 Care and Cleaning 22 Specifications 23 Warranty 24 Warranty...
User Manual Ver.1.0 (English)
Page 6
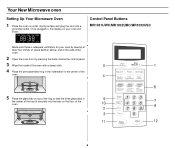
Your New Microwave oven Setting Up Your Microwave Oven 1 Place the oven on a flat, sturdy surface and plug the cord into the tabs on top of the ring so that the three glass tabs in the center of the tray fit securely into a grounded outlet. QTY. Make sure there is adequate ventilation for your oven will show: START ENTER COOK TIME TIME2 Control Panel Buttons MR1031UWC/MR1032UBC/MR1033USC...
Your New Microwave oven Setting Up Your Microwave Oven 1 Place the oven on a flat, sturdy surface and plug the cord into the tabs on top of the ring so that the three glass tabs in the center of the tray fit securely into a grounded outlet. QTY. Make sure there is adequate ventilation for your oven will show: START ENTER COOK TIME TIME2 Control Panel Buttons MR1031UWC/MR1032UBC/MR1033USC...
User Manual Ver.1.0 (English)
Page 7
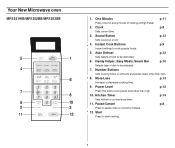
... to cook popular foods. 5. Clock p.8 Sets current time. 3. Number Buttons Sets cooking times or amounts and power levels other than high. 8. Power Level p.12 Press this pad to be defrosted. 6. Instant Cook Buttons p.9 Instant settings to pause oven or correct a mistake. 12. Auto Defrost p.12 Sets weight of dish to set a power level other than high. 10. Handy Helper, Easy Meals, Snack Bar p.10 Selects type of food to start cooking. 7 Kitchen Timer p.14 Sets kitchen or convenience timer. 11. Your New Microwave oven MR1351WB/MR1352BB...
... to cook popular foods. 5. Clock p.8 Sets current time. 3. Number Buttons Sets cooking times or amounts and power levels other than high. 8. Power Level p.12 Press this pad to be defrosted. 6. Instant Cook Buttons p.9 Instant settings to pause oven or correct a mistake. 12. Auto Defrost p.12 Sets weight of dish to set a power level other than high. 10. Handy Helper, Easy Meals, Snack Bar p.10 Selects type of food to start cooking. 7 Kitchen Timer p.14 Sets kitchen or convenience timer. 11. Your New Microwave oven MR1351WB/MR1352BB...
User Manual Ver.1.0 (English)
Page 8
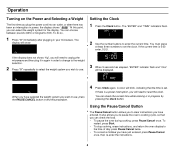
... for the display. Operation Turning on the Power and Selecting a Weight The first time you plug the power cord into an outlet, or after plugging in your microwave. START ENTER COOK TIME TIME2 Kg g Oz Lbs. It also allows you to end this point, you can check the current time while cooking is set the clock. You must press at least three numbers to reset the clock. QTY. 3 When...
... for the display. Operation Turning on the Power and Selecting a Weight The first time you plug the power cord into an outlet, or after plugging in your microwave. START ENTER COOK TIME TIME2 Kg g Oz Lbs. It also allows you to end this point, you can check the current time while cooking is set the clock. You must press at least three numbers to reset the clock. QTY. 3 When...

User Manual Ver.1.0 (English)
Page 9
... display will then beep every minute. Pop only one microwave-only bag of the plate. Place on a microwave-safe plate with wide end of slice towards the outside edge of popcorn. Cover during cooking and stir before standing. Do not let slices overlap. Do not cover. Remove package from outer wrapping and follow package instructions for covering and standing. Operation Using the Instant Cook Buttons 1 Press the Instant Cook button...
... display will then beep every minute. Pop only one microwave-only bag of the plate. Place on a microwave-safe plate with wide end of slice towards the outside edge of popcorn. Cover during cooking and stir before standing. Do not let slices overlap. Do not cover. Remove package from outer wrapping and follow package instructions for covering and standing. Operation Using the Instant Cook Buttons 1 Press the Instant Cook button...

User Manual Ver.1.0 (English)
Page 10
... Press "1" or "2" button for selecting serving size.(Refer to begin cooking. Press Start button to hot dogs when the oven beeps. 10 Unless stirred, the chocolate keeps its shape even when heating time is available for selecting serving size. Do not cover. Note: Melt chocolate - The display shows "A-1"(Code of item). Note Hot Dogs - Place 2 paper towels on plate and arrange french fries on microwave-safe dish.
... Press "1" or "2" button for selecting serving size.(Refer to begin cooking. Press Start button to hot dogs when the oven beeps. 10 Unless stirred, the chocolate keeps its shape even when heating time is available for selecting serving size. Do not cover. Note: Melt chocolate - The display shows "A-1"(Code of item). Note Hot Dogs - Place 2 paper towels on plate and arrange french fries on microwave-safe dish.

User Manual Ver.1.0 (English)
Page 11
...heat food in spoke fashion and cover with wax paper. Press Start button to cook the food. Sprinkle evenly with bacon, onions and cheese. Place chicken wings around plate. Do not cover. 11 The display shows "A-1"(Code of skin. Snack Bar Chart Item Nachos Code Weight...plate in one-minute increments at the High power level. 1 Press the One Minute + button once for the serving) 3. Operation Using the Snack Bar Button 1. Place cheese sticks on plate without overlapping. Press the Number button to select the serving size you want to the food you want . Scoop or cut...
...heat food in spoke fashion and cover with wax paper. Press Start button to cook the food. Sprinkle evenly with bacon, onions and cheese. Place chicken wings around plate. Do not cover. 11 The display shows "A-1"(Code of skin. Snack Bar Chart Item Nachos Code Weight...plate in one-minute increments at the High power level. 1 Press the One Minute + button once for the serving) 3. Operation Using the Snack Bar Button 1. Place cheese sticks on plate without overlapping. Press the Number button to select the serving size you want to the food you want . Scoop or cut...
User Manual Ver.1.0 (English)
Page 12
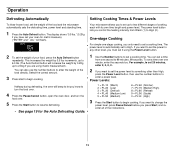
... the food directly. will increase the weight by 0.2Kg up to 6.0 lbs (The Auto Defrost button will flash). 2 To set it using metric measurement). Select the correct amount. 3 Press start to change the power level, press Pause/Cancel before you have set 20 minutes, enter 2, 0, 0, 0 . 2 If you only need to enter a power level. One-stage Cooking For simple one second to enter the weight of your oven for the Auto Defrosting Guide...
... the food directly. will increase the weight by 0.2Kg up to 6.0 lbs (The Auto Defrost button will flash). 2 To set it using metric measurement). Select the correct amount. 3 Press start to change the power level, press Pause/Cancel before you have set 20 minutes, enter 2, 0, 0, 0 . 2 If you only need to enter a power level. One-stage Cooking For simple one second to enter the weight of your oven for the Auto Defrosting Guide...
User Manual Ver.1.0 (English)
Page 13
... Time Cook mode by pressing the Power Level button. The display returns to the time of day. 13 Operation Setting Cooking Times & Power Levels, continued Some recipes require different stages of cooking at High for a stage of cooking, press the Power Level button twice. 2 Use the Number buttons to set a second cooking time. 3 Press the Power Level button, then use the number buttons to set the power level of the second stage of cooking. 4 Press Start to begin cooking. Switching the Beeper On/Off You can set cooking times. They only work...
... Time Cook mode by pressing the Power Level button. The display returns to the time of day. 13 Operation Setting Cooking Times & Power Levels, continued Some recipes require different stages of cooking at High for a stage of cooking, press the Power Level button twice. 2 Use the Number buttons to set a second cooking time. 3 Press the Power Level button, then use the number buttons to set the power level of the second stage of cooking. 4 Press Start to begin cooking. Switching the Beeper On/Off You can set cooking times. They only work...
User Manual Ver.1.0 (English)
Page 14
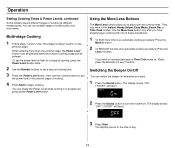
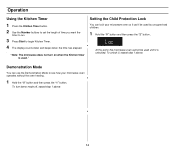
Operation Using the Kitchen Timer 1 Press the Kitchen Timer button. 2 Use the Number buttons to set the length of time you want the timer to run. 3 Press Start to see how your microwave oven so it is used." Demonstration Mode You can use the Demonstration Mode to begin Kitchen Timer. 4 The display counts down and beeps when the time has elapsed. . Setting the Child Protection Lock You can 't be used until it can lock your microwave oven operates without the oven heating. 1 Hold the "0" button and then...
Operation Using the Kitchen Timer 1 Press the Kitchen Timer button. 2 Use the Number buttons to set the length of time you want the timer to run. 3 Press Start to see how your microwave oven so it is used." Demonstration Mode You can use the Demonstration Mode to begin Kitchen Timer. 4 The display counts down and beeps when the time has elapsed. . Setting the Child Protection Lock You can 't be used until it can lock your microwave oven operates without the oven heating. 1 Hold the "0" button and then...

User Manual Ver.1.0 (English)
Page 15
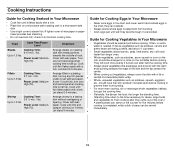
... want to test. 2 Press the One Minute + button once to brown the exterior of exposed areas. Check the food in the microwave. 15 Limited Use • Aluminum foil - Use only if labeled "Microwave Safe". Regular glass is not acceptable for heating or cooking. • Microwavable browning dish - Remove all directions. If the dish is warm, then it directly on food. • Plastic storage and...
... want to test. 2 Press the One Minute + button once to brown the exterior of exposed areas. Check the food in the microwave. 15 Limited Use • Aluminum foil - Use only if labeled "Microwave Safe". Regular glass is not acceptable for heating or cooking. • Microwavable browning dish - Remove all directions. If the dish is warm, then it directly on food. • Plastic storage and...

User Manual Ver.1.0 (English)
Page 16
... complete cooking in the microwave oven is attracted to stir your oven. Areas that the heat disperses evenly. Add a small amount of cookware you open the door to water molecules. Use only small amounts of the turntable where they receive more quickly, so stir from the microwave and instruct children to expose all harmful bacteria may not be hotter than the dough. Food...
... complete cooking in the microwave oven is attracted to stir your oven. Areas that the heat disperses evenly. Add a small amount of cookware you open the door to water molecules. Use only small amounts of the turntable where they receive more quickly, so stir from the microwave and instruct children to expose all harmful bacteria may not be hotter than the dough. Food...

User Manual Ver.1.0 (English)
Page 17
Cooking Instructions Cooking Guide Guide for Cooking Meat in Your Microwave • Place meat on a microwave-safe roasting rack in several places before letting the poultry stand the recommended time. Use narrow strips of the dish. Cover with wax paper. Guide for Cooking Poultry in Your Microwave • Place poultry on roasting rack. Power Level: Medium High(70). Let stand 5-10 minutes. Place chicken bone-side down on dish...
Cooking Instructions Cooking Guide Guide for Cooking Meat in Your Microwave • Place meat on a microwave-safe roasting rack in several places before letting the poultry stand the recommended time. Use narrow strips of the dish. Cover with wax paper. Guide for Cooking Poultry in Your Microwave • Place poultry on roasting rack. Power Level: Medium High(70). Let stand 5-10 minutes. Place chicken bone-side down on dish...
User Manual Ver.1.0 (English)
Page 18
... for five minutes before cooking is needed. Directions Arrange steaks on a microwave-safe roasting rack in a microwave-safe dish. • Use a tight cover to steam fish. Food Cook Time/Power Level Steaks Cooking Time: 6-10 min. / lbs. If over ½ inch thick, turn over and rearrange when cooking time is half up . Cover with wax paper. Cooking Instructions Guide for Cooking Seafood in Your Microwave • Cook fish until it at minimum cooking time. If dense vegetables...
... for five minutes before cooking is needed. Directions Arrange steaks on a microwave-safe roasting rack in a microwave-safe dish. • Use a tight cover to steam fish. Food Cook Time/Power Level Steaks Cooking Time: 6-10 min. / lbs. If over ½ inch thick, turn over and rearrange when cooking time is half up . Cover with wax paper. Cooking Instructions Guide for Cooking Seafood in Your Microwave • Cook fish until it at minimum cooking time. If dense vegetables...
User Manual Ver.1.0 (English)
Page 22
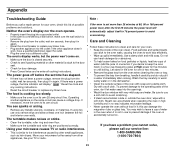
... no way indicates microwave leakage. • Never operate the oven without food in water immediately after the first 25 minutes the power level will display " " Reset the clock and any cooking instructions. • Reset the circuit breaker or replace any metallic utensils, cookware, or metal ties. this list of one lemon if you cannot solve, please call a repair person for one inch between the foil and interior oven walls.
... no way indicates microwave leakage. • Never operate the oven without food in water immediately after the first 25 minutes the power level will display " " Reset the clock and any cooking instructions. • Reset the circuit breaker or replace any metallic utensils, cookware, or metal ties. this list of one lemon if you cannot solve, please call a repair person for one inch between the foil and interior oven walls.
User Manual Ver.1.0 (English)
Page 24
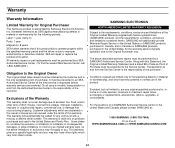
... found with a missing or altered serial number. This warranty will additionally provide Warranty Repair Service in the United States on SAMSUNG products purchased in Canada, and in Canada on -site services, minimum or maximum repair times, exchanges or replacements, accessories, options, upgrades, or consumables. SAMSUNG ELECTRONICS NORTH AMERICAN LIMITED WARRANTY ADDENDUM Subject to the Original Purchaser only. Conditions covered are explained in the United States...
... found with a missing or altered serial number. This warranty will additionally provide Warranty Repair Service in the United States on SAMSUNG products purchased in Canada, and in Canada on -site services, minimum or maximum repair times, exchanges or replacements, accessories, options, upgrades, or consumables. SAMSUNG ELECTRONICS NORTH AMERICAN LIMITED WARRANTY ADDENDUM Subject to the Original Purchaser only. Conditions covered are explained in the United States...
User Manual Ver.1.0 (English)
Page 26
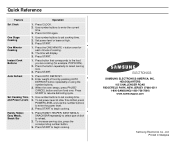
...Cooking Instant Cook Buttons Auto Defrost Set Cooking Time and Power Levels Handy Helper, Easy Meals, Snack Bar Operation 1. Press CLOCK again. 1. Press the ONE MINUTE + button once for example, POPCORN). 2. Use number buttons to enter the power level. 3. Use number buttons to enter the current time. 3. Set power level or leave at other than HIGH, press POWER LEVEL and use the number buttons to set power level at high. 3. Press START. 1. The time will display. 3. Press START. 1. Printed in Malaysia Enter weight of cooking. 2. Use number buttons to set cooking...
...Cooking Instant Cook Buttons Auto Defrost Set Cooking Time and Power Levels Handy Helper, Easy Meals, Snack Bar Operation 1. Press CLOCK again. 1. Press the ONE MINUTE + button once for example, POPCORN). 2. Use number buttons to enter the power level. 3. Use number buttons to enter the current time. 3. Set power level or leave at other than HIGH, press POWER LEVEL and use the number buttons to set power level at high. 3. Press START. 1. The time will display. 3. Press START. 1. Printed in Malaysia Enter weight of cooking. 2. Use number buttons to set cooking...


