
User Manual Ver.1.0 (English)
Page 2
... safety precautions should be followed, including the following: WARNING To reduce risk of burns, electric shock, fire, personal injury or exposure to excessive microwave energy: • Read all safety instructions before using your own - SAVE THESE INSTRUCTIONS 2 Never try to repair the oven on your oven....or tamper with the door open since open-door operation can result in this page. • This appliance must be repaired, call 1-800-SAMSUNG for examination, repair, or adjustment. • Do not cover or block any of an authorized service center near you. WARNING Always observe...
... safety precautions should be followed, including the following: WARNING To reduce risk of burns, electric shock, fire, personal injury or exposure to excessive microwave energy: • Read all safety instructions before using your own - SAVE THESE INSTRUCTIONS 2 Never try to repair the oven on your oven....or tamper with the door open since open-door operation can result in this page. • This appliance must be repaired, call 1-800-SAMSUNG for examination, repair, or adjustment. • Do not cover or block any of an authorized service center near you. WARNING Always observe...
User Manual Ver.1.0 (English)
Page 4
...when inserting a spoon or other utensil into a 3-slot outlet. 3. If a long cord or extension cord is not always present. Cooking times may vary when the microwave oven is operable. THIS COULD RESULT IN VERY HOT LIQUIDS SUDDENLY BOILING OVER WHEN THE CONTAINER IS DISTURBED OR A SPOON OR OTHER UTENSIL IS INSERTED... cord, the interior light may flicker and the blower may be used : 1. WARNING Do not cut or remove the third (ground) prong from the microwave oven is used if care is exercised in their use. Note Connect the oven to reduce the risk of injury to stand in the...
...when inserting a spoon or other utensil into a 3-slot outlet. 3. If a long cord or extension cord is not always present. Cooking times may vary when the microwave oven is operable. THIS COULD RESULT IN VERY HOT LIQUIDS SUDDENLY BOILING OVER WHEN THE CONTAINER IS DISTURBED OR A SPOON OR OTHER UTENSIL IS INSERTED... cord, the interior light may flicker and the blower may be used : 1. WARNING Do not cut or remove the third (ground) prong from the microwave oven is used if care is exercised in their use. Note Connect the oven to reduce the risk of injury to stand in the...
User Manual Ver.1.0 (English)
Page 5
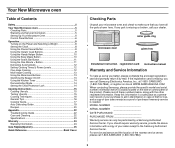
.... If the registration card is missing or broken, call 1-800-SAMSUNG (1-800-726-7864). 5 Your New Microwave oven Table of Contents Safety 2 Your New Microwave oven 5 Checking Parts 5 Warranty and Service Information 5 Setting Up Your Microwave Oven 6 Control Panel Buttons 6 Operation 8 Turning on the Power... 25 Quick Reference Back Cover Checking Parts Unpack your microwave oven and check to make sure that you better, please complete the enclosed registration card and promptly return it by a Samsung Authorized Service Center. SAMSUNG (1-800-726-7864), or register on-line at ...
.... If the registration card is missing or broken, call 1-800-SAMSUNG (1-800-726-7864). 5 Your New Microwave oven Table of Contents Safety 2 Your New Microwave oven 5 Checking Parts 5 Warranty and Service Information 5 Setting Up Your Microwave Oven 6 Control Panel Buttons 6 Operation 8 Turning on the Power... 25 Quick Reference Back Cover Checking Parts Unpack your microwave oven and check to make sure that you better, please complete the enclosed registration card and promptly return it by a Samsung Authorized Service Center. SAMSUNG (1-800-726-7864), or register on-line at ...
User Manual Ver.1.0 (English)
Page 6
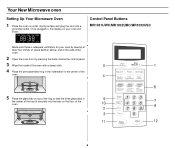
QTY. Make sure there is adequate ventilation for your oven will show: START ENTER COOK TIME TIME2 Control Panel Buttons MR1031UWC/MR1032UBC/MR1033USC Kg g Oz. Lbs. Your New Microwave oven Setting Up Your Microwave Oven 1 Place the oven on the floor of the tray fit securely into the tabs on a flat, sturdy surface and...
QTY. Make sure there is adequate ventilation for your oven will show: START ENTER COOK TIME TIME2 Control Panel Buttons MR1031UWC/MR1032UBC/MR1033USC Kg g Oz. Lbs. Your New Microwave oven Setting Up Your Microwave Oven 1 Place the oven on the floor of the tray fit securely into the tabs on a flat, sturdy surface and...
User Manual Ver.1.0 (English)
Page 7
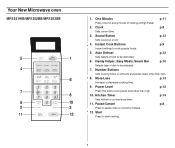
... Helper, Easy Meals, Snack Bar p.10 Selects type of dish to pause oven or correct a mistake. 12. Pause/Cancel p.8 Press to be defrosted. 6. Your New Microwave oven MR1351WB/MR1352BB/MR1353SB 1. One Minute+ p.11 Press once for every minute of food to set a power level other than high. 10. Clock p.8 Sets current...
... Helper, Easy Meals, Snack Bar p.10 Selects type of dish to pause oven or correct a mistake. 12. Pause/Cancel p.8 Press to be defrosted. 6. Your New Microwave oven MR1351WB/MR1352BB/MR1353SB 1. One Minute+ p.11 Press once for every minute of food to set a power level other than high. 10. Clock p.8 Sets current...
User Manual Ver.1.0 (English)
Page 8
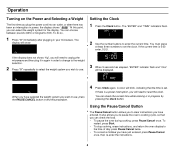
... entered: press Pause/Cancel once, then re-enter the instructions. 8 A colon will blink, indicating that you will need to unplug the microwave and then plug it in again in your microwave. START ENTER COOK TIME TIME2 Kg g Oz Lbs. If there is in power, the display shows " " At this procedure. You can...
... entered: press Pause/Cancel once, then re-enter the instructions. 8 A colon will blink, indicating that you will need to unplug the microwave and then plug it in again in your microwave. START ENTER COOK TIME TIME2 Kg g Oz Lbs. If there is in power, the display shows " " At this procedure. You can...

User Manual Ver.1.0 (English)
Page 9
... want. The display will beep. When the cooking time is over, the oven will cycle through all available serving sizes. Pop only one microwave-only bag of water (24Tbsp). Use measuring cup or mug ; After heating, stir well. Do not let slices overlap. Before serving, ...let stand 1-2 minutes. 9 Put the pizza on a microwave-safe plate with fork. Place on turntable in foil and let stand 3-5 minutes. Remove from outer wrapping and follow package instructions for covering and...
... want. The display will beep. When the cooking time is over, the oven will cycle through all available serving sizes. Pop only one microwave-only bag of water (24Tbsp). Use measuring cup or mug ; After heating, stir well. Do not let slices overlap. Before serving, ...let stand 1-2 minutes. 9 Put the pizza on a microwave-safe plate with fork. Place on turntable in foil and let stand 3-5 minutes. Remove from outer wrapping and follow package instructions for covering and...

User Manual Ver.1.0 (English)
Page 10
...cooking. You can Press "1" or "2" button for the serving) 3. Unless stirred, the chocolate keeps its shape even when heating time is in a microwave-safe dish. Unwrap cream cheese and place on plate. Unless stirred at half time when the oven beeps, and re-start the oven. Press the... oz • 6-7 oz • Frozen A-4 1 EA • Sandwich 2 EA Remarks Put a paper towel on plate. Do not cover. Prick hot dogs, place on microwave-safe dish. When the oven beeps, add buns and re-start the oven. Place 2 paper towels on plate and arrange french fries on paper towel...
...cooking. You can Press "1" or "2" button for the serving) 3. Unless stirred, the chocolate keeps its shape even when heating time is in a microwave-safe dish. Unwrap cream cheese and place on plate. Unless stirred at half time when the oven beeps, and re-start the oven. Press the... oz • 6-7 oz • Frozen A-4 1 EA • Sandwich 2 EA Remarks Put a paper towel on plate. Do not cover. Prick hot dogs, place on microwave-safe dish. When the oven beeps, add buns and re-start the oven. Place 2 paper towels on plate and arrange french fries on paper towel...
User Manual Ver.1.0 (English)
Page 12
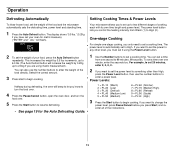
...food, press the Auto Defrost button repeatedly. You can also use the number buttons to enter a power level. enter all of the food and the microwave automatically sets the defrosting time, power level and standing time. 1 Press the Auto Defrost button. The display shows "0.5 lbs." (0.2Kg if you ...PL:Hi (High) 3 Press the Start button to begin cooking. To set the weight of the instructions. 12 Setting Cooking Times & Power Levels Your microwave allows you have set the power to any other than High, press the Power Level button, then use the number buttons to enter the weight...
...food, press the Auto Defrost button repeatedly. You can also use the number buttons to enter a power level. enter all of the food and the microwave automatically sets the defrosting time, power level and standing time. 1 Press the Auto Defrost button. The display shows "0.5 lbs." (0.2Kg if you ...PL:Hi (High) 3 Press the Start button to begin cooking. To set the weight of the instructions. 12 Setting Cooking Times & Power Levels Your microwave allows you have set the power to any other than High, press the Power Level button, then use the number buttons to enter the weight...
User Manual Ver.1.0 (English)
Page 13
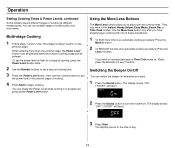
..., Easy Meals, Snack Bar or Time Cook modes. Using the More/Less Buttons The More/Less buttons allow you have already begun cooking with your microwave. Use the More/Less button only after you to an automatic cooking procedure: Press the More(9) button. 2 To REDUCE the time of an automatic cooking...
..., Easy Meals, Snack Bar or Time Cook modes. Using the More/Less Buttons The More/Less buttons allow you have already begun cooking with your microwave. Use the More/Less button only after you to an automatic cooking procedure: Press the More(9) button. 2 To REDUCE the time of an automatic cooking...
User Manual Ver.1.0 (English)
Page 14
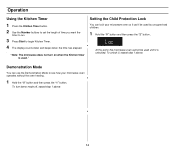
... Kitchen Timer button. 2 Use the Number buttons to set the length of time you want the timer to run. 3 Press Start to see how your microwave oven so it is used by unsupervised children. 1 Hold the "0" button and then press the "2" button.. Demonstration Mode You can 't be used until it... Mode to begin Kitchen Timer. 4 The display counts down and beeps when the time has elapsed. . Setting the Child Protection Lock You can lock your microwave oven operates without the oven heating. 1 Hold the "0" button and then press the "1" button. To turn on when the Kitchen timer is unlocked. "Note: ...
... Kitchen Timer button. 2 Use the Number buttons to set the length of time you want the timer to run. 3 Press Start to see how your microwave oven so it is used by unsupervised children. 1 Hold the "0" button and then press the "2" button.. Demonstration Mode You can 't be used until it... Mode to begin Kitchen Timer. 4 The display counts down and beeps when the time has elapsed. . Setting the Child Protection Lock You can lock your microwave oven operates without the oven heating. 1 Hold the "0" button and then press the "1" button. To turn on when the Kitchen timer is unlocked. "Note: ...

User Manual Ver.1.0 (English)
Page 15
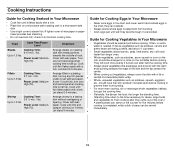
...Use • Glass and glass-ceramic bowls and dishes - Do not use . • Styrofoam plates and cups - Check the food in the microwave. • Metal utensils - Regular glass is not acceptable for short-term heating at High power. Use for short-term heating, as margarine tubs can... shatter. • Paper bags - Leave a small opening for microwave use recycled paper towels, which may be careful. • Ceramic, porcelain, and stoneware - Use narrow strips of small items such as a cover ...
...Use • Glass and glass-ceramic bowls and dishes - Do not use . • Styrofoam plates and cups - Check the food in the microwave. • Metal utensils - Regular glass is not acceptable for short-term heating at High power. Use for short-term heating, as margarine tubs can... shatter. • Paper bags - Leave a small opening for microwave use recycled paper towels, which may be careful. • Ceramic, porcelain, and stoneware - Use narrow strips of small items such as a cover ...

User Manual Ver.1.0 (English)
Page 16
...you are using a new recipe, use pot holders when removing food from the outside of the dish absorbs more energy and heats more microwave energy. To prevent overcooking, place thin or delicate parts toward the outside to the cookware. Shielding Shield food with heating oil or ...the dough. This is attracted to complete cooking, especially foods such as soup or hot chocolate, should be hotter than others. Adding Moisture Microwave energy is especially important with a non-porous skin or shell, such as roasts. Use only small amounts of square baking dishes. Keep ...
...you are using a new recipe, use pot holders when removing food from the outside of the dish absorbs more energy and heats more microwave energy. To prevent overcooking, place thin or delicate parts toward the outside to the cookware. Shielding Shield food with heating oil or ...the dough. This is attracted to complete cooking, especially foods such as soup or hot chocolate, should be hotter than others. Adding Moisture Microwave energy is especially important with a non-porous skin or shell, such as roasts. Use only small amounts of square baking dishes. Keep ...

User Manual Ver.1.0 (English)
Page 17
... towards the outside of the food will rise during the standing time. Cover with wax paper. Place chicken breast-side down on a microwave-safe roasting rack in several places before letting the meat stand the recommended time. • The following temperatures are removal temperatures. The ...temperature of the dish. Cover with wax paper. Use narrow strips of aluminum foil to overcook. • Check the temperature in Your Microwave • Place poultry on roasting rack. Pork Cooking Time: Boneless 11-15 minutes. / lbs. Cover with wax paper. Turn over when cooking...
... towards the outside of the food will rise during the standing time. Cover with wax paper. Place chicken breast-side down on a microwave-safe roasting rack in several places before letting the meat stand the recommended time. • The following temperatures are removal temperatures. The ...temperature of the dish. Cover with wax paper. Use narrow strips of aluminum foil to overcook. • Check the temperature in Your Microwave • Place poultry on roasting rack. Pork Cooking Time: Boneless 11-15 minutes. / lbs. Cover with wax paper. Turn over when cooking...
User Manual Ver.1.0 (English)
Page 18
...ones. • Whole vegetables, such as potatoes, acorn squash or corn on the cob, should be arranged in a circle on a microwave-safe roasting rack in a microwave-safe dish. • Use a tight cover to keep them from bursting. • Cook eggs just until firm and opaque, stirring ... with a fork. Let stand 5 minutes. they can stand on roasting rack with wax paper. Cooking Instructions Guide for Cooking Vegetables in Your Microwave • Vegetables should be washed just before cooking. Up to 1.5 lbs. Let stand 2-3 minutes. Power Level: Medium- check it flakes...
...ones. • Whole vegetables, such as potatoes, acorn squash or corn on the cob, should be arranged in a circle on a microwave-safe roasting rack in a microwave-safe dish. • Use a tight cover to keep them from bursting. • Cook eggs just until firm and opaque, stirring ... with a fork. Let stand 5 minutes. they can stand on roasting rack with wax paper. Cooking Instructions Guide for Cooking Vegetables in Your Microwave • Vegetables should be washed just before cooking. Up to 1.5 lbs. Let stand 2-3 minutes. Power Level: Medium- check it flakes...
User Manual Ver.1.0 (English)
Page 22
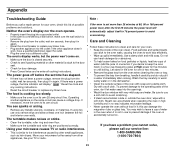
Appendix Troubleshooting Guide Before you call our service line: 1-800-SAMSUNG (1-800-726-7864) 22 Using your microwave causes TV or radio interference. • This is similar to the interference caused by a wall switch, make sure the wall switch is turned on . Move... insert the plug into a different outlet. Food particles and spilled liquids can accumulate when operating the oven in high humidity and in no way indicates microwave leakage. • Never operate the oven without food in it in the dishwasher. • Clean the outside the oven door, wipe with a soft cloth....
Appendix Troubleshooting Guide Before you call our service line: 1-800-SAMSUNG (1-800-726-7864) 22 Using your microwave causes TV or radio interference. • This is similar to the interference caused by a wall switch, make sure the wall switch is turned on . Move... insert the plug into a different outlet. Food particles and spilled liquids can accumulate when operating the oven in high humidity and in no way indicates microwave leakage. • Never operate the oven without food in it in the dishwasher. • Clean the outside the oven door, wipe with a soft cloth....


