
Open Source Guide (ENGLISH)
Page 8
..., MA 02111-1307, USA Everyone is permitted to copy and distribute verbatim copies of this license document, but not limited to Apple and third party printer drivers, filters, and backends for an Apple Operating System, that is distributed under this service if you need to speak to your freedom to share...
..., MA 02111-1307, USA Everyone is permitted to copy and distribute verbatim copies of this license document, but not limited to Apple and third party printer drivers, filters, and backends for an Apple Operating System, that is distributed under this service if you need to speak to your freedom to share...
User Manual (ENGLISH)
Page 4
... Loading Paper ...2.4 Changing the Size of Control Panel Menus 3.3 Information Menu ...3.3 Paper Menu ...3.4 Layout Menu ...3.5 Graphics Menu ...3.6 Printer Menu ...3.6 Setup Menu ...3.6 PCL Menu ...3.7 PostScript Menu ...3.8 EPSON/IBM Menu ...3.8 Network Menu ...3.9 iii Using the Control Panel ... Accessing Control Panel Menus 3.2 Overview of the Paper in the Paper Tray 2.5 Connecting a Printer Cable ...2.6 For Local Printing ...2.6 For Network Printing ...2.6 Turning the Printer On ...2.7 Printing a Demo Page ...2.7 Changing the Display Language 2.8 Using the Toner Save Mode...
... Loading Paper ...2.4 Changing the Size of Control Panel Menus 3.3 Information Menu ...3.3 Paper Menu ...3.4 Layout Menu ...3.5 Graphics Menu ...3.6 Printer Menu ...3.6 Setup Menu ...3.6 PCL Menu ...3.7 PostScript Menu ...3.8 EPSON/IBM Menu ...3.8 Network Menu ...3.9 iii Using the Control Panel ... Accessing Control Panel Menus 3.2 Overview of the Paper in the Paper Tray 2.5 Connecting a Printer Cable ...2.6 For Local Printing ...2.6 For Network Printing ...2.6 Turning the Printer On ...2.7 Printing a Demo Page ...2.7 Changing the Display Language 2.8 Using the Toner Save Mode...
User Manual (ENGLISH)
Page 5
... Quality Problems 7.8 Understanding Display Messages 7.10 Common Windows Problems 7.12 Common Macintosh Problems 7.12 Common PS Problems ...7.13 Common Linux Problems ...7.13 iv 4. Maintaining Your Printer Printing Information Pages ...6.1 Printing a Configuration Page 6.1 Printing Usage Page ...6.1 Maintaining the Toner Cartridge 6.2 Checking the Toner Remains 6.2 Redistributing Toner ...6.2 Replacing the Toner Cartridge 6.3 Cleaning the...
... Quality Problems 7.8 Understanding Display Messages 7.10 Common Windows Problems 7.12 Common Macintosh Problems 7.12 Common PS Problems ...7.13 Common Linux Problems ...7.13 iv 4. Maintaining Your Printer Printing Information Pages ...6.1 Printing a Configuration Page 6.1 Printing Usage Page ...6.1 Maintaining the Toner Cartridge 6.2 Checking the Toner Remains 6.2 Redistributing Toner ...6.2 Replacing the Toner Cartridge 6.3 Cleaning the...

User Manual (ENGLISH)
Page 6
... an Optional Tray 2 ...9.7 Installing a Duplex Unit ...9.9 Printing on the Control Panel 8.2 9. Specifications Printer Specifications ...10.1 Paper Specifications ...10.2 Overview ...10.2 Supported Sizes of Paper 9.9 10. 8. Using Your Printer on a Network About Sharing the Printer on a Network 8.1 Setting Up a Network-Connected Printer 8.1 Configuring Network Parameters on Both Sides of Paper 10.2 Guidelines for Using Paper...
... an Optional Tray 2 ...9.7 Installing a Duplex Unit ...9.9 Printing on the Control Panel 8.2 9. Specifications Printer Specifications ...10.1 Paper Specifications ...10.2 Overview ...10.2 Supported Sizes of Paper 9.9 10. 8. Using Your Printer on a Network About Sharing the Printer on a Network 8.1 Setting Up a Network-Connected Printer 8.1 Configuring Network Parameters on Both Sides of Paper 10.2 Guidelines for Using Paper...
User Manual (ENGLISH)
Page 7
...assembly. The reflected beam, although invisible, can diminish performance, and may expose you cannot resolve the conflict, contact your nearest Samsung dealer. If you to dangerous voltages or other controls may result in the literature accompanying the machine. 4 If an operating ... Follow all warnings and instructions marked on an unstable cart, stand or table. Environmental and Safety Consideration Laser Safety Statement The printer is advisable that the machine be operated in performance. 14 Adjust only those controls covered by the operating instructions. However, it...
...assembly. The reflected beam, although invisible, can diminish performance, and may expose you cannot resolve the conflict, contact your nearest Samsung dealer. If you to dangerous voltages or other controls may result in the literature accompanying the machine. 4 If an operating ... Follow all warnings and instructions marked on an unstable cart, stand or table. Environmental and Safety Consideration Laser Safety Statement The printer is advisable that the machine be operated in performance. 14 Adjust only those controls covered by the operating instructions. However, it...
User Manual (ENGLISH)
Page 8
...Part 15 of the following measures: •Reorient or relocate the receiving antenna. This transmitter must accept any way. When the printer does not receive data for help. This equipment generates, uses and can radiate radio frequency energy and, if not installed and...15 of the Industry and Science Canada. Modification to a wireless device will not occur in a particular installation. Power Saver This printer contains advanced energy conservation technology that to the following two conditions:(1) This device may not cause harmful interference, and(2) this device is...
...Part 15 of the following measures: •Reorient or relocate the receiving antenna. This transmitter must accept any way. When the printer does not receive data for help. This equipment generates, uses and can radiate radio frequency energy and, if not installed and...15 of the Industry and Science Canada. Modification to a wireless device will not occur in a particular installation. Power Saver This printer contains advanced energy conservation technology that to the following two conditions:(1) This device may not cause harmful interference, and(2) this device is...

User Manual (ENGLISH)
Page 9
...telecommunications terminal equipment and the mutual recognition of the Member States related to electromagnetic compatibility. If the country you printer is restricted to 2446.5-2483.5 MHz for requirements. Wireless devices that provide wireless communication. In environments where the.../5/EC Radio Equipment & Telecommunications Terminal Equipment Directive (FAX) This Samsung product has been self-certified by the Radio Approval Marks on commercial aircraft. The wireless devices in your printer is intended for authorization prior to minimize human contact during normal ...
...telecommunications terminal equipment and the mutual recognition of the Member States related to electromagnetic compatibility. If the country you printer is restricted to 2446.5-2483.5 MHz for requirements. Wireless devices that provide wireless communication. In environments where the.../5/EC Radio Equipment & Telecommunications Terminal Equipment Directive (FAX) This Samsung product has been self-certified by the Radio Approval Marks on commercial aircraft. The wireless devices in your printer is intended for authorization prior to minimize human contact during normal ...

User Manual (ENGLISH)
Page 11
...For details, see the Software Section. • Print Booklets. This chapter includes: • Special Features • Printer Components 8 Special Features Your new printer is fold and staple the pages. The text and pictures of each page of your document can be magnified and ...special features that improve the print quality. For details, see the Software Section. • Print Posters. You can customize your printer! For details, see the Software Section. 1.1 Introduction 1 Introduction Congratulations on the purchase of your documents with excellent quality and high...
...For details, see the Software Section. • Print Booklets. This chapter includes: • Special Features • Printer Components 8 Special Features Your new printer is fold and staple the pages. The text and pictures of each page of your document can be magnified and ...special features that improve the print quality. For details, see the Software Section. • Print Posters. You can customize your printer! For details, see the Software Section. 1.1 Introduction 1 Introduction Congratulations on the purchase of your documents with excellent quality and high...

User Manual (ENGLISH)
Page 12
... The table below lists a general overview of paper to save paper (N-Up printing). For details, see the Software Section. • This printer automatically conserves electricity by your printer. (S: Standard, O: Option) Features ML-3560 ML-3561N ML-3561ND IEEE 1284 S S S USB 2.0 S S S Network Interface O S S Wireless LAN O O O PostScript Emulation S S S ...computer. • You can also use an optional wireless network interface in the ML-3560, ML-3561N and ML-3561ND. • Your printer comes with a built-in network interface, 10/100 Base TX. You can add...
... The table below lists a general overview of paper to save paper (N-Up printing). For details, see the Software Section. • This printer automatically conserves electricity by your printer. (S: Standard, O: Option) Features ML-3560 ML-3561N ML-3561ND IEEE 1284 S S S USB 2.0 S S S Network Interface O S S Wireless LAN O O O PostScript Emulation S S S ...computer. • You can also use an optional wireless network interface in the ML-3560, ML-3561N and ML-3561ND. • Your printer comes with a built-in network interface, 10/100 Base TX. You can add...
User Manual (ENGLISH)
Page 13
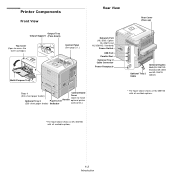
... Tray Tray 1 Control Board (500-sheet paper feeder) Cover (Open to install Optional Tray 2 Paper Level Handle optional printer (500-sheet paper feeder) Indicator accessories.) Optional Tray 2 Cable Optional Duplex Unit (ML-3561ND: Standard ML-3560 and ML-3561N: Option) * The figure above shows an ML-3561ND with all available options. * The figure above shows an...
... Tray Tray 1 Control Board (500-sheet paper feeder) Cover (Open to install Optional Tray 2 Paper Level Handle optional printer (500-sheet paper feeder) Indicator accessories.) Optional Tray 2 Cable Optional Duplex Unit (ML-3561ND: Standard ML-3560 and ML-3561N: Option) * The figure above shows an ML-3561ND with all available options. * The figure above shows an...
User Manual (ENGLISH)
Page 14
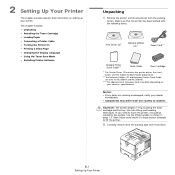
... attempts to lift the printer. 2 Carefully remove all accessories from the printer. 2.1 Setting Up Your Printer If you need to another. Use safe lifting and handling techniques. Use the lifting handles as shown in page 1.3. NOTES: • If any items are only for ML-3561N and ML-3561ND. ***The appearance... of the packing tape from the packing carton. Make sure that the printer has been packed with the following items: Print Driver CD* Network Utilities CD** Power ...
... attempts to lift the printer. 2 Carefully remove all accessories from the printer. 2.1 Setting Up Your Printer If you need to another. Use safe lifting and handling techniques. Use the lifting handles as shown in page 1.3. NOTES: • If any items are only for ML-3561N and ML-3561ND. ***The appearance... of the packing tape from the packing carton. Make sure that the printer has been packed with the following items: Print Driver CD* Network Utilities CD** Power ...
User Manual (ENGLISH)
Page 15
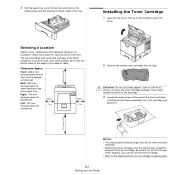
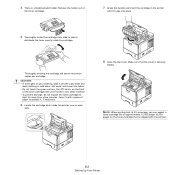
...of the toner cartridge. Be careful not to allow opening covers and trays. Installing the Toner Cartridge 1 Open the top cover. Do not set the printer close to remove it from the cartridge. CAUTION: Do not use the toner cartridge. • Refer to the helpful pictures on the handle to open... end of your desk or table. Carefully pull the tape completely out of heat, cold, and humidity. 3 Pull the paper tray out of the printer and remove the packing tape and the packing material inside of the rear output tray) Right: 100 mm (enough space for ventilation) Left: 100 mm...
...of the toner cartridge. Be careful not to allow opening covers and trays. Installing the Toner Cartridge 1 Open the top cover. Do not set the printer close to remove it from the cartridge. CAUTION: Do not use the toner cartridge. • Refer to the helpful pictures on the handle to open... end of your desk or table. Carefully pull the tape completely out of heat, cold, and humidity. 3 Pull the paper tray out of the printer and remove the packing tape and the packing material inside of the rear output tray) Right: 100 mm (enough space for ventilation) Left: 100 mm...
User Manual (ENGLISH)
Page 16
... it snaps into place. 5 Thoroughly shake the cartridge from side to side to distribute the toner evenly inside the printer, one on the front of the toner cartridge. 7 Grasp the handle and insert the cartridge in cold water. Hot water sets toner into fabric. • ... it off with your hands or any other material. • To prevent damage, do not expose the toner cartridge to protect it with the printer). 2.3 Setting Up Your Printer NOTE: When printing text at 5% coverage, you can expect a toner cartridge life of paper to light for the toner cartridge that the cover...
... it snaps into place. 5 Thoroughly shake the cartridge from side to side to distribute the toner evenly inside the printer, one on the front of the toner cartridge. 7 Grasp the handle and insert the cartridge in cold water. Hot water sets toner into fabric. • ... it off with your hands or any other material. • To prevent damage, do not expose the toner cartridge to protect it with the printer). 2.3 Setting Up Your Printer NOTE: When printing text at 5% coverage, you can expect a toner cartridge life of paper to light for the toner cartridge that the cover...

User Manual (ENGLISH)
Page 17
.... 2 Pull down the metal plate until it up with paper feed, turn the paper around. 3 Squeeze the paper width guide and slide it from the printer. 4 Fan the edges of A4 or Letter-sized paper: 1 Pull open the Tray 1 and remove it to overfill the tray and that all four corners..., see page 2.5. 6 Make sure not to the desired paper size marked at the top side. Overfilling the tray may cause a paper jam. 2.4 Setting Up Your Printer Then tap the stack on a flat surface to even it locks into position. You can hold a maximum of 500 sheets of the tray. To load...
.... 2 Pull down the metal plate until it up with paper feed, turn the paper around. 3 Squeeze the paper width guide and slide it from the printer. 4 Fan the edges of A4 or Letter-sized paper: 1 Pull open the Tray 1 and remove it to overfill the tray and that all four corners..., see page 2.5. 6 Make sure not to the desired paper size marked at the top side. Overfilling the tray may cause a paper jam. 2.4 Setting Up Your Printer Then tap the stack on a flat surface to even it locks into position. You can hold a maximum of 500 sheets of the tray. To load...

User Manual (ENGLISH)
Page 18
... is marked at the bottom of the tray. For details, see from step 5 on your country. 7 Insert and slide the paper tray back into the printer. 3 Squeeze the paper width guide and slide it to the correct position for the paper size you are loading, which is preset to Letter or... to cause the material to warp. • If you need to the desired paper size marked at the bottom of the tray. 2.5 Setting Up Your Printer To change the size, you do not adjust the paper width guide, it can extend the length of the tray outwards completely so that it...
... is marked at the bottom of the tray. For details, see from step 5 on your country. 7 Insert and slide the paper tray back into the printer. 3 Squeeze the paper width guide and slide it to the correct position for the paper size you are loading, which is preset to Letter or... to cause the material to warp. • If you need to the desired paper size marked at the bottom of the tray. 2.5 Setting Up Your Printer To change the size, you do not adjust the paper width guide, it can extend the length of the tray outwards completely so that it...
User Manual (ENGLISH)
Page 19
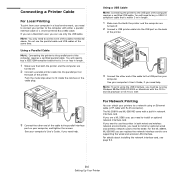
... 3 m or less in length. 1 Make sure that both the printer and the computer are a ML-3560 user, you can use the parallel cable and USB cables at the same time. See your computer's User's Guide, if you need to the ML-3560. For the ML-3561N, ML-3561ND you need to install an optional wired and...
... 3 m or less in length. 1 Make sure that both the printer and the computer are a ML-3560 user, you can use the parallel cable and USB cables at the same time. See your computer's User's Guide, if you need to the ML-3560. For the ML-3561N, ML-3561ND you need to install an optional wired and...

User Manual (ENGLISH)
Page 20
...with power on. A demo page prints out. 2.7 Setting Up Your Printer See your display text in use. NOTE: After connecting the printer, you need to configure the network parameters on the control panel. For the ML-3560, ML-3561N, ML-3561ND you can see "Demo Page" on the bottom line. 4 Press... the Enter button ( ). Using an Ethernet Cable 1 Connect one end of the supplied power cord into the power receptacle on the back of the printer. 2 Connect the other ...
...with power on. A demo page prints out. 2.7 Setting Up Your Printer See your display text in use. NOTE: After connecting the printer, you need to configure the network parameters on the control panel. For the ML-3560, ML-3561N, ML-3561ND you can see "Demo Page" on the bottom line. 4 Press... the Enter button ( ). Using an Ethernet Cable 1 Connect one end of the supplied power cord into the power receptacle on the back of the printer. 2 Connect the other ...

User Manual (ENGLISH)
Page 21
...check mark on the PostScript driver when you install the software. See the Software Section for details about installing the Samsung PCL printer driver. • PostScript Printer Description (PPD) file for Windows to the Software Section for information about installing the Linux driver and printing from... details about installing the Smart Panel program. If you are printing from a Macintosh You can print from the printer properties window on your printer's features. For details, see page 3.2. To install the PostScript driver, you need to ready mode. If you...
...check mark on the PostScript driver when you install the software. See the Software Section for details about installing the Samsung PCL printer driver. • PostScript Printer Description (PPD) file for Windows to the Software Section for information about installing the Linux driver and printing from... details about installing the Smart Panel program. If you are printing from a Macintosh You can print from the printer properties window on your printer's features. For details, see page 3.2. To install the PostScript driver, you need to ready mode. If you...

User Manual (ENGLISH)
Page 22
... * xxx is in progress. When a print job is received from the computer, or if any button is pressed, the printer switches to use the printer's control panel. Description • The printer is on-line and ready to print. • If you press the On Line/Continue button ( ), the...cannot print. • If you press the On Line/Continue button ( ), the printer switches to online. • The printer is printing. • If you want to stop printing, press the Cancel button ( ). • The printer is the current emulation. Sleeping... See "Understanding Display Messages" on the top right...
... * xxx is in progress. When a print job is received from the computer, or if any button is pressed, the printer switches to use the printer's control panel. Description • The printer is on-line and ready to print. • If you press the On Line/Continue button ( ), the...cannot print. • If you press the On Line/Continue button ( ), the printer switches to online. • The printer is printing. • If you want to stop printing, press the Cancel button ( ). • The printer is the current emulation. Sleeping... See "Understanding Display Messages" on the top right...
User Manual (ENGLISH)
Page 23
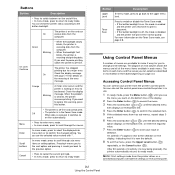
...Menu • Press to enter menu mode. • In menu mode, press to the upper menu level. You can On receive data from the printer driver on a connected computer override the settings on the Toner Save mode, see page 2.8. The items in the Power Save mode. Accessing Control Panel ...Menus You can select are available to make it switches to change printer settings. Button Description Upper Level In menu mode, press to go back to scroll through sub menu items or setting options. An asterisk (*) appears...
...Menu • Press to enter menu mode. • In menu mode, press to the upper menu level. You can On receive data from the printer driver on a connected computer override the settings on the Toner Save mode, see page 2.8. The items in the Power Save mode. Accessing Control Panel ...Menus You can select are available to make it switches to change printer settings. Button Description Upper Level In menu mode, press to go back to scroll through sub menu items or setting options. An asterisk (*) appears...


