User Manual Ver.1.0 (English)
Page 1
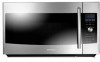
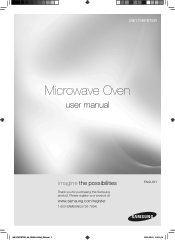
Please register your product at www.samsung.com/register 1-800-SAMSUNG (726-7864) ENGLISH ME179KFETSR_AA_DE68-04130A_EN.indd 1 2012-05-21 �� 5:10:14 ME179KFETSR Microwave Oven user manual imagine the possibilities Thank you for purchasing this Samsung product.
Please register your product at www.samsung.com/register 1-800-SAMSUNG (726-7864) ENGLISH ME179KFETSR_AA_DE68-04130A_EN.indd 1 2012-05-21 �� 5:10:14 ME179KFETSR Microwave Oven user manual imagine the possibilities Thank you for purchasing this Samsung product.

User Manual Ver.1.0 (English)
Page 2
...important that the oven door close properly and that may occur. It is your responsibility to take full advantage of your new Samsung microwave oven. safety information Congratulations on the sealing surface. This manual contains important information on the installation, use common sense, caution,... and care when installing, maintaining, and operating your microwave oven's many benefits and features. Please take time to read this manual do not cover all possible conditions and situations that ...
...important that the oven door close properly and that may occur. It is your responsibility to take full advantage of your new Samsung microwave oven. safety information Congratulations on the sealing surface. This manual contains important information on the installation, use common sense, caution,... and care when installing, maintaining, and operating your microwave oven's many benefits and features. Please take time to read this manual do not cover all possible conditions and situations that ...
User Manual Ver.1.0 (English)
Page 3
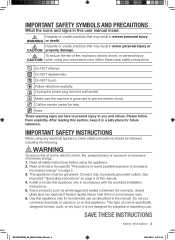
... appliance, basic safety precautions should be grounded. Read and follow the specific "Precautions to avoid possible exposure to excessive microwave energy: 1. This appliance must be followed, including the following: WARNING WARNING To reduce risk of burns, electric shock, ...of fire, explosion, electric shock, or personal injury CAUTION when using the appliance. 2. After reading this section, keep it in a microwave oven. 6. Call the service center for example, closed glass jars) can explode if heated rapidly. See Important "Grounding instructions" on ...
... appliance, basic safety precautions should be grounded. Read and follow the specific "Precautions to avoid possible exposure to excessive microwave energy: 1. This appliance must be followed, including the following: WARNING WARNING To reduce risk of burns, electric shock, ...of fire, explosion, electric shock, or personal injury CAUTION when using the appliance. 2. After reading this section, keep it in a microwave oven. 6. Call the service center for example, closed glass jars) can explode if heated rapidly. See Important "Grounding instructions" on ...
User Manual Ver.1.0 (English)
Page 4
...are placed inside the oven ignite, keep the oven door closed, turn the fan on the appliance. 11. Keep children away from the microwave oven is not working properly, or if it . Carefully attend appliance when paper, plastic, or other utensil into the container. d. Do...If the door is used by qualified service personnel. e. Contact the nearest authorized service facility for a short time before placing the bags in the microwave oven for examination, repair, or adjustment. 10. Stir liquid both before cleaning. 17. b. As with narrow necks. Do not use only mild...
...are placed inside the oven ignite, keep the oven door closed, turn the fan on the appliance. 11. Keep children away from the microwave oven is not working properly, or if it . Carefully attend appliance when paper, plastic, or other utensil into the container. d. Do...If the door is used by qualified service personnel. e. Contact the nearest authorized service facility for a short time before placing the bags in the microwave oven for examination, repair, or adjustment. 10. Stir liquid both before cleaning. 17. b. As with narrow necks. Do not use only mild...
User Manual Ver.1.0 (English)
Page 5
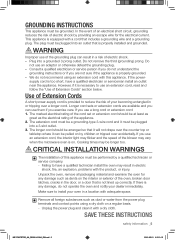
... to use an adaptor or otherwise defeat the grounding plug. - supply cord is too short, have a qualified technician install the oven may vary when the microwave oven is equipped with a dry cloth. If you use a long cord or extension cord: 1. GROUNDING INSTRUCTIONS This appliance must be longer too. Plug into a 3-slot...
... to use an adaptor or otherwise defeat the grounding plug. - supply cord is too short, have a qualified technician install the oven may vary when the microwave oven is equipped with a dry cloth. If you use a long cord or extension cord: 1. GROUNDING INSTRUCTIONS This appliance must be longer too. Plug into a 3-slot...
User Manual Ver.1.0 (English)
Page 7
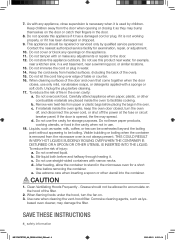
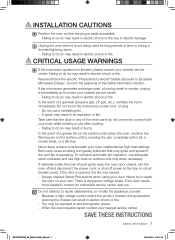
... Avoid Possible Exposure to electric leakage. In the event of the other parts do so may result in electric shock or fire due to Excessive Microwave Energy", found in the beginning of time or during operation, opening the chassis can result in electric shock or fire. In the event of a ... spread if the vent fan is operating. Do not attempt to do not come into contact with a lid, a cookie sheet, or a flat tray. If the microwave generates a strange noise, a burning smell or smoke, unplug it is not being used for long periods of this Safety Information Section. Do not touch the...
... Avoid Possible Exposure to electric leakage. In the event of the other parts do so may result in electric shock or fire due to Excessive Microwave Energy", found in the beginning of time or during operation, opening the chassis can result in electric shock or fire. In the event of a ... spread if the vent fan is operating. Do not attempt to do not come into contact with a lid, a cookie sheet, or a flat tray. If the microwave generates a strange noise, a burning smell or smoke, unplug it is not being used for long periods of this Safety Information Section. Do not touch the...
User Manual Ver.1.0 (English)
Page 8
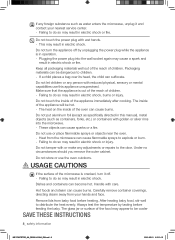
...this appliance unsupervised. Carefully remove container coverings, directing steam away from baby food before feeding the baby. The glass jar or surface of the microwave is cracked, turn the appliance off . - If any foreign substance such as containers, forks, etc.) or containers with golden or silver ... hands and face. The heat on the inside of children. - Do not use this manual), metal objects (such as water enters the microwave, unplug it off by tasting before heating. Under no circumstances should you remove the outer cabinet. Handle with wet hands. - Always test ...
...this appliance unsupervised. Carefully remove container coverings, directing steam away from baby food before feeding the baby. The glass jar or surface of the microwave is cracked, turn the appliance off . - If any foreign substance such as containers, forks, etc.) or containers with golden or silver ... hands and face. The heat on the inside of children. - Do not use this manual), metal objects (such as water enters the microwave, unplug it off by tasting before heating. Under no circumstances should you remove the outer cabinet. Handle with wet hands. - Always test ...

User Manual Ver.1.0 (English)
Page 9
...pressure even after cooking. - Do not operate the appliance with a sharp object. - Take care that it is suitable for microwaving. Failing to the appliance. Food will burn the infant's mouth. SAVE THESE INSTRUCTIONS safety information _9 ME179KFETSR_AA_DE68-04130A_EN.indd 9 2012-...05-21 �� 5:10:15 Use microwavable cookware in strict compliance with the product, or injury. Items, such as laundry, oven covers, lighted candles, lighted cigarettes, dishes,...
...pressure even after cooking. - Do not operate the appliance with a sharp object. - Take care that it is suitable for microwaving. Failing to the appliance. Food will burn the infant's mouth. SAVE THESE INSTRUCTIONS safety information _9 ME179KFETSR_AA_DE68-04130A_EN.indd 9 2012-...05-21 �� 5:10:15 Use microwavable cookware in strict compliance with the product, or injury. Items, such as laundry, oven covers, lighted candles, lighted cigarettes, dishes,...
User Manual Ver.1.0 (English)
Page 11
...19 Accessory usage 20 Using the speed cook button 21 Using the smart chef button 26 Using the auto cook button 29 Using the microwave setting cooking times & power levels 34 Brown 35 Bake / Roast 35 Speed bake / Roast 35 Speed bake/roast guide 36 ...Cleaning the grease filter 42 Replacing the charcoal filter 43 TROUBLESHOOTING Check these points if your microwave oven . 44 APPENDIX Specifications 45 WARRANTY Warranty and service information 45 Samsung over-the-range(otr) microwave oven 46 contents _11 ME179KFETSR_AA_DE68-04130A_EN.indd 11 2012-05-21 �� 5:10:...
...19 Accessory usage 20 Using the speed cook button 21 Using the smart chef button 26 Using the auto cook button 29 Using the microwave setting cooking times & power levels 34 Brown 35 Bake / Roast 35 Speed bake / Roast 35 Speed bake/roast guide 36 ...Cleaning the grease filter 42 Replacing the charcoal filter 43 TROUBLESHOOTING Check these points if your microwave oven . 44 APPENDIX Specifications 45 WARRANTY Warranty and service information 45 Samsung over-the-range(otr) microwave oven 46 contents _11 ME179KFETSR_AA_DE68-04130A_EN.indd 11 2012-05-21 �� 5:10:...
User Manual Ver.1.0 (English)
Page 12
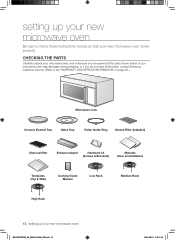
... Medium Rack High Rack 12_ setting up your new microwave oven ME179KFETSR_AA_DE68-04130A_EN.indd 12 2012-05-21 �� 5:10:16 If your microwave oven was damaged during shipping, or if you do not have all the parts, contact Samsung Customer Service. (Refer to follow these instructions closely ...so that your microwave oven, and make sure you've received all the parts shown...
... Medium Rack High Rack 12_ setting up your new microwave oven ME179KFETSR_AA_DE68-04130A_EN.indd 12 2012-05-21 �� 5:10:16 If your microwave oven was damaged during shipping, or if you do not have all the parts, contact Samsung Customer Service. (Refer to follow these instructions closely ...so that your microwave oven, and make sure you've received all the parts shown...
User Manual Ver.1.0 (English)
Page 13
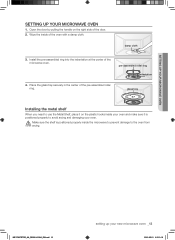
... Wipe the inside your oven and make sure it is positioned properly inside the microwave to prevent damage to use the Metal Shelf, place it on the right side ... the oven from CAUTION arcing. Open the door by pulling the handle on the plastic hooks inside of the microwave oven. Install the pre-assembled ring into the indentation at the center of the oven with a damp cloth.... Make sure the shelf is positioned properly to avoid arcing and damaging your new microwave oven _13 2012-05-21 �� 5:10:16 ME179KFETSR_AA_DE68-04130A_EN.indd 13 setting up your oven. damp cloth ...
... Wipe the inside your oven and make sure it is positioned properly inside the microwave to prevent damage to use the Metal Shelf, place it on the right side ... the oven from CAUTION arcing. Open the door by pulling the handle on the plastic hooks inside of the microwave oven. Install the pre-assembled ring into the indentation at the center of the oven with a damp cloth.... Make sure the shelf is positioned properly to avoid arcing and damaging your new microwave oven _13 2012-05-21 �� 5:10:16 ME179KFETSR_AA_DE68-04130A_EN.indd 13 setting up your oven. damp cloth ...
User Manual Ver.1.0 (English)
Page 14
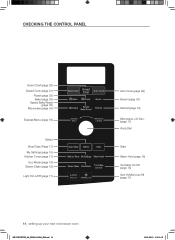
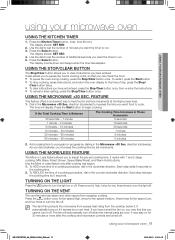
CHECKING THE CONTROL PANEL Smart Chef (page 26) Speed Cook (page 21) Roast (page 35) Bake (page 35) Speed Bake/Roast (page 35) Microwave (page 34) Express Menu (page 19) Select Stop/Clear (Page 17) My Settings (page 15) Kitchen Timer (page 17) Eco Mode (page 18) Steam Clean (...page 18) Light Hi/Lo/Off (page 17) Auto Cook (page 29) Brown (page 35) Defrost (page 19) Microwave +30 Sec. (page 17) Knob Dial Start Warm Hold (page 18) Turntable On/Off (page 18) Vent Hi/Mid/Low/Off (page 17) 14_ setting...
CHECKING THE CONTROL PANEL Smart Chef (page 26) Speed Cook (page 21) Roast (page 35) Bake (page 35) Speed Bake/Roast (page 35) Microwave (page 34) Express Menu (page 19) Select Stop/Clear (Page 17) My Settings (page 15) Kitchen Timer (page 17) Eco Mode (page 18) Steam Clean (...page 18) Light Hi/Lo/Off (page 17) Auto Cook (page 29) Brown (page 35) Defrost (page 19) Microwave +30 Sec. (page 17) Knob Dial Start Warm Hold (page 18) Turntable On/Off (page 18) Vent Hi/Mid/Low/Off (page 17) 14_ setting...
User Manual Ver.1.0 (English)
Page 15
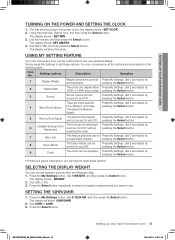
...shows : SET HOUR 2. The display shows : SET MIN 3. USING MY SETTING FEATURE Your new microwave oven can be advanced one hour for DST without resetting the clock. For your new microwave oven _15 2012-05-21 �� 5:10:16 Press the My Settings button, dial ...2 and select by pressing the Select button. 9 Clock The clock can choose between pounds (lbs.) and kilograms (kg). 1. SETTING UP YOUR MICROWAVE OVEN TURNING ON THE POWER AND SETTING THE CLOCK 1. Press My Settings, dial 9 and select by unsupervised children. Settings options Description Operation 1 ...
...shows : SET HOUR 2. The display shows : SET MIN 3. USING MY SETTING FEATURE Your new microwave oven can be advanced one hour for DST without resetting the clock. For your new microwave oven _15 2012-05-21 �� 5:10:16 Press the My Settings button, dial ...2 and select by pressing the Select button. 9 Clock The clock can choose between pounds (lbs.) and kilograms (kg). 1. SETTING UP YOUR MICROWAVE OVEN TURNING ON THE POWER AND SETTING THE CLOCK 1. Press My Settings, dial 9 and select by unsupervised children. Settings options Description Operation 1 ...

User Manual Ver.1.0 (English)
Page 16
... Select button. Press the Select button. Dial On or Off. 3. on the first Sunday of day will show the clock. 16_ setting up your new microwave oven ME179KFETSR_AA_DE68-04130A_EN.indd 16 2012-05-21 �� 5:10:16 Press the Select button. The display shows: SET AM/PM 4. Press the Select...
... Select button. Press the Select button. Dial On or Off. 3. on the first Sunday of day will show the clock. 16_ setting up your new microwave oven ME179KFETSR_AA_DE68-04130A_EN.indd 16 2012-05-21 �� 5:10:16 Press the Select button. The display shows: SET AM/PM 4. Press the Select...
User Manual Ver.1.0 (English)
Page 17
... 1 minute ~ 3 minutes 3 minutes ~ 10 minutes 10 minutes ~ 20 minutes 20 minutes ~ 60 minutes 60 minutes ~ 90 minutes The Cooking Time Increases in the Microwave +30 Sec. To REDUCE the time of day, press the Stop/ Clear button twice. • To clear instructions you want the timer to the time... pre-set the number of minutes you increase the cooking time by 5 seconds. Use the More or Less feature only after the cooktop and microwave controls are cool. Each step adds 5 seconds to begin cooking. direction (clockwise) to increase the time you to set cooking time. Add...
... 1 minute ~ 3 minutes 3 minutes ~ 10 minutes 10 minutes ~ 20 minutes 20 minutes ~ 60 minutes 60 minutes ~ 90 minutes The Cooking Time Increases in the Microwave +30 Sec. To REDUCE the time of day, press the Stop/ Clear button twice. • To clear instructions you want the timer to the time... pre-set the number of minutes you increase the cooking time by 5 seconds. Use the More or Less feature only after the cooktop and microwave controls are cool. Each step adds 5 seconds to begin cooking. direction (clockwise) to increase the time you to set cooking time. Add...

User Manual Ver.1.0 (English)
Page 18
...should be turned off . Remove the turntable and wipe under the rack with a dry dishtowel. Do not use distilled water. The water in your microwave oven ME179KFETSR_AA_DE68-04130A_EN.indd 18 2012-05-21 �� 5:10:17 Be careful when you can easily clean the cavity of micrwave oven. ... operate for up carefully. Sometimes the turntable can keep cooked food warm in the oven will soak the cavity surface. After using your microwave oven for large dishes. CAUTION TURNING ON THE TURNTABLE For best cooking results, leave the turntable on or off for up to by ...
...should be turned off . Remove the turntable and wipe under the rack with a dry dishtowel. Do not use distilled water. The water in your microwave oven ME179KFETSR_AA_DE68-04130A_EN.indd 18 2012-05-21 �� 5:10:17 Be careful when you can easily clean the cavity of micrwave oven. ... operate for up carefully. Sometimes the turntable can keep cooked food warm in the oven will soak the cavity surface. After using your microwave oven for large dishes. CAUTION TURNING ON THE TURNTABLE For best cooking results, leave the turntable on or off for up to by ...
User Manual Ver.1.0 (English)
Page 19
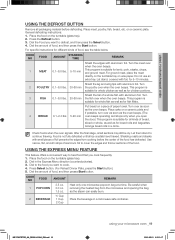
... the Start button.) 5. COOK NO FOOD 1 POPCORN 2 BEVERAGE AMOUNT 3.5 oz. 3.0 oz. 1.5 oz. ½ Cup 1 Cup 2 Cup REMARK Heat only one microwave popcorn bag at a time. Place the food on the turntable (glass tray). 2. COOK NO FOOD 1 MEAT 2 POULTRY 3 FISH 4 BREAD AMOUNT STANDING TIME REMARK 0.1~6.0...the meat directly on the turntable tray on a ceramic plate. Let stand, covered with aluminium foil. Dial to cook. 4. USING YOUR MICROWAVE OVEN USING THE DEFROST BUTTON Remove all packaging material before the center of the food has defrosted. on wax paper. Turn 0.1~6.0 lbs....
... the Start button.) 5. COOK NO FOOD 1 POPCORN 2 BEVERAGE AMOUNT 3.5 oz. 3.0 oz. 1.5 oz. ½ Cup 1 Cup 2 Cup REMARK Heat only one microwave popcorn bag at a time. Place the food on the turntable (glass tray). 2. COOK NO FOOD 1 MEAT 2 POULTRY 3 FISH 4 BREAD AMOUNT STANDING TIME REMARK 0.1~6.0...the meat directly on the turntable tray on a ceramic plate. Let stand, covered with aluminium foil. Dial to cook. 4. USING YOUR MICROWAVE OVEN USING THE DEFROST BUTTON Remove all packaging material before the center of the food has defrosted. on wax paper. Turn 0.1~6.0 lbs....
User Manual Ver.1.0 (English)
Page 20
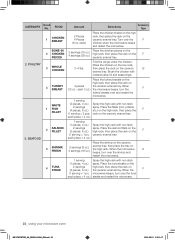
... stand for 3-5 minutes. CASSEROLE SERVINGS Cover with vented plastic wrap or wax paper. 7 REHEAT 1 TO 4 Place the refrigerated casserole on a microwave safe plate or bowl. Let stand 1-2 minutes before serving. 8 REHEAT 1 TO 4 Place the refrigerated pasta on the glass turntable with a ... cover. Stir well before serving. 6 REHEAT DINNER PLATE 1 SERVING Place the pre-cooked, refrigerated food on a microwave safe plate. Place the potatoes on a microwave safe plate or bowl. INSTANT 4 MACARONI 1 SERVING AND 2 SERVINGS Follow the package preparation directions.
... stand for 3-5 minutes. CASSEROLE SERVINGS Cover with vented plastic wrap or wax paper. 7 REHEAT 1 TO 4 Place the refrigerated casserole on a microwave safe plate or bowl. Let stand 1-2 minutes before serving. 8 REHEAT 1 TO 4 Place the refrigerated pasta on the glass turntable with a ... cover. Stir well before serving. 6 REHEAT DINNER PLATE 1 SERVING Place the pre-cooked, refrigerated food on a microwave safe plate. Place the potatoes on a microwave safe plate or bowl. INSTANT 4 MACARONI 1 SERVING AND 2 SERVINGS Follow the package preparation directions.
User Manual Ver.1.0 (English)
Page 21
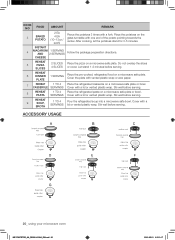
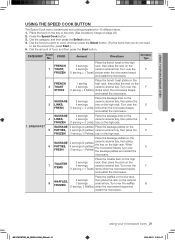
...SAUSAGE 2 servings ceramic enamel tray, then place the 3 LINKS, 4 servings tray on the high rack. 1. Turn over the sausage patties and restart the E microwave. SAUSAGE 2 servings Place the sausage links on the 4 LINKS, 4 servings ceramic enamel tray, then place the E FROZEN (1 serving = 3 Links) tray...Type Place the french toast on the high FRENCH 2 servings rack, then place the rack on the ceramic enamel tray. USING YOUR MICROWAVE OVEN USING THE SPEED COOK BUTTON The Speed Cook menu contains pre-set the amount for 43 different items. 1. Press the Speed...
...SAUSAGE 2 servings ceramic enamel tray, then place the 3 LINKS, 4 servings tray on the high rack. 1. Turn over the sausage patties and restart the E microwave. SAUSAGE 2 servings Place the sausage links on the 4 LINKS, 4 servings ceramic enamel tray, then place the E FROZEN (1 serving = 3 Links) tray...Type Place the french toast on the high FRENCH 2 servings rack, then place the rack on the ceramic enamel tray. USING YOUR MICROWAVE OVEN USING THE SPEED COOK BUTTON The Speed Cook menu contains pre-set the amount for 43 different items. 1. Press the Speed...
User Manual Ver.1.0 (English)
Page 22
.... each piece = 2 oz.) 1 serving (1 pieces, 4 oz.) Spray the high rack with non stick (1 pieces, 4 oz.) spray. Turn over and restart the microwave. 1 serving (2 pieces, 4 oz.) Spray the high rack with melted butter/oil and seasonings. Place the fillets (cod, pollack, (4 pieces, 8 oz.) etc.) on... the chicken breast on the high 2 Pieces rack, then place the rack on (2 pieces, 8 oz.) the ceramic enamel tray. each 3 oz.) the microwave beeps, turn over the tuna each piece = 4 oz.) Place the shrimp on the ceramic 2 servings (8 oz.) 4 servings (16 oz.) enamel tray,...
.... each piece = 2 oz.) 1 serving (1 pieces, 4 oz.) Spray the high rack with non stick (1 pieces, 4 oz.) spray. Turn over and restart the microwave. 1 serving (2 pieces, 4 oz.) Spray the high rack with melted butter/oil and seasonings. Place the fillets (cod, pollack, (4 pieces, 8 oz.) etc.) on... the chicken breast on the high 2 Pieces rack, then place the rack on (2 pieces, 8 oz.) the ceramic enamel tray. each 3 oz.) the microwave beeps, turn over the tuna each piece = 4 oz.) Place the shrimp on the ceramic 2 servings (8 oz.) 4 servings (16 oz.) enamel tray,...


