
User Manual (user Manual) (ver.1.0) (English)
Page 1
1-800-SAMSUNG (1-800-726-7864) U.S.A Samsung Electronics America Service Division 400 Valley Road, Suite 201 Mount Arlington, NJ 07856 www.samsungusa.com CANADA Samsung Electronics Canada Inc. Samsung Customer Care 7037 Financial Drive Mississauga, Ontario L5N 6R3 www.samsung.ca BN68-00665D-02 SAMSUNG LCD TV Owner's Instructions Owner's Instructions LT-P468W This device is a Class B digital apparatus.
1-800-SAMSUNG (1-800-726-7864) U.S.A Samsung Electronics America Service Division 400 Valley Road, Suite 201 Mount Arlington, NJ 07856 www.samsungusa.com CANADA Samsung Electronics Canada Inc. Samsung Customer Care 7037 Financial Drive Mississauga, Ontario L5N 6R3 www.samsung.ca BN68-00665D-02 SAMSUNG LCD TV Owner's Instructions Owner's Instructions LT-P468W This device is a Class B digital apparatus.

User Manual (user Manual) (ver.1.0) (English)
Page 12
... channel. 14 SOURCE √ See pages 28~35 Press to select or check the status of the TV, AV1, AV2, S-Video1, S-Video2, Component1, Component2, HDMI, DVI or PC. 15 Channel Buttons ...selecting one of the preset factory settings (or select your watching TV channel. Your TV and Accessories Remote Control and Accessories Getting started Your TV and Accessories Remote Control Buttons 10 1 POWER 2 P.SIZE ..., and time. Signal Strength ( ) display The < > (Signal Strength) symbol is the better TV gets sensitivity on -screen menu. Ú 9 Move & ENTER √ See page 12 Press to select or ...
... channel. 14 SOURCE √ See pages 28~35 Press to select or check the status of the TV, AV1, AV2, S-Video1, S-Video2, Component1, Component2, HDMI, DVI or PC. 15 Channel Buttons ...selecting one of the preset factory settings (or select your watching TV channel. Your TV and Accessories Remote Control and Accessories Getting started Your TV and Accessories Remote Control Buttons 10 1 POWER 2 P.SIZE ..., and time. Signal Strength ( ) display The < > (Signal Strength) symbol is the better TV gets sensitivity on -screen menu. Ú 9 Move & ENTER √ See page 12 Press to select or ...
User Manual (user Manual) (ver.1.0) (English)
Page 23
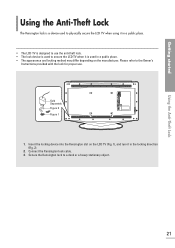
... lock for proper use the anti-theft lock. • The lock device is used to secure the LCD TV when it in a public place. • The appearance and locking method may differ depending on the LCD TV (Fig. 1), and turn it is designed to use . Sold Separately Figure 2 Figure 1 1. Getting started Using the Anti...
... lock for proper use the anti-theft lock. • The lock device is used to secure the LCD TV when it in a public place. • The appearance and locking method may differ depending on the LCD TV (Fig. 1), and turn it is designed to use . Sold Separately Figure 2 Figure 1 1. Getting started Using the Anti...

User Manual (user Manual) (ver.1.0) (English)
Page 26
...the User's Manual regarding Input Devices on Pages 26~27 LCD TV + SATELLITE Please refer to the User's Manual regarding Input Devices on Page 29 LCD TV + DVD Please refer to the User's Manual regarding Input Devices on Page 30 LCD TV + STB Please refer to the User's Manual regarding ...Input Devices on Page 31 LCD TV + CAMCORDER/ Please refer to the User's Manual regarding Input...
...the User's Manual regarding Input Devices on Pages 26~27 LCD TV + SATELLITE Please refer to the User's Manual regarding Input Devices on Page 29 LCD TV + DVD Please refer to the User's Manual regarding Input Devices on Page 30 LCD TV + STB Please refer to the User's Manual regarding ...Input Devices on Page 31 LCD TV + CAMCORDER/ Please refer to the User's Manual regarding Input...

User Manual (user Manual) (ver.1.0) (English)
Page 30
... is unavailable, please check that the video cable is connected correctly. 2 Turn on the VCR. Right (red)] terminals on the side or back of the TV and the [Audio (white/red) Out] terminals on your VCR, then press the [PLAY] button. • If you have connected the... the [Video Out (yellow)] terminal on the VCR. Connecting a VCR Connection & Input Source Setup Connecting a VCR Rear Panel of LCD TV S-Video Cable Video Cable OR 2√ Audio Cable Coaxial Cable œ3 œ1 VCR Connect the antenna cable to the ANTENNA IN 1 terminal on , then press ...
... is unavailable, please check that the video cable is connected correctly. 2 Turn on the VCR. Right (red)] terminals on the side or back of the TV and the [Audio (white/red) Out] terminals on your VCR, then press the [PLAY] button. • If you have connected the... the [Video Out (yellow)] terminal on the VCR. Connecting a VCR Connection & Input Source Setup Connecting a VCR Rear Panel of LCD TV S-Video Cable Video Cable OR 2√ Audio Cable Coaxial Cable œ3 œ1 VCR Connect the antenna cable to the ANTENNA IN 1 terminal on , then press ...

User Manual (user Manual) (ver.1.0) (English)
Page 31
... & Input Source Setup Connecting & Viewing Satellite TV Rear Panel of LCD TV S-Video Cable Satellite box Video Cable OR 2√ Satellite Antenna Audio Cable œ3 Coaxial Cable œ1 1 Connect the Satellite cable to the Antenna Input terminal ... correctly. 2 Turn on the back of the Satellite box. For connection of your choice using the Satellite remote control. • If you have connected the TV and the VCR using the S-Video cable, press the [SOURCE] button to select or . Connect the video cable between the [Video 1In 2 (yellow)] terminal on...
... & Input Source Setup Connecting & Viewing Satellite TV Rear Panel of LCD TV S-Video Cable Satellite box Video Cable OR 2√ Satellite Antenna Audio Cable œ3 Coaxial Cable œ1 1 Connect the Satellite cable to the Antenna Input terminal ... correctly. 2 Turn on the back of the Satellite box. For connection of your choice using the Satellite remote control. • If you have connected the TV and the VCR using the S-Video cable, press the [SOURCE] button to select or . Connect the video cable between the [Video 1In 2 (yellow)] terminal on...
User Manual (user Manual) (ver.1.0) (English)
Page 32
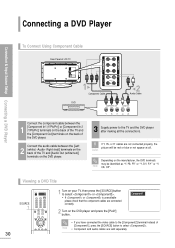
... [Audio Out (white/red)] terminals on the back of the DVD player. Connecting a DVD Player To Connect Using Component Cable Rear Panel of LCD TV Connection & Input Source Setup Connecting a DVD Player 1√ Component Cable DVD œ2 Audio Cable Connect the component cable between the [Left 2 (white...) -Audio- Connect the audio cable between the 1 [Component In1 (Y/Pb/Pr)] or [Component In 2 (Y/Pb/Pr)] terminals on the back of the TV and the [Component Out] terminals on the DVD player. 3 Supply power to select or . • If or is unavailable please check that the component ...
... [Audio Out (white/red)] terminals on the back of the DVD player. Connecting a DVD Player To Connect Using Component Cable Rear Panel of LCD TV Connection & Input Source Setup Connecting a DVD Player 1√ Component Cable DVD œ2 Audio Cable Connect the component cable between the [Left 2 (white...) -Audio- Connect the audio cable between the 1 [Component In1 (Y/Pb/Pr)] or [Component In 2 (Y/Pb/Pr)] terminals on the back of the TV and the [Component Out] terminals on the DVD player. 3 Supply power to select or . • If or is unavailable please check that the component ...
User Manual (user Manual) (ver.1.0) (English)
Page 33
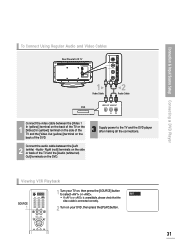
Connection & Input Source Setup Connecting a DVD Player To Connect Using Regular Audio and Video Cables Rear Panel of LCD TV 1√ Video Cable DVD œ2 Audio Cable Connect the video cable between the [Left 2 (white) -Audio- Right (red)] terminals on the side or back of ... DVD. AV1 • If or is unavailable, please check that the video cable is connected correctly. 2 Turn on , then press the [SOURCE] button to the TV and the DVD player after making all the connections. Connect the audio cable between the [Video 1 1 In (yellow)] terminal on the back of the...
Connection & Input Source Setup Connecting a DVD Player To Connect Using Regular Audio and Video Cables Rear Panel of LCD TV 1√ Video Cable DVD œ2 Audio Cable Connect the video cable between the [Left 2 (white) -Audio- Right (red)] terminals on the side or back of ... DVD. AV1 • If or is unavailable, please check that the video cable is connected correctly. 2 Turn on , then press the [SOURCE] button to the TV and the DVD player after making all the connections. Connect the audio cable between the [Video 1 1 In (yellow)] terminal on the back of the...

User Manual (user Manual) (ver.1.0) (English)
Page 34
...blue. Connect the audio cable between the 2 [Component In1 (Y/Pb/Pr)] or the [Component In2 (Y/Pb/Pr)] terminals on the back of the TV and the [Component Out] terminals on the back of the Set Top Box. Connect the component cable between the [Left 3 (white) -Audio- ...Connecting a Digital Set-Top Box (STB) Connection & Input Source Setup Connecting a Digital Set-Top Box (STB) Rear Panel of LCD TV DVI-D Cable (sold separately. Set Top Box Component Cable 2√ Audio Cable œ3 Coaxial Cable œ1 1 Connect the antenna cable to the antenna input...
...blue. Connect the audio cable between the 2 [Component In1 (Y/Pb/Pr)] or the [Component In2 (Y/Pb/Pr)] terminals on the back of the TV and the [Component Out] terminals on the back of the Set Top Box. Connect the component cable between the [Left 3 (white) -Audio- ...Connecting a Digital Set-Top Box (STB) Connection & Input Source Setup Connecting a Digital Set-Top Box (STB) Rear Panel of LCD TV DVI-D Cable (sold separately. Set Top Box Component Cable 2√ Audio Cable œ3 Coaxial Cable œ1 1 Connect the antenna cable to the antenna input...

User Manual (user Manual) (ver.1.0) (English)
Page 35
... connections. Right (red)] terminals on the side or back of the TV and [Audio Out (white/red)] terminals on the side of the TV will make it easy to the [AV2 IN] terminal on the back of LCD TV Audio 2 Cable √ Video Cable œ1 Gaming Device Camcorder Connect... gaming device. Rear Panel of the Camcorder. Connection & Input Source Setup Connecting a Camcorder/Gaming Device Connecting a Camcorder/Gaming Device This applies to your TV on the Camcorder and press the [PLAY] button. • Please refer to the Camcorder User's Manual. • If you have connected the video...
... connections. Right (red)] terminals on the side or back of the TV and [Audio Out (white/red)] terminals on the side of the TV will make it easy to the [AV2 IN] terminal on the back of LCD TV Audio 2 Cable √ Video Cable œ1 Gaming Device Camcorder Connect... gaming device. Rear Panel of the Camcorder. Connection & Input Source Setup Connecting a Camcorder/Gaming Device Connecting a Camcorder/Gaming Device This applies to your TV on the Camcorder and press the [PLAY] button. • Please refer to the Camcorder User's Manual. • If you have connected the video...
User Manual (user Manual) (ver.1.0) (English)
Page 36
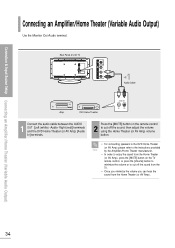
Rear Panel of LCD TV œ1 Audio Cable Amp. Press the [MUTE] button on the remote control 2 to cut off the sound, then adjust the volume using ...Theater manufacturer. • In order to enjoy the sound from the Home Theater (or AV Amp), press the [MUTE] button on the TV remote control, or press the [Volume] button to minimize the volume or to cut off the sound from the... TV. • Once you minimize the volume you can hear the sound from the Home Theater (or AV Amp). 34 Right (red)] ...
Rear Panel of LCD TV œ1 Audio Cable Amp. Press the [MUTE] button on the remote control 2 to cut off the sound, then adjust the volume using ...Theater manufacturer. • In order to enjoy the sound from the Home Theater (or AV Amp), press the [MUTE] button on the TV remote control, or press the [Volume] button to minimize the volume or to cut off the sound from the... TV. • Once you minimize the volume you can hear the sound from the Home Theater (or AV Amp). 34 Right (red)] ...

User Manual (user Manual) (ver.1.0) (English)
Page 37
HDMI • If is unavailable, please check that the HDMI cable is sold separately. Connection & Input Source Setup Connecting an HDMI Corresponding Device Connecting an HDMI Corresponding Device HDMI Corresponding Device Output Terminal Rear Panel of the DVD player (or the HDMI Corresponding Device). Note Viewing a HDMI Device SOURCE 1 1 Turn your TV on the back of the TV and the [HDMI OUT] of LCD TV HDMI Cable œ1 DVD Player Connect the HDMI cable between the [HDMI 1 IN] on , then press the [SOURCE] button to select . HDMI cable is connected correctly. 35
HDMI • If is unavailable, please check that the HDMI cable is sold separately. Connection & Input Source Setup Connecting an HDMI Corresponding Device Connecting an HDMI Corresponding Device HDMI Corresponding Device Output Terminal Rear Panel of the DVD player (or the HDMI Corresponding Device). Note Viewing a HDMI Device SOURCE 1 1 Turn your TV on the back of the TV and the [HDMI OUT] of LCD TV HDMI Cable œ1 DVD Player Connect the HDMI cable between the [HDMI 1 IN] on , then press the [SOURCE] button to select . HDMI cable is connected correctly. 35
User Manual (user Manual) (ver.1.0) (English)
Page 38
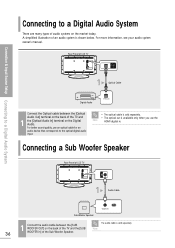
...Connecting to a Digital Audio System There are many types of audio systems on the market today. Connecting a Sub Woofer Speaker Rear Panel of LCD TV 1√ Audio Cable Sub Woofer Speaker The audio cable is available only when you use an optical cable for an audio device that corresponds ...sold separately. • The optical out is sold separately. 1 Connect the audio cable between the [Optical Audio Out] terminal on the back of the TV and 1 the [Optical Audio In] terminal on the Digital Audio. For more information, see your audio system owner's manual. For better sound quality, ...
...Connecting to a Digital Audio System There are many types of audio systems on the market today. Connecting a Sub Woofer Speaker Rear Panel of LCD TV 1√ Audio Cable Sub Woofer Speaker The audio cable is available only when you use an optical cable for an audio device that corresponds ...sold separately. • The optical out is sold separately. 1 Connect the audio cable between the [Optical Audio Out] terminal on the back of the TV and 1 the [Optical Audio In] terminal on the Digital Audio. For more information, see your audio system owner's manual. For better sound quality, ...

User Manual (user Manual) (ver.1.0) (English)
Page 104
... the picture above for better picture quality. • Refer to your PC in Windows XP as the PC monitor. Connecting to a PC Rear Panel of LCD TV PC Rear PC Audio Cable 1√ DVI-D Cable OR œ2 PC Audio Cable PC Video Cable OR PC DVI-D Jack Connected DVI-D Cable Connecting to... a PC 1 Connect the PC Video cable between the [PC Audio In] jack on the back of the TV and [Monitor Output] port on the TV, the sound is heard from the TV speakers. • The PC Video cable, PC Audio cable and DVI-D cable are all sold separately. • When viewing...
... the picture above for better picture quality. • Refer to your PC in Windows XP as the PC monitor. Connecting to a PC Rear Panel of LCD TV PC Rear PC Audio Cable 1√ DVI-D Cable OR œ2 PC Audio Cable PC Video Cable OR PC DVI-D Jack Connected DVI-D Cable Connecting to... a PC 1 Connect the PC Video cable between the [PC Audio In] jack on the back of the TV and [Monitor Output] port on the TV, the sound is heard from the TV speakers. • The PC Video cable, PC Audio cable and DVI-D cable are all sold separately. • When viewing...


