User Manual (ENGLISH)
Page 3
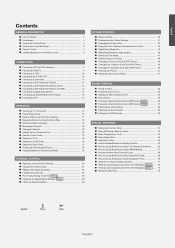
...Tuning Analog Channels Analog 38 Checking the Digital-Signal Strength Digital 39 LNA (Low Noise Amplifier 39 PICTURE CONTROL Picture Control 40 Customizing the Picture Settings 41 Changing the Picture Size 43 Using the Color Weakness Enhancement Feature 44 Digital Noise Reduction 45 DNIe (Digital Natural ...Rating Controls 65 How to Set up Restrictions Using "TV Parental Guidelines" ........ 66 How to Set up Restrictions Using "MPAA Rating 67 Important Notes About Parental Locks 68 How to Set up Restrictions Using Canadian English 69 How to Set up Restrictions Using Canadian French ...
...Tuning Analog Channels Analog 38 Checking the Digital-Signal Strength Digital 39 LNA (Low Noise Amplifier 39 PICTURE CONTROL Picture Control 40 Customizing the Picture Settings 41 Changing the Picture Size 43 Using the Color Weakness Enhancement Feature 44 Digital Noise Reduction 45 DNIe (Digital Natural ...Rating Controls 65 How to Set up Restrictions Using "TV Parental Guidelines" ........ 66 How to Set up Restrictions Using "MPAA Rating 67 Important Notes About Parental Locks 68 How to Set up Restrictions Using Canadian English 69 How to Set up Restrictions Using Canadian French ...
User Manual (ENGLISH)
Page 4
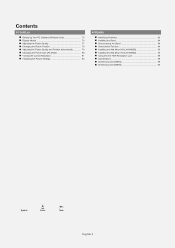
... Your PC Software (Windows Only 76 Display Modes 76 Adjusting the Picture Quality 77 Changing the Picture Position 78 Adjusting the Picture Quality and Position Automatically 79 Changing the Picture Size (PC Mode 80 Viewing the Current Resolution 81 Initializing the Picture Settings 82 APPENDIX Identifying Problems 83 Installing the Stand 84 Disconnecting the Stand 84...
... Your PC Software (Windows Only 76 Display Modes 76 Adjusting the Picture Quality 77 Changing the Picture Position 78 Adjusting the Picture Quality and Position Automatically 79 Changing the Picture Size (PC Mode 80 Viewing the Current Resolution 81 Initializing the Picture Settings 82 APPENDIX Identifying Problems 83 Installing the Stand 84 Disconnecting the Stand 84...
User Manual (ENGLISH)
Page 5
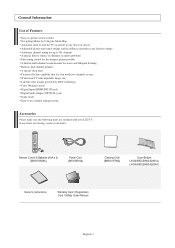
... (HDMI/DVI IN) jack Digital Audio Output (OPTICAL) jack Game mode Easy-to turn the TV on and off at once Widescreen TV with your LCD TV. If any time you choose Adjustable picture and sound settings and the ability to memorize your dealer. Remote Control & Batteries (AAA x 2) (BN59-00568A...Please make sure the following items are missing, contact your favorite settings Automatic channel tuning for up to 181 channels A special filter to reduce or eliminate reception problems Fine tuning control for the sharpest picture possible A built-in multi-channel sound decoder for stereo and ...
... (HDMI/DVI IN) jack Digital Audio Output (OPTICAL) jack Game mode Easy-to turn the TV on and off at once Widescreen TV with your LCD TV. If any time you choose Adjustable picture and sound settings and the ability to memorize your dealer. Remote Control & Batteries (AAA x 2) (BN59-00568A...Please make sure the following items are missing, contact your favorite settings Automatic channel tuning for up to 181 channels A special filter to reduce or eliminate reception problems Fine tuning control for the sharpest picture possible A built-in multi-channel sound decoder for stereo and ...
User Manual (ENGLISH)
Page 9
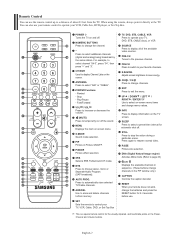
...MODE Picture effect selection. SRS Selects SRS TruSurround XT mode. FAV.CH Press to switch to your TV, DVD, STB, CABLE (box), or VCR SOURCE Press to a distance of the available video sources. CH / CH Press to change the channel. - RESET When your VCR, Cable box, DVD player, or Set-Top...PRE-CH Tunes to page 46) CH Displays the available channels in sequence. (These buttons change channels in Picture ON/OFF. When using the remote, always point it directly at the TV. DNIe (Digital Natural Image engine) Activates DNIe mode. (Refer to the previous channel. SLEEP Press to ...
...MODE Picture effect selection. SRS Selects SRS TruSurround XT mode. FAV.CH Press to switch to your TV, DVD, STB, CABLE (box), or VCR SOURCE Press to a distance of the available video sources. CH / CH Press to change the channel. - RESET When your VCR, Cable box, DVD player, or Set-Top...PRE-CH Tunes to page 46) CH Displays the available channels in sequence. (These buttons change channels in Picture ON/OFF. When using the remote, always point it directly at the TV. DNIe (Digital Natural Image engine) Activates DNIe mode. (Refer to the previous channel. SLEEP Press to ...
User Manual (ENGLISH)
Page 17
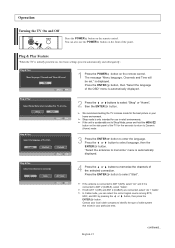
If the unit is connected to ANT 2 (CABLE), select "Cable". English-15 continued... We recommend setting the TV to Shop Mode, press and hold the MENU button on the side panel of the TV for use the POWER button on the front of cable system that exists in retail environments. Press the...button to select language, then the ENTER button. Operation Turning the TV On and Off Press the POWER button on the remote control. The message "Menu language, Channels and Time will be set to Home mode for the best picture in your particular area. You can select the correct signal source ...
If the unit is connected to ANT 2 (CABLE), select "Cable". English-15 continued... We recommend setting the TV to Shop Mode, press and hold the MENU button on the side panel of the TV for use the POWER button on the front of cable system that exists in retail environments. Press the...button to select language, then the ENTER button. Operation Turning the TV On and Off Press the POWER button on the remote control. The message "Menu language, Channels and Time will be set to Home mode for the best picture in your particular area. You can select the correct signal source ...
User Manual (ENGLISH)
Page 19
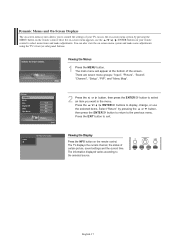
... MENU button on -screen menu system and make adjustments. There are seven menu groups: "Input", "Picture", "Sound", "Channel", "Setup", "PIP", and "Menu Map". 2 Press the or button, then press the ENTER an item you to control the settings of your remote control to select menu items and make some adjustments using the... the Menus 1 Press the MENU button. You can also view the on the remote control. The TV displays the current channel, the status of the screen. button to select Press the / / / /ENTER buttons to the previous menu. Press the EXIT button to ...
... MENU button on -screen menu system and make adjustments. There are seven menu groups: "Input", "Picture", "Sound", "Channel", "Setup", "PIP", and "Menu Map". 2 Press the or button, then press the ENTER an item you to control the settings of your remote control to select menu items and make some adjustments using the... the Menus 1 Press the MENU button. You can also view the on the remote control. The TV displays the current channel, the status of the screen. button to select Press the / / / /ENTER buttons to the previous menu. Press the EXIT button to ...

User Manual (ENGLISH)
Page 41
...ENTER button, to return to the previous menu. Press the EXIT button to select "Signal Strength", then press the ENTER button. The LNA setting must be made separately for each channel. Continue to On, select Off. Select "Return" by pressing the or button, then press the ...reception of available digital channels. 1 Press the MENU button. LNA (Low Noise Amplifier) If the TV is operating in reception quality from "snowy" to increase the signal strength. If the picture is weak, physically adjust your antenna to the previous menu. English-39 If the signal strength meter...
...ENTER button, to return to the previous menu. Press the EXIT button to select "Signal Strength", then press the ENTER button. The LNA setting must be made separately for each channel. Continue to On, select Off. Select "Return" by pressing the or button, then press the ...reception of available digital channels. 1 Press the MENU button. LNA (Low Noise Amplifier) If the TV is operating in reception quality from "snowy" to increase the signal strength. If the picture is weak, physically adjust your antenna to the previous menu. English-39 If the signal strength meter...
User Manual (ENGLISH)
Page 42
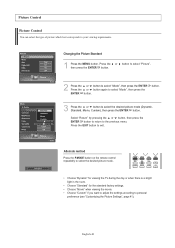
...on the remote control repeatedly to select the desired picture mode. • Choose "Dynamic" for viewing the TV during the day or when there is a bright light in the room. • Choose "Standard" for the standard factory settings. • Choose "Movie" when viewing the movie... to personal preference (see "Customizing the Picture Settings", page 41). Picture Control Picture Control You can select the type of picture which best corresponds to select the desired picture mode (Dynamic, Standard, Movie, Custom), then press the ENTER button. English-40 button. 3 Press the or button to...
...on the remote control repeatedly to select the desired picture mode. • Choose "Dynamic" for viewing the TV during the day or when there is a bright light in the room. • Choose "Standard" for the standard factory settings. • Choose "Movie" when viewing the movie... to personal preference (see "Customizing the Picture Settings", page 41). Picture Control Picture Control You can select the type of picture which best corresponds to select the desired picture mode (Dynamic, Standard, Movie, Custom), then press the ENTER button. English-40 button. 3 Press the or button to...

User Manual (ENGLISH)
Page 43
...and "Color Tone" according to decrease or increase the value of a particular item. • While adjusting a picture option, you can be adjusted while watching Digital TV. English-41 continued... "Tint" doesn't operate in HDMI or 480p Component or higher modes. or button to ...to select the desired picture mode (Dynamic, Standard, Movie, Custom), then press the ENTER button. 4 Press the or button to select "Mode", then press the ENTER button. Customizing the Picture Settings You can select "Standard" which automatically recalls your personalized picture settings. 1 Press the...
...and "Color Tone" according to decrease or increase the value of a particular item. • While adjusting a picture option, you can be adjusted while watching Digital TV. English-41 continued... "Tint" doesn't operate in HDMI or 480p Component or higher modes. or button to ...to select the desired picture mode (Dynamic, Standard, Movie, Custom), then press the ENTER button. 4 Press the or button to select "Mode", then press the ENTER button. Customizing the Picture Settings You can select "Standard" which automatically recalls your personalized picture settings. 1 Press the...

User Manual (ENGLISH)
Page 44
The reset function must be reset to "OK", the previously adjusted settings will be set separately for each mode (Dynamic, Standard, Movie, or Custom). Select "Return" by pressing the Press the ENTER button. English-42 Press the or button to ..." or "Cancel", then press the ENTER button. Press the EXIT button to exit. • If you set "Reset" to the factory defaults. 5 Press the ENTER button to return to the previous menu. Resetting the Picture Settings to the Factory Defaults 7 To return the factory defaults, select "Reset" by pressing the or button, then...
The reset function must be reset to "OK", the previously adjusted settings will be set separately for each mode (Dynamic, Standard, Movie, or Custom). Select "Return" by pressing the Press the ENTER button. English-42 Press the or button to ..." or "Cancel", then press the ENTER button. Press the EXIT button to exit. • If you set "Reset" to the factory defaults. 5 Press the ENTER button to return to the previous menu. Resetting the Picture Settings to the Factory Defaults 7 To return the factory defaults, select "Reset" by pressing the or button, then...
User Manual (ENGLISH)
Page 45
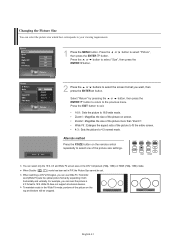
... or button to select "Size", then press the ENTER button. 2 Press the or buttons to 16:9. Horizontal zoom(Wide Fit) sets the optical picture format by pressing the or button, then press the ENTER button to return to 4:3 normal mode. Alternate method Press the P.SIZE button... on the remote control repeatedly to select one of the picture to fit the entire screen. • 4:3 : Sets the picture to the previous menu. To maintain scale in 4:3 format to select the screen format you want, then press the ENTER...
... or button to select "Size", then press the ENTER button. 2 Press the or buttons to 16:9. Horizontal zoom(Wide Fit) sets the optical picture format by pressing the or button, then press the ENTER button to return to 4:3 normal mode. Alternate method Press the P.SIZE button... on the remote control repeatedly to select one of the picture to fit the entire screen. • 4:3 : Sets the picture to the previous menu. To maintain scale in 4:3 format to select the screen format you want, then press the ENTER...

User Manual (ENGLISH)
Page 48
DNIe (Digital Natural Image engine) This TV includes the DNIe function so as to select "Off", "Demo", or "On" then press the ENTER ...Switches on the DNIe mode. Using this function, you can view the applied DNIe and normal pictures on , you can view the screen with 3D noise reduction and detail, contrast and white enhancement. or button to ... If you a more detailed image with the DNIe feature activated. DNIeTM (Digital Natural Image engine) This feature brings you set DNIe to exit. The DNle function is not supported in the visual quality. 1 Press the MENU button. If you can...
DNIe (Digital Natural Image engine) This TV includes the DNIe function so as to select "Off", "Demo", or "On" then press the ENTER ...Switches on the DNIe mode. Using this function, you can view the applied DNIe and normal pictures on , you can view the screen with 3D noise reduction and detail, contrast and white enhancement. or button to ... If you a more detailed image with the DNIe feature activated. DNIeTM (Digital Natural Image engine) This feature brings you set DNIe to exit. The DNle function is not supported in the visual quality. 1 Press the MENU button. If you can...

User Manual (ENGLISH)
Page 49
or button to select "Picture", 2 Press the or button to select "Film Mode", then press the ENTER button. 3 Press the or button to the previous menu. Press the then press ... exit. The Film Mode can automatically sense and process film signals from all sources and adjust the picture for optimum quality. 1 Press the MENU button. English-47 Setting the Film Mode You can only be set when viewing an analog signal in AV modes (AV or S-Video) that support SD (Standard Definition) signals...
or button to select "Picture", 2 Press the or button to select "Film Mode", then press the ENTER button. 3 Press the or button to the previous menu. Press the then press ... exit. The Film Mode can automatically sense and process film signals from all sources and adjust the picture for optimum quality. 1 Press the MENU button. English-47 Setting the Film Mode You can only be set when viewing an analog signal in AV modes (AV or S-Video) that support SD (Standard Definition) signals...

User Manual (ENGLISH)
Page 51
... EXIT button to exit. Press the EXIT button to exit. Double ( , ) mode is not available in PC mode. PIP Settings O : PIP operates X : PIP doesn't operate PIP Settings Main Sub Picture Analog Digital (ATSC) AV1 Picture Analog X X O Digital (ATSC) X X O AV/Component/ X X X HDMI/PC O: PIP operates / X: PIP doesn't operate AV2 S-Video1 Component1 Component2 HDMI1 HDMI2 PC...
... EXIT button to exit. Press the EXIT button to exit. Double ( , ) mode is not available in PC mode. PIP Settings O : PIP operates X : PIP doesn't operate PIP Settings Main Sub Picture Analog Digital (ATSC) AV1 Picture Analog X X O Digital (ATSC) X X O AV/Component/ X X X HDMI/PC O: PIP operates / X: PIP doesn't operate AV2 S-Video1 Component1 Component2 HDMI1 HDMI2 PC...

User Manual (ENGLISH)
Page 52
English-50 Changing the Channel of the Sub (PIP) Picture After you want, then press the ENTER button. • Air : "Air" antenna signal CATV : "... the ENTER button. 3 Press the or button to select a channel you set the signal source (antenna or cable) of the remote control to change the sub picture channels while PIP is easy to exit. Alternate method Press the CH or ...CH button under the cover of the sub picture, it is on. Press the then press the ENTER...
English-50 Changing the Channel of the Sub (PIP) Picture After you want, then press the ENTER button. • Air : "Air" antenna signal CATV : "... the ENTER button. 3 Press the or button to select a channel you set the signal source (antenna or cable) of the remote control to change the sub picture channels while PIP is easy to exit. Alternate method Press the CH or ...CH button under the cover of the sub picture, it is on. Press the then press the ENTER...

User Manual (ENGLISH)
Page 53
If you wish to continue viewing the poor picture, you must set the "Blue Screen" mode to select "On" or "Off", then press the ENTER button. English-51 Press the then press the ENTER button. or button ... press the ENTER button. 3 Press the or button to "Off". 1 Press the MENU button. Setting the Blue Screen Mode If no signal is being received or the signal is very weak, a blue screen automatically replaces the noisy picture background. Select "Return" by pressing the or button, then press the ENTER button to...
If you wish to continue viewing the poor picture, you must set the "Blue Screen" mode to select "On" or "Off", then press the ENTER button. English-51 Press the then press the ENTER button. or button ... press the ENTER button. 3 Press the or button to "Off". 1 Press the MENU button. Setting the Blue Screen Mode If no signal is being received or the signal is very weak, a blue screen automatically replaces the noisy picture background. Select "Return" by pressing the or button, then press the ENTER button to...

User Manual (ENGLISH)
Page 61
... "Sub". Select "Return" by pressing the or button, then press the ENTER button to return to hear sound from either the Main or Sub(PIP) picture in PIP mode. 1 Press the MENU button. Selecting the Sound Select Sound Select enables you to the previous menu. Press the then press the ENTER...", then press the ENTER button. 3 Press the or button to "On". (See page 48) English-59 You can select this option when the "PIP" is set to select "Main", then press the ENTER button. Press the EXIT button to exit.
... "Sub". Select "Return" by pressing the or button, then press the ENTER button to return to hear sound from either the Main or Sub(PIP) picture in PIP mode. 1 Press the MENU button. Selecting the Sound Select Sound Select enables you to the previous menu. Press the then press the ENTER...", then press the ENTER button. 3 Press the or button to "On". (See page 48) English-59 You can select this option when the "PIP" is set to select "Main", then press the ENTER button. Press the EXIT button to exit.
User Manual (ENGLISH)
Page 65
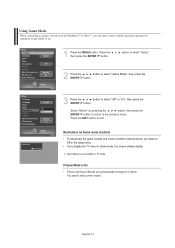
Using Game Mode When connecting to a game console such as PlayStationTM or XboxTM, you display the TV menu in TV mode. Game Mode is On • Picture and Sound Modes are automatically changed to select "Off" or "On", then press the ENTER button. If Game Mode is not available in Game mode, ... experience by pressing the or button, then press the ENTER button to return to the previous menu. You cannot select other modes. Select "Return" by setting the Game Mode to on Game mode (Caution) • To disconnect the game console and connect another external device...
Using Game Mode When connecting to a game console such as PlayStationTM or XboxTM, you display the TV menu in TV mode. Game Mode is On • Picture and Sound Modes are automatically changed to select "Off" or "On", then press the ENTER button. If Game Mode is not available in Game mode, ... experience by pressing the or button, then press the ENTER button to return to the previous menu. You cannot select other modes. Select "Return" by setting the Game Mode to on Game mode (Caution) • To disconnect the game console and connect another external device...

User Manual (ENGLISH)
Page 69
... for movies. Press the number buttons to enter your current 4-digit PIN. (The default PIN for a new TV set is "0000".) The "V-Chip" menu is on, the TV will automatically block any programs that are indicated by pressing the or button, then press the ENTER button to return... to the previous menu. How to Set up Restrictions Using "MPAA Rating" The Movie rating system uses the "MPAA" (Motion Picture Association of America) system,...
... for movies. Press the number buttons to enter your current 4-digit PIN. (The default PIN for a new TV set is "0000".) The "V-Chip" menu is on, the TV will automatically block any programs that are indicated by pressing the or button, then press the ENTER button to return... to the previous menu. How to Set up Restrictions Using "MPAA Rating" The Movie rating system uses the "MPAA" (Motion Picture Association of America) system,...

User Manual (ENGLISH)
Page 84
Initializing the Picture Settings You can replace all picture settings with the factory default values. or button to select "Setup", 3 Press the or button to select "PC", then press the ENTER button. 4 Press the or ...button to select "PC". 2 Press the MENU button. Select "Return" by pressing the or button, then press the ENTER button to return to exit. The picture settings are replaced with the factory default values. 1 Press the SOURCE button to select "Image Reset", then press the ENTER button. English-82 Press the EXIT...
Initializing the Picture Settings You can replace all picture settings with the factory default values. or button to select "Setup", 3 Press the or button to select "PC", then press the ENTER button. 4 Press the or ...button to select "PC". 2 Press the MENU button. Select "Return" by pressing the or button, then press the ENTER button to return to exit. The picture settings are replaced with the factory default values. 1 Press the SOURCE button to select "Image Reset", then press the ENTER button. English-82 Press the EXIT...


