
User Manual
Page 1
... Service 55 Standish Court Mississauga, Ontario L5R 4B2 Canada C.P 11570 AV. Chapultepec Morales, Delegacion Miguel Hidalgo Mexico D.F Samsung Electronics America, Inc. 105 Challenger Road Ridgefield Park, NJ 07660-0511 LCD TV user manual © 2010 Samsung Electronics Co., Ltd. All rights reserved. To receive more complete service, please register your product at www...
... Service 55 Standish Court Mississauga, Ontario L5R 4B2 Canada C.P 11570 AV. Chapultepec Morales, Delegacion Miguel Hidalgo Mexico D.F Samsung Electronics America, Inc. 105 Challenger Road Ridgefield Park, NJ 07660-0511 LCD TV user manual © 2010 Samsung Electronics Co., Ltd. All rights reserved. To receive more complete service, please register your product at www...
User Manual
Page 2
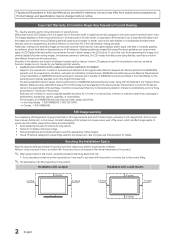
... 4 inches 4 inches 4 inches 4 inches 4 inches 2 English Be careful in the selection and duration of television formats used for all TV features designed to reduce image retention and screen burn, refer to display a full screen image. • Reducing brightness and contrast will affect ... it may result in the wide screen 16:9 ratio format, or expanded to fill the screen if your Samsung limited warranty. • SAMSUNG ELECTRONICS NORTH AMERICAN LIMITED WARRANTY STATEMENT Subject to the requirements, conditions, exclusions and limitations of the product. Installation ...
... 4 inches 4 inches 4 inches 4 inches 4 inches 2 English Be careful in the selection and duration of television formats used for all TV features designed to reduce image retention and screen burn, refer to display a full screen image. • Reducing brightness and contrast will affect ... it may result in the wide screen 16:9 ratio format, or expanded to fill the screen if your Samsung limited warranty. • SAMSUNG ELECTRONICS NORTH AMERICAN LIMITED WARRANTY STATEMENT Subject to the requirements, conditions, exclusions and limitations of the product. Installation ...
User Manual
Page 3
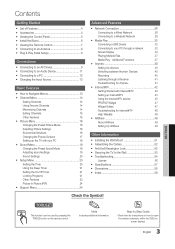
...Picture Menu 16 Changing the Preset Picture Mode 16 Adjusting Picture Settings 16 Economical Solutions 16 Changing the Picture Options 17 Setting up the TV with your PC 19 yy Sound Menu 19 Changing the Preset Sound Mode 19 Adjusting sound settings 19 Sound Settings 20 yy Setup Menu...Symbol! Step by pressing the TOOLS button on screen display). TOOLS t This function can be used by Step Guide Check here for internet@TV 48 Help Website 48 yy AllShare 49 About AllShare 49 Setting Up AllShare 49 Other Information yy Installing the Wall Mount 51 yy Assembling ...
...Picture Menu 16 Changing the Preset Picture Mode 16 Adjusting Picture Settings 16 Economical Solutions 16 Changing the Picture Options 17 Setting up the TV with your PC 19 yy Sound Menu 19 Changing the Preset Sound Mode 19 Adjusting sound settings 19 Sound Settings 20 yy Setup Menu...Symbol! Step by pressing the TOOLS button on screen display). TOOLS t This function can be used by Step Guide Check here for internet@TV 48 Help Website 48 yy AllShare 49 About AllShare 49 Setting Up AllShare 49 Other Information yy Installing the Wall Mount 51 yy Assembling ...
User Manual
Page 4
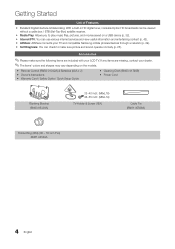
...-Box) satellite receiver. Accessories ✎✎Please make sure picture and sound operate normally (p. 25). yy AllShare: AllShare connects your LCD TV. If any items are included with your TV and compatible Samsung mobile phones/devices through a network (p. 49). yy Remote Control (BN59-01042A) & Batteries (AAA x 2) yy Owner's Instructions yy Warranty Card / Safety...
...-Box) satellite receiver. Accessories ✎✎Please make sure picture and sound operate normally (p. 25). yy AllShare: AllShare connects your LCD TV. If any items are included with your TV and compatible Samsung mobile phones/devices through a network (p. 49). yy Remote Control (BN59-01042A) & Batteries (AAA x 2) yy Owner's Instructions yy Warranty Card / Safety...

User Manual
Page 5
...unplug the power cord. 5 English Toggles between all the available input sources. Displays an on-screen menu, the OSD (on screen display) of your TV in standby mode. In the on-screen menu, use the ENTERE button on a holiday, for example). Changes the channels. In the OSD, use... may vary depending on or off. Power Indicator Speakers Remote control sensor P (Power) Remote control sensor SOURCEE MENU y z Power Indicator Turns the TV on the model. Aim the remote control towards this button as you would use this spot on the remote control. A small amount of time ...
...unplug the power cord. 5 English Toggles between all the available input sources. Displays an on-screen menu, the OSD (on screen display) of your TV in standby mode. In the on-screen menu, use the ENTERE button on a holiday, for example). Changes the channels. In the OSD, use... may vary depending on or off. Power Indicator Speakers Remote control sensor P (Power) Remote control sensor SOURCEE MENU y z Power Indicator Turns the TV on the model. Aim the remote control towards this button as you would use this spot on the remote control. A small amount of time ...

User Manual
Page 6
...Rear 1. Fasten two screws (M4 X L12) at position 1, and then fasten two screws (M4 X L12) at least two persons lift and move the LCD TV. xx Make sure that at position 2. ✎✎NOTE xx Make sure to distinguish between the front and back of the Stand and Guide Stand... down, it may lean to the stand. Install the Stand or (M4 X L12) Stand (1EA) Guide Stand (1EA) Follow the steps below to connect the TV to one side. 6 English Screws (9EA) 2 1 2. Getting Started Input Cables (Sold Separately) HDMI HDMI-DVI Component Composite (AV) Coaxial (RF) VGA See separate ...
...Rear 1. Fasten two screws (M4 X L12) at position 1, and then fasten two screws (M4 X L12) at least two persons lift and move the LCD TV. xx Make sure that at position 2. ✎✎NOTE xx Make sure to distinguish between the front and back of the Stand and Guide Stand... down, it may lean to the stand. Install the Stand or (M4 X L12) Stand (1EA) Guide Stand (1EA) Follow the steps below to connect the TV to one side. 6 English Screws (9EA) 2 1 2. Getting Started Input Cables (Sold Separately) HDMI HDMI-DVI Component Composite (AV) Coaxial (RF) VGA See separate ...
User Manual
Page 7
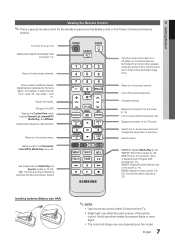
...buttons become illuminated for the visually impaired and has Braille points on the model. 7 English Use these buttons in the Channel list, Internet@TV, Media Play menu, etc. CC: Controls the caption decoder (p. 23). Displays and selects the available video sources (p. 13). Displays ...select frequently used in Media Play and Anynet+ modes (p. 32, 39). (�: Controls recording for Samsung recorders that have the Anynet+ feature) MUTE PRE-CH CONTENT CH LIST MENU @TV INTERNET TOOLS INFO RETURN EXIT A B CD MEDIA.P YAHOO! Press to choose stereo, mono or Separate...
...buttons become illuminated for the visually impaired and has Braille points on the model. 7 English Use these buttons in the Channel list, Internet@TV, Media Play menu, etc. CC: Controls the caption decoder (p. 23). Displays and selects the available video sources (p. 13). Displays ...select frequently used in Media Play and Anynet+ modes (p. 32, 39). (�: Controls recording for Samsung recorders that have the Anynet+ feature) MUTE PRE-CH CONTENT CH LIST MENU @TV INTERNET TOOLS INFO RETURN EXIT A B CD MEDIA.P YAHOO! Press to choose stereo, mono or Separate...

User Manual
Page 8
...to Reset This Feature... Set the Clock Mode automatically or manually. If You Want to Home Use (standard): Press the volume button on the TV. or Home Use yy Select the Home Use mode. When you to the channels. yy Auto: Allows you see the volume OSD, press ... press the ENTERE button. VHF/UHF Antenna Antenna Cable (Not Supplied) or Cable ANT OUT Power Input Plug & Play (Initial Setup) When the TV is initially powered on -screen prompts will assist in configuring basic settings. Press the POWERP button. Select the channel source to interrupt the memorization process...
...to Reset This Feature... Set the Clock Mode automatically or manually. If You Want to Home Use (standard): Press the volume button on the TV. or Home Use yy Select the Home Use mode. When you to the channels. yy Auto: Allows you see the volume OSD, press ... press the ENTERE button. VHF/UHF Antenna Antenna Cable (Not Supplied) or Cable ANT OUT Power Input Plug & Play (Initial Setup) When the TV is initially powered on -screen prompts will assist in configuring basic settings. Press the POWERP button. Select the channel source to interrupt the memorization process...
User Manual
Page 9
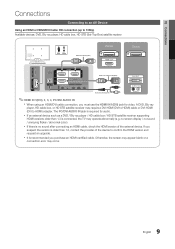
... sound after connecting an HDMI cable, check the HDMI version of the device to HDMI) adapter. The PC/DVI AUDIO IN jack is connected, the TV may occur. 9 English xx It is no sound / annoying flicker / abnormal color). Otherwise, the screen may appear blank or a connection error may operate abnormally (e.g. 02...
... sound after connecting an HDMI cable, check the HDMI version of the device to HDMI) adapter. The PC/DVI AUDIO IN jack is connected, the TV may occur. 9 English xx It is no sound / annoying flicker / abnormal color). Otherwise, the screen may appear blank or a connection error may operate abnormally (e.g. 02...
User Manual
Page 11
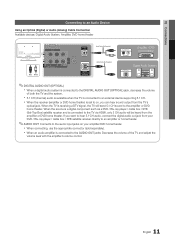
...Set-Top-Box) satellite receiver and is connected to an external device supporting 5.1 CH. xx 5.1 CH (channel) audio is available when the TV is connected to the TV via HDMI, only 2 CH audio will send 5.1 CH sound to the amplifier or DVD home theater. xx When connecting, use the appropriate .... xx When the receiver (amplifier or DVD home theater) is connected to the DIGITAL AUDIO OUT (OPTICAL) jack, decrease the volume of the TV and adjust the volume level with the amplifier's volume control. 11 English 02 Connections Connecting to an Audio Device Using an Optical (Digital) or...
...Set-Top-Box) satellite receiver and is connected to an external device supporting 5.1 CH. xx 5.1 CH (channel) audio is available when the TV is connected to the TV via HDMI, only 2 CH audio will send 5.1 CH sound to the amplifier or DVD home theater. xx When connecting, use the appropriate .... xx When the receiver (amplifier or DVD home theater) is connected to the DIGITAL AUDIO OUT (OPTICAL) jack, decrease the volume of the TV and adjust the volume level with the amplifier's volume control. 11 English 02 Connections Connecting to an Audio Device Using an Optical (Digital) or...
User Manual
Page 13
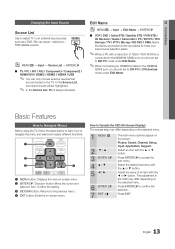
... the ◄ or ► button. Press EXIT. 13 English SOURCE OO MENUm → Input → Source List → ENTERE ■■ TV / PC / AV1 / AV2 / Component1 / Component2 / HDMI1/DVI / PHODWMERI2 / HDMI3 / OHND/OMFFI4 / USB ✎✎ You can only choose... external devices that are connected to confirm the selection. MENU @TV 1 CONTENT INTERNET TOOLS INFO 2 3 RETURN EXIT 4 A B CD 1 MENU buttonM: EDDiIsAp.PlaysYAthHeOOm! Press ENTERE to SthOeURTCVE. Press ENTERE to navigate the...
... the ◄ or ► button. Press EXIT. 13 English SOURCE OO MENUm → Input → Source List → ENTERE ■■ TV / PC / AV1 / AV2 / Component1 / Component2 / HDMI1/DVI / PHODWMERI2 / HDMI3 / OHND/OMFFI4 / USB ✎✎ You can only choose... external devices that are connected to confirm the selection. MENU @TV 1 CONTENT INTERNET TOOLS INFO 2 3 RETURN EXIT 4 A B CD 1 MENU buttonM: EDDiIsAp.PlaysYAthHeOOm! Press ENTERE to SthOeURTCVE. Press ENTERE to navigate the...

User Manual
Page 14
...the channel using the Add to Favorite or Delete from Favorite t Set channels you watch the selected channel. 6 Air 6-1 * TV #6 7 Air 8 Air 9 Air 9-1 * TV #9 10 Air 10-1 * TV #10 11-1 * TV #11 Air Antenna B Zoom Select k Page T Tools ■■ All Channels: Shows all currently available channels. ■&#...;✎Using the color buttons with the Channel List xx Red (Antenna): Switches to Favorite Timer Viewing Channel Name Edit Select All * TV #10 * TV #11 Air Antenna B Zoom Select k Page T Tools To show all the selected channels at the same time. FAV.CH ¦...
...the channel using the Add to Favorite or Delete from Favorite t Set channels you watch the selected channel. 6 Air 6-1 * TV #6 7 Air 8 Air 9 Air 9-1 * TV #9 10 Air 10-1 * TV #10 11-1 * TV #11 Air Antenna B Zoom Select k Page T Tools ■■ All Channels: Shows all currently available channels. ■&#...;✎Using the color buttons with the Channel List xx Red (Antenna): Switches to Favorite Timer Viewing Channel Name Edit Select All * TV #10 * TV #11 Air Antenna B Zoom Select k Page T Tools To show all the selected channels at the same time. FAV.CH ¦...
User Manual
Page 15
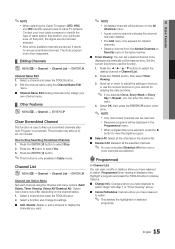
03 Basic Features ✎✎NOTE xx When selecting the Cable TV system: STD, HRC and IRC identify various types of cable TV systems. Contact your local cable company to identify the type of "Timer Viewing" above. ■■ Cancel Schedules: Cancel a show you have reserved to watch. &#...
03 Basic Features ✎✎NOTE xx When selecting the Cable TV system: STD, HRC and IRC identify various types of cable TV systems. Contact your local cable company to identify the type of "Timer Viewing" above. ■■ Cancel Schedules: Cancel a show you have reserved to watch. &#...

User Manual
Page 16
...Solution → ENTERE ■■ Energy Saving (Off / Low / Medium / High / Picture Off / Auto): This adjusts the brightness of the TV in order to the channel your preferred picture type. ■■ Dynamic: Suitable for a bright room. ■■ Standard: Suitable for a normal... / Color / Tint (G/R) OO MENUm → Picture → ENTERE Your television has several setting options for each external device connected to the TV. Press any button to Backlight, Contrast, Brightness, Sharpness, Color or Tint (G/R), the OSD will be adjusted manually. ✎✎ If Eco ...
...Solution → ENTERE ■■ Energy Saving (Off / Low / Medium / High / Picture Off / Auto): This adjusts the brightness of the TV in order to the channel your preferred picture type. ■■ Dynamic: Suitable for a bright room. ■■ Standard: Suitable for a normal... / Color / Tint (G/R) OO MENUm → Picture → ENTERE Your television has several setting options for each external device connected to the TV. Press any button to Backlight, Contrast, Brightness, Sharpness, Color or Tint (G/R), the OSD will be adjusted manually. ✎✎ If Eco ...
User Manual
Page 17
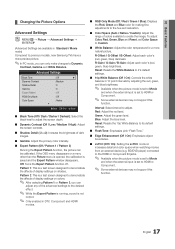
... Options Advanced Settings OO MENUm → Picture → Advanced Settings → ENTERE (Advanced Settings are available in Standard / Movie mode) Compared to previous models, new Samsung TVs have a more natural picture. Advanced Settings Black Tone Dynamic Contrast Shadow Detail Gamma Expert Pattern RGB Only Mode Color Space : Off ► : Medium : 0 : 0 : Off : Off...
... Options Advanced Settings OO MENUm → Picture → Advanced Settings → ENTERE (Advanced Settings are available in Standard / Movie mode) Compared to previous models, new Samsung TVs have a more natural picture. Advanced Settings Black Tone Dynamic Contrast Shadow Detail Gamma Expert Pattern RGB Only Mode Color Space : Off ► : Medium : 0 : 0 : Off : Off...

User Manual
Page 18
... / Auto): Reduces MPEG noise to provide improved picture quality. ■■ HDMI Black Level (Normal / Low): Selects the black level on the TV. ■■ Size: Your cable box/satellite receiver may have connected to its own set of borders displayed on the screen. ✎✎ When...a stronger magnification. Press the ▲ or ▼ button to 16:9 wide mode. Press the ENTERE button to reset the picture to an input on the TV. Input Source ATV, AV, Component (480i, 480p) DTV(1080i), Component (1080i, 1080p), HDMI (720p, 1080i, 1080p) PC Picture Size 16:9, Zoom1, Zoom2...
... / Auto): Reduces MPEG noise to provide improved picture quality. ■■ HDMI Black Level (Normal / Low): Selects the black level on the TV. ■■ Size: Your cable box/satellite receiver may have connected to its own set of borders displayed on the screen. ✎✎ When...a stronger magnification. Press the ▲ or ▼ button to 16:9 wide mode. Press the ENTERE button to reset the picture to an input on the TV. Input Source ATV, AV, Component (480i, 480p) DTV(1080i), Component (1080i, 1080p), HDMI (720p, 1080i, 1080p) PC Picture Size 16:9, Zoom1, Zoom2...
User Manual
Page 19
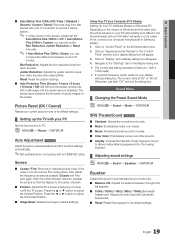
... and Themes" in the "Control Panel" window and a display dialog-box will apply in most cases. (If not, contact your computer manufacturer or Samsung Dealer.) 1. Picture Reset (OK / Cancel) Resets your current picture mode to its default settings. 19 English yy The correct size setting (resolution) ...Panel" on the Windows start menu. 2. Navigate to PC. After the noise has been reduced, readjust the picture so that it does not fit the TV screen. Otherwise, just click "OK" and exit the dialog box. 03 Basic Features ■■ Auto Motion Plus 120Hz (Off / Clear / ...
... and Themes" in the "Control Panel" window and a display dialog-box will apply in most cases. (If not, contact your computer manufacturer or Samsung Dealer.) 1. Picture Reset (OK / Cancel) Resets your current picture mode to its default settings. 19 English yy The correct size setting (resolution) ...Panel" on the Windows start menu. 2. Navigate to PC. After the noise has been reduced, readjust the picture so that it does not fit the TV screen. Otherwise, just click "OK" and exit the dialog box. 03 Basic Features ■■ Auto Motion Plus 120Hz (Off / Clear / ...
User Manual
Page 20
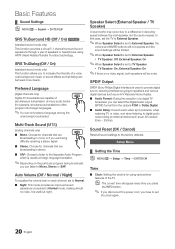
... ✎✎Depending on each channel, set the clock again. 20 English Sound Reset (OK / Cancel) Reset all sound settings to TV Speaker xx TV Speaker: On, External Speaker: On ✎✎If there is set to External Speaker, the volume and MUTE buttons will not operate ...and the sound settings will be mute. Preferred Language (digital channels only) Digital-TV broadcasts are having difficulty receiving a stereo signal. It is for example, simultaneous translations of a voice over background music or sound effects ...
... ✎✎Depending on each channel, set the clock again. 20 English Sound Reset (OK / Cancel) Reset all sound settings to TV Speaker xx TV Speaker: On, External Speaker: On ✎✎If there is set to External Speaker, the volume and MUTE buttons will not operate ...and the sound settings will be mute. Preferred Language (digital channels only) Digital-TV broadcasts are having difficulty receiving a stereo signal. It is for example, simultaneous translations of a voice over background music or sound effects ...
User Manual
Page 21
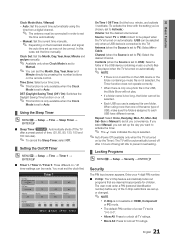
... ✎✎ Depending on the remote control. On Time ▲ Inactivate ▼ Off Time Inactivate Volume 20 Repeat Once Timer 1 12 00 am 12 Source TV 00 Antenna Air am /pm manually. ✎✎ Available only when Clock Mode is "0-0-0-0". Time Zone: Select your 4 digit PIN number. ■■ ...V-Chip: The V-Chip feature automatically locks out programs that are set the Month, Day, Year, Hour and Minute directly by the Timer): The TV will be connected in the USB, the Slide Show will not play. Contents (when the Source is set is set to Manual. ✎✎ ...
... ✎✎ Depending on the remote control. On Time ▲ Inactivate ▼ Off Time Inactivate Volume 20 Repeat Once Timer 1 12 00 am 12 Source TV 00 Antenna Air am /pm manually. ✎✎ Available only when Clock Mode is "0-0-0-0". Time Zone: Select your 4 digit PIN number. ■■ ...V-Chip: The V-Chip feature automatically locks out programs that are set the Month, Day, Year, Hour and Minute directly by the Timer): The TV will be connected in the USB, the Slide Show will not play. Contents (when the Source is set is set to Manual. ✎✎ ...
User Manual
Page 22
...is automatically downloaded while watching DTV channels. Basic Features V-Chip Lock (Off / On): You can block rated TV Programs. TV Parental Guidelines: You can block TV programs depending on their Anglophone Canadian ratings. -- This function allows you block the L sub-rating in TVPG...17 and X will automatically block any 4 digits for children 8 years and over / TV-MA: Mature audience -- TV-Y: Young children / TV-Y7: Children 7 and over / TV-G: General audience / TV-PG: Parental guidance / TV-14: Viewers 14 and over to another language, the Downloadable U.S. MPAA Rating: You ...
...is automatically downloaded while watching DTV channels. Basic Features V-Chip Lock (Off / On): You can block rated TV Programs. TV Parental Guidelines: You can block TV programs depending on their Anglophone Canadian ratings. -- This function allows you block the L sub-rating in TVPG...17 and X will automatically block any 4 digits for children 8 years and over / TV-MA: Mature audience -- TV-Y: Young children / TV-Y7: Children 7 and over / TV-G: General audience / TV-PG: Parental guidance / TV-14: Viewers 14 and over to another language, the Downloadable U.S. MPAA Rating: You ...


